To find your Fire Sense patio heater manual, go to ManualsLib.com and search your exact model number, which is printed on a label on the lower pole or base of the unit. Once you have the right PDF in hand, this guide walks you through assembly, the operating checklist the manual expects you to run, and the most common ignition and flame problems that show up right after setup. A stocking-site-hosted Fire Sense owner manual PDF, such as the troubleshooting section for the Fire Sense wicker based patio heater 60763, can be used to guide assembly troubleshooting for the matching model.
Fire Sense Patio Heater Manual: Assembly and Troubleshooting Guide

Grant Mercer
30 Apr 2026
How to find the right Fire Sense manual or PDF
Fire Sense makes a wide range of propane patio heaters, from standard mushroom-style standing units to tabletop and commercial-grade models. The manuals are not interchangeable, so matching the document to your exact model matters. A procedure that works for the PH01-S will not necessarily apply to the 60262 or a commercial model with a different valve layout.
Start by finding your model number. On most Fire Sense standing heaters, there is a silver or white label on the lower pole, near the base, or on the inside of the base cover. It will show a model number (like PH01-S, PH01-SS, 60262, or a similar code) and sometimes a serial number. Write that down before you do anything else.
Once you have the model number, your best options for the manual PDF are:
- ManualsLib.com: search the model number directly. This is the most reliable source and has hosted Fire Sense manuals including the PH01-S/PH01-SS and 60262 instruction sheets.
- Manuals+ (manuals.plus): a secondary mirror that often has the same documents, useful if ManualsLib is missing your specific variant.
- ManualZilla.com: another mirror, particularly useful for older or discontinued models.
- Fire Sense's own website (firesense.com): check the product page for your model. Some listings include a downloadable PDF directly.
- The retail listing where you bought it: Amazon, Home Depot, and Costco product pages sometimes link the manual PDF in the product details section.
If you cannot find the exact model number but know approximately when you bought the heater and where, searching the retailer's order history will usually surface the full model name. From there, a direct search on ManualsLib takes under a minute. Download the PDF and keep it handy, because you will reference it during assembly and every time the heater acts up. If you are also using a Charmglow unit, the Charmglow patio heater manual can help you verify the correct setup and troubleshooting steps for that specific model.
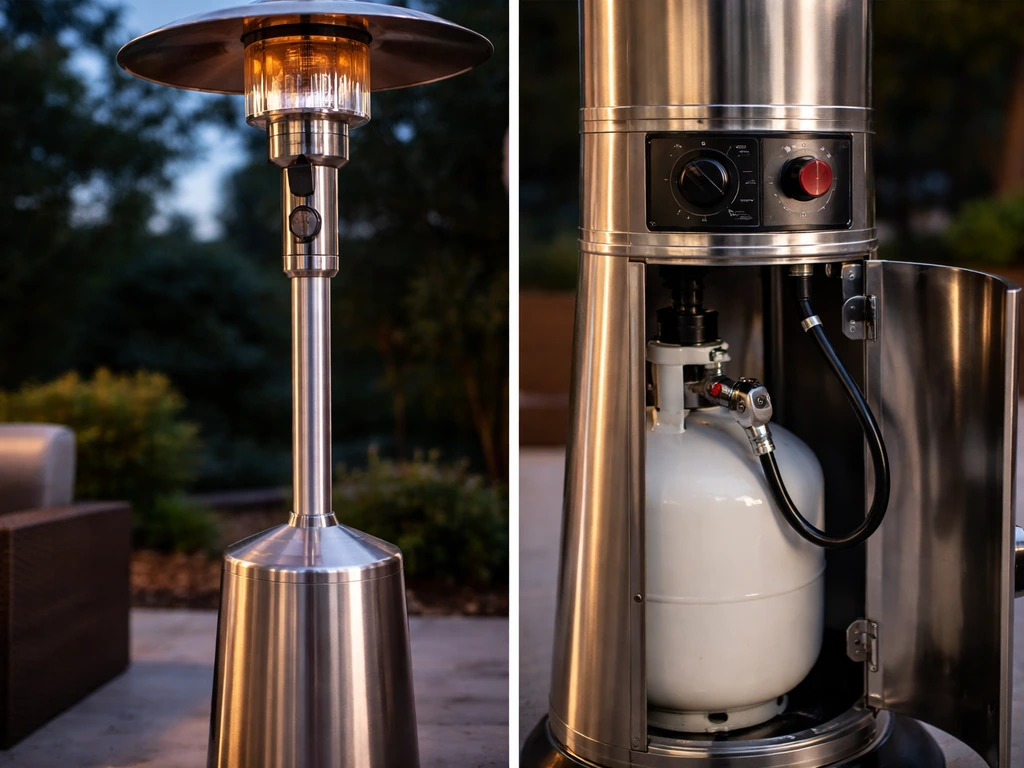
What you're getting into before you start assembling
Most Fire Sense standing patio heaters arrive in two or three boxes with the pole sections, emitter head, base, and hardware packed separately. Assembly typically takes 30 to 60 minutes with a basic set of wrenches and a screwdriver. The manual will walk you through connecting the pole sections, attaching the reflector and emitter head, routing the gas hose, and connecting the regulator to a standard 20 lb propane tank.
Before you open the first bolt, set the unit up outdoors in its final location. Fire Sense heaters are not designed to be moved frequently once assembled, and you need to do a leak test before first use anyway, so you want to be outside with the tank connected when you do that. Give yourself enough room to work and keep any open flame sources well away from the area.
Step-by-step assembly instructions
These steps reflect the general assembly sequence across Fire Sense standing heaters, including the PH01-S, PH01-SS, and 60262 models. Always cross-reference with the specific page in your downloaded manual, because bolt sizes and torque points vary by model.
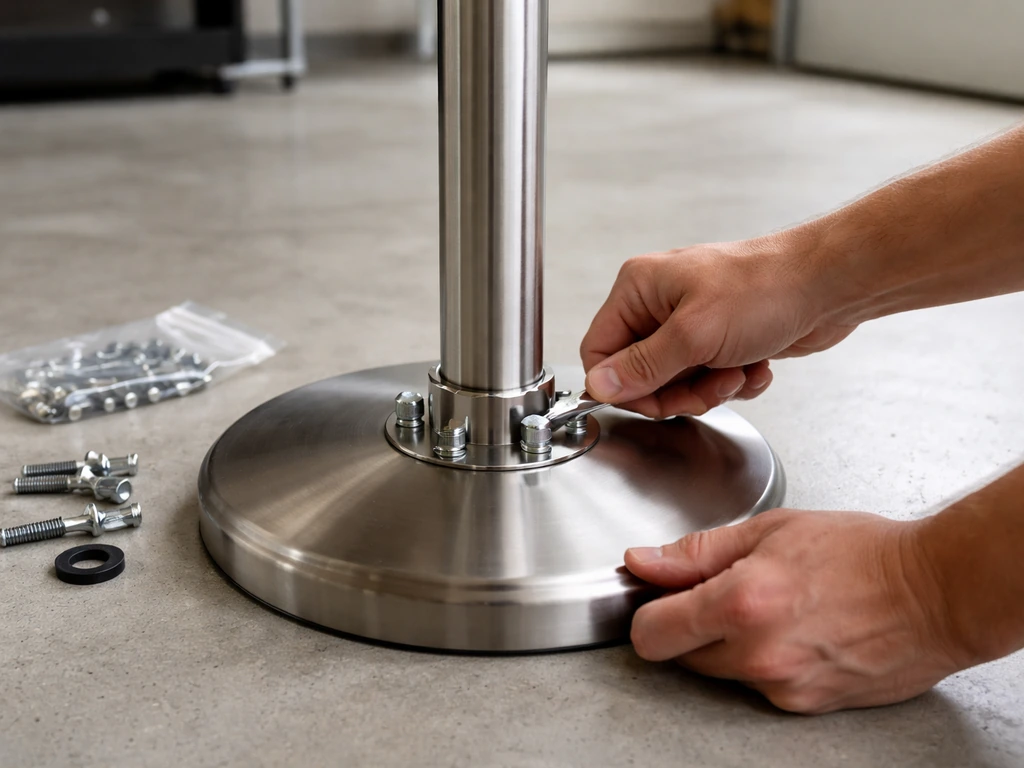
- Lay out all parts and match them to the parts list in your manual before starting. Most manuals include a labeled diagram. Check that every bolt, nut, and bracket is accounted for.
- Assemble the base. Most Fire Sense models use a three- or four-leg base that bolts to a central hub. Tighten the leg bolts snugly but do not over-torque them, as the base is typically powder-coated steel and the threads strip if forced.
- Insert the lower pole section into the base hub and secure it with the set screw or bolt specified in the manual. Keep the pole vertical while tightening.
- Attach middle pole sections if your model has them. These usually connect with a twist-lock or bolt-through collar. Route the gas supply hose up through the center of the pole as you stack each section, following the manual's routing diagram.
- Mount the emitter head assembly onto the top of the upper pole. This is typically a bolt-through connection with a locking nut. Make sure the gas hose feeds up into the head assembly and connects to the inlet fitting before you tighten the head down permanently.
- Attach the reflector (dome/bonnet). Most models have three or four tabs or bolts that secure it to the emitter housing. Tighten evenly so the reflector sits level.
- Connect the regulator to the bottom of the gas hose. The regulator threads onto the hose with a standard right-hand thread fitting. Hand-tighten first, then snug it with a wrench. Do not use thread tape on these fittings unless your manual specifically calls for it.
- Connect the regulator to the propane tank. The POL fitting on the regulator threads onto the tank valve with a left-hand thread (turn counterclockwise to tighten). Make it snug by hand, then a quarter turn with a wrench.
- Perform the leak test before doing anything else (details in the next section).
Parts you'll encounter during assembly
- Base legs and hub assembly
- Lower, middle, and upper pole sections
- Gas supply hose (runs internally through the pole)
- Regulator (pressure-reducing valve that connects to the tank)
- Emitter head with burner, pilot assembly, and control valve/knob
- Thermocouple (a small sensor probe near the pilot flame)
- Tilt safety switch (usually inside or under the base)
- Reflector dome and mounting hardware
- Igniter button (piezo electric, usually mounted on the control panel)
Operating checklist: what to do after assembly before you actually use it
Fire Sense manuals explicitly include an Operation Checklist and require a leak test before first use. Fire•Sense manuals also specify how to conduct the leak test by checking each gas connection for bubbles before lighting blank" rel="noopener noreferrer">require a leak test before first use. If you are working with a Nexgrill patio heater, the Nexgrill patio heater manual can help you confirm the correct operation checklist and leak-test steps for your model. Do not skip this. Propane is heavier than air and will pool at ground level, which creates a serious ignition hazard if you light the heater while there is a leak anywhere in the system.
Leak test
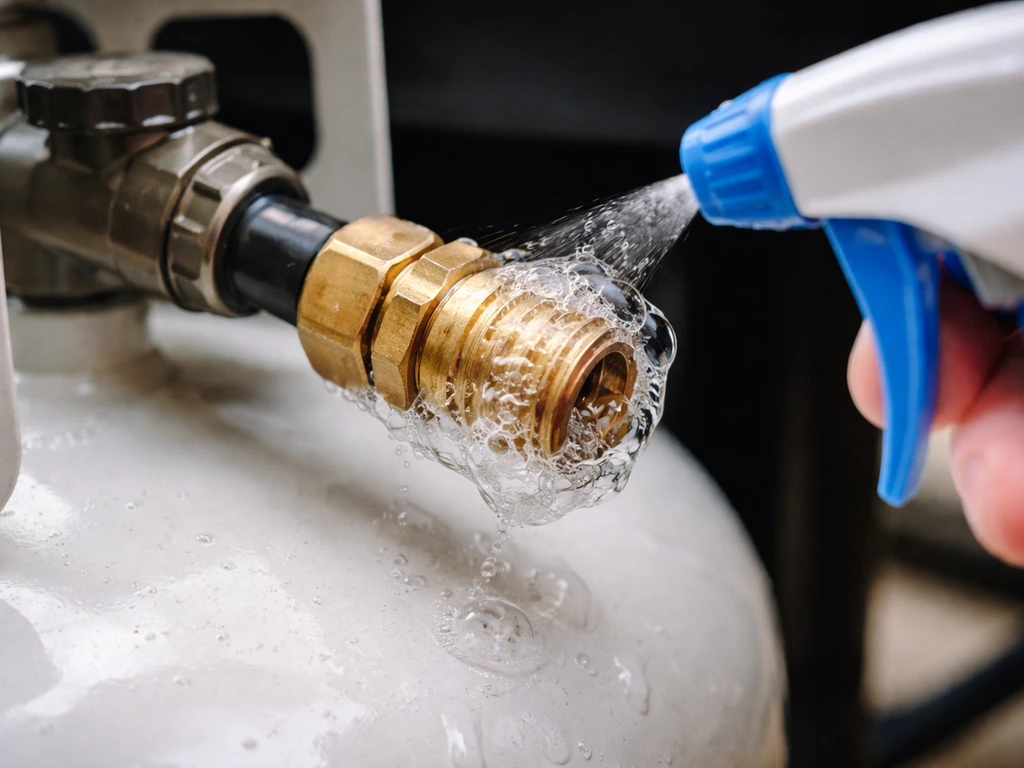
Mix a small amount of dish soap with water in a cup or spray bottle. Open the tank valve fully. With the control knob on the heater still in the OFF position, brush or spray the soapy solution on every gas connection: the tank-to-regulator fitting, the regulator-to-hose fitting, and the hose-to-emitter head fitting. Watch for bubbles. If you see any, close the tank valve immediately, tighten the connection, and retest. Do not light the heater until every connection passes with zero bubbles.
First lighting procedure (PH01-S / PH01-SS style)
- Turn the control knob to OFF and open the propane tank valve fully.
- Wait 30 seconds for any residual air to clear the line.
- Turn the control knob to HI (counterclockwise approximately 90 degrees on most models, or to the Pilot position on models like the 60262).
- Press the knob down and hold it in. Keep holding it throughout the next step.
- While holding the knob down, press the igniter button repeatedly until the pilot flame lights. This usually takes 3 to 5 seconds of holding and a few clicks.
- Once the pilot is lit, continue holding the knob down for at least 30 seconds. This is critical: it heats the thermocouple so it signals the gas valve to stay open.
- Release the knob slowly. If the flame stays, adjust to your desired heat level. If it goes out, wait at least 5 minutes before trying again to let any accumulated gas dissipate.
The 5-minute wait before a re-light attempt is not optional. Fire Sense manuals explicitly call this out as a safety requirement when the flame has gone out unexpectedly, especially in windy conditions. Treat it as mandatory every time.
Flame height check
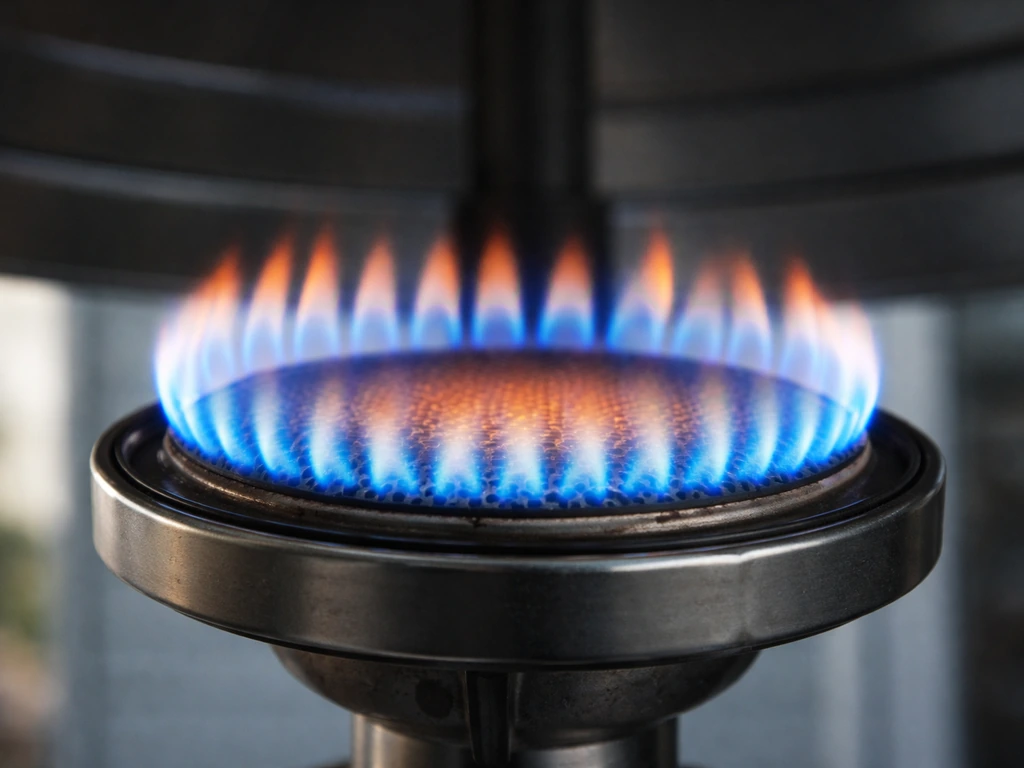
Once the heater is running, the main burner flame should be steady and blue with orange tips, spreading evenly around the emitter. A flame that is mostly orange or yellow, flickering heavily, or only covering part of the burner ring usually points to low gas pressure, a partially closed tank valve, or a supply hose that has been kinked during assembly. Check the hose routing inside the pole if you notice this right after setup.
Troubleshooting the problems people hit right after assembly
The Fire Sense troubleshooting section in the manual covers the most common failure points, and in practice they nearly always fall into one of four categories. Here is how to work through each one.
Heater won't ignite at all
Start with the obvious checks the manual lists first, because they account for the majority of cases:
- Tank is empty or nearly empty: a full 20 lb tank should last roughly 8 to 10 hours at high heat. If the tank feels light when you shake it, swap it out before troubleshooting anything else.
- Control valve not in the correct position: make sure the knob is turned fully to HI or Pilot before pressing down. A common mistake is only partially rotating the knob.
- Gas hose is kinked: if the supply hose got pinched or bent during assembly inside the pole, gas flow will be restricted or blocked. Disassemble far enough to inspect the hose and straighten any bends.
- Piezo igniter not clicking: hold the igniter button to your ear in a quiet space and press it. You should hear a sharp click. If there is no click, the piezo is likely dead. You can light the pilot manually with a long lighter as a temporary workaround, but replace the igniter before regular use.
- Pilot assembly is misaligned: the pilot tube needs to be positioned so the spark gap is directly at the pilot orifice. If the pilot tube got bumped during assembly, it may be aimed slightly off. The manual shows the correct position; compare visually and bend the tube gently back into place if needed.
Heater lights but won't stay lit
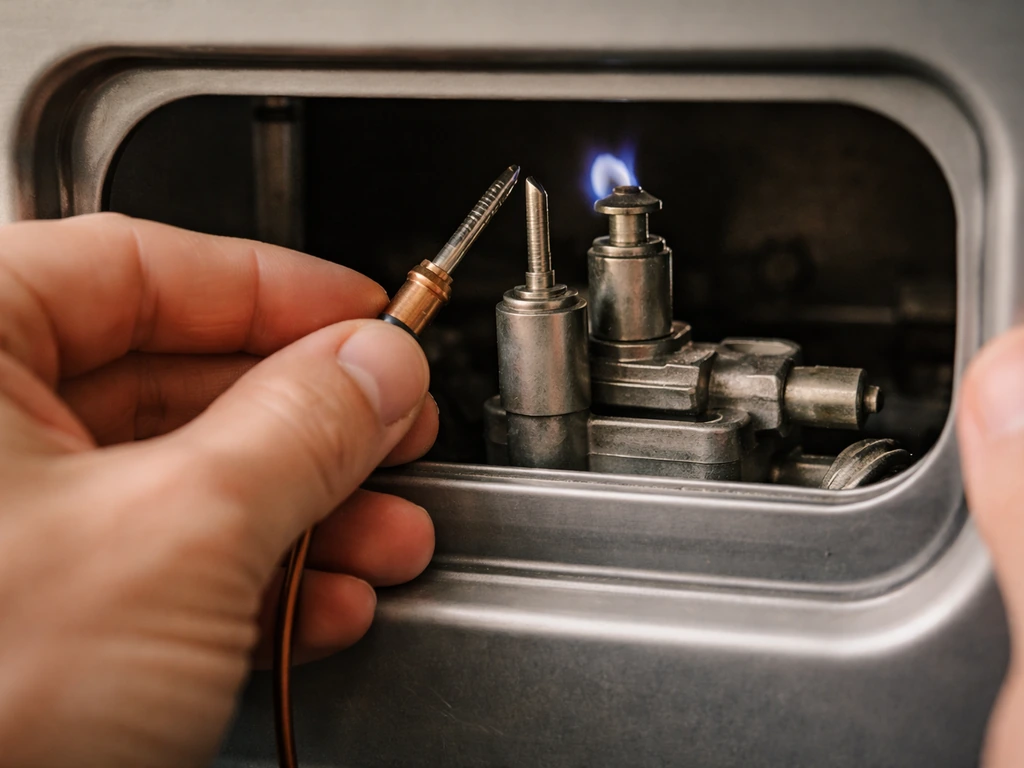
This is almost always a thermocouple issue, and it is one of the most common complaints on Fire Sense heaters after assembly. The thermocouple is a small metal probe (usually copper-colored) positioned with its tip in the pilot flame. When the pilot heats it up, it generates a small voltage that holds the safety valve open. If the thermocouple is cold, dirty, bent away from the flame, or failing, the valve snaps shut within seconds of releasing the control knob.
- Check that you are holding the control knob down long enough after lighting. Most people release it too soon. Hold for a full 30 to 45 seconds after the pilot lights before slowly releasing.
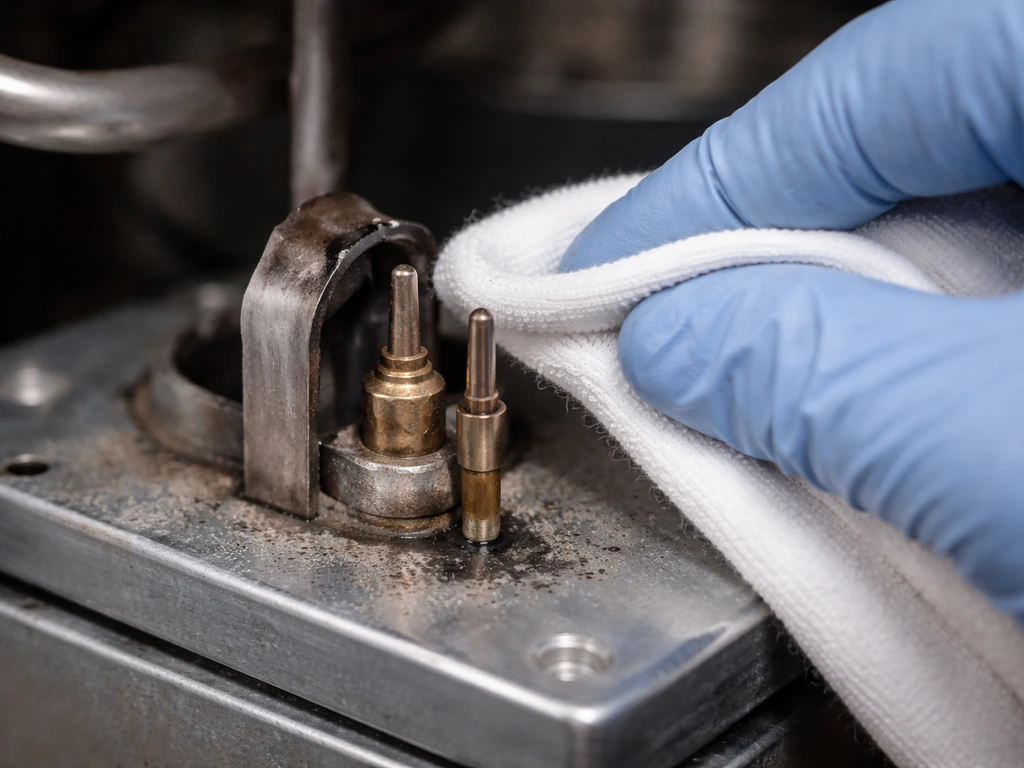
- Inspect the thermocouple tip position. It should sit directly in the pilot flame. If it is bent away, use needle-nose pliers to carefully reposition it so the flame visibly contacts the probe tip.
- Clean the thermocouple tip. If there is oxidation or carbon buildup on the tip, lightly sand it with fine-grit sandpaper and wipe it clean.
- Test the thermocouple output with a multimeter if you have one. A working thermocouple generates 25 to 30 millivolts when heated by the pilot. Significantly lower than that means the thermocouple needs replacement.
- Replace the thermocouple. It is a straightforward DIY fix. Universal replacement thermocouples are available for under $15 at most hardware stores. Make sure the replacement length matches your original.
Tilt switch shutting the heater off unexpectedly
Fire Sense heaters include a tilt safety switch (sometimes called an anti-tip switch) that cuts off gas flow if the heater tips beyond a certain angle. This is a good safety feature, but it can also trigger on slightly uneven ground or if the base is not sitting flat. If your heater shuts off after a few minutes of operation but the thermocouple checks out, the tilt switch is a likely culprit.
Check that the heater is sitting on a firm, level surface. If the patio is slightly sloped, a rubber mat or shim under one base leg often resolves it. Do not bypass or disable the tilt switch. It is there to prevent a tipped heater from becoming a propane fire.
Low or uneven flame after ignition
If the heater stays lit but the flame is weak or uneven, work through this list in order: check the tank level, verify the tank valve is fully open (not just cracked), inspect the gas hose for kinks inside the pole, and check whether the regulator is in bypass mode. Regulators sometimes lock into a bypass or flow-limiting state if the tank valve was opened too quickly, which drastically reduces gas flow. To reset: turn everything off, close the tank valve, wait 30 seconds, then open the tank valve very slowly before relighting.
Safety and maintenance basics to stay on top of
Gas connections
Run a soap-and-water leak test at the start of every season and any time you connect a new propane tank. Connections loosen over time from thermal expansion and contraction, and a small leak at the regulator or hose fitting is not always visible or obvious. If you ever smell gas while the heater is running, turn the control knob to OFF, close the tank valve, and move away from the heater before investigating.
Thermocouple and pilot maintenance
At the start of each season, visually inspect the thermocouple tip and the pilot assembly. Spider webs and insect nests in the pilot orifice are surprisingly common after winter storage and will block ignition completely. A soft brush or a short blast of compressed air clears most debris without damaging the components.
Tilt switch check
You can verify the tilt switch is working by tilting the running heater past about 30 degrees. The flame should extinguish within a second or two. If it does not cut out, the switch may be stuck or faulty and should be replaced before continued use. A non-functioning tilt switch is a safety issue, not a minor inconvenience.
End-of-season storage
Before storing the heater, disconnect the propane tank and store it outdoors in an upright, ventilated location away from the heater. Do not store the tank inside a garage or shed attached to the house. Cover the heater with a weatherproof cover to keep moisture and insects out of the burner and pilot assembly. If you live somewhere with hard winters, storing the heater in a shed or garage (without the tank) will significantly extend the life of the regulator and gas hose.
When to stop and call a professional
Most Fire Sense issues are DIY-friendly. But if you smell gas and cannot identify the source after a thorough leak test, if the control valve is stiff or feels damaged, or if the regulator shows signs of physical damage or corrosion, stop and contact a qualified gas appliance technician. The same goes if the heater has been knocked over while running. Replacing a thermocouple is reasonable DIY work; diagnosing a damaged main gas valve is not.
How Fire Sense compares to similar brands you might also be working with
If you are managing multiple outdoor heaters or inherited one without documentation, the manual-finding process is nearly identical across brands. AZ Patio Heaters, East Oak, Nexgrill, and Charmglow all use the same strategy: locate the model label on the unit, search ManualsLib or the brand's website, and download the PDF. If you are looking for the East Oak patio heater manual, use the same model-label and ManualsLib search approach described here.
The ignition and thermocouple mechanics are also broadly similar across these brands, so the troubleshooting logic here transfers well. The main differences tend to be in valve position labeling and the exact thermocouple length, so always confirm part numbers against your specific model's parts list before ordering replacements.
| What to do | Where / How |
|---|---|
| Find your model number | Label on lower pole, base hub, or inside the base cover |
| Download the manual PDF | ManualsLib.com, Manuals+, ManualZilla, or firesense.com |
| Leak test before first use | Soapy water on all gas fittings; zero bubbles required |
| First ignition hold time | 30 to 45 seconds after pilot lights before releasing knob |
| Re-light wait after flame-out | At least 5 minutes to let gas dissipate |
| Thermocouple fix | Reposition tip in flame, clean, or replace (under $15) |
| Tilt switch acting up | Level the surface; never bypass the switch |
| Regulator in bypass mode | Close tank, wait 30 sec, reopen valve very slowly |
| Seasonal maintenance | Leak test, clear pilot debris, inspect thermocouple |
FAQ
What should I do if I cannot find the exact Fire Sense patio heater manual PDF for my model number?
If your Fire Sense patio heater manual is missing from ManualsLib for your exact code, use the model label to search with the closest match (for example, PH01-S vs PH01-SS). If the PDF you find is clearly for a different valve layout, do not use its assembly or torque guidance. Instead, use that manual only for general safety steps like leak testing and the correct lighting sequence, then confirm part numbers by comparing the valve/regulator label details on your unit.
If the leak test bubbles at one connection, how should I fix it before attempting to light the heater again?
Do not tighten or loosen fittings until you have confirmed the leak test is clean. If bubbles appear at a connection, close the tank valve first, then correct the specific fitting that bubbles. After tightening, retest that same connection again, and only proceed when the soapy mixture shows zero bubbles at all gas joints (tank-to-regulator, regulator-to-hose, and hose-to-emitter).
Can I reuse the same propane tank or regulator setting after assembly or troubleshooting?
Yes, but only if the manual allows it and you still complete a leak test after the adjustment. A common mistake is assuming the regulator setting does not matter, then opening the tank quickly and triggering a flow limit or bypass state. If you swap parts or reposition the regulator or hose, run the full bubble test again, and open the tank valve slowly during the next attempt.
My pilot lights, but the heater shuts off when I release the control knob. What does that usually mean?
If the pilot lights but the burner does not stay on, first keep the control knob held in the ignition position for the full amount of time the manual specifies so the thermocouple fully warms. A frequent edge case is releasing the knob too early, which makes the safety valve close even if the pilot flame looks normal.
How can I confirm the tilt (anti-tip) switch is working without taking unsafe risks?
Do not test the tilt safety switch by manually striking or forcing the heater beyond normal tipping risk. The safe check described in many Fire Sense manuals is to tilt the running heater past roughly 30 degrees and confirm it shuts off within a second or two. If the flame does not extinguish that quickly, treat it as a safety failure and stop use until the switch is replaced.
What are the most likely causes of a weak or partially uneven flame right after setup?
An orange or yellow flame is not always low gas pressure. If it appears mostly right after assembly, inspect the hose routing inside the pole for a partial kink or pinched section that restricts flow. Also verify the tank valve is fully open and the regulator is not stuck in a bypass or flow-limiting state, then reset by closing the tank, waiting about 30 seconds, and reopening the tank valve slowly.
What causes common start-up failures after winter storage, and what should I inspect first?
If you store the heater through winter, the next ignition issue is often debris blocking the pilot orifice, webs, or insect nesting. Before lighting for the season, check and clean the pilot assembly (soft brush or compressed air), and visually confirm the thermocouple tip alignment in the pilot flame path.
What should I do if I smell propane gas while the heater is on or during troubleshooting?
If you smell gas while the heater is running, turn the control knob to OFF and close the tank valve immediately, then move away before inspecting. After it is safe, re-run the full leak test at every connection. If you cannot identify and eliminate the source, or if you see signs of corrosion, physical damage, or a stiff or damaged control valve, stop and use a qualified technician.
Why is there a mandatory wait before relighting, and what goes wrong if I ignore it?
If your heater is off for safety reasons and you attempt re-ignition repeatedly, do not rush the timing. Respect the required waiting period before relighting, especially in windy conditions, then retry once with the control knob sequence the manual specifies. Multiple quick retries increase risk if gas has accumulated.
When should I replace the regulator or hose instead of continuing to troubleshoot the burner or thermocouple?
If you see visible corrosion or the regulator has physical damage, replace the affected component rather than trying to “adjust” around it. Regulators and hoses can degrade internally, so the safest decision aid is: if you cannot pass the soap-bubble leak test on all joints after replacement and careful inspection, do not continue using the heater until serviced.