To find the right Hampton Bay patio heater manual, flip your heater's control box or base panel to locate the model number sticker, then search that exact number on Home Depot's static PDF hosting (homedepot.com) or ManualsLib. For the bronze pyramid model, that number is PH08-SB (40,000 BTU). For the common stainless dome heater, it's NCZH-G-SS (48,000 BTU). Once you have your model number, you can pull the correct manual in under two minutes and get straight to the safety checks, assembly steps, or troubleshooting table you actually need.
Hampton Bay Patio Heater Manual Guide and Troubleshooting

Grant Mercer
13 May 2026
Quick ways to identify your exact Hampton Bay heater model
Hampton Bay sells several distinct patio heater styles, and the manuals are not interchangeable. Before you download anything, confirm which heater you actually have. The two most common configurations are the pyramid-style (with a tall glass tube flame column) and the mushroom-style (with a dome reflector on top). These use different burner assemblies, different control boxes, and different troubleshooting tables.
The fastest way to get your model number is to check the rating plate, which is usually a sticker on the control box housing, on the base leg, or occasionally underneath the gas connection collar. On the pyramid heater, the sticker will show something like Model #PH08-SB and Item #1005794584. On the stainless dome heater, look for MODEL #NCZH-G-SS. Write both the model number and the item number down, because some manual repositories index by one or the other.
- Check the control box panel first, on the side or back face near the knob
- If nothing is there, look at the base leg closest to the gas connection
- On pyramid models, also check underneath the glass tube mounting collar
- The rating plate shows model number, BTU rating, fuel type (LP/propane), and sometimes a manufacture date
- If the sticker is worn or missing, check your original Home Depot receipt or order confirmation, which will list the item number you can use to cross-reference
The BTU rating is also a useful secondary filter. The pyramid PH08-SB runs at 40,000 BTU. The stainless NCZH-G-SS runs at 48,000 BTU. If the sticker is partially illegible but you can read the BTU rating, that narrows the search significantly. Hampton Bay also produces a 31-inch outdoor gas patio heater and a tabletop gas version, each with their own model numbers and manuals, so don't assume one manual covers all Hampton Bay heaters. A 31-inch Hampton Bay outdoor gas patio heater manual can be found by matching the model number on your heater to the correct PDF 31-inch outdoor gas patio heater manual.
Where to get the correct manual (including pyramid-style versions)
The most reliable source is Home Depot's own static file hosting. Hampton Bay is a Home Depot exclusive brand, so the THD-hosted PDFs are the authoritative versions, not scanned copies or reposted files. Search your model number followed by 'manual PDF' and you'll usually hit the direct PDF link within the first few results. The pyramid model PH08-SB and the stainless NCZH-G-SS both have directly hosted PDFs on THD's static storage domain.
If the direct PDF link doesn't appear immediately, two backup sources work well. ManualsLib maintains a Hampton Bay patio heater index that lets you browse by product line when you're not sure of the exact model number. Manualzz also hosts a searchable copy of the PH08-SB guide that includes assembly, operation, and the troubleshooting table in a readable format.
For the pyramid heater specifically, the Manualzz mirror is particularly useful because it's fully text-searchable, which helps if you're jumping straight to a specific section. Hampton Bay PH08-SB 40000 BTU Bronze Gas Pyramid Patio Heater Use and care guide (Manualzz mirror) notes that pyramid-style model identifiers shown at the top of the manual: THD PRODUCT NAME “Bronze Pyramid Heater”, Item # “1005794584”, Model # “PH08-SB”.
- Home Depot static PDF hosting: search '[model number] patio heater manual PDF homedepot.com'
- ManualsLib Hampton Bay patio heater index: useful for browsing when you don't have the model number yet
- Manualzz: hosts the PH08-SB pyramid heater manual with searchable text
- Avoid random third-party manual aggregator sites that may serve outdated or incorrectly labeled files
- If you bought the heater recently, the product page on homedepot.com usually has a 'Documents' or 'Guides & Documents' tab with a direct PDF download
One thing worth knowing: Hampton Bay has sold pyramid-style heaters under slightly different finish names (bronze, stainless bronze) with model numbers like PH08-SB and PH08-SSB. For Havana Bronze commercial patio heater instructions, use the same approach to locate your exact model number and then follow the manual's assembly and safety steps. The manuals for these variants are formatted identically and cover the same assembly and operation steps, so if you can't find your exact suffix, the PH08-SB manual is the correct reference for either version.
Manual essentials: safety, clearance, fuel type, and parts overview
Before you touch the assembly steps or the ignition sequence, the manual front-loads several safety points that are genuinely important, not just legal boilerplate. Read these even if you've used propane appliances before, because patio heater failures often trace back to skipping them.
The big safety rules the manual states explicitly
- Outdoor use only, no exceptions: operating a propane patio heater indoors or in any enclosed or semi-enclosed space creates carbon monoxide buildup that can kill without warning
- If you smell gas: immediately turn the gas regulator off, extinguish any open flame nearby, do not operate any electrical switches, and if the smell continues, leave the area and call your gas supplier or the fire department
- Do not attempt to light the heater until assembly is fully complete and a propane leak test has been performed
- If relighting a heater that was recently burning or recently failed to light, wait at least 5 minutes before trying again to allow any accumulated gas to dissipate
- The heater requires a specific overhead clearance from any combustible material above it; check the manual for your exact model, but plan for at least several feet of clearance above the flame/emitter
The fuel type for all Hampton Bay patio heaters in this lineup is liquid propane (LP). They are not rated for natural gas use. The manual specifies this clearly, and using the wrong fuel type will void any warranty and create a genuine safety hazard. Use only the regulator and hose assembly that comes with the heater or is specified as a compatible replacement.
The parts inventory in the manual is worth reviewing before you start assembly, even if the heater came partly pre-assembled. For the pyramid model, named components include the base, control box, glass tube column, emitter/burner head, reflector, damper, wireguard, and the ignition chamber. Knowing these names matters because the troubleshooting table references them by name, and replacement parts are searched by these labels.
Assembly and initial setup steps the manual will walk you through
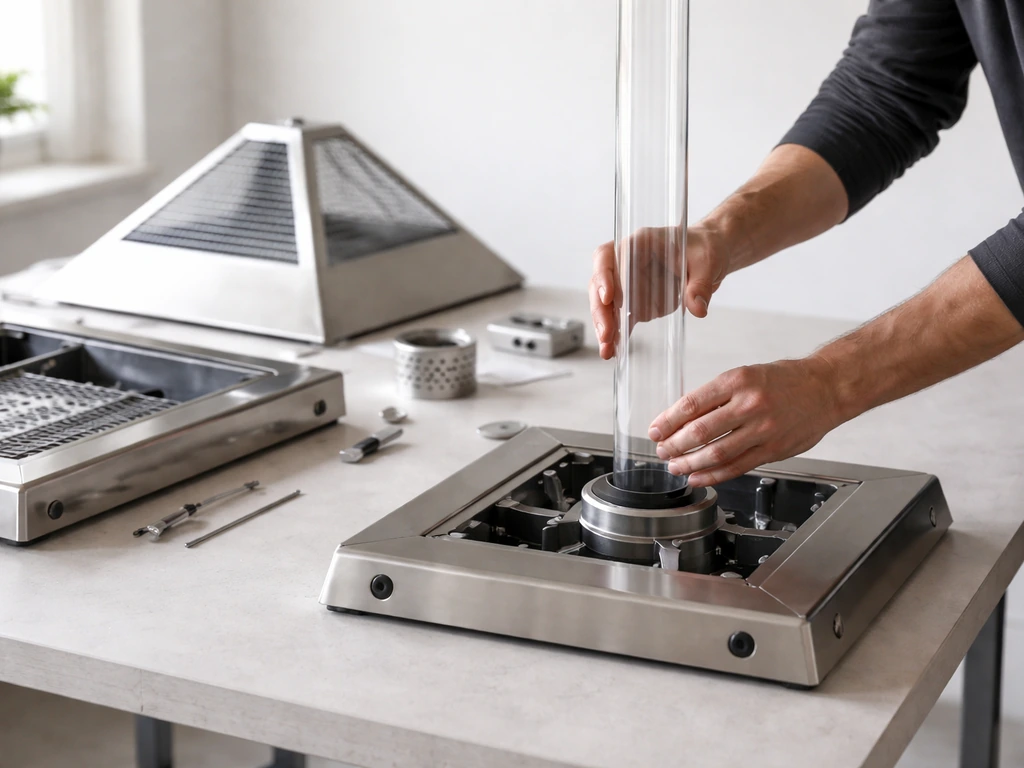
Assembly for the pyramid-style heater is more involved than the dome/mushroom style because of the glass tube column, which requires careful alignment during assembly. The manual sequences this in a specific order for a reason: structural stability of the column affects whether the tilt switch (a safety shutoff) trips correctly during normal use.
- Lay out all parts and verify against the parts list in the manual before starting; missing a small hardware piece early causes problems later
- Assemble the base and pole sections first, following the manual's torque guidance for the fasteners; snug but not overtightened
- Mount the control box to the pole at the specified height, ensuring the gas inlet port faces downward as shown in the diagram
- Attach the glass tube column (pyramid models) carefully, as this component is fragile and the mounting collar must seat fully before tightening
- Install the emitter/burner head at the top, then add the wireguard and reflector in the order shown; the reflector orientation affects heat direction
- Connect the gas hose from the regulator to the control box inlet, hand-tighten first, then snug with a wrench (do not overtighten)
- Install the ignition chamber battery with the anode (positive) terminal facing outward as the manual specifies
- Before connecting the propane tank, perform a full visual inspection of all connections, then connect the tank and perform the soap-bubble leak test on every gas connection
- For the leak test: apply soapy water to every fitting and the regulator connection, slowly open the tank valve, and watch for bubbles; if bubbles appear, close the tank valve, disconnect, reconnect, and retest; if bubbles persist after several attempts, the valve or fitting is defective and must be replaced before use
- Only after a clean leak test should you attempt first-time lighting
The tabletop and outdoor gas versions of the Hampton Bay heater have a shorter assembly sequence since there's no pole to build, but the leak test step is identical and equally mandatory. For detailed tabletop patio heater instructions, use the exact model's manual and follow the leak test and assembly steps in order. For the tabletop gas version, follow the Hampton Bay outdoor or tabletop gas patio heater instructions in your manual for the correct assembly order, leak testing, and setup steps. Don't skip it because the heater is smaller.
If it won't ignite: step-by-step checks using the manual flow
Ignition failures are the most common issue people run into, and most of them are fixable without any parts at all. Work through these checks in order before assuming a component is broken.
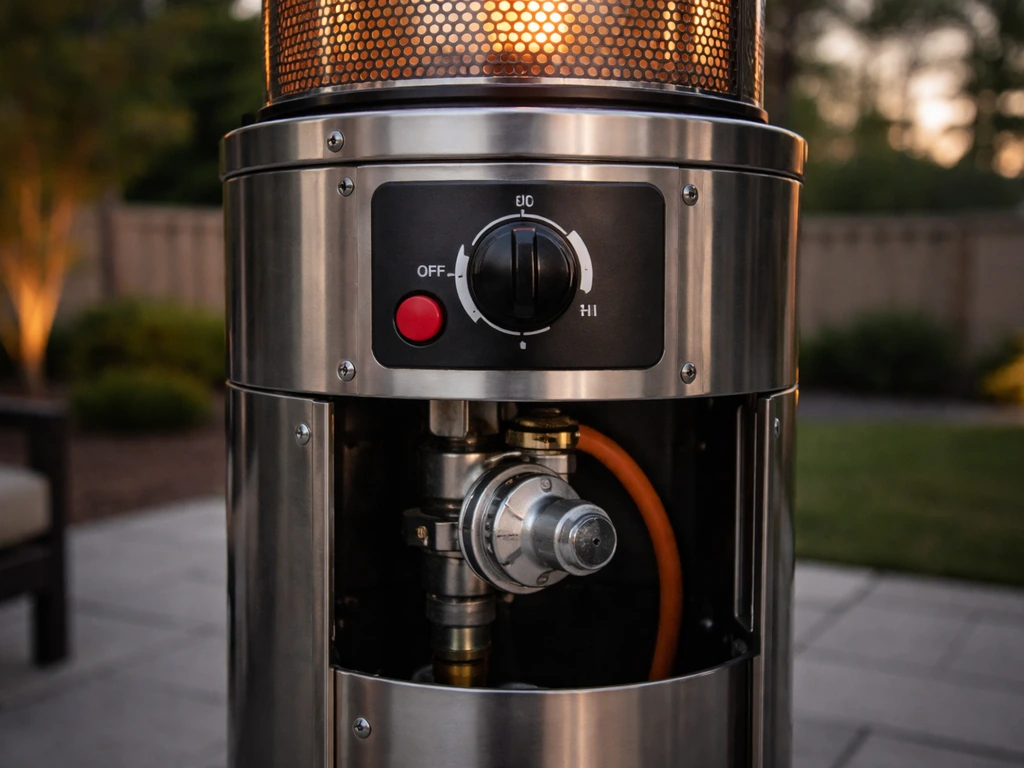
- Confirm the control knob is fully in the OFF position before starting the lighting sequence; the manual is explicit that ignition attempts with the knob in any intermediate position will fail
- Open the propane tank valve slowly and fully, then wait about 10 seconds for gas pressure to stabilize before proceeding
- Push the control knob in and rotate to the HIGH or ignition position as shown in the manual's lighting diagram, then press the igniter button while holding the knob depressed
- If no spark is visible or audible at the igniter, check the ignition chamber battery first: verify polarity (anode/positive facing outward) and replace with a fresh battery if needed
- If there's a spark but no flame, check propane level: a nearly empty tank in cold weather (below about 40°F) may not have enough vapor pressure to ignite reliably; replace or warm the tank
- Check that the burner orifice is not blocked by debris, spider webs, or insect nests; this is an extremely common cause of no-ignition and requires cleaning the orifice with compressed air (never a metal probe)
- Verify the gas hose and regulator are not kinked or damaged; a pinched hose will restrict flow enough to prevent ignition
- If the tank is full, the battery is fresh, the orifice is clear, and there's still no ignition after three attempts, stop, wait the mandatory 5 minutes, and then try the lighting sequence once more from the beginning
Cold weather is a real factor with propane. The manual's troubleshooting table specifically calls out low outdoor temperature as a cause of ignition failure, because propane's vapor pressure drops significantly below freezing. If you're trying to light the heater when it's very cold outside and the tank has been sitting in the cold, moving the tank to a warmer spot for 20 to 30 minutes before trying again often solves the problem without any repair at all.
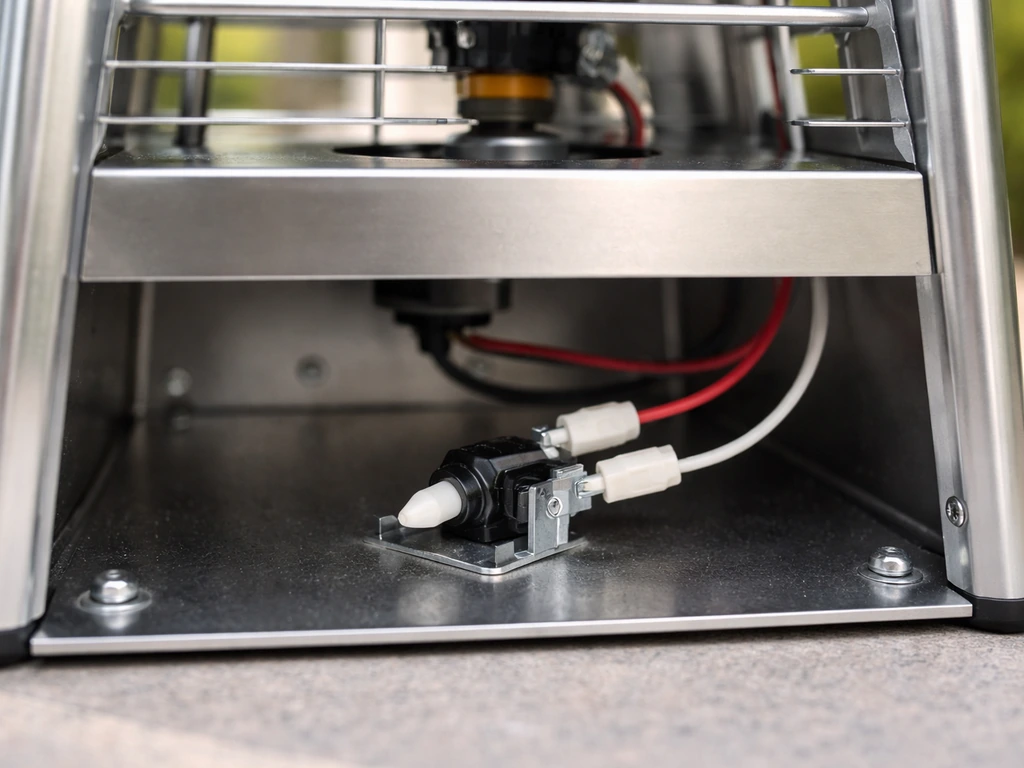
If it ignites but won't stay lit: thermocouple and ignition troubleshooting
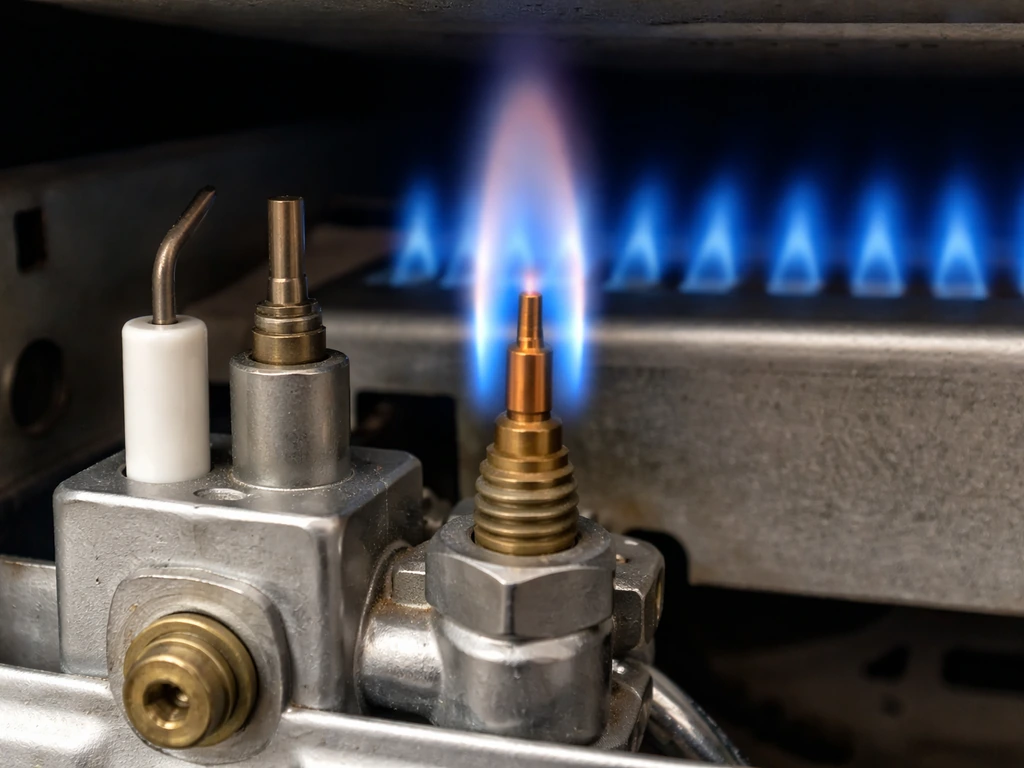
A heater that lights briefly and then dies within a few seconds after you release the control knob is almost always a thermocouple issue. The thermocouple is a small probe positioned in the flame path near the burner. It generates a tiny electrical current when heated by the flame, and that current holds open a safety valve that keeps gas flowing. If the thermocouple isn't generating enough current, the safety valve closes and the flame goes out.
Diagnosing a thermocouple problem
First, rule out the operator step: when you push and hold the control knob in during lighting, you must hold it depressed for a full 30 to 45 seconds after the flame appears. This gives the thermocouple time to heat up enough to hold the valve open on its own. Many people release the knob too quickly. If holding longer doesn't fix it, then the thermocouple itself is the suspect.
- Visually inspect the thermocouple tip: it should sit directly in the flame path; if it's bent away from the burner, the flame isn't heating it properly
- Check the thermocouple connection at the valve body: it should be snug and finger-tight; a loose connection reduces the current reaching the valve
- Clean the thermocouple tip gently with fine steel wool if it has oxidation buildup; a coated tip reads lower temperature and generates less current
- If the thermocouple is correctly positioned, clean, and properly connected but the heater still won't stay lit, the thermocouple itself has failed and needs replacement
- A replacement thermocouple for Hampton Bay patio heaters is a standard part available from Home Depot or online; match the tip diameter and lead length to your original
A second cause of won't-stay-lit behavior is low gas pressure from an almost-empty tank. This can mimic a thermocouple failure because there's just enough gas to light but not enough sustained flow to maintain a flame that heats the thermocouple properly. If you're not sure about tank level, swap in a full tank before replacing the thermocouple.
Tilt switch and safety shutoff troubleshooting
Hampton Bay patio heaters include a tilt switch as a safety feature: if the heater tips over past a certain angle, the switch cuts gas flow and the flame goes out. This is a genuinely important safety device, but it also causes false trips that confuse people into thinking something is broken.
The tilt switch is typically located inside the base of the heater. On pyramid models, the switch is in the lower control box area or base assembly. It works as a mercury switch or a ball-bearing switch that interrupts the ignition circuit when tilted beyond its threshold. If your heater keeps shutting off unexpectedly, the first thing to check is whether the heater is sitting on a perfectly level surface. Even a slight lean on uneven patio pavers can be enough to trip the switch repeatedly.
- Place the heater on a hard, level surface and use a bubble level on the base to confirm it's sitting flat
- If the surface is slightly uneven, use rubber shims under the base feet to level the heater before operating
- If the heater is level but still trips the tilt switch, locate the switch inside the base (you'll need to remove the access panel; the manual shows its location)
- Inspect the switch for visible damage, corrosion, or a disconnected wire lead
- On ball-bearing tilt switches, the small metal ball can sometimes get stuck due to corrosion or debris; gentle cleaning with contact cleaner can free it
- Test the switch continuity with a basic multimeter set to continuity mode: when the heater is upright, the circuit should be closed (continuity); when tilted significantly, it should open
- If the switch fails the continuity test or is visibly damaged, replace it; this is a straightforward part swap and the manual shows the wiring connection
Don't ever bypass or disable the tilt switch permanently. It exists specifically to prevent a fire if the heater falls over, and a tall pyramid-style heater on a deck or patio is a real tip-over risk if the ground is soft or someone bumps it. A $15 replacement switch is a much better outcome than a deck fire.
When the manual isn't enough: replacement parts, cleaning, and deciding on service
Most Hampton Bay patio heater problems are solvable with a manual, basic tools, and a replacement part or two. But there are situations where the right answer is to stop and either order a specific part or decide whether the repair cost makes sense relative to the heater's value. ManualsLib list: HAMPTON BAY Calentadores De Patio notes that a manual library index exists for Hampton Bay patio heaters under ManualsLib, enabling cross-model browsing when you don’t know the exact model number yet.
Parts you can reasonably source and replace yourself
| Part | Why it fails | DIY-friendly? |
|---|---|---|
| Thermocouple | Oxidation, heat fatigue, physical damage | Yes, standard part, easy swap |
| Igniter battery | Normal drain, wrong polarity installation | Yes, trivial fix |
| Tilt switch | Corrosion, stuck ball bearing, wire break | Yes, basic wiring swap |
| Gas hose and regulator | Cracking, kinking, regulator failure over time | Yes, use OEM-spec replacement |
| Burner orifice | Blockage from debris or insect nests | Yes, clean with compressed air; replace if physically damaged |
| Glass tube (pyramid models) | Physical breakage | Yes, but handle with care; source from Home Depot parts or Hampton Bay service |
| Control valve | Internal failure after years of use | Borderline; if the valve body itself is faulty, replacement is more involved and may not be cost-effective on an older heater |
For cleaning, the burner and emitter screen should be inspected at the start of each season and cleaned if there's any visible debris, rust scale, or insect blockage. Use compressed air to blow out the orifice and burner ports. Never use water directly on the burner assembly or control box. The glass tube on pyramid models should be wiped down with a dry cloth; avoid abrasive cleaners that can weaken the glass.
Replacement parts for Hampton Bay heaters are available through Home Depot's parts and repair service, and many generic propane heater parts (thermocouples, hose and regulator assemblies, tilt switches) are compatible as long as you match the specifications. The manual's parts list is your reference for matching part names and configurations.
If you're dealing with a gas valve that won't hold, a regulator that repeatedly fails, or a control knob assembly that's broken internally, do a quick cost comparison before ordering parts. Hampton Bay heaters are mid-range in price, and if the heater is several years old and needs a $60 to $80 valve plus labor time, a new heater may be the more practical choice. The 48,000 BTU stainless NCZH-G-SS and the pyramid PH08-SB are both straightforward replacements if the repair economics don't add up. For model-specific deep dives, the Hampton Bay 48000 BTU stainless steel patio heater manual and the Hampton Bay 31-inch outdoor gas patio heater manual cover the distinct quirks of those configurations in more detail.
One last thing worth knowing: if you can't find parts for an older Hampton Bay model because it's been discontinued, the thermocouple and hose/regulator are the two components most likely to be universally compatible across brands. A propane patio heater thermocouple is a commodity part. The control valve and igniter assembly, however, are more model-specific. If those are the failed components on a discontinued model, that's usually the point where a replacement heater makes more financial and practical sense than continued repair.
FAQ
How do I confirm whether my Hampton Bay patio heater is really LP (propane) before I try to light it or replace parts?
Check the rating plate for “LP” or “Liquid Propane,” and verify your fuel setup uses a propane cylinder with the regulator and hose included or listed for your model. If the heater was connected to a natural gas line, stop and switch to the correct LP-rated kit, because parts like regulators and valves are not interchangeable between fuel types.
Where exactly is the model number on my Hampton Bay patio heater if I cannot see it on the sticker?
Look for the label on the control box housing or base leg, then check underneath the gas connection collar. If it is still not readable, photograph the burner area and control knob area, then search using the closest full code you can make out, and cross-check the BTU rating on the same sticker.
Can I use the PH08-SB manual for my pyramid heater if my model number ends with a different suffix, like PH08-SSB?
Often you can use the PH08-SB manual as the correct reference for assembly and operation, because the variants are formatted the same, but confirm first that your heater uses the same pyramid-style glass tube column. If the manual’s parts list names do not match your visible components, do not assume compatibility and keep looking for your exact suffix.
What should I do if the heater ignites but will not stay lit even after holding the control knob longer?
Follow the two likely paths in order: first, try a full propane tank to rule out low pressure causing a “lights then dies” symptom. If it still fails, inspect the thermocouple location and condition, then plan on replacing the thermocouple rather than the control knob assembly, unless your model’s manual points to a different component.
My patio heater keeps shutting off without tipping over, how can I tell if it is the tilt switch?
Place the heater on a perfectly level surface and test again. If it continues, check for installation issues like uneven pavers, a wobbly base, or a patio that has sloped drainage. If the shutoff happens only when the wind gusts or the heater rocks slightly, that pattern strongly points to the tilt safety device.
Is it safe to test the heater with the tilt switch disconnected temporarily to troubleshoot?
No. Do not bypass or disconnect the tilt switch, even briefly. If you suspect a false trip, solve the root cause by leveling the unit and inspecting how it sits, then use the manual for a proper tilt-switch replacement if needed.
What leak test method is expected in the manual, and how do I do it without damaging parts?
Use only the leak-test step described for your model, typically applying leak solution to the specified gas connection joints and valve fittings. Do not apply water to the burner or control box, and keep the solution off electrical connections, then re-check after any hose or regulator change.
How often should I clean the burner and emitter screen, and what is the safest way to clean them?
Inspect and clean at the start of each season, and also if you notice reduced flame quality, odor, or visible debris. Use compressed air to clear burner ports and the orifice openings, and avoid wet cleaning on the burner assembly or control area.
What if the glass tube on my pyramid heater looks dirty or slightly hazy, can I use glass cleaner or wipes?
Wipe it with a dry cloth only, and avoid abrasive cleaners or aggressive solvents that could weaken or scratch the glass. If there is stubborn residue, stop and check the manual’s cleaning guidance for your exact model before using any chemical cleaner.
When temperature is freezing, what steps improve ignition without repairs?
Bring the propane tank to a warmer location for about 20 to 30 minutes before trying again, especially if the tank has been sitting outside in the cold. If ignition still fails, move to the manual’s ordered checks for airflow, burner blockage, and the ignition sequence rather than swapping parts immediately.
What are the most common mistakes that lead to gas ignition problems on Hampton Bay heaters?
Releasing the control knob too quickly after ignition, skipping the required time for the thermocouple to heat, and using an empty or near-empty tank that can light but cannot sustain flame. Another frequent issue is a blocked burner or insect debris, which prevents proper gas flow even if the ignition system works.
If I need replacement parts and my exact part is discontinued, which parts are usually most transferable?
Thermocouples and hose plus regulator assemblies are often the most commonly compatible across brands if they match the correct specs. Control valves and igniter assemblies are more model-specific, so prioritize matching those carefully using your manual’s parts list and your heater’s exact model number.
Is it worth repairing an older Hampton Bay patio heater, or should I replace it?
Do a quick total-cost check that includes the part price and whether labor or multiple components are likely. If you are facing expensive model-specific failures like a gas valve plus additional parts, and the heater is several years old, replacement can be more cost-effective than ongoing repairs.