Hiland patio heaters fall into two main families: the standing Premium Series (model numbers starting with HLDS01-) and the smaller tabletop units (HLDS032 and its suffix variants). The Premium series owner’s manuals list common Hiland outdoor propane patio heater model numbers such as HLDS01-CGT, HLDS01-CBT, and HLDS01-BST, along with other HLDS01-* variants Premium Series (model numbers starting with HLDS01-).
Hiland Patio Heater Manual: Find Model, Assemble, Fix Issues

Grant Mercer
13 May 2026
The right manual depends entirely on which family you have, so before you download anything or start assembly, take 60 seconds to confirm your model number. If you specifically need the patio heater PH 2800 B manual, confirm the model number first so you download the correct PDF for your exact unit.
Once you know that, the rest of this guide walks you through assembly, lighting, and the most common problems that send people searching for help in the first place.
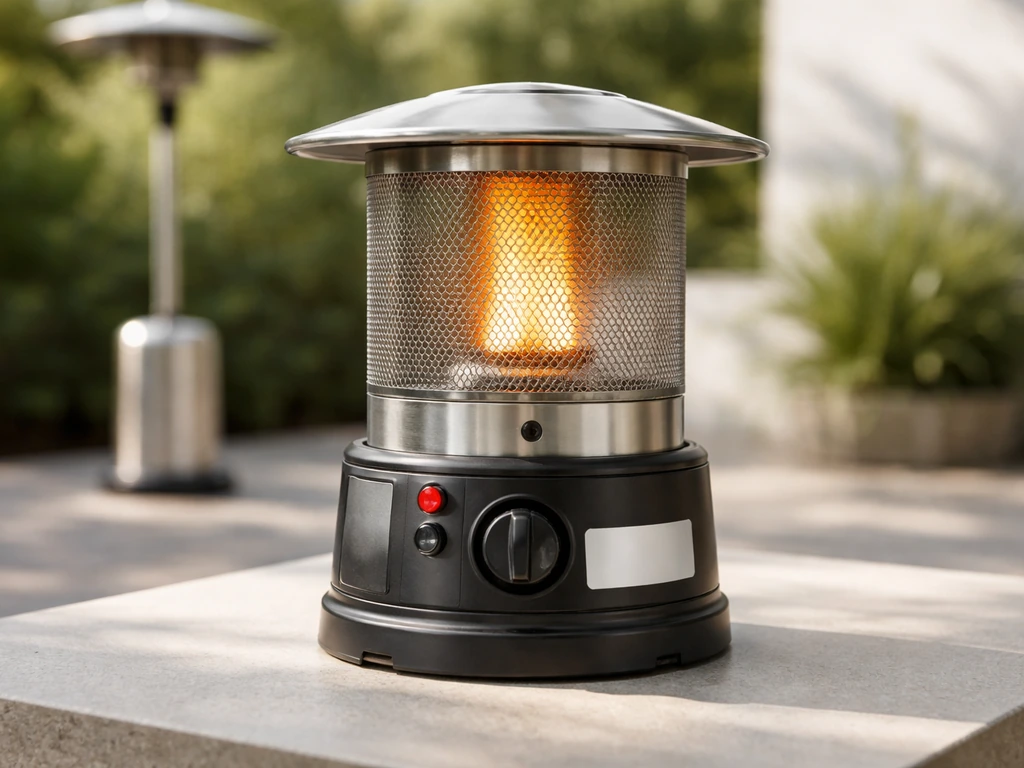
How to identify your Hiland model (Premium Series vs tabletop)
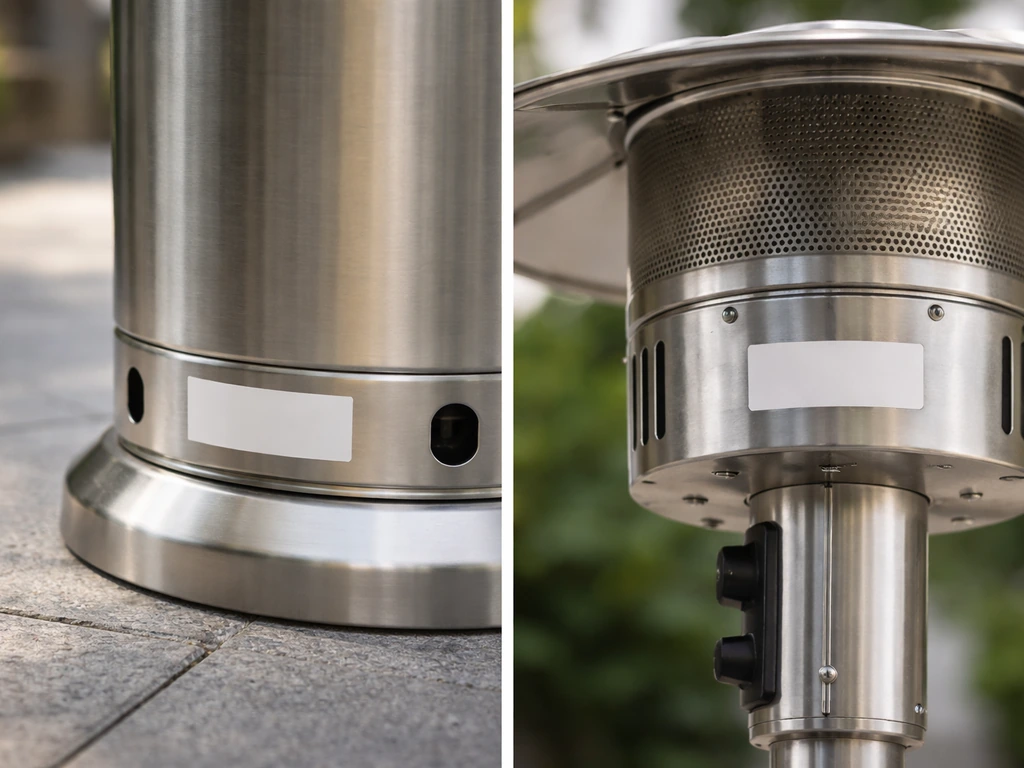
The model number sticker is almost always on the base of the heater or on the back of the burner head housing. On standing units, check the bottom of the pole or the underside of the base plate. On tabletop units, flip it over and look at the bottom of the tank cradle. The number you're looking for starts with HLDS.
| Feature | Premium Series (standing) | Tabletop |
|---|---|---|
| Model prefix | HLDS01- | HLDS032 / HLDS032-* |
| Example models | HLDS01-CGT, HLDS01-CBT, HLDS01-BST, HLDS01-GTHG | HLDS032-WHSQ, HLDS032-B and other suffix variants |
| Fuel tank location | External 20 lb propane cylinder underneath dome | Small 1 lb propane cylinder inside base |
| Height | Standing (roughly 88 inches) | Tabletop (roughly 18–24 inches) |
| Manual to look for | Premium Series Patio Heater Owner's Manual | Tabletop Patio Heater Model HLDS032 manual |
One thing worth knowing: Hiland is branded and sold under AZ Patio Heaters, so any manual or PDF that says "AZ Patio Heaters" on the cover is the same documentation. Don't let that confuse you. If your model number matches, you have the right file. Also, a single Premium Series PDF often covers multiple sub-models at once, like HLDS01-GTHG, HLDS01-GTSS, and HLDS01-GTCB in the same document, so don't be surprised if your exact suffix isn't the only one listed.
Where to find the correct Hiland manual
AZ Patio Heaters (the manufacturer) hosts PDFs on their website at azpatioproducts.com. Search by model number in their support or manuals section. If you need an HLD032-style “Hss a ss patio heater manual,” start by searching your exact model number in AZ Patio Heaters’ support or manuals section Search by model number in their support or manuals section.. If you bought from a retailer like Costco, Home Depot, or Target, the retailer's product page often has a PDF download link in the specs or documentation tab. Search Google for your exact model number plus "owner's manual PDF" and you'll usually find a direct download in the first few results.
When you open the manual, these are the four sections that actually matter for most people: Then, look up the BFC-A-SS patio heater manual to match your exact setup and troubleshoot safely.
- Assembly instructions: covers which parts need to be installed before first use and in what order
- Operating instructions (lighting sequence): the exact press-and-hold steps for the control knob, including hold times
- Safety shutoffs: explains how the tilt switch and thermocouple work and what trips them
- Troubleshooting table: lists symptoms, causes, and corrective actions side by side
Skip the warranty section for now unless you're within the coverage window and the problem is clearly a manufacturing defect. Focus on the troubleshooting table first whenever something isn't working. The corrective actions are specific and usually fixable at home.
Assembly instructions for Hiland patio heaters
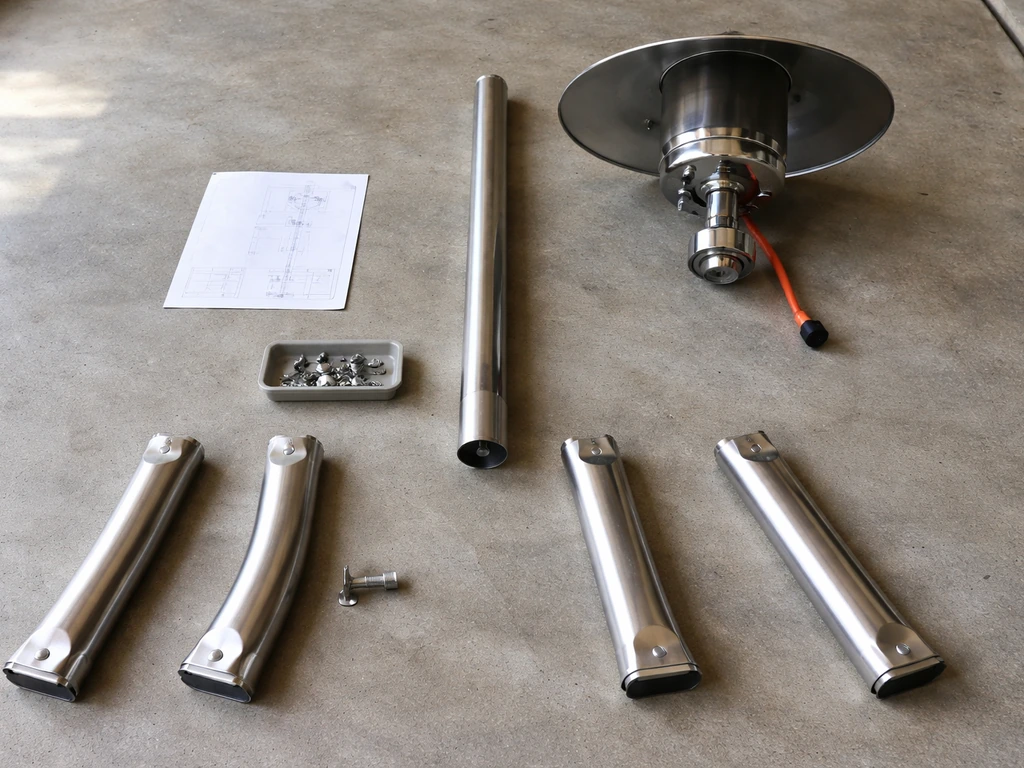
Standing Premium Series (HLDS01-* models)
- Lay out all parts and match them to the parts diagram in the manual before touching a wrench. Missing a bolt now is easier to handle than mid-assembly.
- Attach the base legs to the center pole base plate first. Tighten the bolts finger-tight to start, then snug them down with the included wrench once all legs are in place.
- Slide the lower pole section into the base and secure with the bolt and nut at the collar. Do not fully tighten yet.
- Connect the middle and upper pole sections in order. Most HLDS01 models have two or three pole sections that stack and lock with a bolt at each joint.
- Attach the emitter screen assembly and reflector to the burner head. The reflector usually has tabs that slot into the head housing before the screws go in.
- Route the gas supply hose from the regulator (which connects to your propane tank at the base) up through or along the pole. Make sure the hose isn't pinched or kinked at any pole joint.
- Seat the burner head assembly onto the top of the pole and secure with the locking collar or set bolt.
- Connect the gas hose to the valve inlet on the burner head. Hand-tighten first, then snug with a wrench. Do not over-torque the brass fitting.
- Perform a leak check before ever igniting. Mix dish soap with water, apply it to every connection point (regulator-to-tank, hose fittings, valve inlet). Open the tank valve slowly and watch for bubbles. If you see any, close the tank immediately, tighten or re-seat the fitting, and recheck.
- Once no bubbles appear and all connections are confirmed tight, go back and fully tighten all pole joint bolts.
Tabletop units (HLDS032 and variants)
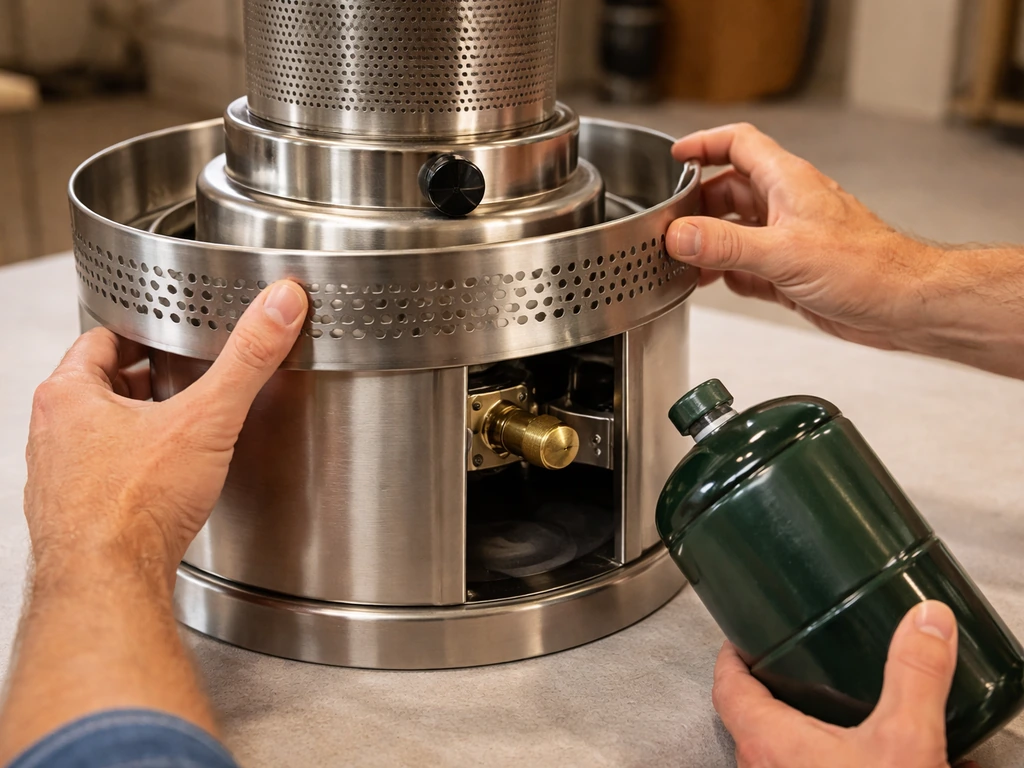
Tabletop Hiland heaters arrive mostly pre-assembled. The main setup tasks are attaching any decorative panels or guard rings if included, installing a 1 lb propane cylinder into the base cradle, and connecting the regulator. Screw the regulator onto the propane cylinder clockwise until hand-tight, then give it a quarter turn with a wrench. Apply the same soapy water leak check to the regulator-cylinder connection before lighting. Once that passes, you're ready to operate. For instructions specific to your model, consult the patioboss electric patio heater manual that matches your heater’s setup and safety steps ready to operate.
Lighting your Hiland heater (and why timing matters)
The most common reason a Hiland heater fails to light or stay lit isn't a broken part. It's rushing the ignition sequence. The thermocouple is a safety sensor that needs to get hot enough to tell the gas valve it's safe to stay open. If you release the control knob too early, the gas valve closes and the flame goes out. This is the heater working exactly as designed.
Here is the correct lighting sequence for the HLDS032 tabletop models, and it's essentially the same process on Premium Series standing units:
- Open the propane tank valve fully (counterclockwise).
- Push the variable control knob in and turn it to the pilot or low position.
- Press and hold the control knob down firmly. Keep holding.
- Press the igniter button repeatedly until the pilot lights. This may take 3 to 5 clicks.
- Once the pilot flame is lit, continue holding the knob down for a full 20 seconds.
- After those 20 seconds, wait an additional 15 seconds while still holding to allow the thermocouple to heat up fully.
- Slowly release the knob. The pilot flame should stay lit.
- If the flame holds, turn the control knob to your desired heat setting.
If the pilot goes out the moment you release the knob, that 15-second thermocouple warm-up wasn't long enough, or the thermocouple itself has a problem. Try the sequence again and hold even longer (up to 45 seconds total) before releasing. If it still won't hold after two or three patient attempts, you're likely dealing with a thermocouple fault rather than a technique issue.
Fixing the most common Hiland problems
Won't ignite at all
First check the obvious: is the tank valve open and is there gas in the tank? Lift the tank. If it feels light, that's your answer. If gas is available, listen for a faint hiss when you press and hold the control knob to pilot. No hiss means gas isn't reaching the burner, which points to a closed or faulty gas valve, a kinked hose, or a regulator that's locked in overpressure protection mode. To reset an OPD-equipped regulator, close the tank valve, disconnect the regulator from the tank, wait 30 seconds, reconnect, open the tank valve very slowly (this is important), then try again. Fast opening trips the safety and limits flow.
Lights but won't stay lit

This is almost always the thermocouple. The thermocouple tip needs to sit directly in the pilot flame. If it's been bumped, corroded, or has carbon buildup, it either isn't reading the flame temperature correctly or isn't making good contact with the gas valve circuit. Visually inspect the tip: it should be clean and positioned so the pilot flame wraps around it.
Gently clean any buildup with fine steel wool or a soft wire brush, then retry the full lighting sequence with the extended hold time. If it still won't stay lit after cleaning and a longer hold, the thermocouple needs to be replaced. The Hiland manuals are direct about this: the corrective action is "Replace thermocouple. " It's a straightforward swap available at hardware stores and costs under $20 for most compatible units.
Tilt switch causing shutoffs
The anti-tilt switch is a safety device that cuts gas flow if the heater tips past a certain angle. On standing Premium Series heaters it's typically mounted at or near the base. On tabletop units it's inside the base housing. If your heater shuts off randomly or won't stay lit even after thermocouple checks, the tilt switch is the next suspect.
Before assuming it's broken, make sure the heater is on a flat, level surface. A slightly uneven patio stone can hold the unit at enough of an angle to trip the switch. If the surface is level and it's still triggering, check the wiring connection at the switch itself. The Hiland troubleshooting table specifically lists "[Anti tilt switch could be faulty, or wires not connected properly](https://azpatioheaters.
com/uploads/Files/G-FTB68043%20IMEdit2. pdf)" with the corrective action to replace the switch or reconnect the wire. Pull the base cover, locate the switch, and check whether the wiring connector is seated fully. A loose connector is often all it is.
Burner or electrode issues
If the igniter clicks but no spark is visible at the burner tip, the electrode gap may have shifted or the electrode wire has come loose. The electrode tip should sit about 3 to 5 mm from the burner. Visually check the gap and gently re-bend the electrode if it's drifted. Also check that the wire from the igniter button to the electrode hasn't been pinched in a pole joint during assembly. A pinched wire won't spark reliably. If the burner is lighting unevenly or with a yellow/orange flame instead of mostly blue, the burner ports are dirty. Let the heater cool completely, remove the burner assembly, and clear the ports with compressed air or a soft brush.
Troubleshooting checklist before calling it
| Symptom | Check first | Likely fix |
|---|---|---|
| No ignition at all | Tank valve open? Gas in tank? Regulator reset? | Reset regulator, open tank slowly |
| Ignites but flame dies on release | Hold time long enough? Thermocouple clean and positioned correctly? | Extend hold to 35–45 sec; clean or replace thermocouple |
| Random shutoffs | Heater on level surface? Tilt switch wiring connected? | Level the surface; reconnect or replace tilt switch |
| Igniter clicks but no spark | Electrode gap correct? Wire pinched at pole joint? | Adjust electrode gap; re-route wire |
| Weak or yellow flame | Burner ports blocked? Low gas pressure? | Clean burner ports; check tank level |
| Smell gas but no flame | Gas leak at connection points? | Leak check with soapy water; do not light until leak is resolved |
When to stop DIY and get help
There are a few situations where you should stop turning wrenches and call a professional or contact AZ Patio Heaters support directly. If you smell gas and can't locate the source with a soapy water test, do not attempt to light the heater. Close the tank valve, move the heater away from the house, and don't use it until the leak is found and fixed.
If the gas valve itself is leaking or failing internally, that's not a DIY repair: valves need to be replaced by someone who can verify the repair with proper equipment. Similarly, if wiring inside the burner housing looks burned, melted, or heavily corroded, stop and get a professional assessment. Finally, if your heater is still within the manufacturer's warranty period, document the fault and contact AZ Patio Heaters before you start swapping parts, as DIY repairs can sometimes void coverage.
Most Hiland heater problems are genuinely fixable at home, and the thermocouple and tilt switch replacements that come up most often are well within what a handy homeowner can handle with basic tools. If you need the exact steps for your specific model, use the pg188h patio heater manual to confirm the correct troubleshooting and replacement procedure thermocouple and tilt switch replacements.
If you've worked through other propane heater manuals before, like those for DCS patio heaters or other premium standing models, you'll find the Hiland diagnostic process very familiar. The key is patience with the ignition sequence and systematic checking rather than guessing. A Hiland that won't stay lit almost always has a solvable mechanical reason behind it.
FAQ
I downloaded what looked like the right Hiland patio heater manual, but it does not match my control knob or parts layout. How can I tell I have the correct model?
Before you pull the manual, confirm the model family first, Premium Series (HLDS01-...) versus tabletop (HLDS032...). The lighting and safety components differ, so using the wrong PDF can send you troubleshooting the wrong switch or ignition steps.
What should I do if I suspect a leak but I still want to troubleshoot ignition problems?
If you smell gas at any point, do not light it or keep trying the ignition. Close the tank valve and perform the soapy water leak check on every connection you can access, including the regulator-to-tank joint and any hose fittings, then test again after correcting what bubbles.
How long should I hold the control knob for the pilot on a Hiland tabletop unit before I suspect a part failure?
Yes, you can extend the knob-hold time, but do it within safe limits. For HLDS032-style tabletop units, if the pilot goes out when you release, hold longer on the pilot warm-up, up to about 45 seconds total, and repeat only a couple times before switching to a thermocouple diagnosis.
When my Hiland patio heater fails to light, how can I tell whether the problem is gas delivery or the thermocouple?
A faint hiss while holding the knob indicates gas is reaching the pilot circuit. If there is no hiss, the issue is upstream (tank valve not fully open, empty tank, regulator stuck in safety overpressure mode, or a valve or hose restriction) rather than the thermocouple.
My Hiland regulator seems to block gas flow after reconnecting, what is the proper way to reset it?
If your regulator is OPD-equipped and it seems locked out, reset it by closing the tank valve, disconnecting the regulator, waiting about 30 seconds, reconnecting, then opening the tank valve very slowly. Fast opening can trip the safety flow limit and prevent ignition.
I cleaned the thermocouple tip, but it still will not stay lit. How do I decide between re-trying and replacing?
Do not rely on a visual “looks clean” check only. The thermocouple tip needs to be centered in the pilot flame and free of carbon. If you clean it but it still will not stay lit after you extend the hold time, plan on replacing the thermocouple rather than repeatedly re-bending or re-trying.
My Hiland heater shuts off randomly. Could the anti-tilt switch be tripping, and how do I confirm it?
The anti-tilt switch can trip from an uneven patio, even if the heater appears roughly level. Use a bubble level on the surface where the heater sits, and confirm the base is on a stable, level area before you inspect wiring or order a replacement.
The igniter clicks on my Hiland, but the burner never sparks. What are the first things to check?
If the igniter clicks but there is no visible spark, check the electrode gap (commonly around 3 to 5 mm from the burner) and verify the electrode wire is not pinched where poles connect or covers meet. Re-gap and route the wire correctly before further troubleshooting.
Why does my Hiland patio heater sometimes burn with yellow/orange flame instead of mostly blue?
If you get a yellow or orange flame or uneven ignition, that points more often to burner port buildup than to thermocouple timing. Let it cool fully, remove the burner assembly, and clear ports with compressed air or a soft brush, then try lighting again.
At what point should I stop troubleshooting and get professional help for my Hiland heater?
If the wiring inside the burner housing is visibly burned, melted, or heavily corroded, stop DIY troubleshooting. That is a stop-and-check-for-repair situation, because degraded wiring can create ignition or safety faults.
If my Hiland patio heater is still under warranty, should I try thermocouple or tilt switch replacement myself?
Yes, but do it strategically. Document the symptoms, the model number, and what steps you already took, then contact support before replacing parts if you are within the warranty window, since DIY swaps can complicate coverage decisions.