Most patio heaters fail for one of four reasons: the igniter isn't sparking, the thermocouple isn't sensing the flame, something is blocking gas flow, or a safety switch has tripped. You can diagnose and fix the majority of these problems yourself in under an hour with basic hand tools, a flathead screwdriver, and some dish soap mixed with water. Start with the safety checks below, then work through each system in order until you find the culprit.
How to Fix a Patio Heater: Won’t Light and Ignition Issues

Grant Mercer
2 May 2026
Safety checks before you touch anything
Before you open a panel or twist a fitting, do these things. They are not optional, especially when propane is involved.
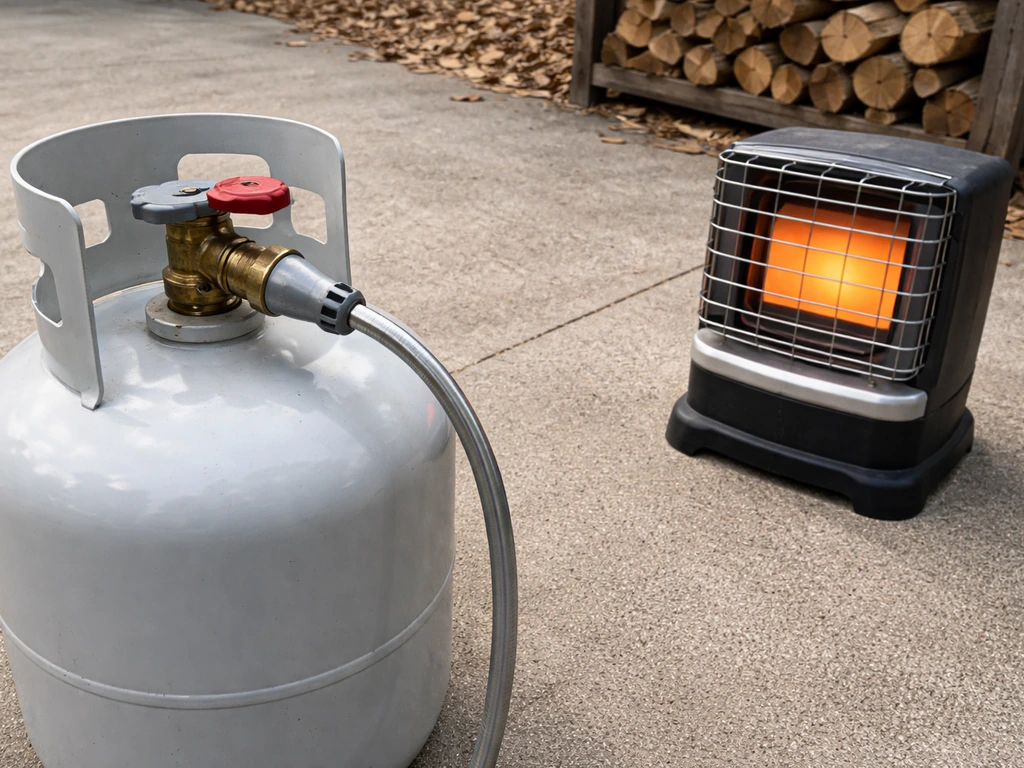
- Turn the gas off at the cylinder valve. Do not rely on the control knob alone.
- Move the heater away from anything flammable and work outdoors or in a well-ventilated area.
- Let the heater cool completely if it has been running recently. Touching a hot burner or thermocouple tip while it is still hot can burn you and give you a false reading.
- Smell for gas before doing anything else. If you detect a strong propane odor, do not attempt any repair. Move away, let the area ventilate, and contact your gas supplier.
- Look up your model number on the label (usually on the base or under the burner head). Having the right model number matters when you need to order a thermocouple, regulator, or igniter that actually fits.
- Never operate the heater with any safety component bypassed or disabled, even temporarily during testing.
Once you have done all of that, make a quick soapy water solution: mix roughly 70% water with 30% foaming dish soap. You will use this throughout the diagnosis to check connections for leaks.
Diagnose why your patio heater won't light
The fastest way to narrow down the problem is to answer three questions in order. Each one points you to a different section of this guide.
- Is the igniter producing a visible spark at the electrode? (If no, go to the igniter section.)
- Is there spark but still no pilot flame? (If yes, the issue is fuel delivery or a tripped safety switch.)
- Does the pilot light but go out within a few seconds? (If yes, the thermocouple or tilt switch is the likely culprit.)
The distinction between 'no spark' and 'spark but no flame' is important. Manufacturers like Mr. Heater and Fire Sense both structure their troubleshooting trees around exactly this split, and mixing up the two categories wastes time. Confirm which situation you have before going further.
Check gas delivery first
Before blaming any component, rule out the obvious supply issues. Common culprits listed in multiple manufacturer manuals include: the cylinder valve being fully closed, the regulator not fully engaged on the tank, air trapped in the gas line, and low or empty propane. Open the cylinder valve slowly, reseat the regulator if it feels loose, and try igniting again. If the tank is fresh and you still get nothing, hold the control knob in the pilot position for about 30 seconds before pressing the igniter. This bleeds trapped air out of the line. If you have a propane tank that was stored cold, low pressure can temporarily prevent the pilot from lighting even with a good spark.
Check for gas leaks

With the cylinder valve open (but the control knob off), brush your soapy water mix onto every fitting you can reach: the hose connections, the regulator threads, and any inline fittings on the feed line. Bubbles mean a leak. Tighten the fitting, wipe it dry, and test again. If a fitting still leaks after tightening, the hose or regulator needs replacing before you go any further. Do not operate the heater until a leak is fully resolved.
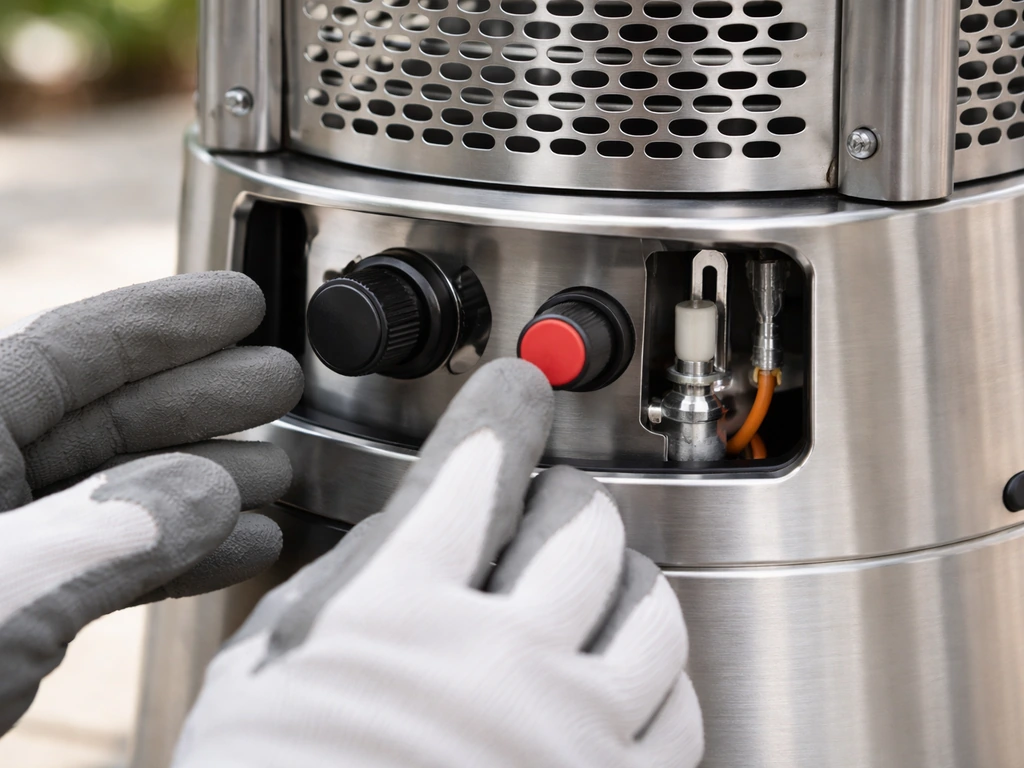
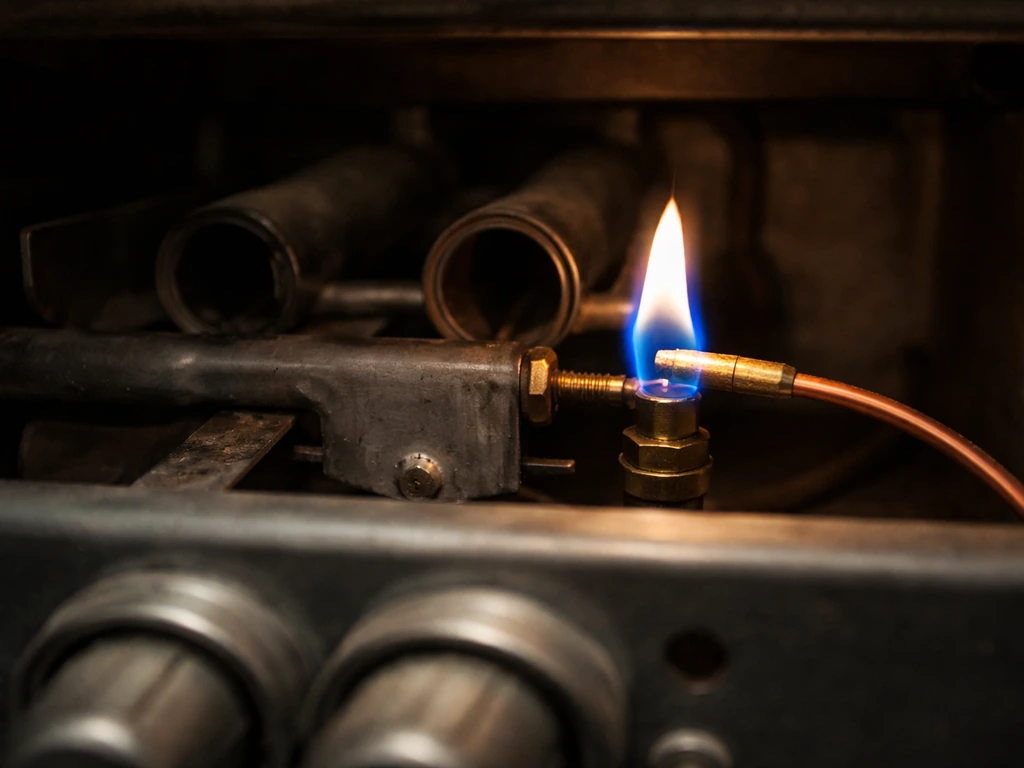
Fixing the igniter: spark and ignition system troubleshooting
If you press the ignition button and hear no click or see no spark at the electrode tip near the pilot, you have an igniter problem. Patio heaters use one of two ignition types: a piezo (mechanical click) igniter that generates its own spark, or an electronic module powered by a AAA battery. Knowing which type you have tells you where to look first.
Piezo igniter (no battery required)
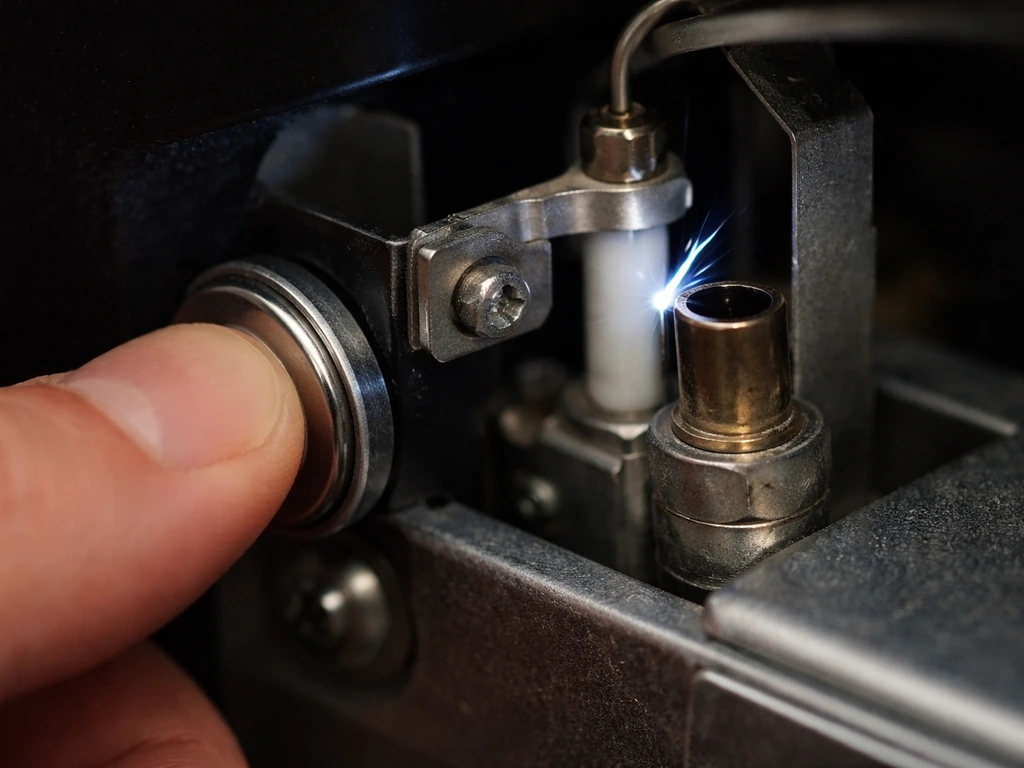
Press the button firmly and watch the electrode tip near the pilot tube in dim light. If there is no spark at all, check the wire running from the piezo button to the electrode. A disconnected or corroded wire is the most common fix here and takes about two minutes. If the wire is intact and grounded properly but still no spark, the piezo unit itself has likely failed. According to DESA Tech's troubleshooting procedure, if you confirm no spark at the electrode after checking the wiring, replace the piezo igniter. They are inexpensive and available for most brands.
Electronic igniter (battery-powered)
If your heater has an electronic ignition module (common on Fire Sense models and some others), start by replacing the AAA battery even if it seems fine. A weak battery produces a faint spark that is not strong enough to light the pilot reliably. Replace the battery, try again, and see if the spark improves before doing anything else. If your patio heater has an electronic ignition module, you can replace the AAA battery by opening the battery compartment and swapping in a fresh cell.
Check and adjust the electrode gap
A spark that jumps to the wrong place, or a gap that is too wide, will not reliably ignite the pilot. The electrode tip should sit about 3 to 5 mm (roughly 1/8 to 3/16 of an inch) away from the pilot assembly. Great American Fireplace's manual specifies exactly 1/8 inch (3 mm) for proper sparking. If the electrode has been knocked out of position, carefully bend it back to the correct gap. Also check that the electrode is not cracked or coated with carbon deposits. A gentle wipe with fine sandpaper or steel wool clears carbon buildup and restores conductivity.
Thermocouple and valve problems: fixing a heater that won't stay lit
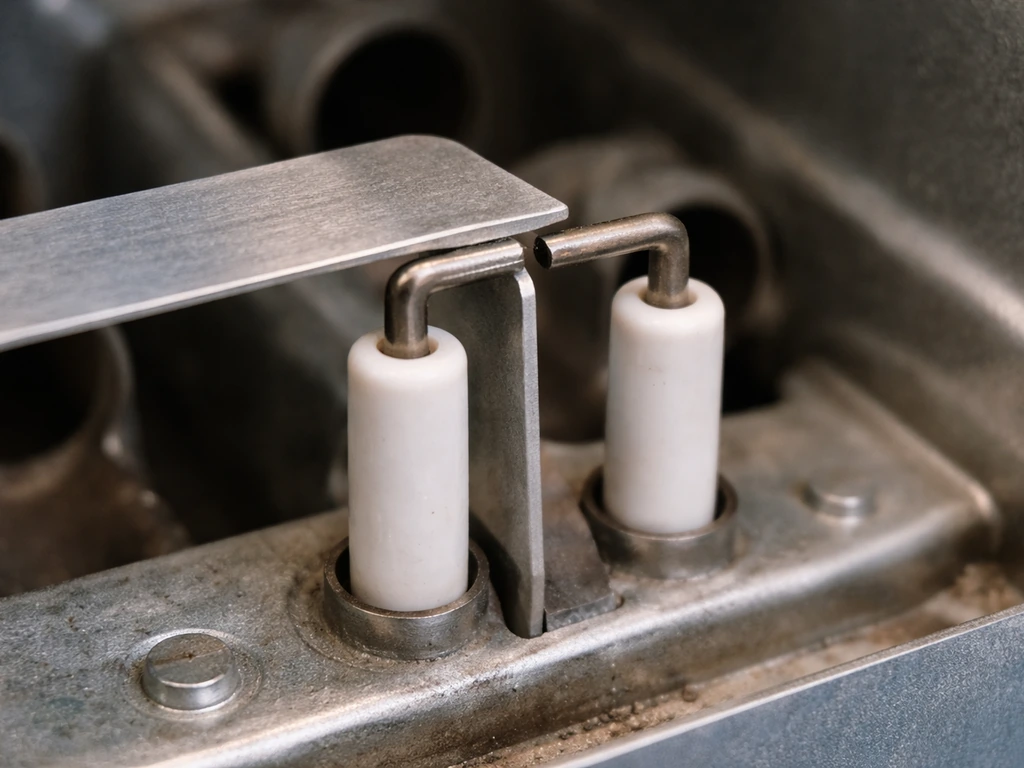
This is the most common complaint with patio heaters: the pilot lights when you hold the knob down, but goes out the moment you release it. The thermocouple is almost always involved. It is the small metal probe that sits in the pilot flame. When it gets hot, it generates a tiny electrical signal (typically in the 300 to 500 millivolt range) that tells the gas valve it is safe to stay open. If that signal is too weak or absent, the valve closes and the flame dies.
Is the pilot flame actually touching the thermocouple?
Before replacing anything, look at where the pilot flame lands when you hold the knob down. It needs to wrap around the thermocouple tip, not blow past it or land short of it. If the flame is there but not touching the probe, the thermocouple is not getting hot enough to generate its signal. A clogged pilot orifice or low gas pressure is usually the reason. Dirt buildup around the pilot orifice is specifically called out in the Patio Comfort PC02 manual as a cause of this exact symptom. If the pilot orifice is dirty or partially blocked, the pilot may not stay lit, so cleaning it can solve the issue. Clean the orifice with a thin wire or compressed air before assuming the thermocouple itself is bad.
Clean the thermocouple tip
Carbon and oxidation on the thermocouple tip reduce its ability to generate voltage. With the gas off and the unit cooled, use fine steel wool or emery cloth to gently clean the tip of the thermocouple probe. This takes about 60 seconds and sometimes resolves a 'won't stay lit' problem completely without any parts replacement. There is a full guide on how to clean a patio heater thermocouple if you want to go deeper on that process.
Test the thermocouple output
If you have a multimeter, you can measure the thermocouple's output while the pilot is lit. Set it to millivolts DC and connect the leads to the thermocouple's connection point. A healthy thermocouple on most patio heaters should read somewhere in the 300 to 500 mV range, targeting around 400 mV. A reading below 200 mV or near zero means the thermocouple is worn out and needs replacing. Replacement thermocouples are available for most brands and are one of the most common DIY fixes on these heaters.
Replacing the thermocouple
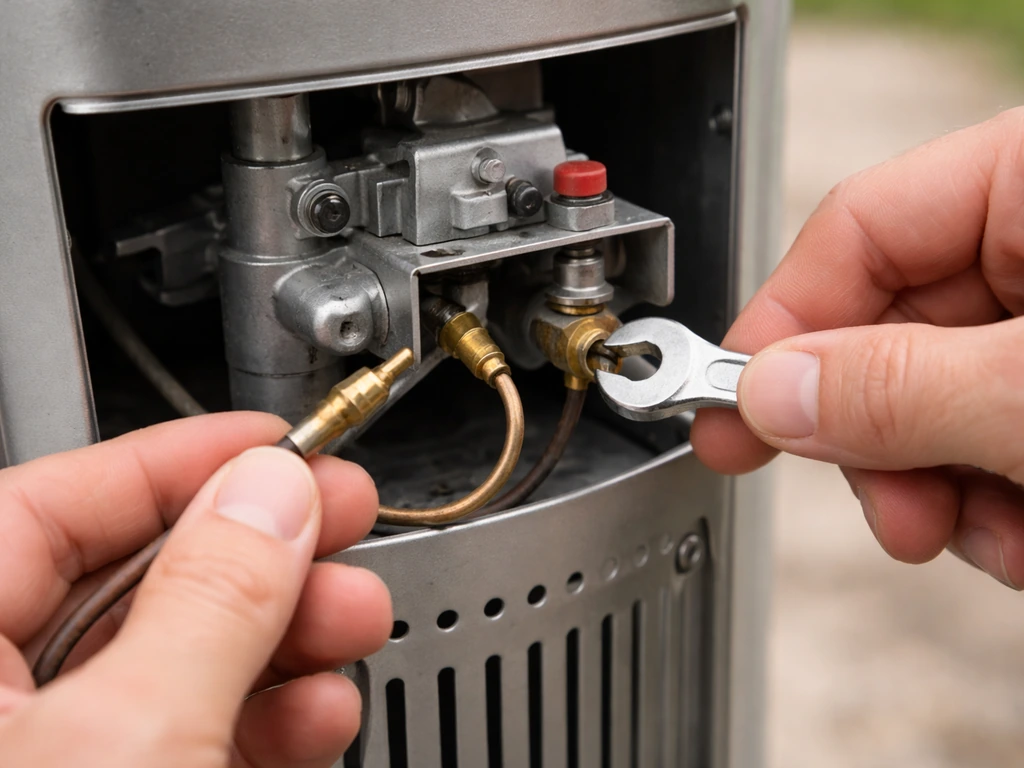
Replacing a thermocouple is straightforward on most tower and mushroom-style patio heaters. You disconnect the old probe from the gas valve connection, unscrew it from the pilot bracket, thread in the new one, and reconnect it. The key is making sure the tip of the new thermocouple sits correctly in the pilot flame path, not offset to one side. If you are unsure about the process, there is a dedicated guide on how to fix the thermocouple on a patio heater that covers the replacement step by step. For a complete, step-by-step walkthrough of replacing the thermocouple safely and correctly, follow this guide on how to fix thermocouple on a patio heater how to fix thermocouple on patio heater.
Other common failure points you should not overlook
Tilt switch (auto shutoff) problems
Most patio heaters have a tip-over safety switch that cuts gas if the heater tilts beyond a certain angle. It is a great safety feature that also causes a lot of confusion during troubleshooting. If your heater is on an uneven surface, a patio with a slight slope, or if it got nudged during setup, the tilt switch may have tripped without the heater actually falling over. Wano Co's troubleshooting guide specifically flags uneven or unstable surfaces as a trigger for sensitive tilt switches. Set the heater on a level, firm surface and try again. If the switch itself is faulty (defective tip-over switches are called out by name in Mr. Heater's replacement parts documentation), the switch needs replacing, not bypassing. Never operate the heater long-term with the tilt switch disabled.
Gas supply issues beyond the obvious
If your tank is not empty but the heater still struggles, the regulator is worth a close look. A regulator that is not fully engaged on the tank threads can cause low pressure that prevents the pilot from establishing. It can also trigger the regulator's built-in flow-limiting safety (common when you open the valve too fast), which cuts gas flow as if the tank were empty. Close the cylinder valve, wait 30 seconds, and then open it slowly to reset the regulator. If the problem keeps happening with a known-good tank, the regulator may need replacing. There is a guide on how to replace a regulator on a patio heater that covers the process.
Burner and airflow problems
Spider webs, insect nests, and debris regularly clog the venturi tube and burner ports on patio heaters that sit outside between uses. Fire Sense's troubleshooting documentation specifically notes that debris in the pilot assembly, venturi tube, and burner ports can cause the unit to not light or perform poorly. Fire Sense troubleshooting guidance for the PH08-SA also calls out “Pilot will not stay on” related to debris around the pilot, and “Burner will not light” when gas pressure is low Debris in the pilot assembly, venturi tube, and burner ports can cause the unit to not light or perform poorly.. If your pilot lights but the main burner will not establish, or if the flame is uneven and yellow instead of blue, a blocked burner is likely. With the gas off and the unit cool, remove the burner assembly and use compressed air to clear the venturi tube and ports. A soft brush works well for the ports themselves. High wind is another factor: the Patio Comfort PC02 manual lists 'high wind condition' as a cause of pilot blowout. If your heater goes out every time the breeze picks up, try repositioning it or using a wind guard if one is available for your model.
Step-by-step repair workflow
Use this sequence to work through the repair systematically. After each step, test the heater before moving to the next one. Many people skip ahead and end up replacing parts they did not need to.
- Confirm gas supply: open cylinder valve, check tank level, reseat regulator. Test ignition.
- Check for leaks: apply soapy water to all fittings with the valve open. Tighten any bubbling joints and retest.
- Level the heater and confirm the tilt switch is not tripped. Test ignition.
- Bleed the gas line: hold the control knob in pilot position for 30 seconds before sparking to clear trapped air.
- Inspect the igniter: check for spark at the electrode. Verify the electrode gap is 3 to 5 mm. Check wiring connections. Replace battery if electronic, or replace piezo unit if mechanical.
- Clean the pilot orifice and thermocouple tip: use thin wire for the orifice and fine steel wool for the thermocouple probe.
- Confirm pilot flame contact with thermocouple tip. Adjust the probe position if needed.
- Test thermocouple output with a multimeter (should read 300 to 500 mV while pilot is lit). Replace the thermocouple if output is weak or absent.
- Inspect and clean the venturi tube and burner ports with compressed air.
- If all above steps fail and gas is confirmed good, the gas valve or a combined safety valve assembly may have failed.
When to call a professional
Stop the DIY process and call a certified gas appliance technician if you smell gas at any point during troubleshooting and cannot identify the source, if a fitting leaks after being tightened and the hose or regulator appears damaged, if the gas valve itself appears to be the faulty component (valve replacement requires working directly with the gas delivery system and is beyond basic DIY scope), or if your heater is older than 10 years and you are dealing with multiple simultaneous failures. At that point the cost of parts often approaches or exceeds the cost of a replacement unit.
Maintenance tips to prevent this from happening again
Most patio heater breakdowns are preventable. The heaters that give owners the least trouble are the ones that get a quick inspection at the start of each season and are stored or covered properly when not in use.
- Clean the pilot orifice and thermocouple tip at the beginning of each season. A 10-minute clean in spring prevents most 'won't stay lit' calls in summer.
- Clear the venturi tube and burner ports with compressed air before first use each year, especially if the heater sits outside uncovered.
- Inspect the gas hose for cracks, brittleness, or kinks. Hoses degrade over time from UV exposure and heat cycling. Replace any hose that looks cracked.
- Run a soapy water leak test on all connections at the start of each season, not just when you suspect a problem.
- Cover the heater when it is not in use. A good cover keeps insects, spiders, and moisture out of the burner and venturi.
- Store propane tanks upright and in a shaded, ventilated area during off-season storage to avoid pressure fluctuations that stress the regulator.
- Check the tilt switch annually by gently tilting the heater to confirm it cuts off as expected, then confirm it resets on a level surface.
- Keep the electrode gap at 3 to 5 mm. If you notice the igniter clicking more than usual before the pilot lights, check the gap before the electrode fails entirely.
Patio heaters are genuinely repairable appliances. The vast majority of failures come down to a dirty thermocouple, a weak igniter, or a gas supply issue, and all three are well within DIY range. If the gas supply is the problem, the quickest checks are the regulator, tank valve, and for any leaks at the connections gas supply issue. Work through the steps in order, test after each fix, and you will have a clear answer on whether the problem is fixable at home or worth a call to a pro.
FAQ
What should I do first if my patio heater won’t light, but I’m not sure whether there’s a spark or not?
Do the spark test in dim light with the control knob at the pilot position, confirm whether the electrode tip produces any visible sparks, then stop. If you see no click at the piezo button or no spark at the electrode, focus on the igniter wiring or module battery, not the thermocouple.
If I get spark but no flame, is it always a gas problem?
Not always. You can also have an incorrect electrode gap or misaligned electrode tip, which leads to spark arcing in the wrong spot and the pilot not igniting. Recheck the gap and that the flame path is capable of contacting the thermocouple once the pilot lights.
How can I tell whether the pilot is lighting but I’m not holding the knob long enough?
Hold the knob down longer than you normally would, commonly about 30 seconds, while watching whether the pilot flame becomes stable. If the pilot only stays lit briefly, the issue is usually thermocouple heating, pilot flame alignment, or a partially blocked pilot orifice.
Is it safe to use a flame to check for gas leaks while troubleshooting?
No. Use the soapy water method on every accessible connection instead. If you see bubbles, tighten and retest, and do not continue operating until the leak is fixed or the hose or regulator is replaced.
Can I clean the thermocouple tip even if I can’t measure millivolts?
Yes. With the gas off and the unit fully cooled, gently polish oxidation or carbon off the thermocouple tip using fine steel wool or emery cloth. This sometimes restores output enough to stop the “won’t stay lit” behavior without replacing parts.
What millivolt reading is considered “bad,” and do I have to use a multimeter?
A typical healthy range is roughly 300 to 500 mV, with around 400 mV as a practical target. If you read under 200 mV or near zero with the pilot held, the thermocouple is likely worn. You do not need a multimeter to start, but it helps avoid unnecessary replacements.
Why does my heater work once, then fail the next time even though I didn’t change anything?
Often the regulator, tank valve connection, or air in the line is not fully settled. After closing the tank valve, wait about 30 seconds, reopen it slowly, and hold the knob at pilot long enough to purge trapped air.
What causes the main burner to stay off even when the pilot lights?
A blocked venturi tube or clogged burner ports can prevent the main burner from establishing, even if the pilot is fine. Clear debris with compressed air and inspect for a yellow, uneven flame pattern that suggests restricted airflow.
My flame looks blue but keeps going out when the wind picks up, what should I try?
Reposition the heater on a stable location and reduce airflow around it. If your model supports it, use a wind guard, and verify the venting area around the burner is not obstructed by nearby furniture or walls.
What’s the difference between a tripped tilt switch and a real tip-over?
The heater can trip its safety switch on uneven or sloped surfaces without actually falling over. Set the heater on a level, firm surface, then retry. If the heater keeps tripping on level ground, do not bypass the switch, replace the defective tilt switch if needed.
How do I know whether my igniter is piezo or electronic, and does it change the troubleshooting?
Yes. Piezo igniters usually produce a mechanical click when pressed, while electronic modules rely on a small battery. Once you identify the type, check wiring for piezo or replace the AAA battery for electronic models before assuming the ignition system is dead.
What should I check if the regulator seems loose or won’t seat properly on the tank?
If the regulator does not fully engage, it can reduce pressure and prevent reliable pilot ignition. Close the cylinder valve, wait, reseat the regulator firmly, then open the valve slowly and retest. If reseating fails with a known-good tank, the regulator may need replacement.
When is it time to stop DIY and call a technician?
Stop immediately if you smell gas, if leak bubbles persist after tightening and the hose or regulator appears damaged, or if the gas valve itself appears faulty. Also consider a pro if the heater is older than about 10 years or multiple failures occur at once.
How can I prevent “won’t light” problems from coming back each season?
Do a quick start-of-season inspection and cleaning. Clear debris from the burner area and pilot assembly, verify the heater sits on a level surface, and store it covered so insects and moisture do not clog the pilot or burner ports.