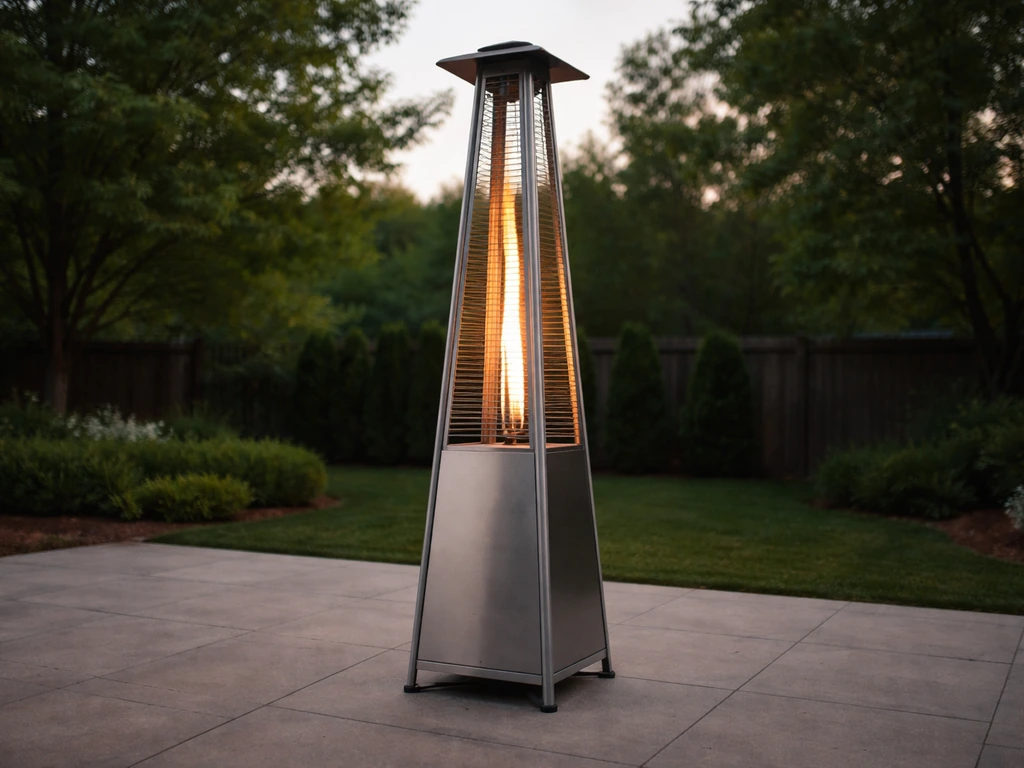
Assembling a Pamapic patio heater takes about 45 to 60 minutes if you lay out all the parts first and follow the build order from the base up. For more detailed pyramid patio heater assembly instructions, keep following the build sequence and double-check every fit before you tighten anything. The key rule: don't fully tighten any bolt until everything is in place. Do a soap-water leak check on every gas connection before you ever hit the igniter. Do those two things and you'll avoid 90% of the problems people run into after assembly.
Pamapic Patio Heater Assembly Instructions and Manual Guide

Grant Mercer
26 Jun 2026
Before you start: safety, tools, and what's in the box
Before you touch a single bolt, pick your assembly location. Pamapic specifies outdoor use on a firm, level surface with adequate ventilation. The pyramid models require at least 100 cm (about 39 inches) of clearance on all sides and above from any combustible material. That means no assembling this under a low patio cover, against a wood fence, or near anything that can catch heat. This isn't a suggestion buried in fine print, it's the number one safety requirement the manual leads with.
Gather your tools before you open the hardware bags. You won't need anything exotic, but having the right size on hand saves a lot of frustration mid-build.
- Phillips head screwdriver with a medium blade
- Adjustable wrench (one is usually included in the box as hardware item MM)
- Spray bottle filled with equal parts dish soap and water (for the leak check)
- A AAA or AA battery for the ignition assembly (check your specific model's requirement)
- The included hardware bag — count all pieces before starting
Lay every part out on a clean, flat surface and match them against the parts list in your manual. For the pyramid-style models, the box typically contains: reflector, top plate assembly, glass tube, upper support sections, protective guard, black silicone ring, side and front panels, gas hose and regulator, middle and lower plates, control box assembly, wheels, base plate, and a hardware bag with bolts, nuts, washers, and brackets. Pamapic’s listing for its Pamapic patio heater describes a wheeled propane pyramid-style setup, with wheels included with the heater components. If anything is missing or damaged, stop and contact Pamapic before proceeding. A missing silicone ring, for example, isn't something you skip over, it's a required seal for the glass tube and affects both safety and flame stability.
Step-by-step assembly from base up
The build sequence matters. Always start from the bottom and work up. Once your base is stable, you can move through the rest of the steps to assemble a Hampton Bay patio heater safely and correctly. Trying to attach the base after you've built the upper frame is a headache you don't need.
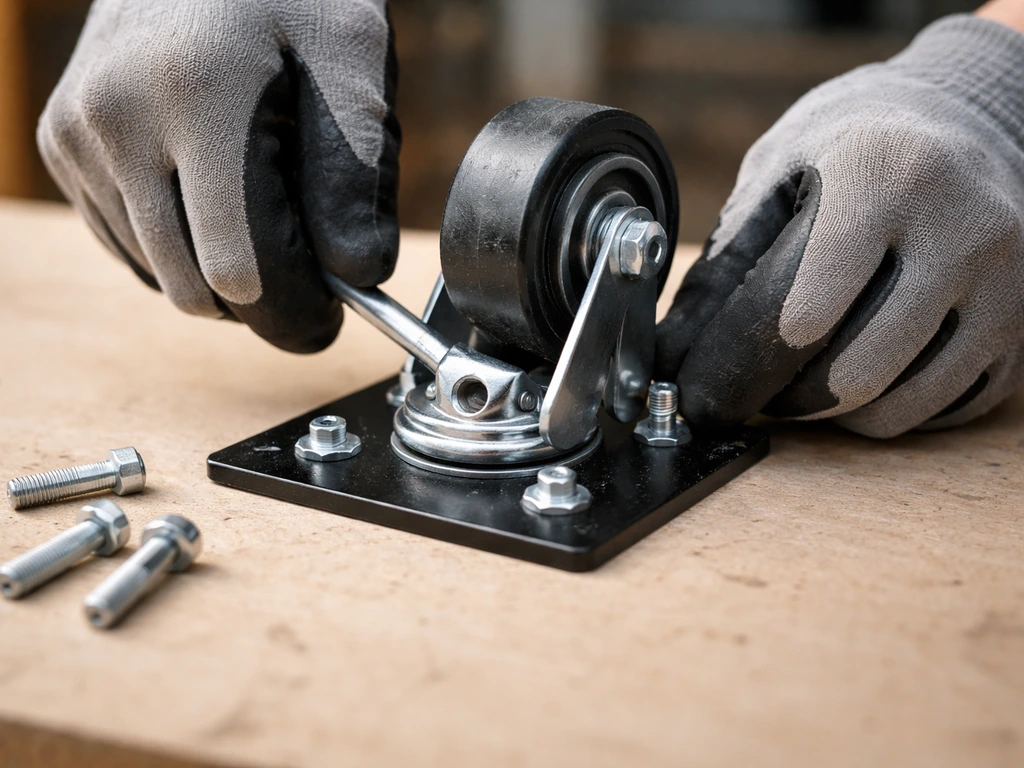
- Step 1 — Wheel assembly: Attach the wheel assembly to the bottom base plate using 4 bolts M6x10 and 4 M6 nuts. Thread each bolt finger-tight first, then snug them to about 50% torque. You'll fully tighten at the very end.
- Step 2 — Lower support posts: Insert the lower support posts into the base plate, aligning the pins with the corresponding holes. Secure with the M5x10 screws (hardware CC, 30 total across the full build) and flat washers where indicated. Again, snug but not fully tight.
- Step 3 — Middle plate: Slide the middle plate onto the lower supports. Align it carefully — if it's sitting crooked now, the upper frame sections won't line up later. Use fixing brackets (hardware GG, qty 4) with flat washers (hardware FF, qty 6) at the bracket points.
- Step 4 — Propane tank housing: Install the tank housing section around the base area. This is where the 20 lb (9.1 kg) propane cylinder will sit. Route the gas hose as directed so it isn't pinched or kinked when the tank is placed inside.
- Step 5 — Upper support sections: Attach the upper support posts from the middle plate upward, connecting each section in sequence. Most Pamapic pyramid models have two or three upper frame sections that stack. Keep all hardware at 50% tightness as you work up the frame.
The single most useful tip I can give you for this stage: Pamapic's own setup guidance says to get all bolts in place at roughly 50% tightness before you fully tighten anything. If you crank each bolt down tight as you go, the frame will fight you when you try to align the next section, and you can end up with a slight twist in the structure that makes the glass tube fit badly later.
Attaching the burner, glass tube, and reflector correctly
This is the part most people get wrong, and it's also the part most likely to cause flame problems if rushed. Take your time here.
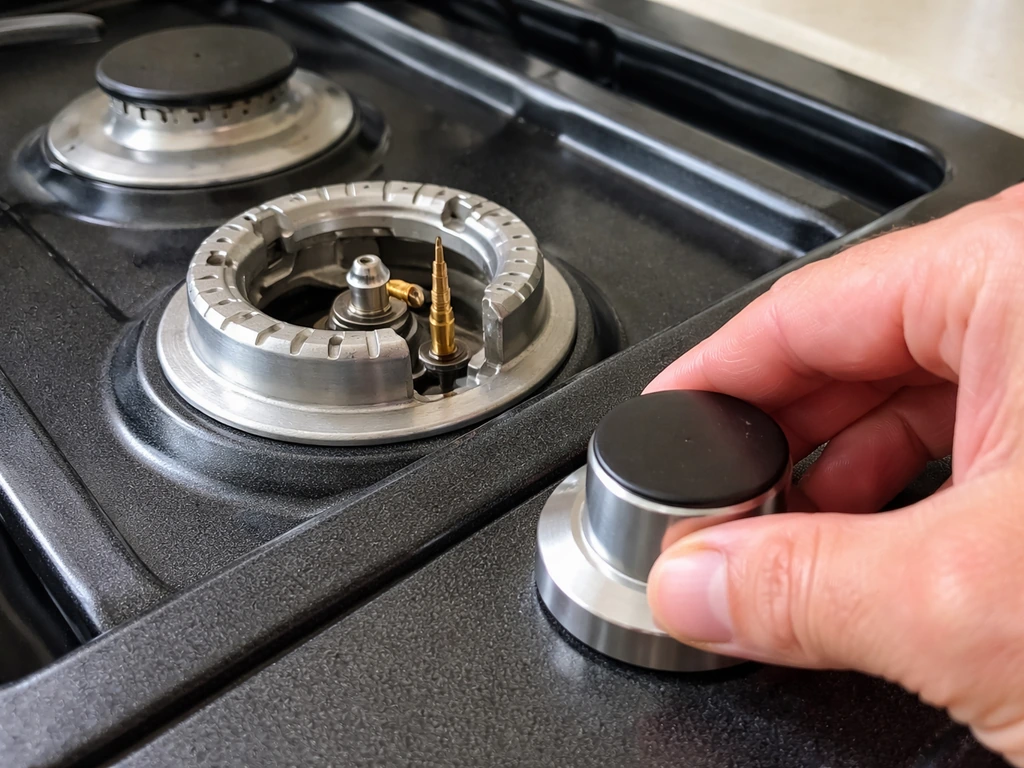
- Burner assembly: Mount the burner assembly onto the gas line routing path inside the upper frame. The gas line from the regulator must run cleanly up through the frame to the burner without sharp bends. Secure the gas line with any clips or brackets provided.
- Black silicone ring: Place the black silicone ring into the lower glass tube seat before you insert the glass tube. This ring is not optional. It creates the seal that keeps the glass tube stable and seated correctly. A missing or misplaced ring can cause the tube to vibrate, sit unevenly, or allow air drafts that kill the flame.
- Glass tube: Lower the quartz glass tube straight down into the frame, seating the bottom rim firmly in the silicone ring. The top of the tube should align with the upper tube seat. Do not force it. If it won't drop in cleanly, recheck that the silicone ring is properly seated and not bunched up.
- Protective guard: Fit the wire protective guard around the glass tube as specified in the manual. This keeps hands away from the hot glass surface during operation.
- Reflector / top plate assembly: Attach the reflector hood to the top of the frame using the designated fasteners. The reflector should sit level and centered over the burner. Tighten the reflector fasteners securely — this component sits directly above the flame and must not be loose.
Once the glass tube and reflector are in, do a visual check from eye level looking down. The tube should be centered, the burner tip should be visible at the center of the tube, and the reflector above should be level. If anything looks off-center, loosen and re-seat before moving on.
Mounting the control panel, regulator, and ignition
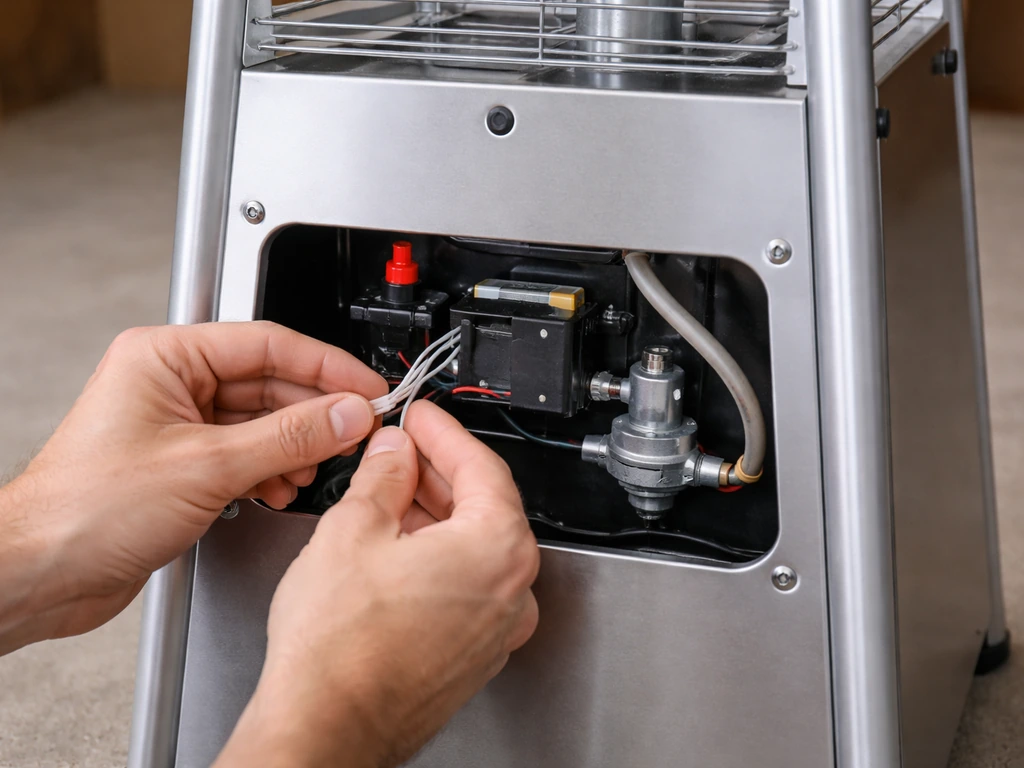
On Pamapic pyramid heaters, the control box assembly integrates with the stand rather than sitting as a completely separate external unit. Here's how to handle it correctly. For East Oak models, follow the east oak patio heater assembly instructions for the correct order and safe setup steps before first use.
- Load the battery: Before mounting the control box, open the ignition battery compartment and install the correct battery (check your manual — typically AAA). A dead or missing battery is the number one reason the igniter produces no spark after assembly.
- Mount the control box: Secure the control box assembly to the designated position on the frame, typically at mid-height for easy access. Use the screws specified in your manual and don't overtighten into the plastic housing.
- Connect the ignition wire: Route the ignition wire from the control box up to the igniter at the burner. This wire must be connected firmly at both ends. If it's loose at the burner end, you'll get no spark at all or only intermittent sparks.
- Attach the gas hose and regulator: Connect the regulator hose fitting to the control valve/burner assembly connection point inside the frame. Hand-tighten first, then snug with the wrench. Do not overtighten — the Model 8692 manual specifically says to tighten the coupling nut fully but warns against overtightening, which can damage the fitting and cause leaks.
- Panel/side panels: Attach the side panels and front panel to the frame. These are cosmetic but also protect internal components from weather. Secure all panel screws before the final tightening pass.
Gas connections and the leak check you must do before first use
This is not optional. Every time you connect a propane tank to a patio heater, whether it's the first time or after a tank swap, you need to do a soap bubble leak check. This takes about five minutes and protects you from a serious hazard.
- Make sure the control knob is in the OFF position before you connect the tank.
- Connect the regulator coupling nut to the propane tank valve and tighten clockwise until fully snug. The Pamapic manual says 'fully tightened' but also 'do not overtighten.' Firm hand pressure plus about a quarter-turn with a wrench is the right feel for most standard regulator fittings.
- Mix equal parts liquid dish soap and water in your spray bottle.
- Open the propane tank valve slowly, just one full turn. This pressurizes the line.
- Spray the soap solution generously onto every gas connection: the regulator-to-tank coupling, the hose connection to the burner assembly, and any intermediate fittings.
- Watch for 5 to 10 seconds. Bubbles forming at any connection mean gas is escaping.
- If you see bubbles: close the tank valve immediately, tighten the leaking connection, reopen the valve, and retest. Repeat until no bubbles appear.
- If bubbles persist after retightening: close the tank valve, disconnect the regulator, and do not operate the heater. Contact Pamapic support or a qualified technician before using the unit.
Never test for gas leaks with a flame or lighter. The soap solution method is the only safe approach. If you smell gas strongly at any point during setup, back away, don't operate any electrical switches nearby, and let the area ventilate before investigating.
Final tightening, placement, and the pre-light checklist
Once the leak check passes, go back through every fastener on the heater from the base up and bring them all to full tightness. This is the pass where you finish what you started at 50%. Work systematically: base plate bolts, lower support screws, middle plate brackets, upper support screws, control box screws, reflector fasteners. Don't skip the base, a loose base bolt is the most common cause of the heater feeling wobbly during use.
Before you light the heater, run through this checklist:
- Heater is on a firm, level outdoor surface (not grass, not soft soil, not a sloped deck)
- At least 100 cm clearance on all sides and above from combustibles
- Propane tank is seated properly inside the tank housing
- Gas hose is not kinked, pinched, or resting against a hot surface
- Glass tube is fully seated in the silicone ring at the bottom
- Reflector is centered and all fasteners are tight
- Ignition battery is installed in the control box
- Ignition wire is connected at both ends
- Leak check completed with zero bubbles
- Tank valve is open
- Control knob is in the OFF position before attempting to light
- No children or pets in the immediate area during first light
The Pamapic pyramid heater's tip-over safety switch will shut the unit off if it tilts beyond 45 degrees. If your surface isn't truly level, the heater may cut out unexpectedly during use. Use a small level on the base plate before first light if you're not sure about the surface.
Lighting the heater for the first time
The Model 8692 and similar Pamapic pyramid models use a pulse ignition system. If you are assembling a mainstays 7 foot patio heater, use the manual’s lighting sequence and confirm your ignition steps match the model pulse ignition system. Here's the exact lighting sequence from the manual, because getting this wrong is the number one cause of 'I can't get it to light' calls right after assembly.
- Make sure the tank valve is open and the control knob is fully in the OFF position.
- Push the control knob in and turn it to the LOW setting while keeping it pressed in.
- Press the igniter button repeatedly. You should hear and see a spark at the burner. It may take several presses — especially the first time, because air in the gas line needs to purge before gas reaches the burner.
- When the pilot flame catches, keep the control knob pressed in and hold it for 10 to 15 seconds. This is the thermocouple heat-up period. The thermocouple needs to reach operating temperature before it will hold the gas valve open.
- After that initial 10 to 15 seconds, continue holding for another 10 to 15 seconds before slowly releasing the knob.
- If the flame holds after you release, you can turn the knob to your desired heat setting.
- If the flame goes out when you release, wait 5 minutes before trying again (to allow any built-up gas to disperse), then repeat the process and hold longer on the next attempt.
If it won't light or won't stay lit after assembly: quick diagnostics
Most post-assembly ignition problems trace back to a handful of root causes. Work through these in order before assuming the unit is defective.
Won't ignite at all (no flame)
| Symptom | Most Likely Cause | What to Check/Do |
|---|---|---|
| Igniter clicks but no flame | Air in the gas line after first connect | Keep pressing the igniter for 10 to 15 seconds to purge air; try again |
| Igniter clicks but no flame | Tank valve closed or tank empty | Verify tank valve is fully open; check tank isn't empty |
| No click at all from igniter | Dead battery or disconnected ignition wire | Replace battery; check wire connection at control box and at burner |
| No click, no spark visible | Igniter tip misaligned with burner | Visually inspect igniter position; it should be close to but not touching the burner port |
| Gas smell but no ignition | Low gas pressure or regulator issue | Close tank valve, wait 5 minutes, reconnect regulator, try again |
Lights but goes out when you release the knob
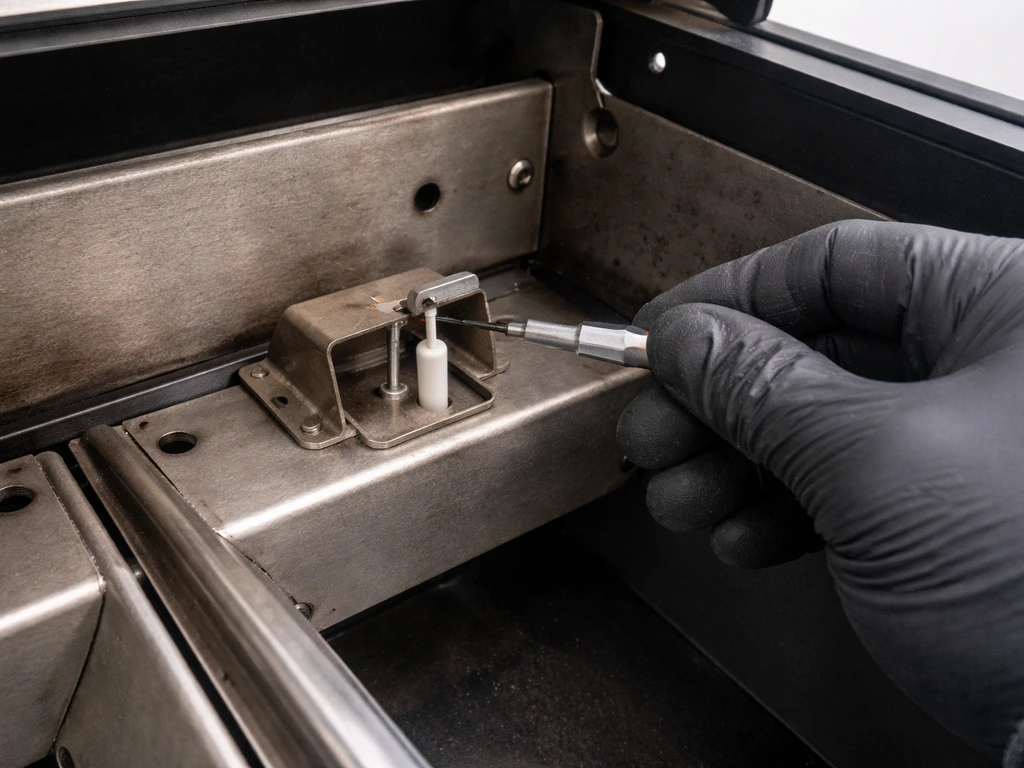
This is almost always a thermocouple timing issue, a thermocouple seating problem, or a faulty thermocouple. The thermocouple is a small probe near the pilot flame that senses heat and signals the gas valve to stay open. If it isn't getting hot enough, or isn't connected properly, the valve closes the moment you release the knob.
- Hold the knob longer: Try holding the control knob pressed in for a full 30 seconds after the pilot lights before releasing slowly. Releasing at 10 seconds is often not enough, especially in cold weather.
- Check thermocouple seating: The thermocouple tip must sit directly in the pilot flame. If the burner assembly wasn't seated correctly during assembly, the thermocouple tip may be slightly out of position. Shut off the tank, let it cool, and inspect.
- Check the thermocouple connection: The thermocouple wire connects to the gas valve. If it worked loose during assembly, the signal won't reach the valve. Ensure the connection is hand-tight.
- Inspect for a faulty thermocouple: If you've confirmed correct positioning and connections and the heater still won't stay lit, the thermocouple itself may be defective. This is a replaceable part available from Pamapic or generic suppliers. It's a reasonable DIY fix for someone comfortable working with gas appliances.
Flame goes out during normal operation
- Anti-tilt switch activated: If the heater is on a slightly uneven surface, the tilt switch can trip during operation, cutting the flame. Verify your surface is truly level.
- Anti-tilt switch loose or faulty: Check that the tilt switch assembly inside the base is firmly connected. A loose tilt switch can trigger a false shutdown even when the heater is stable. Reconnect or replace if loose.
- Low propane pressure: A near-empty tank or cold temperatures can cause pressure drops that kill the flame. Check tank level and move to a fresh tank if in doubt.
- Wind: Strong gusts can extinguish the pilot. Reposition the heater with its back to prevailing wind, or use a windbreak.
A note on when to stop DIYing
If you've confirmed a persistent gas leak that won't seal with tightening, or if the regulator is damaged, stop and don't use the heater. These aren't assembly issues you can work around, they require a replacement part or a service call. Similarly, if you smell gas while the heater is running and can't identify the source, shut off the tank valve and move the unit away from any ignition sources before investigating. Patio heaters are repairable appliances, but gas leaks are the one area where the right call is to pause and get proper help rather than push through.
If you're working through assembly on a different brand, the process is broadly similar but does vary in hardware layout and control positioning. Other popular pyramid-style builds follow comparable step sequences, so the base-up assembly logic and leak-check discipline apply across the board even when the specific bolt sizes and part names differ.
FAQ
What if a part is missing or looks slightly different from the diagram, can I continue the pamapic patio heater assembly anyway?
Don’t rely on the box label alone, use your manual’s part list to confirm you have the black silicone ring and that the glass tube hardware matches your model. If the ring is missing or the tube is cracked, stop, because skipping it can cause both poor flame stability and heat leaks that won’t show up on a quick visual check.
If I notice the frame is a little crooked while building, should I start over or loosen something specific?
Yes, but only before the first full tightening pass. First, keep every bolt at about 50% tightness while you align sections, then tighten in the order described (base, lower, middle, upper, control box, reflector). If you fully tighten early and later discover a misalignment, loosen the minimum number of fasteners needed to re-seat the misfit section.
My Pamapic heater is assembled, but it won’t ignite consistently, what should I check first?
Before you test igniter behavior, confirm the burner tip is actually visible at the center of the glass tube and the tube is seated correctly. After that, verify the control box is mounted in the correct stand order for your model family, because a mispositioned control box can make ignition steps fail even when gas is flowing normally.
How do I diagnose a thermocouple problem after pamapic patio heater assembly?
If you suspect a thermocouple issue, you usually need to focus on placement and heat contact, not just tightening. Re-seat the thermocouple probe so it sits properly near the pilot flame, then try lighting again and watch whether it stays open after you release the knob long enough to build heat.
I have a model with pulse ignition, what mistake usually causes repeated no-start attempts after assembly?
A pulse ignition system often depends on repeated step timing, not just pressing the igniter once. Follow the model’s lighting sequence exactly for your unit type, and if it fails, don’t keep cycling rapidly, pause and re-check that everything is seated (tube, reflector, control box wiring position) before trying again.
What should I do if I smell gas while assembling or right after connecting the propane tank?
If you smell gas during setup, immediately shut off the propane tank valve, move the heater away from ignition sources, and ventilate the area before investigating further. Do not use switches, and don’t attempt to fix the issue while gas is still present.
Is it okay to check for leaks with a lighter if the heater is already assembled?
Don’t use a flame to detect leaks, use soap bubble solution on every gas connection. If bubbles appear and tightening doesn’t stop them, stop using the heater, because that indicates a sealing problem at the connection point or a damaged component like a regulator that needs replacement.
Why does my heater shut off during use even though it ignites?
If the heater shuts off unexpectedly, start with the surface level. Use a small level on the base plate, because the tip-over safety switch can trigger at more than about a 45 degree tilt, even if the heater looks level from a distance.
Can I assemble the Pamapic patio heater on a patio with a partial cover or near a wooden fence?
Don’t assemble or operate it under a low cover or near combustibles like wood fencing. Use the manual’s clearance requirements on all sides and above, and make sure the assembly surface is firm and level with ventilation, because restricted airflow can worsen combustion and heat buildup.
Do I need to do a full leak check after every propane tank swap?
For any tank swap after installation, repeat the same discipline: connect the tank, then do the soap bubble leak check on the gas connections before you attempt to ignite. Even if the last connection was fine, gasket wear and small alignment changes happen every time.
Can I substitute a different seal if the Pamapic silicone ring is not available?
If you’re missing an item like the silicone ring, don’t “make do” with silicone sealant or substitute parts. The silicone ring is a required seal for the glass tube, and substitutes can alter fit and flame behavior, increasing risk and causing persistent performance issues.