To use your East Oak patio heater manual correctly, you first need to match your exact model number to the right document, because East Oak publishes several different manuals across model families like the UR50BN3/UR50BK3/UR50SR1, the Firecove line (EO-PH001, EO-PH22002 through EO-PH22004), the Firehut (EO-PH22005), and the TORCHSY Mini Tower (EO-PH22007, EO-MPH22017, EO-MPH22018). For help locating the correct Nexgrill patio heater manual for your exact model, use the model number label and match it to the right document. If you need to confirm the exact steps for your AZ Patio Heaters model, follow the az patio heaters manual instructions before operating. Using the wrong manual is a real risk since these heaters look nearly identical on the outside but differ in gas valve sequences, ignition wiring, and parts. Once you have the right document, everything from assembly to lighting to thermocouple diagnosis becomes straightforward.
East Oak Patio Heater Manual: Setup, Safety, and Troubleshooting

Find the exact East Oak model and the right manual
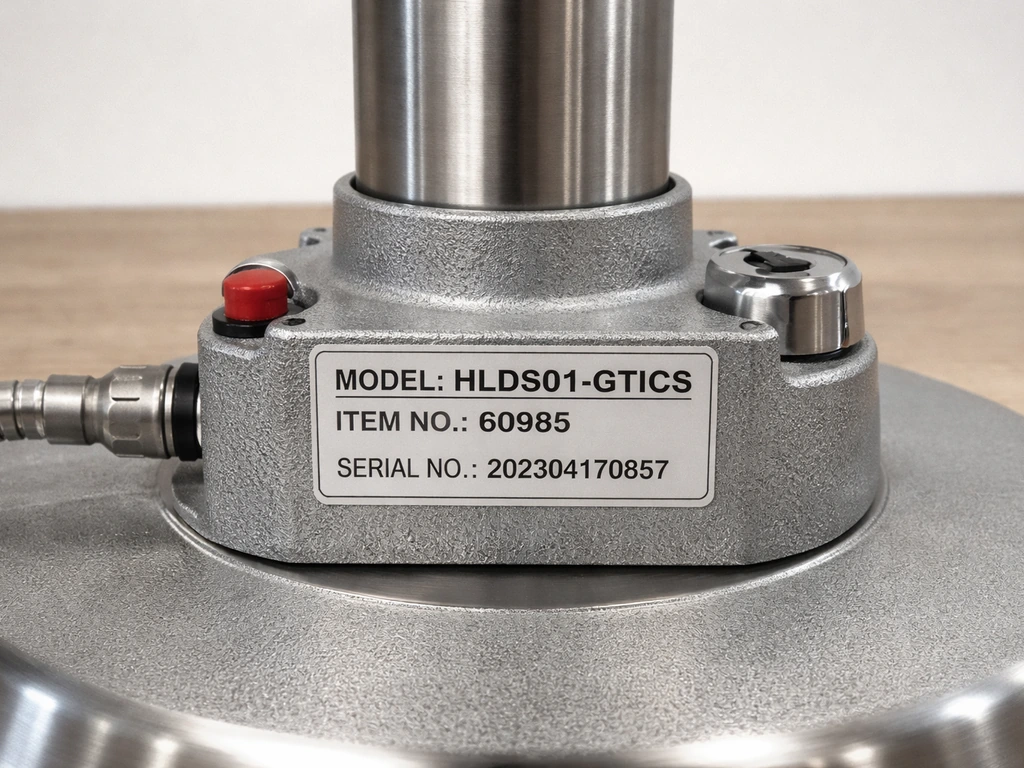
The model number is almost always on a label affixed to the base pole or the regulator housing, not the box. Flip the heater base up or look at the back of the lower pole section. You are looking for a string like EO-PH22005 or UR50BN3. Write it down exactly, because even one digit different (EO-PH22004 vs. EO-PH22005) means a different manual family.
East Oak hosts PDF manuals at eastoak.com, usually under a support or manuals section. Search for your model number directly. If the site returns nothing, try searching Google for your model number followed by 'owner's manual PDF' or check ManualsLib, which mirrors most East Oak documents. The East Oak product page for the TORCH 55,000 BTU propane patio heater includes a “Download User Manual” option on the page East Oak TORCH 55,000 BTU Propane Patio Heater with Round Table. When you open the manual, verify the model number appears on the cover page. Each East Oak manual lists the specific model codes it covers right at the top, so cross-reference yours before reading any further.
Here is a quick reference to the main East Oak model families and their corresponding manual groupings:
| Model Family / Name | Model Numbers Covered | BTU Output |
|---|---|---|
| UR50 Series | UR50BN3, UR50BK3, UR50SR1 | 50,000 BTU |
| TORCH Firecove | EO-PH001, EO-PH22002, EO-PH22003, EO-PH22004 | 50,000 BTU |
| TORCH Firehut | EO-PH22005 | 50,000 BTU |
| TORCHSY Mini Tower | EO-PH22007, EO-MPH22017, EO-MPH22018 | 11,000 BTU |
One thing to know: a single manual often covers multiple SKUs that differ only in finish or color. The UR50 manual, for example, applies equally to the bronze (UR50BN3), black (UR50BK3), and stainless (UR50SR1) versions. If your model ends in a letter variant but the root number matches, you are in the right document. Do not assume the manual from the box is wrong just because it lists more than one model code.
If you genuinely cannot find your manual and the model label is worn off, you can usually identify the family by the heater's physical design: the Firehut/EO-PH22005 has a distinctive mushroom-cap emitter, the Firecove series has a tapered reflector hood, and the TORCHSY is noticeably shorter and lighter than the full-size 50,000 BTU tower units. When in doubt, contact East Oak support directly with a photo of the unit and the serial number.
How to use the manual safely before you do anything
Read the Safety Guide section of your specific manual before touching the propane tank. This is not a formality. East Oak's safety sections carry specifications that directly affect whether your setup is safe, and some of those numbers are model-specific. For example, the EO-PH22005 manual explicitly states the maximum supply pressure is 11 WC (inches of water column). Running a regulator that delivers higher pressure than rated can cause uncontrolled flame or valve damage.
There are a few safety rules that apply across every East Oak model, and your manual will reinforce all of them:
- Never use a flame or lighter to check for gas leaks. Your manual states this explicitly, and it can cause a flash fire or explosion. Use only soapy water.
- Do not store gasoline, flammable liquids, or anything with flammable vapors near the operating heater.
- Keep combustion air pathways and ventilation openings clear of debris, leaves, and obstructions.
- Always perform leak tests outdoors in a spacious, open area with no open flames or flammable items nearby.
- Use a propane tank with a protective collar around the gas valve, as specified in the EO-PH22005 manual, to prevent valve damage during transport or tipping.
- Let the heater cool completely before moving it, covering it, or performing any maintenance.
The manual's Safety Guide is also where you will find clearance requirements from walls, overhangs, and combustibles. Do not skip those measurements. A heater that looks fine in a covered patio may be too close to the ceiling per the spec in your manual. Check every table in that section before you run the heater for the first time.
Assembly and first-start checklist
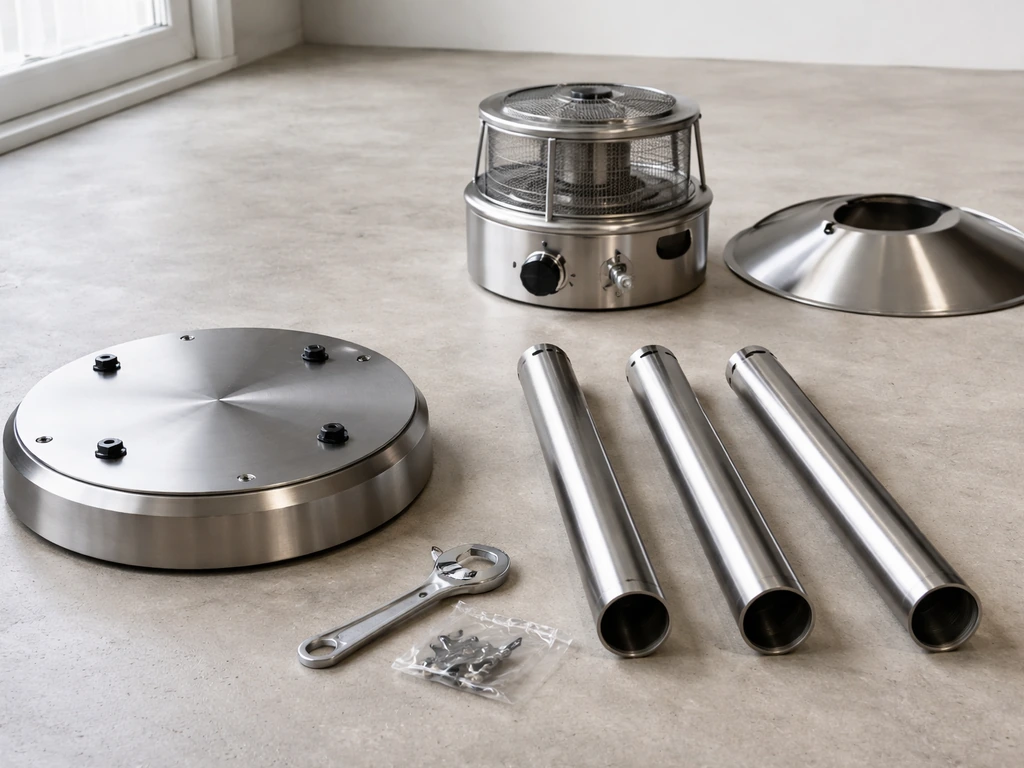
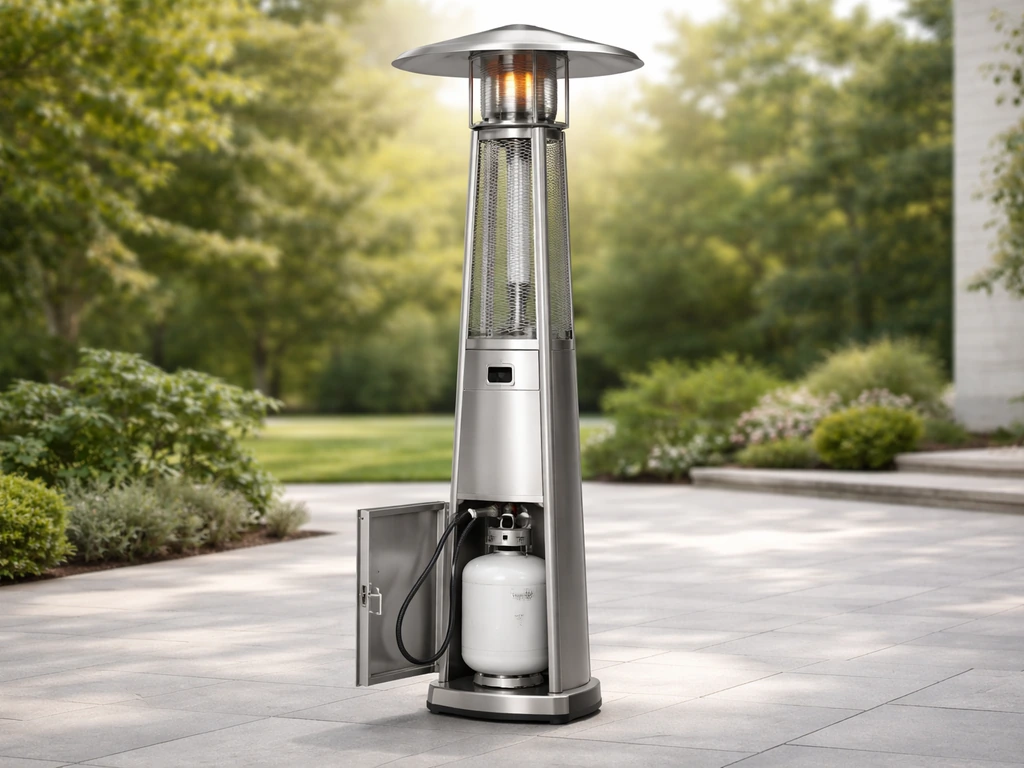
East Oak tower heaters ship disassembled in several sections: the base, the lower pole, the middle pole, the upper burner/emitter assembly, and the reflector or hood. Your manual's assembly diagram will show numbered call-outs for every bolt and the correct orientation of each section. Follow the numbered sequence in your manual exactly, since the order matters for threading the gas line through the pole sections cleanly without kinking the hose.
Once the heater is assembled, work through this checklist before connecting the tank:
- Confirm all pole sections are fully seated and hardware is snug, not just hand-tight. Check your manual's torque guidance if listed.
- Verify the reflector or emitter hood is correctly oriented per the assembly diagram, usually secured with a set screw or locking pin.
- Inspect the gas hose for any kinks, pinch points, or abrasion marks from assembly. A damaged hose is a replacement, not a 'good enough' situation.
- Connect the regulator to the propane tank hand-tight, then an additional quarter turn with a wrench. Do not over-tighten.
- Open the tank valve slowly and perform a soap-and-water leak test on every connection: regulator-to-tank, hose connections, and valve inlet. Apply the solution with a brush or cloth, then watch for bubbles. No bubbles means no leak.
- If any connection shows bubbles, close the tank valve immediately, depressurize by briefly opening the burner valve, then re-seat and re-tighten the leaking connection. Repeat the leak test.
- Once leak-free, close the burner control valve and proceed to the lighting steps.
On the first ignition, the EO-PH22004 manual notes that some initial odor and minor smoke is normal as manufacturing residues burn off the emitter screen. This clears within a few minutes of operation and is not a malfunction. The manual also notes the expected flame color is blue, so if you see a stable blue flame at the burner head, the unit is operating correctly.
Lighting, ignition, and normal operation steps
The ignition sequence on East Oak's 50,000 BTU tower heaters follows a consistent pattern across most model families. Here is the procedure as documented in the EO-PH22004 manual, which is representative of the full-size Firecove and Firehut series:
- Confirm the control knob is in the OFF position.
- Open the propane tank valve fully by turning it counterclockwise.
- Allow gas to flow for 3 to 5 seconds to purge air from the line.
- Press and turn the variable control knob to the HI position. You will feel a detent click.
- While holding the knob depressed in the HI position, press the igniter button repeatedly, several times in succession, until the burner head flame ignites.
- Continue holding the control knob depressed for approximately 30 seconds after ignition to allow the thermocouple to heat up and hold the valve open.
- Once the flame is stable, release the knob. If the flame goes out when you release, the thermocouple has not reached operating temperature. Press and hold again and repeat the 30-second hold.
- After a stable flame is confirmed, adjust the control knob to your desired heat output between HI and LO.
To shut the heater off, turn the control knob to OFF, then close the tank valve by turning it clockwise. Always close the tank valve when the heater is unattended or stored. This prevents slow gas seepage through the valve seat over time.
If the flame is blown out by wind mid-operation, do not immediately try to relight. The EO-PH22004 manual is explicit on this: turn the control knob to OFF, close the tank valve, and wait a minimum of 5 minutes before repeating the full lighting sequence. This wait period lets any accumulated unburned gas disperse. Skipping it risks a gas pocket ignition when you next try to light.
Troubleshooting: won't ignite or won't stay lit
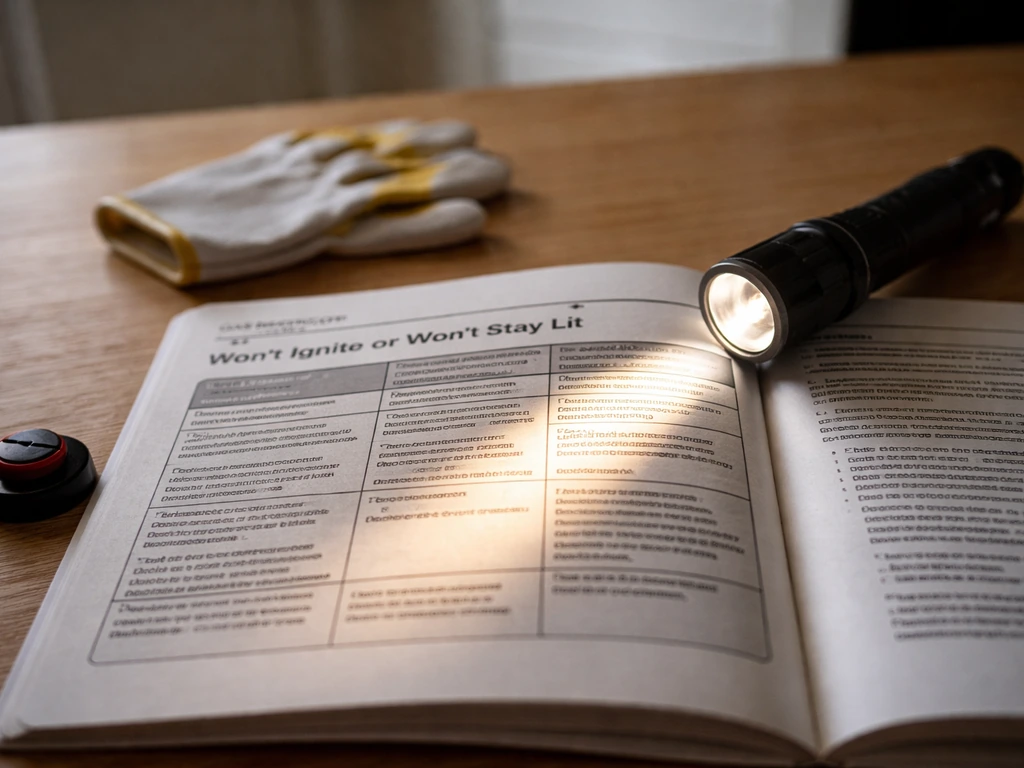
This is the most common complaint with East Oak heaters, and the manual's troubleshooting table is actually pretty useful here once you know how to read it. Start with the simplest cause and work toward the more complex ones.
Heater won't ignite at all
- Tank is empty or valve is closed: Check tank weight and confirm the valve is open. Obvious, but it is the first thing to rule out.
- Air in the gas line: If the tank is new or was recently reconnected, purge the line by holding the control knob at HI for 5 seconds before attempting ignition. The first few igniter clicks may produce nothing if air is still in the hose.
- Igniter electrode is dirty or misaligned: Look through the burner head opening. The electrode tip should be positioned close to (but not touching) the burner, typically 3 to 5mm gap depending on the model. Carbon buildup on the tip prevents sparking. Clean with a dry toothbrush or fine emery cloth.
- Clogged burner injector: The EO-PH22005 troubleshooting table specifically lists a clogged burner injector as a cause of no ignition. The injector is the small brass orifice inside the burner venturi tube. Remove it per your manual's parts diagram, and clear the hole with compressed air or a thin wire. Never enlarge the hole.
- Low gas supply pressure: If the regulator is faulty or the tank is nearly empty in cold weather (propane vaporization slows significantly below 20°F), pressure may be too low to sustain flow. The EO-PH22005 manual says to call your gas supplier if low pressure is suspected. Swap the regulator first if other causes are ruled out.
- Igniter battery dead (on models with battery-powered ignition): Some East Oak models use a AA or AAA battery in the igniter module. Check your manual's parts section for battery location and replace it.
Heater ignites but won't stay lit
If the flame lights but dies when you release the control knob, the thermocouple is almost always the culprit, and that is covered in detail in the next section. But before going there, check these first:
- Not holding the knob long enough: The thermocouple needs heat to generate the millivolt signal that holds the gas valve open. You need to hold the knob depressed for a full 30 seconds after ignition. Many people let go too early.
- Flame is lighting but blowing off the thermocouple tip: In windy conditions, the flame may ignite but get deflected away from the thermocouple. Even a partial shield around the burner helps. Check your manual for any wind-guard assembly steps you may have skipped.
- Delayed ignition causing a weak initial flame: The EO-PH22005 manual notes delayed ignition as a distinct condition in the troubleshooting section. If gas pools before igniting, the weak pop that follows may not create enough sustained flame to heat the thermocouple. The fix is to reduce the pre-ignition gas purge time and attempt ignition sooner.
Troubleshooting: tilt switch, safety shutoff, and thermocouple issues
Tilt switch and auto-shutoff
East Oak tower heaters include a tilt-activated safety shutoff. When the heater leans past a set angle (typically around 30 to 45 degrees from vertical depending on the model), the tilt switch opens the circuit and cuts gas flow. This is a deliberate safety feature, and it works even when the heater is only slightly off-level.
If your heater keeps shutting off unexpectedly, start here:
- Check the surface the heater sits on. Even a gentle slope on a deck or patio can trigger the tilt switch over time, especially as the propane tank drains and the base gets lighter.
- Look at the base wheel casters. If one caster is rolled up on a crack or raised board edge, the heater may be sitting at a slight angle. Move the unit to a flat surface and test.
- Inspect the tilt switch itself, which is usually a small weighted pendulum or ball-bearing switch mounted inside the lower pole assembly. Check your model's parts diagram in the manual to locate it. A stuck or corroded switch can trigger false shutoffs even when the heater is perfectly vertical. Gently tap the housing and try relighting. If the flame holds, the switch is sticking and needs replacement.
- Do not bypass or disable the tilt switch. It is a life-safety device. A replacement switch costs a few dollars and is available from East Oak's parts page or third-party suppliers using your model number.
Thermocouple failures
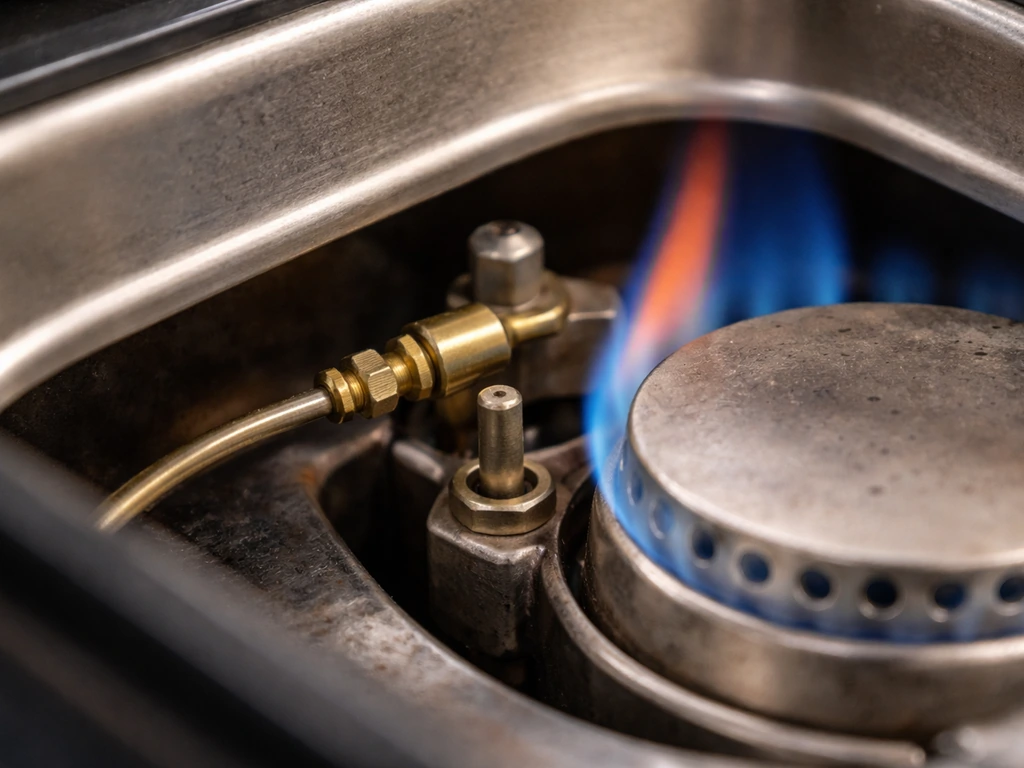
The thermocouple is a small probe positioned in the burner flame that generates a tiny electrical current when heated. That current holds the gas safety valve open. When it fails, the valve closes and the heater shuts off the moment you release the control knob. This is by design, so a failed thermocouple is not a gas valve problem. Do not replace the valve until you have confirmed the thermocouple is at fault.
Here is how to diagnose it:
- Hold the control knob down for the full 30 seconds after ignition and see if the flame holds on release. If not, proceed.
- Visually inspect the thermocouple tip position. It must be sitting directly in the burner flame, not beside it. Carbon buildup on the tip insulates it and reduces its output. Clean the tip with fine sandpaper or steel wool until the metal is bright.
- If cleaning does not help, test the thermocouple output with a multimeter set to millivolts. With the flame heating the tip for 60 seconds, you should read between 15 and 30 millivolts across the thermocouple leads. Below 10 millivolts means the thermocouple is weak and should be replaced.
- Thermocouple replacement requires matching the thread size and length. Check your model's parts list in the manual for the correct spec. East Oak thermocouples are generally standard M8 or M9 threaded connections and are available as universal replacements.
- After installing a new thermocouple, reconnect carefully and repeat the full leak test before operating the heater.
If you replace the thermocouple and the heater still will not stay lit, the gas valve itself may have a faulty solenoid or seat. At that point, the repair cost starts to approach heater replacement cost, so get a parts quote before ordering. This is also a good time to consult East Oak support with your model number.
Maintenance and parts replacement: using the manual as your guide
Your East Oak manual contains a parts diagram and, in most model manuals, a maintenance or care section. Use the parts diagram as your reference whenever you order a replacement component. The part names and positions shown there are how East Oak's support team identifies components, so using the same terminology avoids ordering errors. THDstatic hosts an “EAST OAK PATIO HEATER” owner’s manual PDF that includes warranty and support contact information East Oak's support team identifies components.
For seasonal maintenance, work through this routine at the start and end of each heating season:
- Inspect the burner screen for rust, holes, or debris blockage. A damaged screen affects combustion quality and can cause uneven or lifting flames. Clean with a dry brush; replace if the mesh is compromised.
- Clear the venturi tube opening (the air intake at the base of the burner assembly) of spider webs and insects. This is a well-documented problem with propane heaters stored outdoors. A blocked venturi restricts air mixing and causes a yellow, sooty flame.
- Check the gas hose for cracking, brittleness, or abrasion. Propane hoses degrade from UV exposure. If the hose shows any surface crazing or visible cracking, replace it before operating the heater.
- Clean the reflector hood with a damp cloth. Built-up grease or carbon on the reflector reduces heat output efficiency and can produce odors.
- Test the tilt switch annually by intentionally tipping the heater past 45 degrees during a low-flame operation and confirming it shuts off. If it does not shut off, the switch is faulty and must be replaced.
- Re-perform the full soap-and-water leak test on all connections at the start of every season, even if you stored the heater connected.
For parts ordering, your manual's exploded parts diagram is the most reliable starting point. Most East Oak replacement parts (thermocouple, igniter electrode, regulator, tilt switch, burner screen) are available directly from eastoak.com using the model number. Third-party universal parts will often work for thermocouples and regulators, but always verify thread pitch and hose length against your manual's specifications before purchasing.
East Oak heaters are genuinely repairable appliances. Most failures, including thermocouple wear, igniter electrode fouling, and clogged injectors, are straightforward fixes that cost well under $20 in parts. The key to getting the right repair the first time is staying in your specific manual throughout the process, not guessing based on a similar-looking unit. If you have worked through other brands before, the process here is similar to what you might see with Fire Sense, AZ Patio Heaters, or Nexgrill heaters: the underlying propane safety system is consistent across the industry, but the valve sequences, igniter placement, and part thread specs vary enough that model-specific documentation always matters.
FAQ
Where exactly should I look for the East Oak model number if the base label is missing or faded?
Check the regulator housing and the back side of the lower pole section, then also look for a serial plate on the frame near the propane connection. If the label is truly gone, photograph the burner head, emitter style, and the regulator fitting, and provide the serial number to East Oak support to map you to the correct manual family.
Can I use a different East Oak manual if my model number differs only by the last digit or color suffix?
Often the manual covers multiple finishes, but the safe rule is to match the full code exactly (for example, EO-PH22004 vs EO-PH22005 can be different in valve sequence or gas pressure specs). If the manual cover list includes your exact root code, you can use it, otherwise do not guess based on appearance or BTU rating.
What should I do if I smell gas after setup, before lighting?
Stop immediately, turn the control knob to OFF, and close the tank valve. Do not attempt ignition, then leak-check all connections (regulator to tank and hose-to-regulator). If you cannot confirm the leak source, move away from ignition sources and contact support or a qualified gas technician.
Is initial odor and smoke always normal on the first ignition?
A brief burn-off odor or minor smoke can be normal, but it should subside within a few minutes and not keep escalating. If the flame pattern remains wrong, the heater repeatedly cycles, or the smell is strong enough to cause coughing, shut it down and re-check burner cleanliness, seating of the emitter screen, and correct assembly orientation.
How can I tell whether my blue flame is correct if my flame looks smaller or partially orange?
A stable blue flame at the burner head is the baseline. Small variations can occur with low gas flow or wind, but persistent orange, excessive soot, or flame lifting usually indicates airflow or burner clogging issues (such as a dirty injector or misaligned reflector). Clean the components per the manual and verify regulator rating before further attempts.
What is the correct wait time after a wind-blown flame before trying to relight?
Wait at least 5 minutes, with the control knob OFF and the tank valve closed, before starting the full lighting sequence again. The goal is to let any unburned gas disperse to reduce the risk of a gas pocket igniting.
My heater lights but goes out when I release the knob, can it still be a gas valve issue?
The most common cause is a failing thermocouple, because it is what keeps the safety valve open when heated. However, if you confirm the thermocouple is positioned correctly in the flame and replacing it does not solve the problem, the next suspect is the gas valve solenoid or seat, at that point you should price parts against the manual’s diagram and consider support.
How do I verify the tilt safety shutoff is working without causing repeated shutdowns during normal use?
Start with stable placement on level ground, then gently check that the heater is not leaning beyond the manual’s tilt threshold. If it trips easily, review assembly tightness and base pole alignment because a slightly misassembled pole can trigger the tilt switch even when the heater looks mostly upright.
Should I ever replace the entire gas valve when the heater will not stay lit?
Not right away. First diagnose thermocouple function and placement, because valve replacement costs quickly rise and is often unnecessary. Replace parts in the order your troubleshooting table indicates, and only move to the valve after confirming the thermocouple tests out and the wiring connection is secure.
Can I use universal thermocouples or regulators as replacement parts?
Sometimes, but confirm thread pitch, connector type, and required hose length or routing as specified in your manual. Universal parts that fit loosely or do not match the regulator output rating can lead to improper flame behavior or safety shutoffs.
What maintenance should I do at the start of the season if my heater worked last year?
Inspect the burner head and emitter screen for debris, check that the igniter electrode is clean and properly gapped or positioned per the manual, and verify the injector area is not clogged. Also confirm all fasteners and pole sections are assembled in the correct order so gas flow and ignition alignment are preserved.
How should I store the heater during off-season to prevent valve seepage or damage?
Turn the control knob OFF and close the tank valve completely before storage. Store the heater covered and upright if the manual allows it, and keep the regulator and hose protected from water intrusion that can affect ignition performance.