Getting a patio grill set up correctly comes down to four things done in the right order: place it safely, assemble it completely, connect fuel and check for leaks, then do a controlled first ignition before you put any food on. Skip any of those steps and you either end up with a grill that won't light or, worse, one that isn't safe to run. This guide walks you through every step for gas (propane and natural gas) and charcoal grills, with troubleshooting built in so that if something goes wrong on the first try, you know exactly what to check next.
Patio Grill Setup Checklist: Assemble, Connect, Test Safely

Grant Mercer
7 May 2026
Choose the right grill type and pick your spot
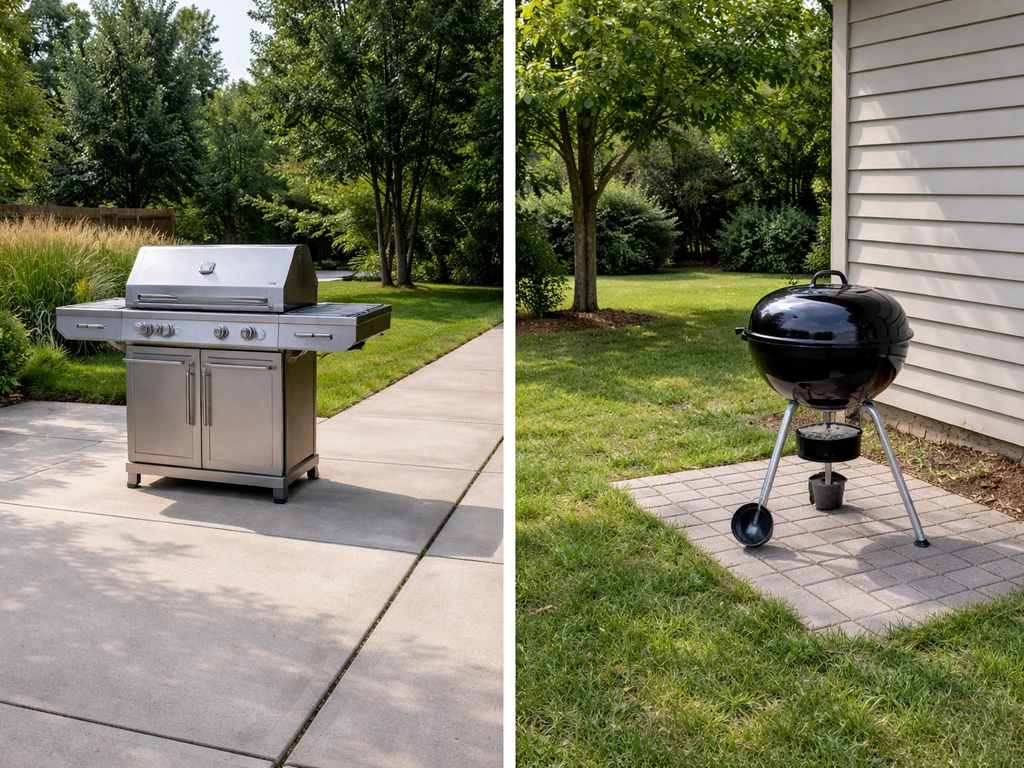
Before you open a single box, decide which type of grill you're working with, because placement rules and safety margins differ between them. Gas grills (propane or natural gas) need more clearance from structures than most people expect. The U.S. Consumer Product Safety Commission requires at least 10 feet of separation between the grill and any building or structure. That means 10 feet from the house wall, the fence, and anything overhead. You also cannot run a gas or charcoal grill under a roof, overhang, carport, breezeway, covered porch, or any surface that can catch fire. Even a pergola with partial coverage counts. If your planned spot has a roof of any kind above it, move the grill.
Charcoal grills carry a different but equally serious risk: carbon monoxide. Burning charcoal produces CO at levels that can be lethal indoors or in semi-enclosed spaces, so outdoor-only placement with full open-air ventilation is non-negotiable. For both grill types, clearance to combustibles on the sides matters too. Napoleon's safety guidance calls out lateral clearance to combustibles as a specific factor, not just front-to-back distance from the house.
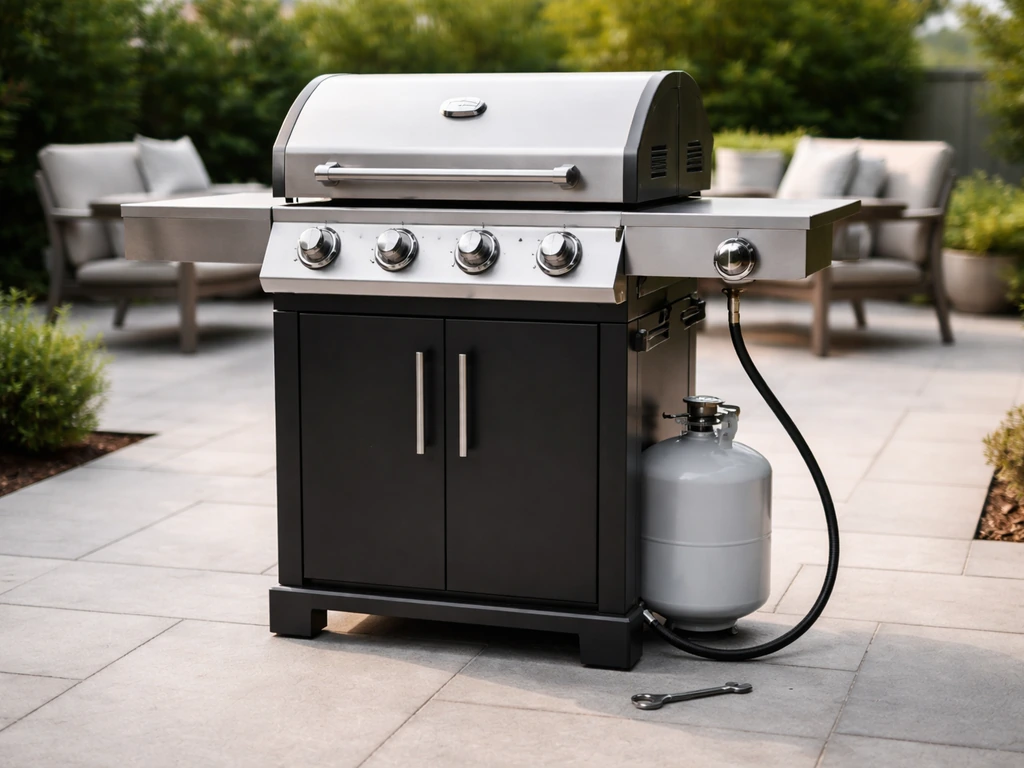
Once you've confirmed the location is safe, check the surface. Gas grills need a stable, level, non-combustible surface. A concrete patio or paver pad is ideal. Wooden decks are common but add risk, especially with charcoal. If you're on a wood deck, use a grill mat rated for your grill type and keep a fire extinguisher nearby. Make sure all four legs or casters are fully contacting the surface and that the grill doesn't rock.
| Grill Type | Min. Clearance from Building | Overhead Coverage Allowed? | Indoor/Garage Use Allowed? | Carbon Monoxide Risk |
|---|---|---|---|---|
| Propane gas | 10 feet | No | Never | Low (if outdoors) |
| Natural gas | 10 feet | No | Never | Low (if outdoors) |
| Charcoal | 10 feet+ | No | Never | High — outdoor only |
Tools, unboxing, and assembly order
Most gas grills ship partially assembled, and the order in which you put things together matters. Doing it out of sequence often means you have to backtrack, which leads to stripped bolts or skipped steps. Gather everything you need before you start.
- Phillips and flathead screwdrivers (most grills use both)
- Adjustable wrench and a set of open-end wrenches (typically 3/8" to 9/16")
- Needle-nose pliers (useful for cotter pins and small clips)
- Dish soap and water in a spray bottle (for the leak check)
- A level (a phone app works fine)
- Thread-seal tape (PTFE/gas-rated) if your natural gas fitting isn't pre-taped
- The assembly manual — download it from the manufacturer's site if it's missing
Unbox everything and lay parts out on a tarp before you start. Cross-check against the parts list in the manual. Missing a bolt now is far less frustrating than discovering it halfway through assembly. The general assembly order for a freestanding gas grill is: frame and leg assembly first, then firebox attachment, then internal components (burner tubes, flame tamers or flavorizer bars, cooking grates), then external components (side shelves, handle, lid, warming rack), and finally the control panel and igniters. Igniters go in last because they're fragile and easy to damage if the grill is being moved around during assembly.
When you install burner tubes, make sure each tube's inlet port slides over the corresponding valve orifice. This is the most commonly skipped alignment step, and misaligned burners are a leading cause of low flame and ignition failure on new grills. You should feel the tube seat firmly with no gap between it and the orifice. Secure the burner with its retention clip or screw before moving on. Flavorizer bars or flame tamers go in next, angled side down, overlapping like roof shingles so grease drains to the drip tray rather than pooling on the burners.
Fuel hookup and leak checks
Connecting a propane tank
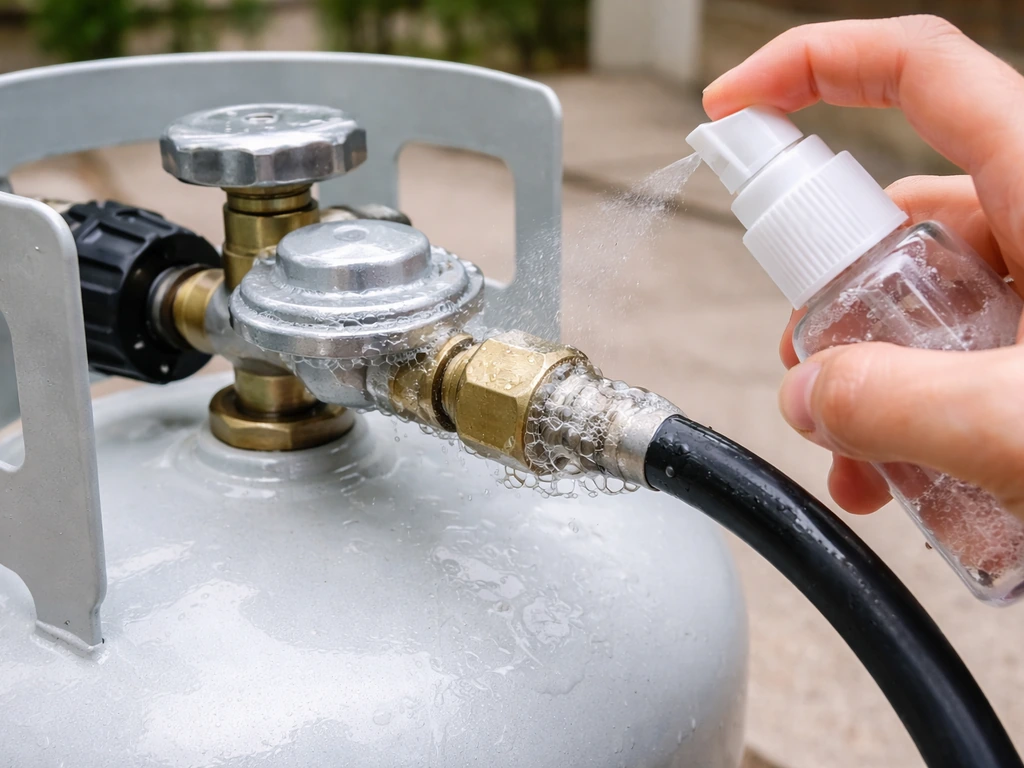
Make sure all burner control knobs are in the OFF position before you touch the tank. Connect the regulator fitting to the tank valve by hand-tightening it clockwise (propane fittings are reverse-threaded, so "righty-loosey" applies to removal, not tightening). Tighten with a wrench until snug, but don't over-torque the connection. Open the tank valve slowly and fully, then immediately do a leak check before doing anything else.
The leak check is simple but mandatory. Mix dish soap with water in a spray bottle and spray it liberally on the tank-to-regulator connection, the regulator body, and the hose running to the grill. After reconnecting fittings, a soapy-water test is a recommended way to check for leaks by watching for bubbles, and the grill should not be operated if a leak persists Mix dish soap with water in a spray bottle and spray it liberally.
Watch for 30 to 60 seconds. If you see bubbles forming, you have a leak. Turn the tank valve off immediately, tighten the fitting, and repeat the test. If bubbles persist after re-tightening, the regulator or hose has a defect and needs to be replaced before you light anything.
Don't try to cook around a leaking connection.
Connecting a natural gas line
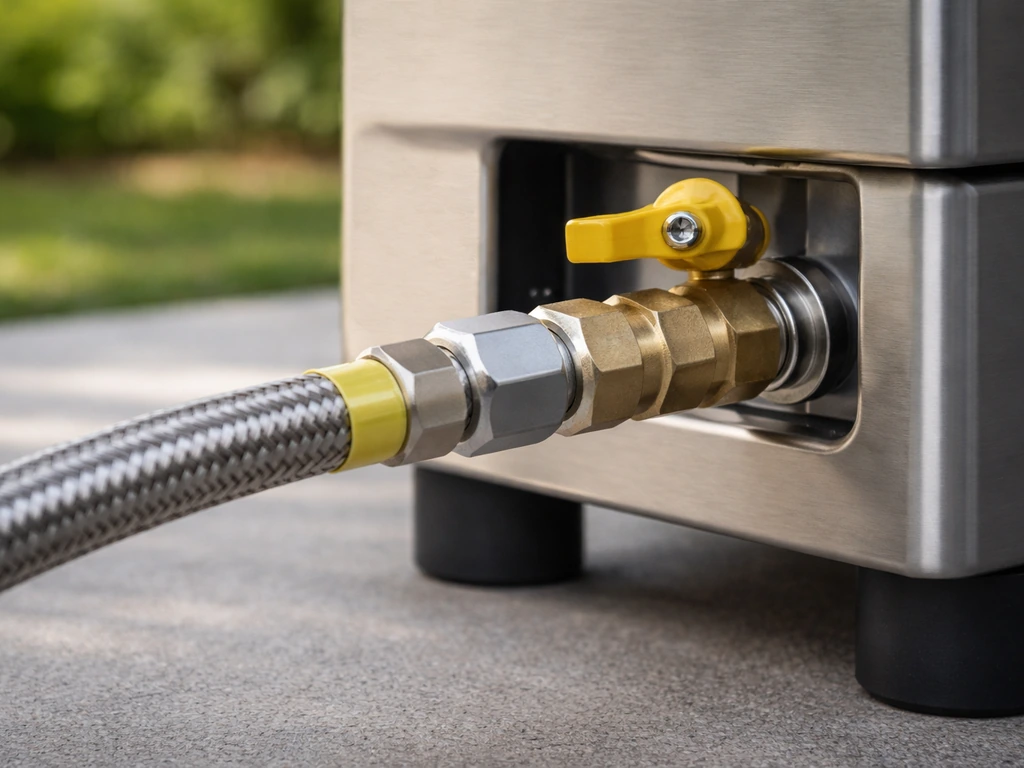
Natural gas grills connect to a dedicated outdoor gas supply line via a flex hose, typically a 10-foot stainless steel braided hose that comes with the grill. Weber's natural gas models, for example, include this hose specifically sized for their orifices, so don't substitute a generic hose without verifying it matches your model's specs. The connection point on the house side is a quick-disconnect fitting installed by a licensed plumber.
If that fitting isn't already in place, stop and have a plumber install it. That part isn't a DIY job. Once the supply line is ready, connect the grill-side quick-disconnect fitting, verify it clicks fully into place, and run the same soapy-water leak check on every connection point from the wall fitting to the grill inlet.
Charcoal: no fuel line, but still a setup step
Charcoal grills don't have fuel hookups, but you still need to prep the firebox before the first use. Make sure the ash catcher is properly seated, the charcoal grate is level inside the bowl, and the vents (top and bottom) open and close freely. Stuck vents mean you can't control temperature, which makes charcoal cooking nearly impossible.
First ignition walkthrough and safe warm-up
Gas grill ignition sequence
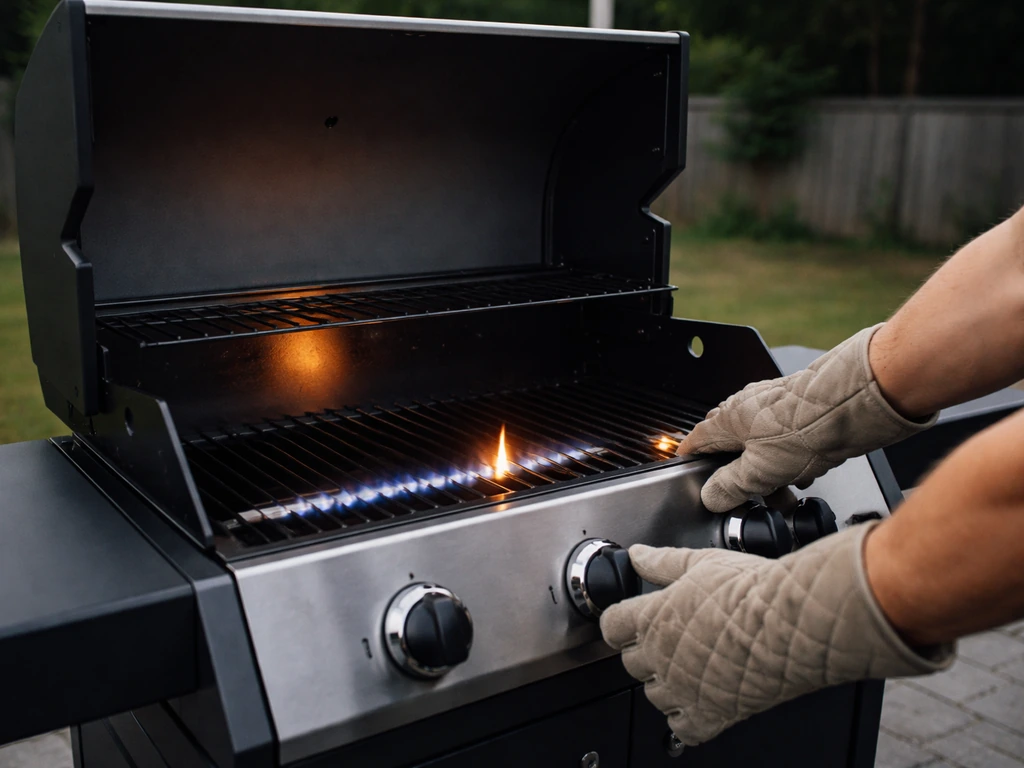
The sequence here matters and skipping steps is how accidents happen. Open the grill lid fully before you touch any knob. This is not optional. If gas accumulates in a closed grill and then ignites, you get a fireball, not a controlled flame. With the lid open, open the propane tank valve (or natural gas supply valve) slowly all the way. Wait about one minute for gas to travel through the regulator and hose to the burner valves. Then push the igniter button while simultaneously turning the first burner control knob to the HIGH position. You should hear a click and see the burner light within a second or two.
If the burner lights, close the lid and let the grill preheat on HIGH for 10 to 15 minutes. This burns off any manufacturing oils, packing residue, or assembly lubricants from the factory. You may see some smoke or smell something odd during this burn-off. That's normal. What you should see at the end of preheat: a steady, even blue flame with small yellow tips on each burner, and a grill temperature of 400 to 500 degrees Fahrenheit on the thermometer. If the flame is entirely yellow or orange and lifting off the burner ports, that's a problem addressed in the troubleshooting section below.
If a burner doesn't ignite on the first attempt, turn that burner knob back to OFF immediately. Wait a full five minutes with the lid open before trying again. This is the safety window Weber and most other manufacturers build into their ignition instructions. Gas can accumulate faster than you think, and a five-minute pause lets it fully disperse. Don't reduce this wait time.
Charcoal grill first light
Use a chimney starter for the first ignition. Fill the chimney with the amount of charcoal appropriate for your cook (roughly half-full for indirect cooking, full for high-heat searing). Place two or three sheets of crumpled newspaper or a paraffin starter cube under the chimney, set it on the charcoal grate, and light the newspaper from the bottom. The coals are ready when the top coals are covered in a layer of gray ash, typically 15 to 20 minutes. Pour them into the grill, arrange them for your cooking method (direct or two-zone), and put the cooking grate on top. Let the grate heat for five minutes before placing food.
If it won't ignite or won't stay lit: quick diagnosis
Most first-use ignition failures on gas grills fall into a short list of causes. Work through these in order before assuming the grill is defective.
- Burner tube not seated on the orifice: Go back and check that each burner tube inlet is properly positioned over its valve orifice. Even a small gap means the gas flow path is broken. This is the number-one cause of ignition failure on newly assembled grills.
- Igniter electrode not positioned correctly: The electrode tip should sit about 3/16" to 1/4" from the burner. If it's touching the burner or too far away, you'll either get no spark or a weak one that won't ignite the gas. Reposition the electrode bracket if needed.
- Igniter battery is dead or missing: Push-button piezo igniters don't need a battery, but electronic igniters do. Check the battery compartment (usually behind a panel near the control knobs) and replace the AA or AAA battery if the igniter clicks weakly or not at all.
- Igniter wire or electrode is wet or grease-coated: Even on a brand-new grill, moisture from sitting in a warehouse can affect the electrode. Dry it with a paper towel and try again. On older units, Char-Broil notes that grease buildup on the electrode is a leading cause of spark failure, requiring replacement of the igniter assembly.
- Regulator bypass / pressure issue: If you opened the propane valve too fast or had the burner knobs open before turning on the tank, the regulator may have gone into its bypass safety mode, severely restricting gas flow. You'll get a tiny, anemic flame if any. Fix: turn everything off, disconnect the regulator from the tank, wait one minute, reconnect, open the tank valve slowly, then follow the correct ignition sequence.
- Clogged burner ports: On a new grill this is rare, but check that no packing material or debris is blocking the small holes along the burner tube. On any grill, clogged ports produce uneven or absent flames. Clear them with a stiff wire or a straightened paper clip.
- Won't stay lit after igniting: If the burner lights but goes out within a few seconds, on a gas grill this almost always points to a thermocouple or flame-sensor issue (more common on heaters than grills, but some have them), a blocked port that starves the flame, or a regulator that's under-delivering pressure. If it's a newly assembled grill, re-check burner seating and regulator connection first.
If you're working with a Char-Broil Patio Bistro electric grill rather than a gas or charcoal unit, ignition and flame problems don't apply, but element and temperature control issues follow a completely different diagnostic path covered in dedicated troubleshooting resources for that model.
Adjusting for even heat and proper burner performance
After your preheat, walk around the grill and look at each burner through the cooking grate. All burners running on the same knob setting should show similar flame height and color. If one burner is significantly lower or higher than the others, you've got either a partially blocked port on the low burner or a misaligned burner tube. Turn the grill off, let it cool, and inspect that burner individually.
The air shutters on your burner tubes control the air-to-gas mixture and directly affect flame quality. Most manufacturers, including Weber, set the air shutters at the factory for the correct ratio and say they typically don't need adjustment. What you can and should do is keep the outside of the air shutter screens clean. Use a soft brush to clear debris from the shutter openings every few uses. A blocked shutter screen restricts airflow to the burner, which pushes the flame yellow and reduces heat output.
For charcoal, uneven heat is controlled entirely through vent management and coal arrangement. If one side is running hotter, your coal bed isn't even, or your bottom vent is partially blocked on one side. Redistribute the coals and check that both vents open fully without restriction. A two-zone setup (all coals on one side, nothing on the other) is the most useful configuration for most backyard cooking because it gives you direct high heat and an indirect zone for thicker cuts or indirect cooking, exactly what you'd want when grilling patio steaks, for example.
First cook, seasoning, and ongoing maintenance
Seasoning the grates before you cook
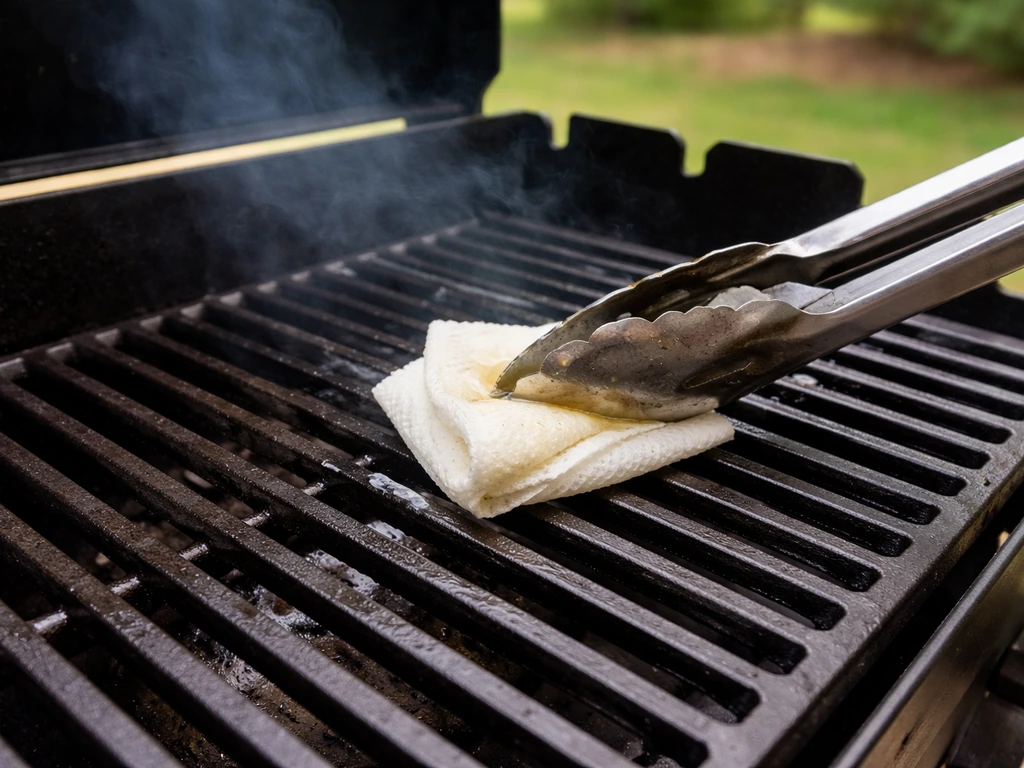
After the burn-off preheat, take a folded paper towel, dip it in a high-smoke-point oil (vegetable, canola, or flaxseed), use long tongs to grip it, and wipe the cooking grates while they're hot. Coat them lightly, close the lid for five minutes, then wipe again. This builds a thin non-stick layer that prevents food from welding itself to the grates on the first cook and protects cast-iron grates from rust. You don't need to do a multi-hour seasoning process like you would with a cast-iron skillet, but those two oil wipes make a real difference.
Maintenance checklist to keep it running reliably
A grill that's maintained properly lasts years longer and causes far fewer ignition problems. The most common issues that bring people back looking for help, including failed ignition, uneven heat, and burners that won't stay lit, are almost all preventable with basic regular maintenance.
| Task | When to Do It | Why It Matters |
|---|---|---|
| Brush grates with a grill brush | Before and after every cook | Prevents grease buildup that clogs burner ports |
| Inspect and clean burner ports | Every 5–10 uses or monthly | Clogged ports cause low flame and ignition failure |
| Wipe down flavorizer bars or flame tamers | Every month or after heavy use | Prevents grease fires and uneven heat |
| Clear and rinse the drip tray | Every 3–5 uses | Full drip trays are a leading cause of grease fires |
| Check igniter electrode position and cleanliness | Monthly | Keeps spark reliable; catches corrosion early |
| Spray soapy water on all gas connections | Start of each season and after reconnecting tank | Catches slow leaks before they become dangerous |
| Brush air shutter screens with a soft brush | Every season | Maintains correct air-to-gas ratio for clean combustion |
| Inspect hose and regulator for cracks or kinks | Every season | Damaged hoses are a common source of dangerous leaks |
| Oil the grates | At the start of each season and after deep cleaning | Prevents rust and sticking |
| Cover the grill when not in use | After every use | Keeps moisture, pests, and debris out of burner tubes and electronics |
Store propane cylinders outdoors, upright, in a well-ventilated spot away from direct sunlight and heat sources. Never store a propane tank in a garage, shed, or enclosed space. If you're putting the grill away for a season, disconnect the propane tank and leave the tank valve closed. For natural gas grills, close the supply shutoff valve at the wall when the grill isn't in use for extended periods.
If you follow this setup and maintenance routine, most of the common problems people search for help with, especially ignition failures and uneven burner performance, simply won't happen. And if they do, you now know exactly where to start diagnosing. For grill-type-specific issues like problems with a particular electric model or charcoal grill safety considerations on a confined patio, those topics have dedicated guides that go deeper on the specifics.
If you want specifics for cooking patio steaks on the stove-like heat control, check the guide for how to cook patio steaks on the stove. If you're dealing with char broil patio bistro electric grill problems, follow the electric grill troubleshooting steps in the next guide to pinpoint the cause quickly problems with a particular electric model.
If you’re grilling on a patio with charcoal, review charcoal grill patio safety steps like clearance, ventilation, and safe handling to reduce risk charcoal grill safety considerations.
FAQ
Do I need to keep the lid open when lighting a gas patio grill?
No. Before the first ignition, keep the lid open during the gas start sequence and after any failed attempt, because unburned gas can build up inside a closed hood and flash when it finally lights. Only close the lid once a burner is actively burning.
What should I do if bubbles show up at a connection during the leak test?
If you smell gas or you see bubbles during the leak check, do not light the grill. Shut the tank or supply valve off, tighten the connection carefully, and re-test with soapy water. If bubbles persist after re-tightening, replace the regulator or the hose fitting before using.
How much clearance should I leave around a patio grill setup location?
Measure clearance from more than just the back wall. Include the sides, any nearby fence or railing, and anything overhead that can catch fire. A grill under any roof or overhang increases risk even if the area feels open, so choose a fully open-air spot.
Can I use a generic hose for a natural gas patio grill?
For natural gas, use the specific hose and fittings intended for your grill model. Swapping in a random generic hose can create mismatched pressure or connection issues, and the correct house-side quick-disconnect must already be installed by a licensed plumber.
How long should I preheat after the first ignition, and when do I stop?
Your first preheat is meant to burn off manufacturing residue. Let it run long enough to stabilize (about 10 to 15 minutes on HIGH), then confirm flame quality and temperature. If smoke is extreme or you see flames acting abnormally, stop and inspect for blocked burner ports or misaligned tubes.
What is the safe waiting time before retrying a burner that won’t light on a gas patio grill?
If ignition fails, turn that burner knob back to OFF right away, keep the lid open, and wait a full five minutes before trying again. Trying repeatedly within that window can accumulate gas and increase the risk of a flare-up.
Should I adjust the air shutters on my gas grill if the flame looks off?
Use the air shutter screens with regular light cleaning, not adjustments. Most grills are factory-set for the correct air-to-gas ratio, so altering the shutters without the manufacturer’s guidance can cause unstable flame, yellow burning, and poor heat output.
My charcoal patio grill setup gives uneven heat, what should I check first?
Check for an even charcoal bed and vent freedom first. Uneven heat is most often caused by uneven coal arrangement or a partially blocked top or bottom vent. Redistribute coals and confirm both vents open smoothly before changing other variables.
Is there a quick way to oil the grates for the first cook on a patio grill?
Yes, and it should be done while the grates are hot. Lightly oil the grates using a high-smoke-point oil and a folded towel held with long tongs, then close the lid briefly and wipe again. This helps prevent food from sticking on the first cook and reduces early rust risk on cast-iron grates.
How should I store a propane tank and shut down a natural gas patio grill for the season?
Store propane cylinders outdoors, upright, and away from heat sources and direct sun. If you’re putting the grill away for the season, disconnect the cylinder and keep the tank valve closed. For natural gas, close the wall shutoff valve for extended non-use.