Style Selections gas patio heaters are sold exclusively through Lowe's under a few different model codes, and the manual you need depends entirely on which unit you have. The most commonly documented model is the FHTS80146 (internal code AS21346), an 88-inch, 48,000 BTU LP gas tower heater. Before you do anything else, find your model number, pull the correct manual, and match every assembly step to that document. If you are missing the Enders Elegance patio heater manual, search your model number and download the correct PDF so you follow the right assembly and lighting instructions. Following the wrong version is one of the most common reasons these heaters get assembled incorrectly and then refuse to light.
Style Selections Gas Patio Heater Manual: Assembly and Setup

Grant Mercer
3 Jul 2026
Step 1: Identify your exact Style Selections model
Lowe's sells multiple Style Selections gas patio heater designs, so "Style Selections patio heater" is not a single product. Some are LP (propane) only, and at least one listing covers a natural gas configuration. The hardware, regulator, and assembly sequence differ between them, which means you need the right manual before you touch a single bolt.
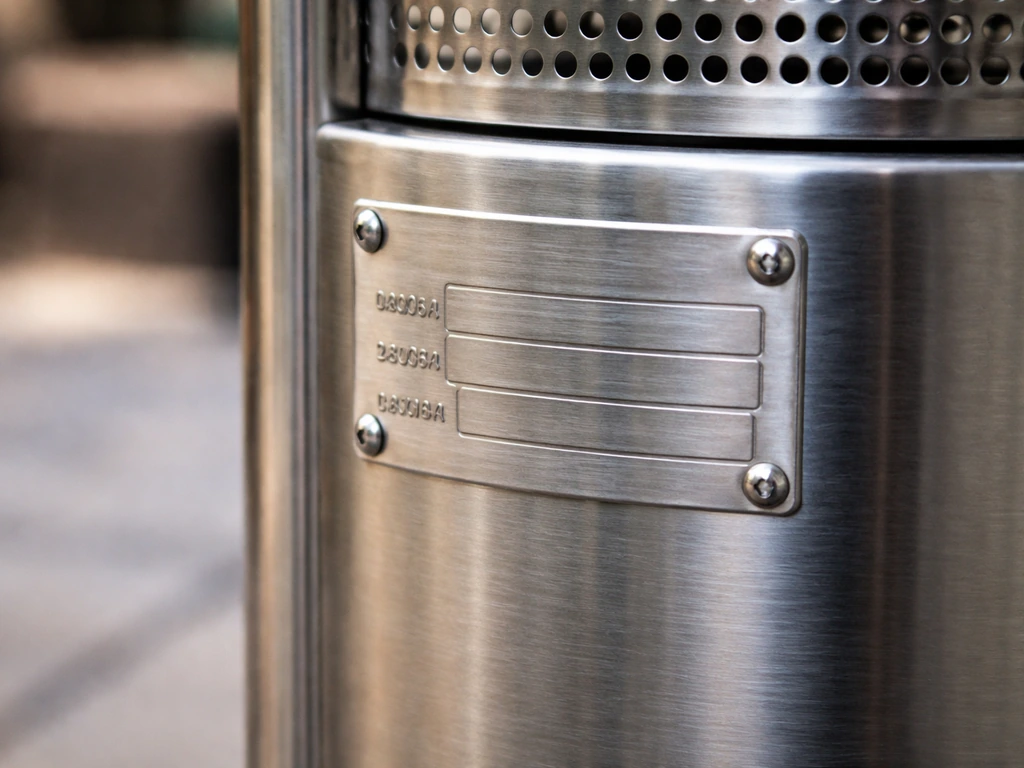
The fastest way to confirm your model is to look for the manufacturer data label directly on the heater itself, not on the box. On most Style Selections tower heaters, this label is on the base pole or the base unit near where the gas hose connects. It will show a model number like FHTS80146 or a similar alphanumeric code. Write it down. If the heater is still in the box, check the box end panel and the instruction booklet cover for the same code.
If you bought the heater at Lowe's, you can also look up your purchase history online and click through to the product page. Lowe's product pages for Style Selections heaters typically show the model code in the specifications tab or in the linked PDF manual. Match what you see there to what is printed on your data label before proceeding.
Step 2: Find the correct manual and parts list
Once you have your model number, you have a few reliable ways to get the right manual. The Lowe's product page for your specific heater usually has a link to an installation manual PDF, often in the "Documents" or "Resources" section near the bottom of the page. If you need an Andersen Stokke patio heater manual, make sure it matches your model code before following the assembly and safety steps installation manual PDF. Search Lowe's site with your model number to go directly to that listing. If the PDF link is there, download it before you start anything and keep it open on your phone or a second screen while you work.
If the Lowe's page does not have the PDF or the link is broken, go to Manualzz and search the model number exactly as it appears on your data label (for example, "FHTS80146" or "AS21346"). Manualzz indexes manufacturer PDFs by model and is one of the more reliable places to find Style Selections heater documentation. The manual for the FHTS80146/AS21346 unit is available there and includes the full parts list, hardware list, package contents checklist, safety section, assembly section, operation checklist, and troubleshooting table.
Do not use a generic Style Selections manual or one borrowed from a different model. Even if the heaters look similar, regulator fittings, hardware counts, and ignition sequences can differ. If you need the Alva patio gas heater manual, make sure the model code matches the one on your unit before you follow any assembly or lighting steps. Confirm the model code on the cover of the PDF matches your data label before following a single step.
Step 3: Unbox and run the pre-assembly safety check
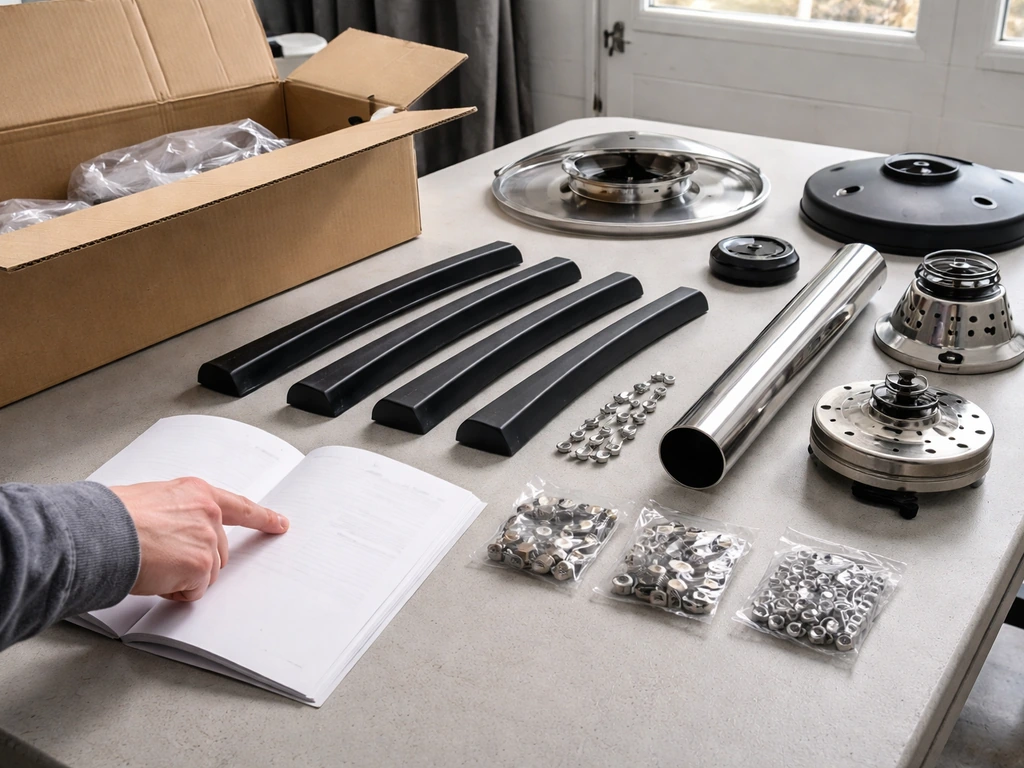
Before assembly begins, do a full inventory of every part against the parts list in your manual. Lay everything out on a clean, flat surface. Patio heater boxes often contain loose hardware (bolts, nuts, and the reflector ring hardware) in a small bag buried under foam layers, so dig through all the packaging before assuming something is missing. For the FHTS80146, the manual lists specific hardware counts, so count every bolt and washer against that list now rather than discovering a missing piece halfway through assembly.
- Check every component for visible shipping damage, especially the emitter screen, reflector, and burner head. Dents or cracks in these parts can be a fire and safety risk.
- Inspect the gas hose and regulator for any cuts, kinks, cracks, or abrasions on the rubber hose. Do not use the heater if the hose is damaged. Replace it first.
- Confirm the regulator is rated for LP gas (propane) if that is your fuel type. The FHTS80146 is an LP unit. Never connect an LP regulator to a natural gas supply.
- Verify the propane cylinder you plan to use is a standard 20 lb (5-gallon) BBQ-style cylinder with a standard POL or QCC1 valve. Most Style Selections LP heaters use a QCC1 (Type 1) connection regulator.
- Do all assembly work outdoors or in a well-ventilated area, away from open flames, pilot lights, or any ignition sources.
Step 4: Assemble the heater step by step
The exact sequence in your manual is the authoritative one, but the general assembly workflow for Style Selections tower heaters like the FHTS80146 follows this order. If your manual shows a different sequence for a specific step, follow the manual.
- Attach the base legs to the base plate using the provided bolts and washers. Hand-tighten first, then snug them down with a wrench once all legs are in position. Do not overtighten the base hardware or you risk stripping the threads in the pole.
- Insert the lower pole section into the base and secure it according to the manual. On most Style Selections models, this is a set-screw or bolt collar arrangement. Make sure the pole is fully seated and vertical before tightening.
- Thread the gas hose up through or along the lower pole section before stacking the upper pole sections. If you assemble all the poles first and then try to route the hose, you will have to partially disassemble the unit.
- Attach the middle and upper pole sections in order. Each section typically mates with a pin or locking collar. Confirm each joint is fully seated and locked before moving on.
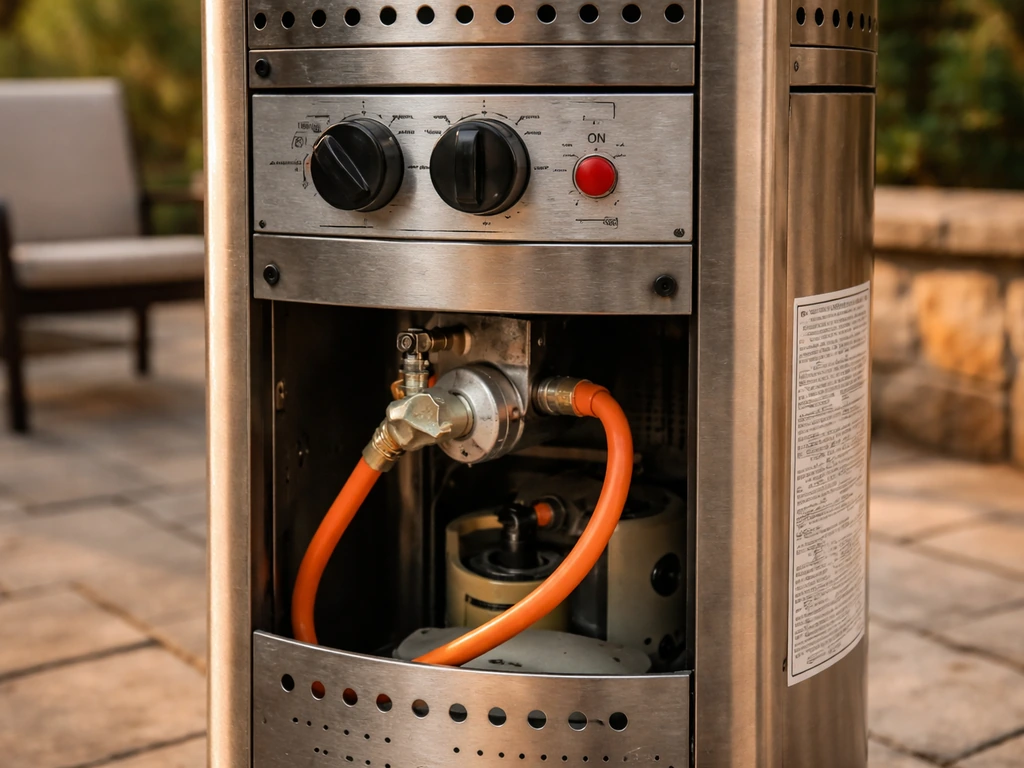
- Mount the burner/control assembly onto the top of the pole. This is the heaviest part of the top section. Have someone hold the pole steady while you secure the burner housing. The gas hose connects to the burner assembly at this stage.
- Attach the emitter screen and reflector. The reflector ring usually secures with small screws or clips around the perimeter of the burner housing. Make sure it is fully seated and level, because a tilted reflector can affect heat distribution and flame pattern.
- Connect the gas hose to the control valve fitting on the burner assembly. Tighten this connection hand-tight, then add a firm quarter-turn with a wrench. Do not overtighten brass fittings.
- Route the lower end of the gas hose to the regulator and connect the regulator. Keep the propane cylinder disconnected until after you have completed the leak test in the next section.
Once everything is assembled, give the whole unit a shake test. Grab the pole and apply light lateral pressure. Nothing should feel loose or wobbly. A heater that tips easily before gas is even connected will be unstable and potentially dangerous during operation. Tighten any loose joints now.
Step 5: Connect the gas and run a leak test
This is the step most people rush, and it is the one where rushing can seriously hurt you. Do the leak test every single time you connect a propane cylinder, not just the first time.
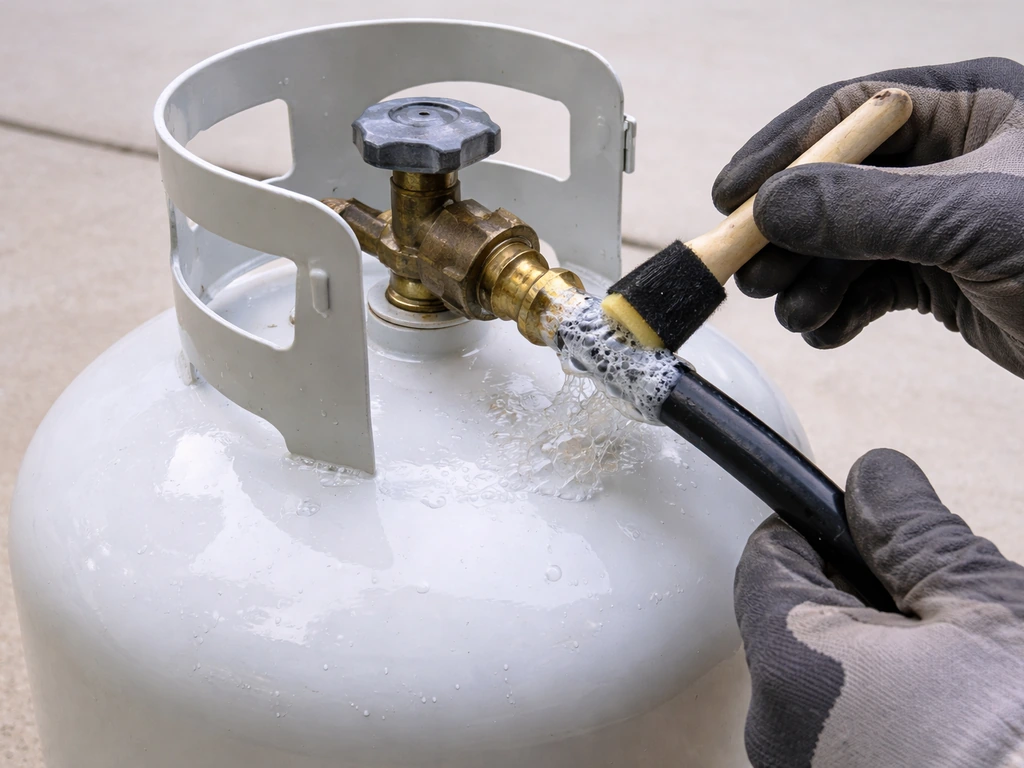
First, make a leak-test solution: mix one part liquid dish soap with three parts water. A small cup works fine. You want enough to apply generously with a brush, a spoon, or by squirting it onto fittings.
- Make sure the heater control knob is in the OFF position before connecting the cylinder.
- Thread the regulator onto the propane cylinder valve hand-tight, then snug it. QCC1 regulators thread on clockwise (standard right-hand thread). If the fitting does not thread on smoothly by hand, stop and inspect for cross-threading.
- Apply the soap solution generously to all three connection points: where the regulator attaches to the cylinder valve, where the hose attaches to the regulator, and where the hose attaches to the burner/control valve assembly.
- Slowly open the cylinder valve all the way (turn counterclockwise). Watch every connection you coated for 30 full seconds.
- If you see bubbles forming and growing at any connection, that connection is leaking. Close the cylinder valve immediately. Loosen the fitting, re-seat it, re-tighten, re-apply soap solution, and re-open the valve to re-test.
- If bubbles persist after re-tightening, do not use the heater. Contact Style Selections customer service or Lowe's. Do not attempt to modify or repair the regulator or hose yourself.
- If no bubbles appear at any connection after 30 seconds, the gas connections are sound and you can move to ignition.
One important note: do this test away from any open flame, spark source, or electrical outlet. If you smell gas at any point during testing, move away from the heater, do not use any switches or devices, and let the area air out before investigating.
Step 6: Light the heater for the first time
Once the leak test passes, you are ready for first ignition. The lighting sequence for the FHTS80146 and most similar Style Selections LP heaters follows this pattern, but always verify the exact steps in your model's manual before you start.
- Confirm the control knob is in the OFF position and the cylinder valve is closed. Wait at least 5 minutes if you had gas flowing during the leak test. This clears any gas that may have accumulated.
- Open the propane cylinder valve fully by turning counterclockwise.
- Push the control knob in firmly (most valves require you to depress the knob to unlock it from the OFF detent) and rotate it to the PILOT or ignition position. Your manual will show the exact symbol or label for this.
- While holding the knob depressed, press the igniter button. You should hear a clicking sound. Hold the knob in for the full ignition cycle, approximately 5 seconds, while pressing the igniter.
- Once the pilot lights, continue holding the knob depressed for another 10 to 30 seconds to allow the thermocouple to heat up and hold the pilot valve open. If you release too early, the pilot will go out.
- After the pilot is established and staying lit, rotate the knob from the pilot position to your desired heat setting (LOW, MEDIUM, HIGH). The main burner should ignite from the pilot.
- If the burner does not light after pressing the igniter for 5 seconds, release the knob, let it return to OFF, wait 5 full minutes, and try again from step 3. Attempting to re-ignite immediately without waiting risks a gas buildup.
To shut the heater off, push the control knob in and rotate it clockwise back to the OFF position. The pilot will extinguish. Close the propane cylinder valve after each use. After use, it is normal to see some discoloration or darkening on the emitter screen. That is not a defect.
Common assembly mistakes and what to do when it won't light
The troubleshooting table in the Style Selections FHTS80146 manual covers the most likely failure scenarios clearly. Here is how to work through them in a logical order after assembly.
Pilot won't light at all
- Cylinder valve is closed: the most common cause after assembly. Open it fully before attempting ignition.
- Air in the gas line: this is especially common on a brand-new installation. Air in the hose and regulator can prevent the pilot from catching on the first few tries. Follow the full wait-and-retry sequence (5 minutes between attempts) and the air will purge over several attempts.
- Igniter fails to spark: hold a long lighter or match near the pilot orifice and manually attempt to light while holding the knob in. If it lights manually, the piezo igniter may need replacement, but the heater itself is functional.
- Blockage in the pilot tube or orifice: if the unit was stored or if insects got inside the pole, there may be a physical obstruction. With the gas off and cylinder disconnected, visually inspect the pilot tube opening for debris.
Pilot lights but won't stay lit
- Thermocouple not getting enough heat: the most common cause. Hold the control knob depressed for a full 30 seconds after the pilot lights. Many first-timers release after 5 to 10 seconds, which is not long enough for a cold thermocouple to generate the millivolt signal that holds the gas valve open.
- Low gas pressure: if the cylinder is less than a quarter full or the ambient temperature is below 40°F, the propane vaporization rate drops and pressure can be too low to keep the pilot stable. Use a fuller cylinder or bring the cylinder indoors briefly to warm it to room temperature.
- Thermocouple not positioned correctly: check that the thermocouple tip is sitting directly in the pilot flame. If a component was not fully seated during assembly, the thermocouple may be slightly misaligned. This is a common assembly error on first builds.
Pilot lights but main burner won't come on
- Gas valve not rotating fully from pilot to burner position: confirm you are rotating the knob past the pilot detent to a heat setting.
- Blockage in the main burner orifice: with the gas disconnected and heater cool, inspect the burner head for debris, spider webs, or insect nests. These are surprisingly common on heaters that have been stored outdoors.
- Low gas pressure: same as above, related to temperature or a low cylinder.
Thick black smoke or abnormal flame
Black smoke and heavy carbon buildup usually indicate a blocked burner screen or a dirty reflector restricting airflow. Shut the heater off, let it cool completely, and clean the reflector surface and burner screen according to the maintenance section of your manual. A partially blocked burner starves the flame of air and produces incomplete combustion. Do not continue operating a heater that is producing heavy black smoke.
When to stop and call for service
The Style Selections manual is direct about this: any service or repair of the gas passages and associated components should be done by a qualified service technician. If you have worked through the troubleshooting steps above and the heater still will not ignite or stay lit, or if you smell gas during operation that cannot be traced to an obvious loose fitting, do not keep trying. Contact Lowe's or the manufacturer's customer service line. Pushing past a persistent gas issue is not a DIY situation.
Keeping it running: maintenance tips and safety rules
Before every use
- Run through the operation checklist in your manual. Confirm all components are properly assembled and intact, the gas hose has no new damage, and all connections are secure.
- Check wind conditions. The Style Selections manual recommends not operating in winds above 10 mph. High wind can blow the pilot out mid-use and cause gas to accumulate before you notice.
- Do not operate below 40°F ambient temperature if the propane cylinder is less than a quarter full. Below this threshold, low vapor pressure from the cold tank leads to pilot instability.
- Make sure you are using the heater outdoors only with adequate ventilation. This is not a caveat, it is a hard safety rule for any LP appliance.
Routine maintenance
- Clean the reflector and emitter screen at the start of each season using a soft cloth. Dirt and film on these surfaces reduces efficiency and can cause smoke.
- Inspect the gas hose and regulator at the start of each season and after any period of storage. If the hose shows cracking, stiffness, or surface damage, replace it before use.
- Run a soap-bubble leak test at the start of each season and any time you disconnect and reconnect the cylinder.
- Store the heater in a covered location or with a protective cover when not in use to prevent insect nesting in the burner and pilot assembly.
- Never store or use the heater in an enclosed space, garage, or shed with the propane cylinder attached.
Hard safety rules: do's and don'ts
| Do | Don't |
|---|---|
| Read the full manual for your exact model code before first use | Use a manual from a different Style Selections model or a generic patio heater guide |
| Close the cylinder valve after every use | Leave the cylinder valve open when the heater is unattended or stored |
| Keep the heater on a firm, level, non-combustible surface | Operate on an uneven, soft, or combustible surface |
| Keep a 3-foot (minimum) clearance from combustibles on all sides and above | Place under an overhang, umbrella, or close to furniture during operation |
| Allow the heater to cool fully before covering or moving it | Cover or transport a heater that is still warm |
| Replace damaged hoses, regulators, or burner components with manufacturer-approved parts | Attempt to repair gas valves, orifices, or regulators yourself |
Style Selections heaters are straightforward LP appliances when you have the right manual in hand and follow the sequence methodically. Most post-assembly problems, from a pilot that won't hold to a burner that won't come on, trace back to one of the issues in the troubleshooting table above or to a step in the assembly that was missed or only partially completed. If you are working through a different brand with a similar setup, the same general methodology applies, whether you are dealing with a Living Accents, Alva, Andersen Stokke, or Enders Elegance heater. If you are looking for the exact living accents patio heater manual, the model number on the heater label is the key to finding the right PDF. The manual-first approach and the gas-connection discipline are the same across all of them.
FAQ
How can I tell whether my Style Selections patio heater is LP propane or natural gas before I try to assemble or connect it?
Check the model code on the data label and match it to the manual, but also look for an LP tank connection style versus a natural gas hose inlet described in your documentation. If your manual specifies LP and you have a natural gas setup, do not attempt a workaround, you can damage components and create a safety risk.
My data label model number is different from what I see on the box. Which one should I use to download the style selections gas patio heater manual?
Use the model number printed on the heater’s manufacturer data label, not the shipping label or outer box. If the manual you find does not match that label exactly, keep searching until the PDF header or document page shows the same model code.
What if I lost the manual or my model code is hard to read on the base pole?
Clean the label gently so the characters are legible, then re-check both the base pole area and the booklet cover. If it still cannot be read, call the manufacturer or Lowe’s with any other identifier you have (model family, purchase info, photos) and avoid using an unrelated generic PDF.
Do I need to do a leak test every time, or only the first time I connect a propane cylinder?
Do it every single time you connect a propane cylinder. Even if you do not disconnect often, a loose connection or worn seal can happen between uses.
Can I check for gas leaks by sniffing, instead of using dish soap solution?
No. A leak-test solution is the reliable method because it shows bubbles at specific fittings. Sniffing alone can miss small leaks and can also put you in danger if gas accumulates near the connection.
How do I know which fittings to test in the leak-test checklist?
Follow your manual’s diagram and test every connection involved in the gas path, including regulator and hose interface points. If your manual does not show explicit steps for each fitting, treat every threaded or gasketed joint as a test point until you have verified them all.
What should I do if the leak test bubbles but tightening does not fix it?
Stop immediately, disconnect the propane source, and let everything air out. Replace any suspect regulator hose or fittings only if your manual lists an approved replacement part, otherwise contact Lowe’s or customer service rather than continuing to operate.
The heater shakes but also seems stable, is that always safe?
A light bump test is fine, but any looseness that makes the unit wobble indicates a joint not seated or tightened correctly. Re-check the assembly order against the manual before gas is connected, then tighten only as specified.
I assembled everything and found extra hardware. Should I continue, or is that a sign I used the wrong manual?
Extra pieces usually mean a step was skipped, duplicated, or the wrong model manual was used. Stop and re-inventory against the parts list, because the reflector ring hardware and fastener counts are safety-critical for correct combustion airflow.
What does it mean if the pilot will light but will not stay lit?
That pattern is covered in troubleshooting, and common causes include incorrect positioning, blocked burner components, or assembly steps not completed as instructed. Do not keep retrying repeatedly if it fails to hold, instead work the troubleshooting table and escalate to service if it persists.
How should I clean the burner screen or reflector if black smoke appears?
Shut the heater off and let it cool fully, then clean the reflector surface and burner screen per the maintenance section. Do not operate when you see heavy black smoke, it indicates incomplete combustion and restricted airflow.
Is it okay to disassemble gas passages or try to repair parts if troubleshooting does not solve the problem?
No. If you need to service or repair gas passages or connected components, the manual directs that a qualified service technician should handle it. If you smell gas during operation or cannot identify a loose fitting, stop and contact service.
What is the correct shutoff procedure before disconnecting propane?
Push the control knob in and rotate it clockwise back to OFF so the pilot extinguishes, then close the propane cylinder valve after each use. Only disconnect after the heater is fully shut down and has had time to cool.
Is discoloration or darkening on the emitter screen after use normal?
Yes, some discoloration after operation is expected for this type of heater. If you see worsening soot buildup, heavy black smoke, or persistent odors, use the troubleshooting steps and stop operation until the airflow or ignition issue is resolved.