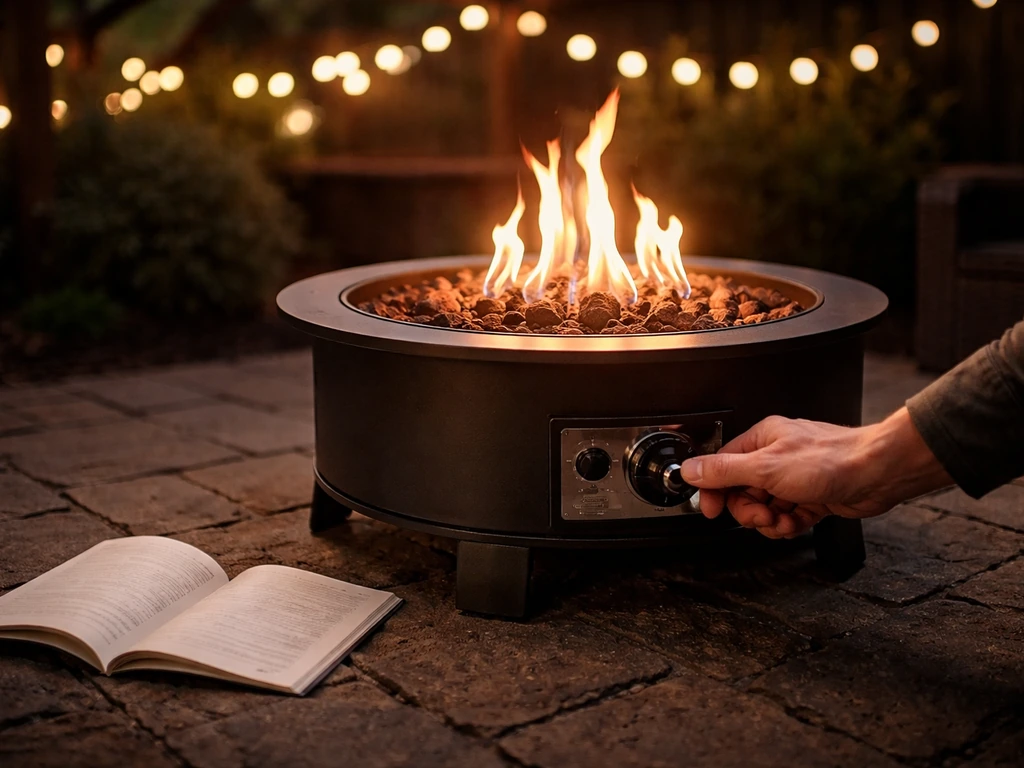
To light a Patio Glow fire pit safely, you turn the control knob to the pilot or low position, press and hold it in, then press the push-button igniter repeatedly until the flame catches. Hold the knob in for 30 seconds after ignition to let the thermocouple heat up, then slowly release it. If the flame goes out, you're dealing with either a gas supply issue, a weak igniter battery, or a thermocouple that isn't getting hot enough. Everything else in this guide breaks that process down further and tells you what to do when the basic steps don't work.
Patio Glow Fire Pit Manual and Lighting Instructions

Grant Mercer
27 Jun 2026
What's in the Patio Glow fire pit manual (and how to actually use it)
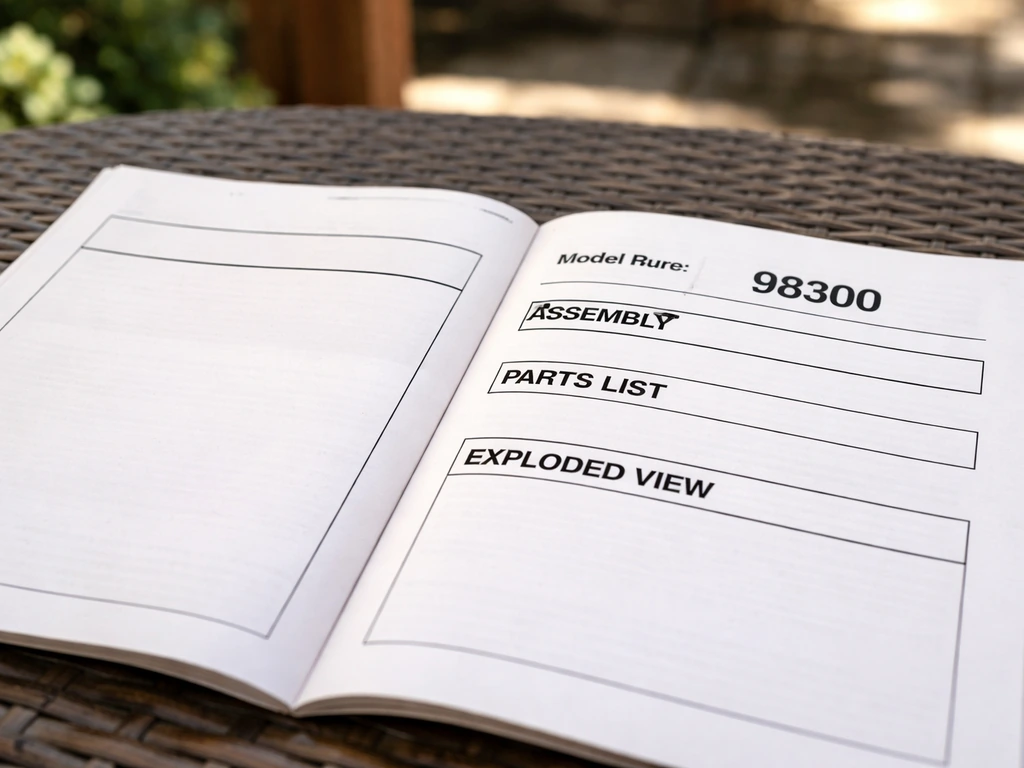
Patio Glow has produced multiple fire pit models, and the manuals are not interchangeable. The most well-documented model is the 98300, which runs at 30,000 BTU/hr and uses a push-button ignition module with a single AAA (1.5V) battery. There's also at least a 99300 in the lineup. Before you follow any instructions, confirm your model number by finding the rating label on the unit itself, usually on the bottom frame or burner housing. In the Patio Glow 98300 manual, the rating/label section lists “Serial Number Model Number: 98300,” which is why checking the label helps ensure you use the correct manual confirm your model number by finding the rating label. It will read something like 'Serial Number Model Number: 98300.' Once you have that number, you can pull the correct manual from a manual library site that indexes Patio Glow models by number.
When you open the manual, here's what to actually look for and use: the parts identification diagram (so you can name the components you're touching), the rated input in BTU/hr (tells you the gas demand), the regulator and inlet pressure specs if you're on natural gas (the 98300 calls for 5 to 7 inches water column), and the lighting instruction sequence. Most of the assembly section you'll only need once. After that, the operating and troubleshooting sections are the two pages worth bookmarking or photographing on your phone so you have them at the fire pit. If you need the exact Sunjoy patio heater manual steps, use the same approach to find the model-specific lighting and troubleshooting sections.
If you can't locate your exact manual, the 98300 instructions are a reliable reference for most Patio Glow propane fire pit models that share the same control knob and ignition module design. The core lighting sequence is the same. Other brands like Endless Summer, Garden Treasures, and Sunjoy use very similar ignition systems, so if you've worked with those units before, the Patio Glow will feel familiar. If you need an endless summer patio heater manual, look up the exact model number on the rating label and follow its lighting and maintenance sections.
Quick safety checklist before you light
Don't skip this. Gas appliances can bite you fast if you light them without doing a few basic checks first. This takes two minutes and it matters.
- Check clearances: keep the fire pit at least 3 feet from any structure, fence, furniture, or overhead obstruction. Never operate it on a covered porch or enclosed space.
- Smell for gas before you open anything: if you detect a sulfur or rotten egg smell near the regulator or hose, stop completely, move everyone away, and do not attempt to light.
- Inspect the hose and regulator: look for cracks, kinks, or any sign of wear on the LP hose. Replace it if anything looks damaged. A $15 hose replacement is cheaper than the alternative.
- Check the propane tank valve: make sure the tank is not empty and the valve is fully closed before you connect it. Open it slowly once connected.
- Soap test the connections: if you've just connected or reconnected the regulator, apply soapy water to all connection points and look for bubbles before lighting. Bubbles mean a leak.
- Confirm the igniter battery: the Patio Glow 98300 uses a single AAA 1.5V battery in the ignition module. A weak battery is the most common reason the push-button igniter fails to spark.
- Keep children and pets away from the unit during lighting.
- Never attempt to light the unit in high wind conditions. Wind disrupts the pilot flame and can prevent the thermocouple from staying heated.
Patio Glow fire pit setup and operating overview
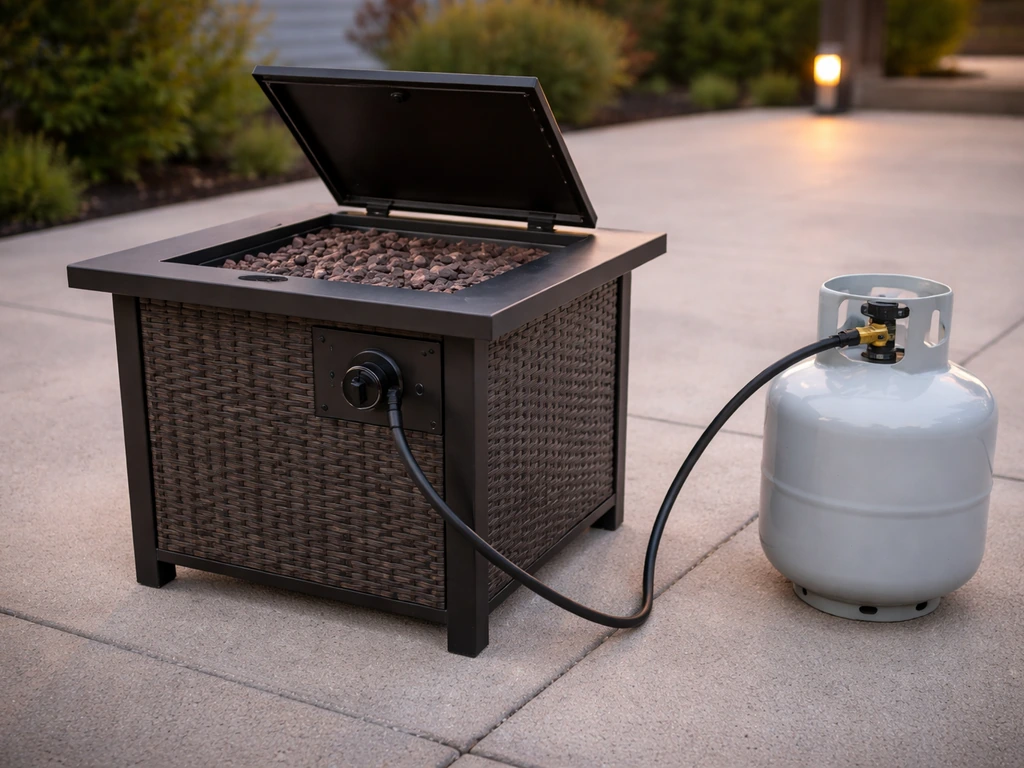
Patio Glow fire pits are LP propane appliances by default, though the 98300 model includes a natural gas conversion option. For propane use, you connect a standard 20 lb tank via the included regulator and hose. The 30,000 BTU/hr input rating means a standard 20 lb tank will last roughly 8 to 10 hours at full burn, less if the ambient temperature is cold since LP pressure drops in the cold.
The main controls are straightforward. There's a single control knob on the front or side of the unit and a push-button igniter. The knob typically has three positions: Off, Pilot (or a push-in position for ignition), and a variable flame range from Low to High. The gas valve is internal and controlled by the knob. The ignition module is a piezo-electric or battery-powered spark generator that creates the spark when you press the button. All of this is identified on the parts diagram in the manual, which is worth reviewing once so you know exactly what you're pressing and turning. If you are looking for the garden treasures patio heater manual, use the model number on your unit to find the correct instructions and safety specs.
If you're converting to natural gas, the 98300 manual specifies a maximum inlet pressure of 7 inches water column and a minimum of 5 inches water column. That conversion involves swapping the orifice and should only be done by someone comfortable working with gas fittings. For the vast majority of readers running propane from a standard tank, none of that applies.
Step-by-step lighting instructions
These steps follow the standard Patio Glow ignition sequence for models using the control knob and push-button ignition module setup.
- Make sure all valves are closed and the control knob is in the Off position before you start.
- Open the propane tank valve slowly, about one full turn. You don't need to open it all the way.
- Wait 5 seconds for the gas to reach the valve, then push the control knob in and turn it to the Pilot or lowest position. Keep the knob pressed in the entire time.
- While holding the knob in, press the push-button igniter repeatedly, about once per second. You should hear a clicking sound with each press. Look through the burner opening or viewport to see if a flame appears.
- Once a flame ignites, continue holding the knob in for a full 30 seconds. This is critical. The thermocouple probe needs to heat up enough to signal the gas valve to stay open. Let go too soon and the flame dies.
- After 30 seconds, slowly release the knob. The flame should stay lit. If it goes out, wait 5 minutes before trying again to let any accumulated gas disperse.
- Once the pilot is stable and holding, turn the knob from Pilot to your desired flame height between Low and High.
- To shut off, turn the knob back to Off and then close the propane tank valve.
If it won't light: common causes and fixes
If you're pressing the button and nothing is catching, work through these in order. Most ignition failures come down to one of four things: no spark, no gas, blocked burner, or wrong technique.
| Symptom | Most Likely Cause | Fix |
|---|---|---|
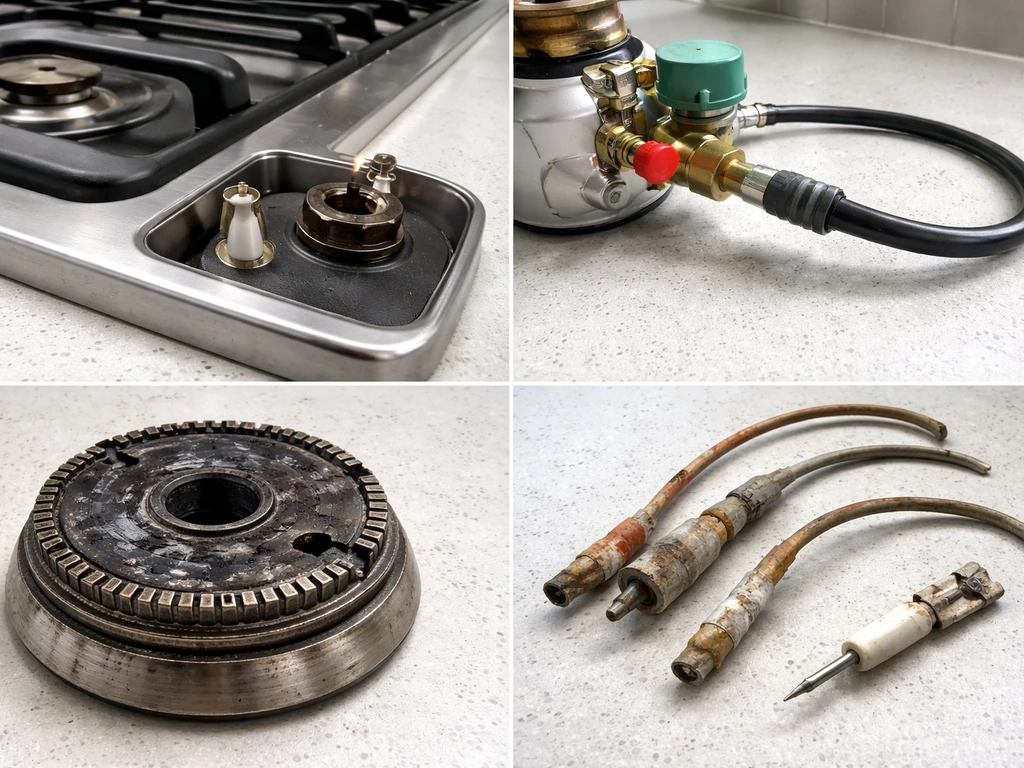
| No clicking sound when pressing igniter button | Dead or weak AAA battery in ignition module | Replace the AAA battery. This is the single most common fix. |
| Clicking but no spark visible | Spark electrode gap too wide or corroded | Inspect the electrode tip near the burner. Clean off carbon buildup with a dry brush or fine sandpaper. Check the wire connection at the module. |
| Clicking and spark but no flame | No gas reaching the burner | Confirm propane tank is not empty. Make sure tank valve is open. Check that regulator is fully connected and not in the tripped/locked position. |
| Faint flame that dies immediately | Thermocouple not positioned correctly or not being held long enough | Hold the knob in for a full 30 seconds, not less. If the thermocouple is bent away from the flame, gently reposition it so it sits directly in the flame path. |
| Strong gas smell but no ignition | Gas building up before spark | Stop immediately. Turn everything off. Ventilate the area for 10 minutes before trying again. Do not keep pressing the igniter with gas present. |
One thing worth checking if nothing above works: the regulator can enter a lockout state if it detects a rapid pressure drop, which sometimes happens if the tank valve was opened too fast. Close the tank valve completely, disconnect the regulator, wait 30 seconds, then reconnect and open the valve very slowly. That often resets the regulator.
If it lights but won't stay lit
This is a different problem from a no-light situation. When the flame catches but dies within a few seconds of releasing the control knob, the thermocouple is almost always the culprit. The thermocouple is a small probe that sits in the flame. When it gets hot enough, it generates a tiny electrical signal that holds the gas valve open. If it doesn't generate enough signal, the valve closes as a safety measure and the flame goes out.
Check these things first
- Are you holding the knob in long enough? 30 seconds is the minimum. Many people let go at 10 to 15 seconds and assume the thermocouple is bad when the real issue is technique.
- Is the thermocouple tip positioned in the flame? It needs to be surrounded by flame, not just near it. A bent probe that's drifted out of position is a very common issue on older units.
- Is the thermocouple connection tight at the gas valve? The small nut where the thermocouple wire connects to the valve can loosen over time. Hand-tighten it a quarter turn and try again.
- Is the burner producing a strong enough flame to heat the thermocouple? A weak, lazy flame (often caused by low tank pressure or a partially blocked orifice) may not produce enough heat.
When it's probably the thermocouple itself
If you've held the knob in for a full 30 seconds, the thermocouple tip is sitting directly in the flame, and the connection is tight, then the thermocouple itself is likely worn out. Thermocouples are consumable parts. They degrade over years of heat cycling and eventually stop generating enough voltage to hold the valve open. A replacement thermocouple for a fire pit in this class typically costs $10 to $20 and is a straightforward swap: unscrew the old one from the valve fitting and the bracket near the burner, route the new one the same way, and snug the fittings. It's one of the most cost-effective repairs you can make on a gas fire pit, and it's the same fix you'd make on an Endless Summer or Fire Sense unit with the same symptom.
If you replace the thermocouple and the problem continues, the gas valve itself may be faulty. At that point, weigh the cost of a replacement valve against the age of the unit. A new valve on a fire pit that's 8 or more years old may not be worth the investment.
Keeping it running well: maintenance and best practices
A Patio Glow fire pit doesn't need much ongoing attention, but a few simple habits will keep it lighting reliably season after season.
- Replace the ignition module battery (AAA, 1.5V) at the start of each season. Don't wait for it to fail mid-use.
- Inspect the burner orifice annually. Use a can of compressed air to clear any debris or spider webs. Spiders love to nest in gas orifices over winter and it's a very real cause of ignition failure.
- Check the LP hose and regulator connection for cracks or brittleness every season. UV exposure degrades hose material over time. Replace the hose every 5 years as a baseline.
- Cover the unit when not in use. Moisture inside the burner assembly accelerates corrosion of the thermocouple and gas valve.
- Disconnect the propane tank and store it upright in a ventilated outdoor area when the fire pit won't be used for more than a few weeks.
- Clean lava rocks or fire glass annually. Debris buildup can restrict flame and affect how the thermocouple heats.
- Before each season, do a full soap-water leak test on all connections after reconnecting the tank.
- If you notice the flame color has changed from blue at the base to predominantly orange or yellow, that can indicate incomplete combustion. Check the air shutter adjustment and orifice cleanliness.
One last thing: know when to stop and call someone. If you've done all of the above and the unit still won't stay lit, if you're getting a persistent gas smell after multiple attempts, or if any component looks physically damaged or corroded through, don't push further. A qualified LP gas technician can diagnose a failed gas valve or regulator in a short visit and it's far safer than chasing a gas leak on your own. Treat your fire pit like a repairable appliance, but respect the point where DIY ends.
FAQ
My Patio Glow patio glow fire pit sparks but will not light. What should I check first?
If the igniter makes sparks but no burner flame appears, check that gas is actually reaching the burner (tank valve fully open, regulator hose not kinked, and the burner ports not obstructed). Also confirm the knob is held in at the correct pilot or ignition position during the entire lighting attempt, not just while pressing the button.
The flame lights, but it goes out right after I release the knob. How do I fix that?
Once the flame catches, keep holding the knob long enough for the thermocouple to heat (the guide’s baseline is 30 seconds). If it shuts off sooner, release attempts can be too early, or the thermocouple tip may not be sitting in the flame. Repositioning should be done carefully following your model’s parts diagram.
How do I know if the igniter battery is the cause of repeated failed starts?
A weak or failing AAA battery often causes intermittent spark, especially when it gets cold. Replace the battery with a fresh 1.5V AAA, and make sure the battery orientation and contacts are clean and seated before retrying.
Can I use a different Patio Glow model’s manual if I cannot find my exact patio glow fire pit manual?
Do not rely on a “similar model” manual if your unit label shows a different model number. The article notes manuals are not interchangeable, so using the wrong sequence or pressure specs can lead to improper operation.
What’s the correct setup for propane use with a Patio Glow fire pit, and can I use natural gas parts on propane?
Yes for propane. If you are on propane, use the included propane regulator and hose and connect to a standard 20 lb LP tank. If you have natural gas plumbing, do not use the LP regulator setup, and follow the model’s conversion guidance instead.
My regulator seems locked out after turning on the tank quickly. What’s the reset process?
If the regulator appears to lock out after a fast tank-valve opening, the described reset procedure helps: close the tank valve, disconnect the regulator, wait about 30 seconds, reconnect, then open the valve slowly.
What if the flame never catches even though I hear/feel gas flow and the igniter works?
Blockages can prevent ignition even when sparks and gas supply seem fine. Check for debris in the burner area and ensure burner ports are clear, then try lighting again using the correct pilot/low position and holding time.
Is it safe to keep trying if I smell gas after unsuccessful lighting attempts?
Smell of gas after multiple attempts is a stop condition. Turn the knob to Off, close the tank valve (if applicable), ventilate the area, and do not keep retrying. Contact a qualified LP technician to diagnose a possible leak or failed control component.
When should I replace the thermocouple versus troubleshooting the gas valve?
Thermocouples degrade with heat cycles, so the symptom pattern matters: it lights and then dies after releasing the knob even after the required hold time. If that matches, replacement is usually the most practical fix before considering higher-cost parts like a gas valve.
What should I verify after swapping a thermocouple so the fire pit stays lit?
After replacing the thermocouple, do a careful lighting test: verify the connection is snug, the probe is routed the same way as the original, and the tip is positioned to sit in the flame. Then hold the knob long enough for stabilization before releasing.
Can I convert my Patio Glow fire pit from propane to natural gas myself?
If you are converting to natural gas, the article states the conversion involves swapping the orifice and specifying inlet pressure. Because that changes gas components, have someone comfortable with gas fittings do it, and do not attempt the conversion without your model’s exact specifications.
My knob has multiple positions, how do I confirm which one is the correct pilot or ignition setting?
If the control knob positions are unclear, use the parts/controls diagram in your model’s manual to confirm Off, Pilot (or push-in/ignite), and Low to High. Wrong knob positioning during ignition is a common mistake.
What simple maintenance habits help prevent Patio Glow fire pit ignition problems season after season?
Ongoing maintenance is mostly about keeping it clean and stored properly. At minimum, keep the burner area free of insects and debris and follow your model manual’s cleaning guidance before seasonal use to reduce ignition and airflow issues.