
If you own a Zubri Z1-12 patio heater and need to assemble it, light it, troubleshoot a no-ignition problem, or figure out why it keeps shutting off, this guide walks you through every step using the actual OEM manual procedures. Troubleshooting Propane Ignition Systems, HVAC Laboratory (thermocouple/thermopile outputs) notes that Typical flame‑safety sensing devices: thermocouple pilot generators produce small millivolt outputs (commonly ~20–30 mV) sufficient to hold many appliance gas valves; thermopiles (multiple thermocouples) used for millivolt systems can produce larger outputs (hundreds of mV, e.g., ~500 mV open‑circuit for some thermopile systems). These voltage ranges matter when diagnosing a thermocouple/thermopile failure (multimeter checks) or determining whether a valve will stay open Troubleshooting Propane Ignition Systems — HVAC Laboratory (thermocouple/thermopile outputs). The Z1-12 is a 40,000 BTU portable propane tower heater with a thermocouple safety device, a tilt/tip switch, and a low-pressure regulator rated to 11.0 inches water column. Most of the common problems owners run into, including failed ignition, a flame that won't stay lit, a tripped tilt switch, or a blocked emitter, are fixable at home with basic tools and a methodical approach.
Zubri Patio Heaters Instructions: Setup, Troubleshoot & Maintain

Who this guide is for and why safety comes first
This guide is written for homeowners and DIYers who want to repair and maintain their Zubri heater rather than paying for an unnecessary service call or throwing it away. You don't need HVAC training, but you do need to take propane safety seriously. Propane is heavier than air, which means it pools at ground level when it leaks. A small leak you can't smell can still find an ignition source. Before you touch anything, read through the safety points below and keep them in mind every time you work on the heater.
- Always work outdoors or in a well-ventilated area. Never bring propane cylinders or a connected heater indoors.
- Keep an ABC fire extinguisher within arm's reach any time gas is connected.
- Wear safety glasses when working near the burner head, emitter, or any pressurized connection.
- Shut off the cylinder valve fully before making or breaking any gas connection.
- Never use an open flame to test for leaks. Use only soap-water solution or an approved leak detector fluid.
- Do not connect the Zubri Z1-12 to a fixed (piped) gas supply. The components are not rated for it. If you want a fixed-gas setup, contact a registered gas dealer.
- If you smell gas and cannot immediately identify and stop the source, move away from the heater and call your propane supplier.
For PPE, at minimum wear safety glasses and heat-resistant gloves when working near the burner or reflector assembly. Close-toed shoes are a good idea any time you are lifting or assembling the heater stand. That covers the baseline. Now let's get into the heater itself.
Identifying your Zubri model and its parts
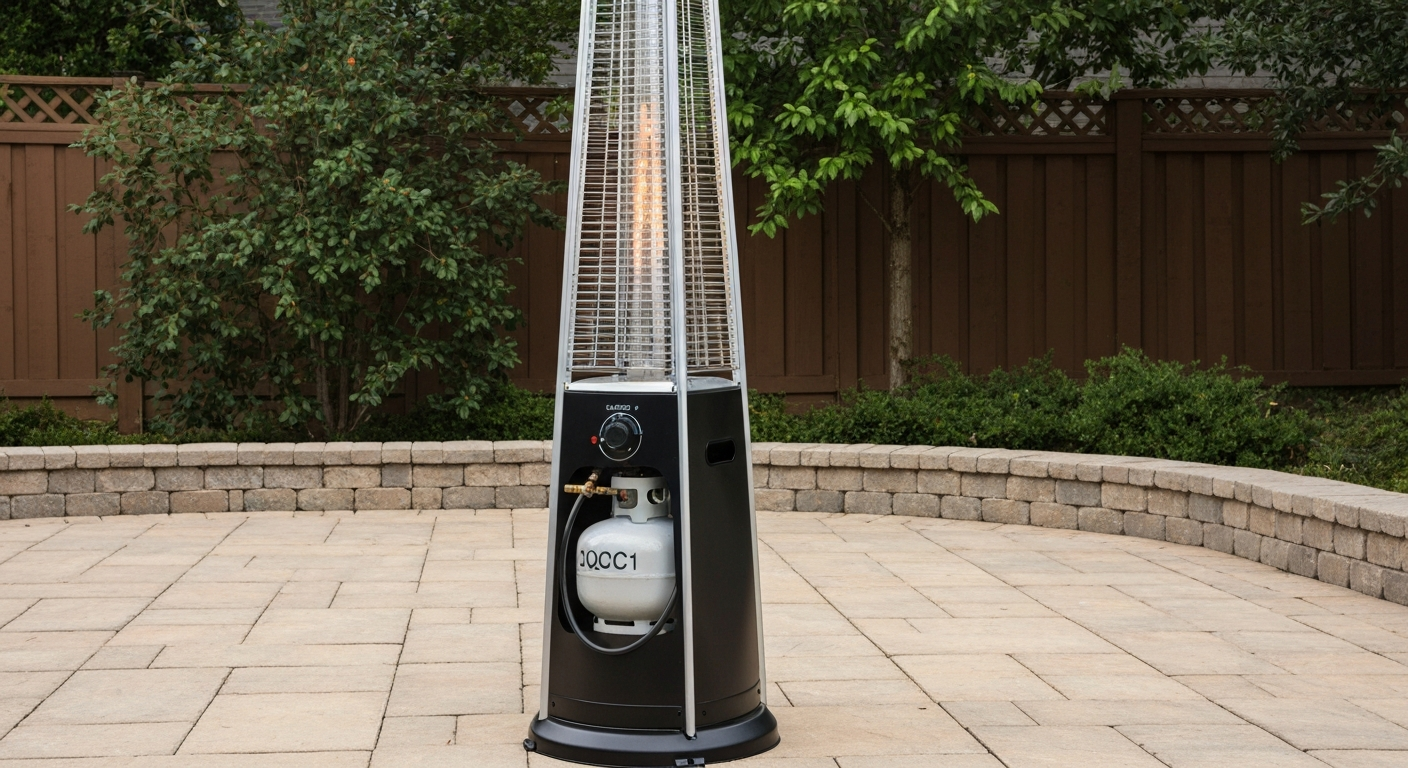
The primary Zubri model covered by this guide is the Z1-12. You can confirm your model by checking the label on the lower pole section or on the control cone housing, which is the metal shroud around the control knob and regulator connection. The label will print the model number (Z1-12), BTU rating (40,000 BTU), and the ANSI/UL 144 certification reference for the low-pressure regulator. If your label is worn or missing, the 40,000 BTU output and the cylindrical reflector design with a center emitter screen are the clearest identifiers.
Understanding the part names in the manual makes assembly and troubleshooting much easier. Here is how the Zubri Z1-12 breaks down by named component, matching the OEM manual's parts identification labels.
| Part Name | Location / Description | Relevance to Repairs |
|---|---|---|
| Burner head | Top of the upper pole, inside the reflector dome | Can block or corrode; inspect during maintenance |
| Emitter | Mesh screen at the burner head center | Blockages here cause ignition failure; check first |
| Thermocouple | Small probe positioned in the pilot flame path | Failure = flame won't stay lit after releasing knob |
| Control cone | Metal housing at mid-pole containing the control knob and regulator inlet | Houses the gas valve and regulator connection |
| Control knob | Rotary knob on the control cone | Push-in and turn to operate; failure = won't ignite |
| Reflector | Curved metal dome above the burner | Attached via threaded rod and wing nut |
| Skirt | Decorative cover around the lower pole and cylinder area | Attached via Velcro and zipper; remove for cylinder access |
| Regulator hose | Connects cylinder to control cone inlet | Supplies regulated LP gas at ≤11" W.C. pressure |
| Legs | Three legs with snap-in spring clips | Base stability; check clips are fully seated |
| Leg stabilizer / brace | Cross-brace connecting the legs | Prevents tipping; must be assembled before use |
| Tilt / tip switch | Internal safety device in the upper assembly | Cuts gas if heater tips; can trigger from vibration |
For ordering replacement parts, the PHP Distribution parts price list uses Zubri-specific part numbers. The thermocouple is listed as Z1-TC, the skirt assembly as Z1-SKB, and the control knob as Z1-KNOB. Keep these codes handy when searching distributor catalogs or calling parts suppliers.
Unboxing, inventory, and pre-assembly inspection
Before you start snapping parts together, spend five minutes going through the box carefully. Damage during shipping is more common than people realize, and a cracked regulator hose or a bent burner rod will cause problems the first time you light the heater.
- Lay all parts out on a clean, flat surface outdoors or in a garage.
- Match each part against the parts list in the Z1-12 manual. Confirm you have all three legs, the leg stabilizer brace, the upper pole sections, the reflector, the burner head assembly, the regulator hose, the skirt, wing nuts, and any included hardware.
- Inspect the regulator hose along its full length for cuts, kinks, or abrasion. Flex it gently and look for cracks in the rubber. Any damage means replace the hose before using the heater.
- Check the threaded fittings on the regulator. The QCC1/Type-1 (ACME) hand-tighten nut should spin freely and show no cross-threading or corrosion.
- Inspect the burner head and emitter screen for dents or deformation from shipping.
- Confirm the thermocouple probe is straight and undamaged.
- Check the control knob for cracks and make sure it pushes in and rotates smoothly before assembly.
- If anything is missing or damaged, contact your retailer or Zubri dealer before proceeding.
A quick pre-assembly safety checklist: confirm you are working outdoors, no propane cylinder is connected yet, you have your safety glasses on, and the work surface is stable. Don't rush this stage. Finding a cracked hose now is far better than finding it after you've connected a full cylinder.
Step-by-step assembly and first-time setup
The Z1-12 manual lays out a specific assembly sequence. Follow it in order because some steps (like attaching the stabilizer brace) are much harder once other components are in place. This sequence is for a first-time build from a new box.
- Attach the three legs to the base using the snap-in spring clips. Push each leg firmly into its socket until you feel and hear the clip engage. Tug each leg gently outward to confirm it is locked. A leg that pulls free without pressing the release clip is not seated.
- Attach the leg stabilizer brace. Connect the cross-brace between the legs at the appropriate mounting points. The brace is what keeps the heater from racking sideways, so make sure all connection points are secure.
- Assemble the pole sections. Most Z1-12 units have two or three pole segments. Slide the lower pole into the base, then connect the upper pole section with the control cone. Confirm alignment so the control knob faces outward for easy access.
- Hang the propane cylinder on the hook inside the lower pole/skirt area. The cylinder hangs from a dedicated bracket, which keeps it centered and reduces tipping risk. Do not connect the regulator yet.
- Attach the reflector to the threaded rod at the top of the upper pole using the folding wing nut. Hand-tighten until snug. The OEM manual says explicitly: do not over-tighten. The wing nut is designed for tool-free adjustment and over-tightening can crack the reflector mounting point.
- Attach the skirt using the Velcro and zipper fasteners. The skirt wraps around the lower section to cover the cylinder and lower pole. Make sure the zipper opens on the correct side for cylinder access.
- Regulator hose note: The regulator hose connects inside the control cone at the factory. The manual instructs you to apply PTFE (Teflon) tape to the valve threads only if the regulator hose is not already connected inside the control cone. On most new units the hose comes pre-connected at the cone end. If you are installing a replacement hose, wrap the male valve thread (not the QCC1 nut end) with two to three wraps of PTFE tape before threading in.
- Before connecting the cylinder, do a visual check: all legs locked, brace installed, reflector secured, no loose hardware visible.
- Connect the regulator hose to the propane cylinder. Hand-tighten the QCC1 nut clockwise until it is snug. Do not use tools on the QCC1 nut. Proceed to the leak test (covered in the propane hookup section below) before your first use.
After assembly, check that the heater stands level on a flat surface without rocking. The tilt switch inside the unit is sensitive to off-level positioning, and even a slight lean can trip it intermittently. If the heater rocks, adjust leg position or find a flatter surface.
Quick-reference pre-use safety checklist
Run through this checklist every time before you light the heater, not just the first time. It takes about 90 seconds and catches most of the issues that lead to wasted gas or dangerous situations.
- Heater is standing on a stable, level, non-combustible surface outdoors.
- Minimum clearances met: at least 16 inches of clearance above the reflector and at least 7 feet of side clearance from combustible materials including overhead structures, fences, and awnings.
- All three legs are locked and the stabilizer brace is secure.
- Reflector wing nut is snug; reflector is not loose or tilted.
- Regulator hose shows no visible cuts, kinks, or cracks.
- QCC1 connection to cylinder is hand-tight.
- Propane cylinder is not expired (check the collar date stamp; cylinders should be re-qualified every 12 years).
- Emitter screen is free of debris, spider webs, and obstructions.
- Control knob is in the OFF position before opening the cylinder valve.
- No one is standing directly over or leaning over the burner head area.
Controls and safe operation
The Z1-12 has a single control knob on the control cone. It does three things: it rotates to select gas flow level, it pushes in to allow gas to flow past the thermocouple-controlled safety valve, and it returns to the off position when released before the thermocouple heats up. Understanding this behavior is what makes lighting the heater reliable and what explains the most common complaint, which is the flame going out the moment you release the knob.
What the control knob actually does
When you push the knob in, you are manually holding open the gas valve, bypassing the thermocouple's hold-open function temporarily. This lets gas reach the burner so you can ignite it. Once the thermocouple probe heats up in the flame (which takes at least 15 seconds), it generates enough millivoltage, typically in the 20 to 30 mV range for a single thermocouple, to magnetically hold the valve open on its own. Only then can you release the knob and have the flame stay lit. If you let go before 15 seconds, the valve snaps shut and the flame dies. This is not a fault; it is the safety device working correctly.
Flame adjustment and the tilt switch
Once the flame is established and you release the knob, you can rotate it counter-clockwise to increase flame size or clockwise to reduce it. The heater does not have a thermostat; output is manually controlled by this knob position. Do not leave the heater unattended at a high flame setting in windy conditions, as gusts can extinguish the burner without tripping the tilt switch, and gas will continue to flow briefly until the thermocouple cools and the safety valve closes.
The tilt/tip switch is a passive safety device built into the upper assembly. If the heater is bumped hard enough to tilt it beyond its threshold angle, the switch cuts the gas supply immediately. You will notice the flame disappear suddenly. After a tilt-switch event, the heater must be returned to vertical and the full lighting sequence must be repeated from the beginning. The switch resets automatically once the heater is upright, but the thermocouple will have cooled and needs to be re-heated through the 15-second hold period again. If your tilt switch trips repeatedly without an obvious bump, check that the surface is level and the legs are fully seated.
Propane hookup and leak testing
The Zubri Z1-12 uses a low-pressure regulator that is ANSI/UL 144-1985 certified and delivers a maximum outlet pressure of 11.0 inches water column (approximately 2.74 kPa). This is standard for outdoor LP patio heaters. The regulator connects to a standard 20 lb propane cylinder via a QCC1/Type-1 (ACME) hand-tighten nut. If you are using an older cylinder with a POL (Prest-O-Lite, left-hand internal thread) valve, you need an appropriate adapter or a regulator assembly with a POL fitting. Do not force the QCC1 nut onto a POL outlet. They are not compatible and forcing them will damage both.
Connecting the cylinder step by step
- Confirm the control knob on the heater is in the OFF position.
- Remove the safety cap from the propane cylinder valve.
- Place the cylinder on the hanging bracket inside the heater skirt.
- Thread the QCC1 hand-tighten nut of the regulator hose onto the cylinder valve outlet. Turn clockwise until snug. Hand pressure only, no wrenches.
- Do not open the cylinder valve yet.
Leak test procedure (do this every time you connect a cylinder)
- Mix a generous amount of dish soap with water to create a thick, bubble-prone solution, or use a commercially available propane leak detector fluid.
- Apply the solution generously to the QCC1 connection at the cylinder, the full length of the regulator hose, and the inlet fitting at the control cone.
- Slowly open the cylinder valve one full turn. Do not stand directly over the heater while doing this.
- Watch all coated surfaces for 30 seconds. Growing or streaming bubbles indicate a leak.
- If no bubbles appear, the connections are sound. Wipe off the soap solution before lighting.
- If bubbles appear at the QCC1 nut, close the cylinder valve, hand-tighten the nut more firmly, and re-test.
- If bubbles appear at the hose body or at the control cone inlet, close the cylinder valve immediately and do not use the heater. A cracked hose must be replaced. A leaking control cone fitting may need PTFE tape or professional inspection.
- If bubbles persist at any connection after reasonable tightening, shut off the cylinder, remove it from the heater, replace the safety cap, and contact your propane supplier. Do not use the heater until the leak is resolved.
When replacing the regulator hose assembly, match these specifications to the Zubri OEM requirement: UL144 or UL569 certified, QCC1/Type-1 (ACME) cylinder connection, outlet pressure no more than 11 inches W.C., and the correct termination fitting for your control cone inlet. Flame King and similar brands sell compatible assemblies at most hardware stores; verify the certification marks on the label before purchasing.
Ignition and lighting the heater
The Z1-12 OEM manual gives a specific three-step lighting sequence. Most ignition failures trace back to deviating from this sequence, so follow it exactly the first few times until it becomes habit.
Standard lighting sequence
- Turn on the gas at the cylinder valve. Open it slowly, one full turn counter-clockwise.
- Position an ignition source (lighter or extended match) under the burner head, at the emitter level, before pushing the control knob. This is important: have the flame ready before gas starts flowing.
- Push the control knob in firmly and turn it counter-clockwise to the ignite/high position. Gas will begin flowing.
- Apply your ignition source. The burner should light within a few seconds.
- Keep the control knob pushed in for a minimum of 15 seconds after the flame ignites. This is the thermocouple heat-up period. Do not release early.
- After 15 seconds, slowly release the knob. The flame should remain lit. If it goes out, the thermocouple needs more time or has a fault. Wait two full minutes before retrying to allow any unburned gas to disperse.
- Once the flame holds with the knob released, adjust flame height by rotating the knob to your preferred setting.
Using the piezo or battery igniter
Some Z1-12 configurations include a piezo push-button igniter mounted on the control cone. If yours has one, the process is the same as above, except instead of using a separate lighter you press the piezo button while holding the control knob in. The piezo generates a high-voltage spark mechanically, with no batteries required. Press the button repeatedly (one press per second) while holding the knob in until the burner lights. If the piezo sparks visibly at the electrode but the burner does not light, the issue is with gas flow, not the igniter. If you press the button and see or hear nothing, the piezo crystal may be fatigued or the electrode wire may be disconnected.
Battery-powered electronic igniters on some models use a small battery (typically AA or AAA) to generate the ignition spark. If the spark is weak or absent, replace the battery first before assuming the igniter module has failed. Replacement igniters, whether piezo or battery-type, are widely available as aftermarket parts in the $15 to $80 range and are a straightforward DIY swap on the Z1-12.
Ignition troubleshooting: symptom by symptom
The Zubri Z1-12 manual lists its own troubleshooting checklist and it is a solid starting point, but the diagnostic flow below goes further. Work through each symptom in order, checking the simplest causes before moving to component-level diagnosis.
Heater will not ignite at all (no flame, no spark)
- Check the cylinder: is it empty? Lift or weigh it. A 20 lb cylinder weighs roughly 37 lbs when full and 17 lbs empty.
- Is the cylinder valve fully open? Turn it one full counter-clockwise turn.
- Is the QCC1 connection fully engaged and hand-tight? A loose nut prevents gas flow.
- Listen for any gas flow sound when you push the control knob in. If you hear nothing at all, the valve may be stuck or the regulator may be faulty.
- Check the emitter screen for blockages. Spider webs, dust, and debris are the single most common cause of no-ignition on heaters that have been stored. Clean with compressed air or a soft brush.
- Confirm the emitter is firmly seated. A loose emitter disrupts the gas-air mix needed for reliable ignition.
- Try a soap-bubble test on all connections to rule out a leak that is venting gas away from the burner.
Sparks but no flame
If the piezo or igniter is sparking visibly but the burner won't light, the problem is almost always gas supply. Confirm the cylinder has fuel, the valve is open, and the QCC1 connection is fully engaged. Then check the emitter for blockages. If all of those check out, try holding a lit lighter at the burner head while pushing the control knob in. If the burner lights with a manual flame but not with the piezo, the igniter electrode position may have shifted away from the gas stream, or the electrode gap has widened from heat cycling. Inspect the electrode tip position relative to the emitter and compare to the original position described in the manual.
Flame lights but goes out immediately when knob is released
This is almost always a thermocouple issue, but before replacing the thermocouple, rule out two simpler causes. First, confirm you are holding the knob in for the full 15 seconds. Many people let go at 8 to 10 seconds, which is not long enough. Second, make sure the thermocouple probe is positioned correctly in the flame path. If the tip is not sitting in the burner flame, it won't heat up enough to hold the valve open regardless of how long you wait.
If the probe position is correct and you are holding the knob for 15-plus seconds and the flame still dies on release, the thermocouple is likely worn out or failed. You can confirm this with a digital multimeter: with the thermocouple in a flame, a functioning single thermocouple should produce roughly 20 to 30 millivolts. A reading significantly below this range means the thermocouple is not generating enough output to hold the magnetic gas valve open. The Z1-TC replacement thermocouple from PHP Distribution is the correct OEM-spec part for the Z1-12.
Flame goes out randomly during use
Random shutoffs during normal operation usually point to one of three causes: a tripped tilt switch, a failing thermocouple that loses its hold under heat fluctuation, or a partially blocked emitter causing inconsistent combustion. Check the surface the heater is sitting on first. Even a slight slope or an uneven paving stone can cause the tilt switch to trip during normal thermal expansion of the legs. If the surface is fine, inspect the emitter screen and clean it. If the problem continues, test the thermocouple output as described above.
Tilt switch keeps tripping (heater shuts off from normal vibration)
A tilt switch that trips at the slightest movement may have become mis-calibrated, have a loose mounting inside the upper housing, or the heater may be sitting on an uneven surface. Start by verifying the surface is flat and the legs are fully locked. If the switch is tripping on a perfectly level surface with no obvious disturbance, the switch mechanism itself may have shifted internally. Accessing the tilt switch requires disassembling the upper assembly housing. This is a reasonable DIY task for someone comfortable with basic appliance disassembly, but if you are unsure, this is a good point to bring in a qualified service person since you are working inside the gas pathway.
Ignition troubleshooting quick-reference table
| Symptom | Most Likely Causes | First DIY Check | When to Call a Pro |
|---|---|---|---|
| Won't ignite, no spark | Empty cylinder, valve closed, piezo failed | Check gas level, open valve, test piezo by watching for spark | If gas confirmed flowing and spark present but no ignition after emitter cleaning |
| Sparks but no flame | Gas supply interrupted, blocked emitter, electrode misaligned | Confirm gas flow, clean emitter, check electrode gap | If gas confirmed and emitter clean but still won't light |
| Lights then goes out on release | Thermocouple not heated long enough, thermocouple failed | Hold knob 15+ sec, check probe position, test mV output | If new thermocouple doesn't resolve the issue |
| Flame goes out randomly | Tilt switch tripped, dirty emitter, failing thermocouple | Level the heater, clean emitter, test thermocouple mV | If tilt switch appears damaged or loose internally |
| Low or uneven flame | Partially blocked emitter or jet, low cylinder pressure | Clean emitter, check cylinder level, test regulator pressure | If regulator pressure is incorrect after replacement |
| Gas smell without flame | Loose connection, cracked hose, valve seat leak | Immediate soap-bubble test on all connections | Any persistent gas smell after tightening connections |
Routine maintenance and cleaning schedule
The Zubri manual calls for annual servicing by a qualified person, and that is a reasonable baseline. In practice, a Z1-12 used seasonally in a typical backyard needs a pre-season inspection and clean before first use, a quick mid-season check, and a proper winterizing clean-and-store at the end of the season. If you use the heater year-round, inspect it every 3 months.
| Task | Frequency | Tools / Materials Needed |
|---|---|---|
| Clean emitter screen and burner head | Before each season; monthly if used heavily | Compressed air, soft brush, dry cloth |
| Inspect regulator hose for cracks or kinks | Every use (visual); full flex-check pre-season | Eyes, hands |
| Soap-bubble leak test | Every cylinder change | Dish soap and water or leak detector fluid |
| Check and tighten all hardware (legs, brace, reflector nut) | Pre-season and mid-season | Hand check; no tools usually needed |
| Inspect thermocouple probe for corrosion or tip damage | Pre-season | Visual inspection |
| Test igniter spark | Pre-season | Visual check in low light |
| Clean reflector interior | Pre-season | Damp cloth, mild detergent |
| Full annual service by qualified technician | Annually (OEM requirement) | Professional service |
Cleaning the emitter and burner head
Remove the reflector by loosening the wing nut on the threaded rod. This gives you clear access to the burner head and emitter screen. Use compressed air to blow out debris from the emitter screen, directing air from inside the mesh outward to push blockages out rather than in. For stubborn deposits, a soft-bristle brush works well. Do not use wire brushes or sharp tools on the emitter mesh; the mesh is fine and can be damaged easily. If the mesh is corroded, deformed, or has holes, replace it. A damaged emitter affects combustion quality and can cause incomplete burn.
Replacing the thermocouple
Thermocouple replacement is one of the most common Z1-12 repairs. The process involves disconnecting the old thermocouple from the gas valve connection point (usually a push-fit or threaded fitting at the control cone), removing the probe from its bracket at the burner head, and reversing the process with the new part. Order the Z1-TC part from PHP Distribution or a compatible thermocouple with the same tip-to-connection length. Before threading any fittings, make absolutely sure the cylinder valve is closed and the regulator hose is disconnected from the cylinder. After installation, run a full leak test before lighting. Manufacturer guidance and industry best practice require leak testing after any cylinder or connection change, use a soapy‑water “bubble” test or an approved leak‑detector solution applied to valve, regulator, and hose connections and repeat until no bubbles form; see Safety Guide for Portable Propane Cylinders, Propane Education & Research Council (PERC) Safety Guide for Portable Propane Cylinders — Propane Education & Research Council (PERC).
Replacement parts: what to order and where
Most consumable and wear parts for the Z1-12 are available through PHP Distribution and general heater parts suppliers. Here are the key parts with their Zubri-specific references where applicable.
| Part | Z1 Part Number | Typical Cost Range | Notes |
|---|---|---|---|
| Thermocouple | Z1-TC | $10–$25 | Confirm probe length matches original |
| Control knob | Z1-KNOB | $8–$20 | Check shaft diameter before ordering |
| Skirt assembly | Z1-SKB | $20–$40 | Includes Velcro and zipper |
| Piezo igniter | Generic (heater type) | $15–$40 | Confirm electrode thread size |
| Battery electronic igniter | Generic (heater type) | $25–$80 | Match voltage and connector type |
| Regulator hose assembly | Generic UL144/QCC1 | $15–$35 | Must be UL144 certified, 11" W.C. max outlet |
| Emitter / burner screen | Generic (Z1 size) | $10–$25 | Match mesh diameter to original |
| O-rings (valve/regulator seals) | Generic (measure ID/OD) | $1–$5 per piece | Replace any time valve or regulator is serviced |
When buying a replacement regulator hose, check the product label for UL144 certification, QCC1/Type-1 (ACME) tank connection, and an outlet pressure specification of 11 inches W.C. or lower. Flame King and similar brands available at major hardware stores meet these specs, but always verify the label rather than assuming. A regulator with incorrect output pressure will cause combustion problems or may not hold adequate gas flow for the 40,000 BTU burner.
Storage and winterizing
Proper storage is one of the best maintenance investments you can make. Most of the dirty emitter and corroded thermocouple problems I see on Z1-12 heaters are caused by improper off-season storage, usually leaving the heater uncovered outdoors with a cylinder still attached. The Zubri OEM manual is explicit about isolation steps for storage, and they are worth following precisely.
- Turn off the gas at the cylinder valve fully.
- Disconnect the regulator hose from the cylinder. Important: disconnect at the cylinder end only. Do not disconnect the hose from inside the control cone. The cone-end connection uses PTFE tape or a sealant and is not designed for repeated reconnection.
- Replace the safety cap on the propane cylinder valve.
- Remove the cylinder from the heater. Propane cylinders must not be stored indoors (this includes garages with open flames or ignition sources). Store the cylinder upright, outdoors, away from heat sources.
- Clean the emitter, burner head, and reflector before storing.
- Cover or bag the burner head area to prevent insects (especially spiders) from nesting in the emitter over winter. This is one of the primary causes of spring ignition failures.
- Store the heater in a dry location. If storing outdoors, use a properly fitted weatherproof cover.
- Never store spare propane cylinders underneath or directly next to the heater.
DIY vs. calling a professional: clear decision points
The Zubri manual states that repairs must be performed by a qualified service person and that the heater should be serviced at least annually. That is not meant to scare you away from basic maintenance and part swaps, but it does reflect the fact that there are genuine limits to safe DIY on gas appliances. Here is a clear breakdown.
| Task | DIY Appropriate? | Notes |
|---|---|---|
| Cleaning emitter and reflector | Yes | Simple; no gas connections involved |
| Replacing thermocouple | Yes, with care | Disconnect cylinder first; run leak test after |
| Replacing igniter (piezo or battery) | Yes | No gas connections on most models; confirm before starting |
| Replacing regulator hose assembly | Yes | Match OEM specs; mandatory leak test after |
| Replacing control knob | Yes | External part; no internal gas work |
| Adjusting or replacing tilt switch | Proceed carefully | Requires internal disassembly near gas valve; stop if uncomfortable |
| Replacing gas valve or valve seat | No | Internal gas component; requires qualified service person |
| Converting to fixed gas supply | No | Zubri manual prohibits this; contact a registered gas dealer |
| Repairing cracked or deformed burner head | No | Replace only; do not weld or patch a burner |
| Any repair after persistent gas smell | No | Stop use, remove cylinder, contact propane supplier |
If you find yourself opening the gas valve body, modifying the control cone internals, or attempting to fabricate a replacement for a safety component like the thermocouple seat or the tilt switch mechanism, stop and call a professional. The cost of a service call is far lower than the consequences of a propane incident. Owners of other portable patio heater brands face the same decision points: the same principles that apply to the Z1-12 apply when working on comparable heaters from other manufacturers, whether the issue is a thermocouple swap, a regulator replacement, or an igniter upgrade.
A note on comparable heater manuals and parts
The Zubri Z1-12 sits in the same product category as a number of other portable propane tower heaters, and their assembly, ignition, and troubleshooting logic is broadly similar. For a comparable set of assembly and safety instructions, consult the Trustech patio heater manual for additional guidance on similar models. For example, the Kirkland Signature patio heater manual covers similar safety, assembly, and ignition procedures and can be consulted as a comparable reference (see the Kirkland Signature patio heater manual). For general fan and outdoor fixture installation tips, see Kichler Basics Patio Fan for a concise companion guide. If you are also managing a heater from another brand, detailed manual-based guides for models like the Kirkland Signature patio heater, the Shinerich patio heater, the Trustech patio heater, and the Blue Rhino patio heater follow the same symptom-to-fix framework described here. The thermocouple behavior, tilt switch function, and propane hookup procedures are nearly identical across this category, though part numbers and specific assembly steps differ. For a comparable reference, see the Shinerich patio heater manual for similar assembly, ignition, and safety guidance. Briza infrared heaters use a different heating technology (electric infrared) and have a separate set of maintenance considerations altogether. See the Briza infrared patio heater manual for model-specific assembly, safety, and maintenance instructions.
FAQ
How do I identify my Zubri patio heater model and key parts before starting any work?
Locate the model plate or sticker (inside the control cone or on the leg bracket) and note model number (e.g., Z1‑12) and BTU rating. Key parts to identify and photograph: reflector, emitter/burner head, control cone, control knob/valve, thermocouple/thermopile (sensor near pilot/burner), piezo or battery igniter assembly, regulator+hose (external), leg assembly and skirt, tilt/tip switch (in base/leg), and propane cylinder connection (QCC/ACME or POL). Record regulator rating (UL/ANSI marks) and take clear photos of each part and the nameplate for reference and ordering spares.
What safe preparation and tools do I need before unboxing or assembling a Zubri heater?
Work outdoors on a stable flat surface, away from ignition sources. Required tools: adjustable wrench, screwdriver set, PTFE (thread) tape, soapy water/leak detector, digital multimeter (for thermocouple checks), needle files/pick (for cleaning jets), replacement O‑rings, gloves and eye protection. Safety steps: keep cylinder capped until connected, read OEM manual, have a fire extinguisher nearby, do not smoke, ensure cylinder is upright and regulator is for LP gas. Keep children/pets away.
What is the reproducible unboxing and assembly procedure (step‑by‑step) per Zubri instructions?
1) Remove all packing and verify parts list. 2) Attach legs to base using snap‑in spring clips; insert leg stabilizer/brace and fasten. 3) Mount the propane cylinder on the hook (do not connect yet). 4) Install control cone assembly on top of legs per manual. 5) Attach reflector to threaded rod and secure with wing nut—do not over‑tighten. 6) Fasten emitter/burner head to control cone and ensure bolts are tight. 7) Fit skirt with Velcro/zipper. 8) Connect regulator/hose only at cylinder now: ensure regulator nut threads match (QCC/Acme or POL) and hand‑tighten per OEM. 9) Do not apply PTFE tape to pre‑installed regulator connections; only use thread tape if connecting aftermarket fittings that require it and only on external male threads per manual. 10) Perform leak test before lighting.
What is the correct, step‑by‑step lighting and first‑time startup procedure?
1) Confirm cylinder has fuel and valve is closed. 2) Open cylinder valve slowly one full turn. 3) Position yourself so you can see the burner and control cone. 4) Press and push‑in the control knob; turn counterclockwise to the ignite position while holding the knob depressed. 5) If equipped, press the piezo/button until you see a spark and the burner lights. 6) Keep the knob depressed for at least 15 seconds to heat the thermocouple/thermopile so the valve will hold. 7) Release knob; if flame stays, adjust to desired level. 8) If flame goes out, shut off gas, wait two minutes for venting, then retry. If multiple failed attempts, follow troubleshooting flow.
What immediate safety checks and a pre‑use checklist should I perform before each use?
Check for: cylinder gas level and correct regulator; regulator/hose damage, cracks or hardening; tightness of all connections (hand‑tighten QCC nut); no visible corrosion on burner, emitter, or reflector; tilt/tip switch unobstructed and functional; skirt and clearances meet OEM minimums (minimum 16" above and 7 ft side clearance per manual); no leaks (bubble test at connections). Confirm area is ventilated and no combustible overhangs. If any failure, do not operate until resolved.
What is a reproducible leak test (bubble test) procedure after connecting the cylinder?
1) Mix thick soapy water or use a commercial leak‑detector spray. 2) With cylinder valve closed, apply solution to regulator inlet nut, regulator/hose connection points, and any accessible fittings. 3) Slowly open the cylinder valve while watching for steady bubble formation. 4) If bubbles appear, immediately close the cylinder valve, tighten connections, replace damaged hose/O‑rings, and retest. 5) If bubbles persist after tightening or you smell a strong odor, close valve, remove cylinder outside, and contact the propane supplier or a professional. Never use a flame to test for leaks.