To fix your DCS patio heater, you first need to confirm which model you actually have, because DCS made two very different heater families with completely different ignition systems: the DRH-48N built-in heater (electronic ignition with a flame sensor and lockout module) and the PH3 family (PHFS-DW-SS, PHFS-DW-BK, PHFS-DW-WT, PHFS-DW-BL, PHFS-DW-GN, PHFS-DW-BZ), which uses a piezo igniter and thermocouple setup. The troubleshooting steps, reset procedures, and even the gas connections differ between them, so using the wrong manual sends you down the wrong path entirely.
DCS Patio Heater Manual: Find the Right One Fast

Grant Mercer
25 Jun 2026
Step one: identify your exact DCS model
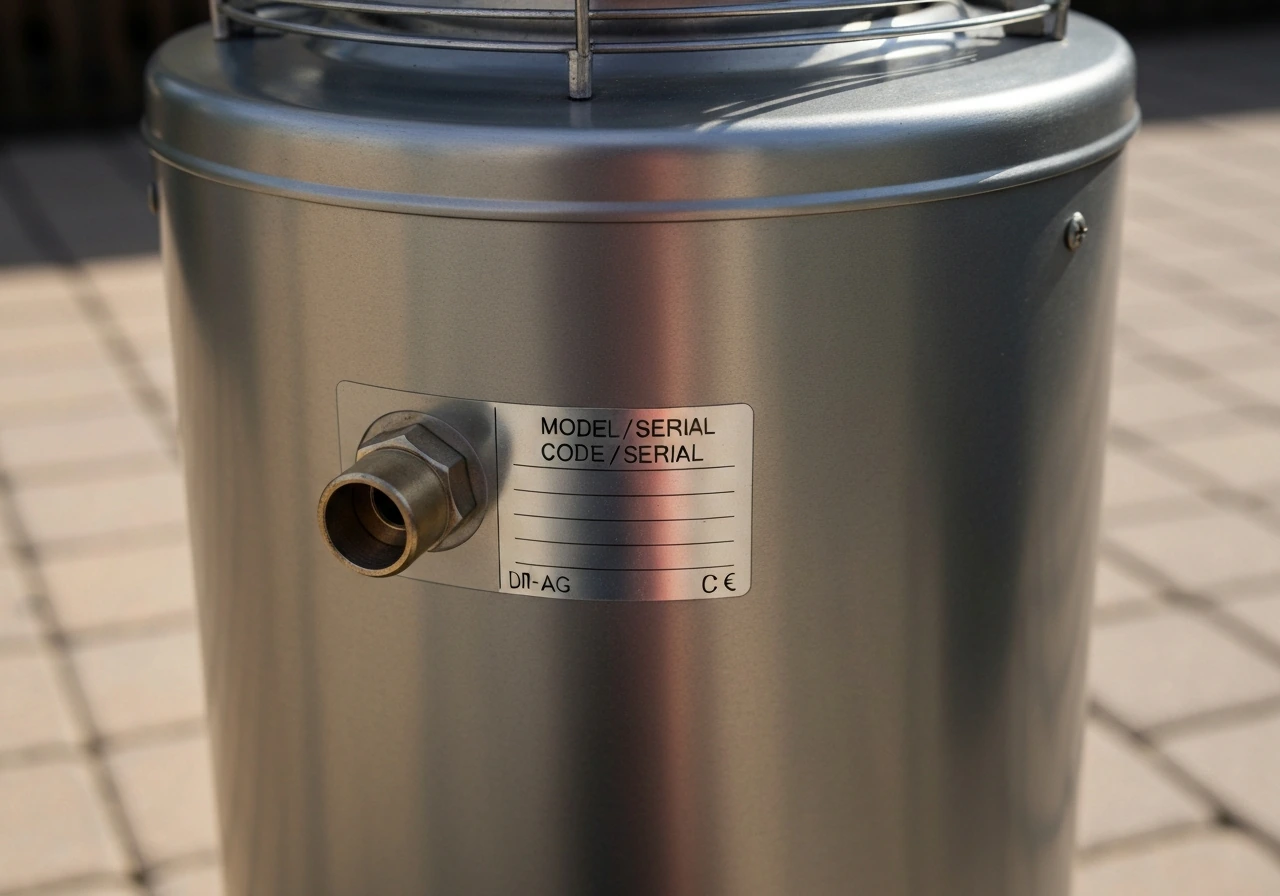
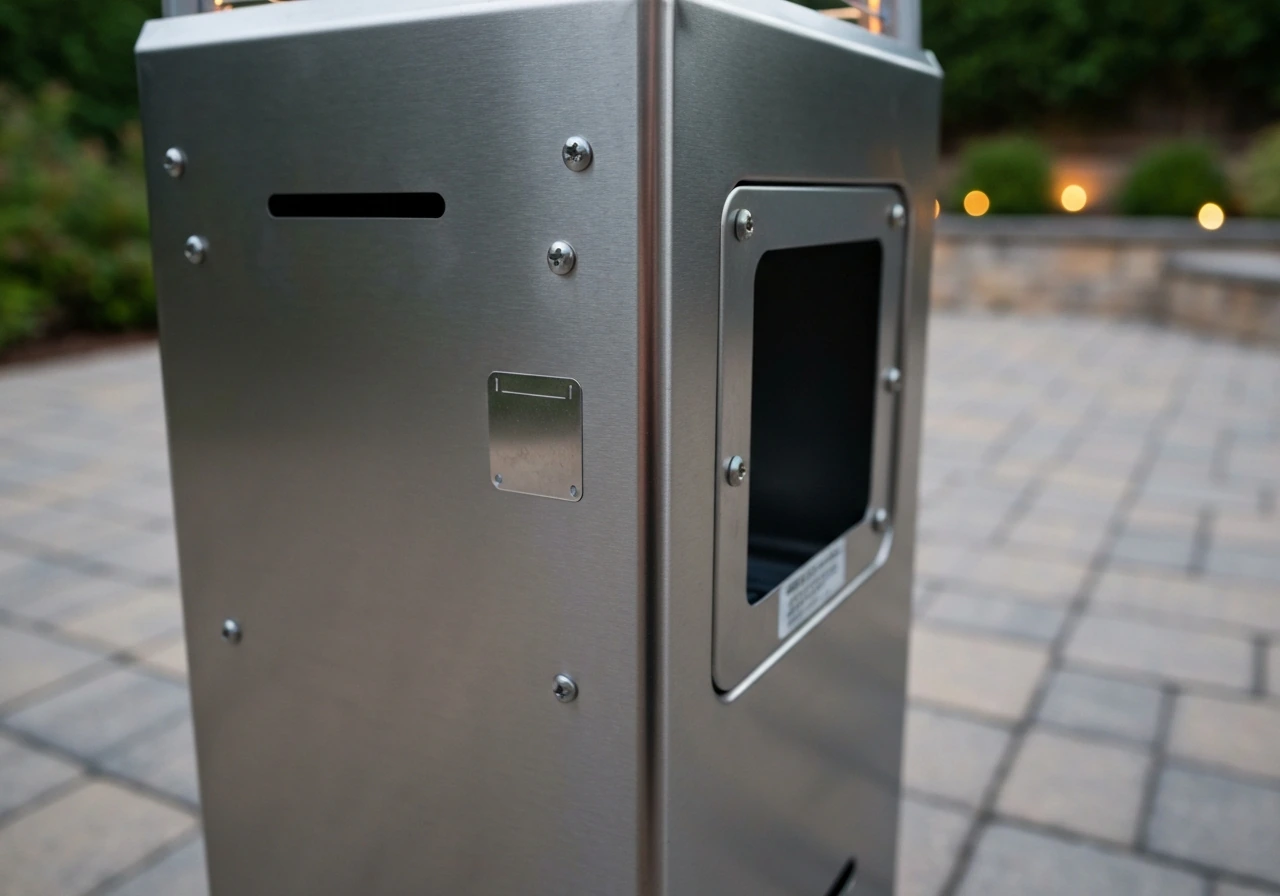
Before you open any manual, find your model number. On the DRH-48N built-in heater, DCS placed the model, code, and serial numbers on the right side of the unit near the gas inlet. Look there first. On the PH3 portable heaters, the model number is typically on a label near the base or on the valve panel. The full model number will look something like DRH-48N or PHFS-DW-SS. That suffix matters: the two-letter color/finish code at the end (SS for stainless, BK for black, and so on) just identifies the finish, but the PHFS-DW prefix tells you it's the PH3 family with the piezo ignition system.
Once you have the model number, you want the right document. For the DRH-48N, DCS publishes two PDFs: the full installation and user guide (document 238042E, sometimes labeled DCSUserInstallGuideDRH-48NHeater238042E.pdf) and a shorter Quick Reference Guide (QRG-US-71531.pdf). Both are hosted on dcsappliances. DCS publishes the DRH-48N Quick Reference Guide (QRG-US-71531) on dcsappliances.com, and it is tied to the DRH-48N SKU so you can cross-verify you have the correct built-in model before troubleshooting. com under their installation manuals directory. The Quick Reference Guide is handy for fast lighting reminders, but for any real troubleshooting you want the full guide because it includes wiring diagrams, the ignition module schematic, and leak-test procedures. For the PH3 (PHFS-DW) family, the Use and Care Guide is available on Manualzz and covers all color variants under one document. If you are looking for the HSS patio heater manual, use the model number first and download the exact PDF for your heater family so the steps match your ignition type Use and Care Guide.
Quick startup and control checks straight from the manual
Before diving into component-level diagnosis, run through the correct startup sequence for your model. If you need the exact steps, use the pg188h patio heater manual for your model’s recommended startup order before troubleshooting any ignition issues run through the correct startup sequence for your model. Getting the order wrong is genuinely one of the most common reasons a DCS heater won't light the first time someone tries it.
DRH-48N startup sequence
- Turn the manual gas valve to the ON position.
- Turn the electrical supply ON. The ignition module will begin its automatic ignition cycle.
- The burner should light within the first 4 seconds of the ignition attempt.
- To shut down: turn the electrical supply OFF first, then turn the manual gas valve OFF.
That order (gas first, then power) is not optional. The ignition module needs gas present when it fires the mini-igniter, and the flame sensor only has that short window to confirm ignition. Reversing the sequence is a common setup mistake.
PH3 (PHFS-DW) startup sequence
- Open the LP tank valve counterclockwise.
- Push and hold the control knob in, then turn it to the pilot position.
- While holding the knob in, press the piezo igniter button to spark the pilot.
- Keep the knob held in for 30 seconds to allow the thermocouple to heat up, then slowly release.
- If the pilot stays lit, turn the knob counterclockwise to the desired heat setting.
- To shut down: turn the control knob clockwise to OFF (a slight popping sound is normal), then close the LP tank valve clockwise.
No ignition and won't-stay-lit fixes
These are the two most common complaints, and the fix depends entirely on which model you have. If you have the BFC-A-SS patio heater manual, use it to confirm the exact troubleshooting steps for your model and ignition type. Here's how to work through each one.
DRH-48N: flame sensor lockout is the first thing to check
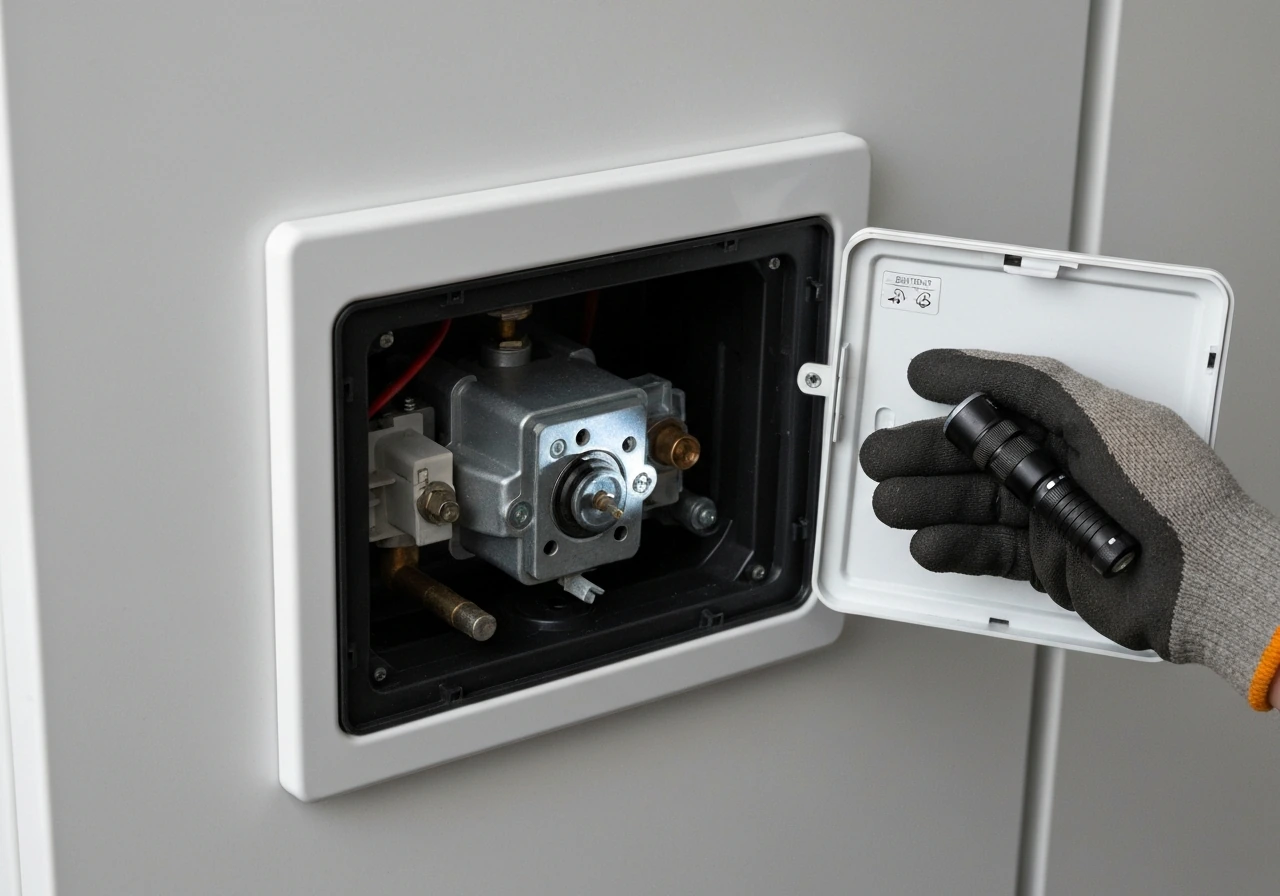
The DRH-48N uses an electronic ignition module with a flame sensor (labeled PUR in the wiring schematic) that watches for ignition in the first 4 seconds. If the burner doesn't light in that window, the flame sensor shuts off the mini-igniter. The unit automatically retries up to 3 times before it locks out completely. Once locked out, the heater will not attempt ignition again until you reset it.
Reset procedure: turn the electrical supply OFF, wait a full 5 minutes to let any unburned gas dissipate safely, then turn the electrical supply back ON. Do not skip the 5-minute wait. That wait is a safety step, not a suggestion.
If it keeps locking out after reset, work through this checklist before touching any components. Confirm the manual gas valve is actually open, check that gas pressure at the unit is adequate (see the gas supply section below), and verify the mini-igniter electrode is positioned correctly near the burner. The wiring schematic in guide 238042E labels each terminal: the flame sensor wire is purple (PUR), the gas valve wire is blue (BLU), the thermostat is orange (ORG), and the igniter wire is red (RED). A loose connection on any of these can cause repeated lockout. Inspect each connection visually before assuming a component has failed.
PH3: piezo spark, pilot, and thermocouple problems
The PH3 troubleshooting flow starts with a simple question: does a spark appear at the pilot when you press the piezo button? For the patio heater PH 2800 B manual, follow the PH3-specific troubleshooting flow for ignition, spark, pilot, and thermocouple checks PH3 troubleshooting flow. If you see no spark at all, check that the igniter wire is connected and the insulation isn't damaged. If the wire is fine, replace the piezo igniter. If there is a spark but the pilot won't light, the issue shifts to gas supply or a blocked pilot orifice.
Won't stay lit on the PH3 is almost always a thermocouple or pilot-flow issue. The pilot flame heats the thermocouple, and the thermocouple signal is what allows the gas valve to stay open for the main burner. If the pilot is partially blocked by debris or spider webs, the flame won't be strong enough to heat the thermocouple adequately, so the main burner never comes on or the pilot drops out when you release the knob. The fix is to clean the pilot orifice (detailed in the maintenance section below).
If the pilot fails to relight after a shutdown: turn the control knob to OFF, wait the full 5 minutes the manual specifies, then repeat the lighting steps from the beginning. Attempting to relight too soon, especially on a warm heater, is a common failure point.
Flame quality problems, overheating shutdown, and tilt switch issues
Yellow tipping, uneven glow, and low flame
The PH3 manual is explicit about flame color: a healthy flame should appear blue with only slight yellow tipping. Extreme yellow tipping or a flame that never reaches temperature are both listed as signs of burner blockage, typically from spiders or insects that nest inside the venturi tube and burner ports between uses. This is genuinely the most common maintenance failure on portable patio heaters across all brands, not just DCS.
Uneven emitter glow is another common complaint. The PH3 manual walks through it in order: first check that the control knob is fully counterclockwise (full on), then check the burner and orifices for blockage. After ruling those out, check whether the heater is level. If it's tilted, the tilt/safety valve on the PH3 can partially restrict gas flow to protect against tip-over.
Low flame usually starts with gas supply. Before pulling apart the burner assembly, check whether the LP cylinder is getting low, whether the supply hose is kinked, and whether the regulator is functioning. The PH3 manual specifically calls out a bent or kinked hose as a cause of low flame, and it's easy to overlook.
Tilt switch and safety valve behavior
The PH3 has a tilt safety valve. If the heater isn't perfectly level, this valve can misread the tilt and shut down or restrict gas, which shows up as uneven glow or the heater going out unexpectedly on a level-looking surface. The manual's fix: loosen (but do not remove) the screws at the top of the safety valve cylinder, adjust the heater until it's genuinely level, then retighten. Don't assume your patio is level just because it looks flat.
The DRH-48N is a built-in unit and doesn't use the same tip-over tilt switch, but it does have thermal safety behavior managed through the ignition module and flame sensor. Repeated lockouts that can't be resolved with the reset procedure, adequate gas supply, and clean components typically point to either a failing flame sensor or a fault in the ignition module itself, which is a job for a qualified technician.
Gas supply and regulator checks
Gas supply problems cause a huge percentage of patio heater failures, and they're easy to overlook because the heater itself looks fine. Here's how to work through them for each DCS model type.
PH3 LP gas setup
The PH3 ships configured for LP (propane) and comes with a regulator and hose assembly sized for a standard 20 lb. (5-gallon) LP tank. The manual explicitly warns against connecting to an unregulated LP tank. Never bypass the regulator. If you want to run the PH3 on natural gas or a different configuration, a factory conversion kit is required. Don't improvise this.
Before blaming the igniter or pilot, run through this gas supply checklist. Check that the LP cylinder isn't empty, verify the tank valve is fully open, and physically inspect the hose for kinks or cracks. Straighten any kink you find and retest. After any new connection or hose change, do a leak test before lighting.
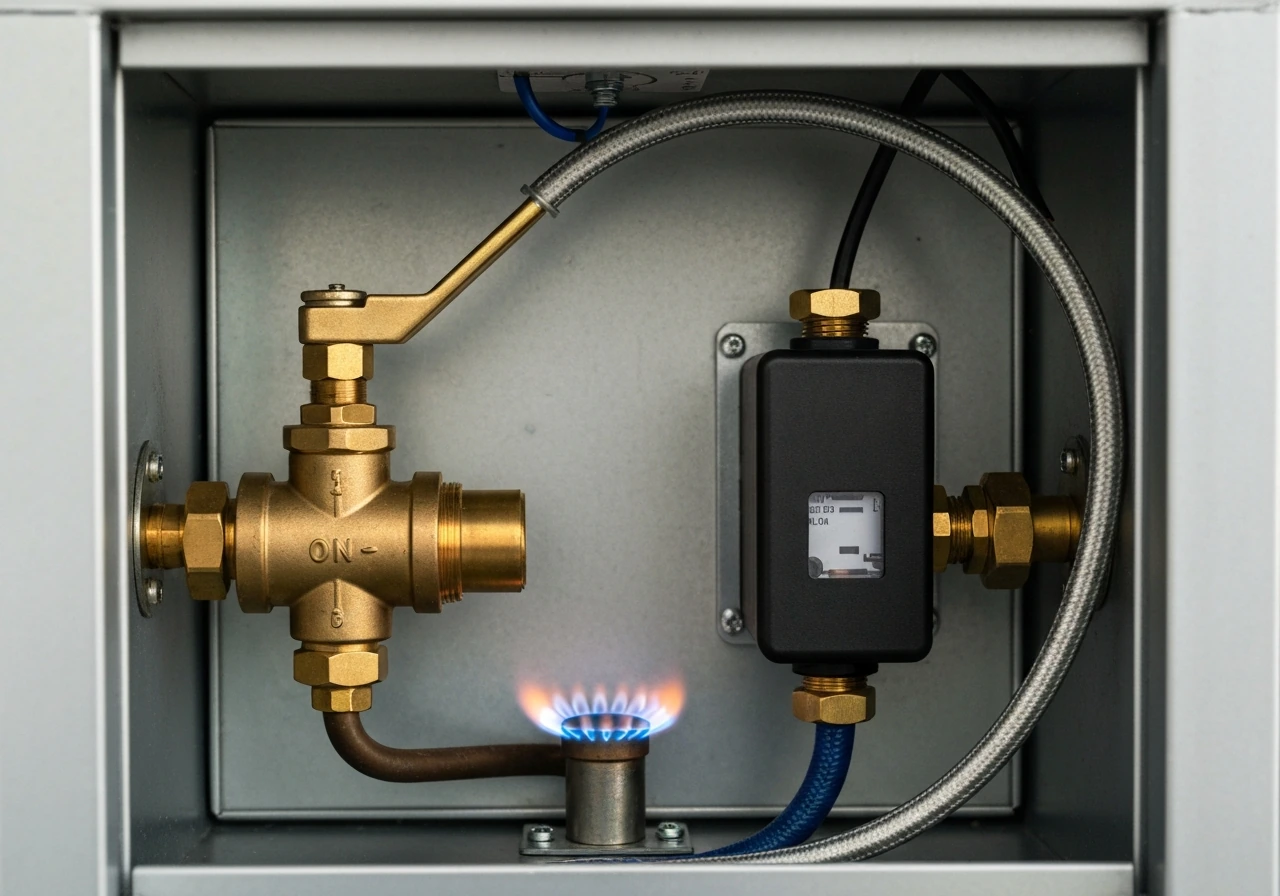
DRH-48N natural gas installation
The DRH-48N is a built-in heater that connects to a permanent gas line. The installation manual requires a drip leg in the gas line and a 1/8-inch NPT plugged test gauge connection immediately upstream of the heater's gas supply connection. This test port is important: if you ever need to measure supply pressure during service, this is where you do it. If your installation doesn't have this port, have it added by a plumber or gas technician.
The DRH-48N also has a ventilation requirement that's easy to miss: a minimum of 4 CFM of building ventilation per 1,000 BTU of input. Air inlets on the heater must never be blocked. If the heater is installed in an enclosed or semi-enclosed space, verify airflow meets this spec before assuming you have a fuel or ignition problem.
Leak testing both models
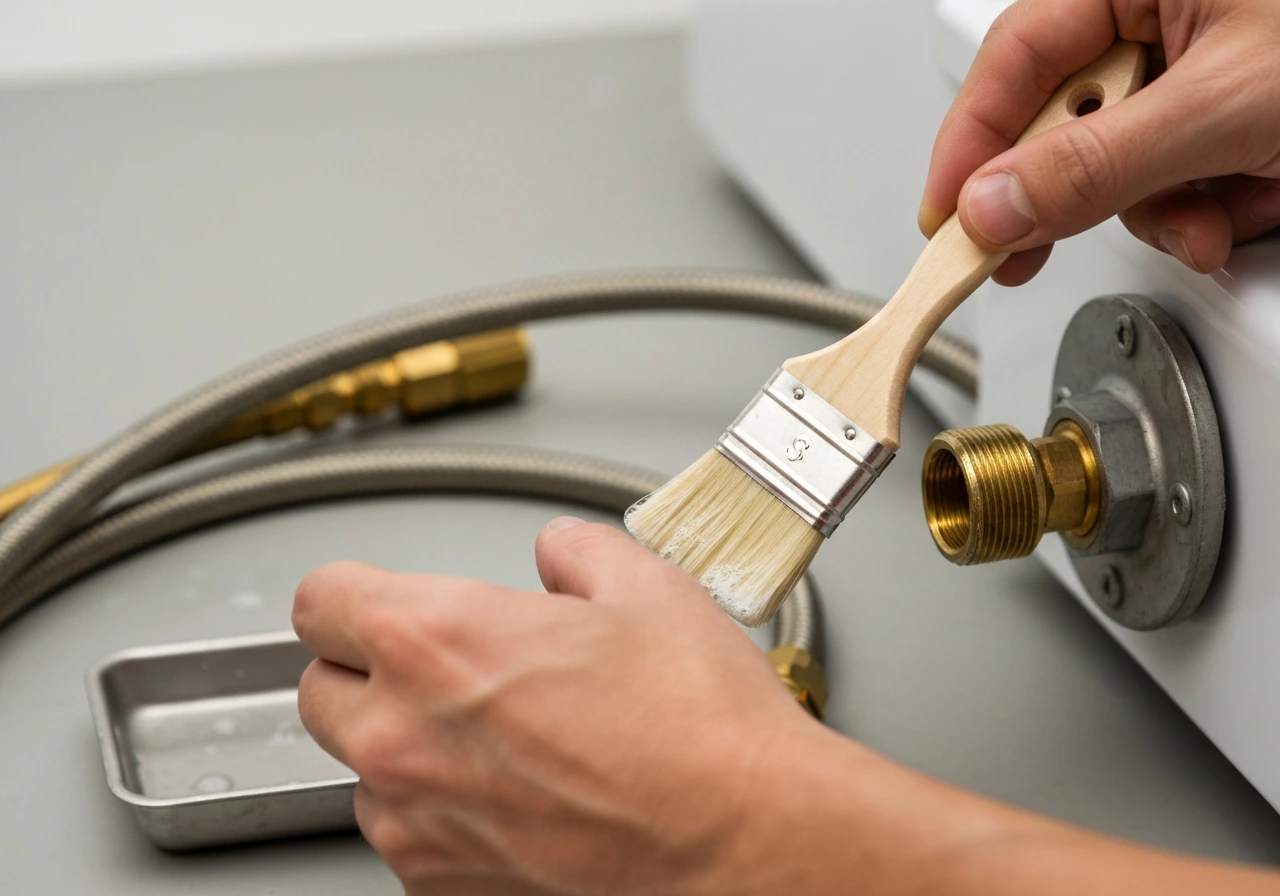
Always run a leak test after any gas connection work. Mix 1 part liquid dish detergent with 1 part water to make a soap solution. Turn the gas supply on, then brush or spray the solution onto every fitting, connection, and joint. Watch for bubbles. If you see any, shut the gas off immediately, tighten or repair the fitting, and retest. Never use an open flame to check for gas leaks. Never do this while smoking. These are not casual warnings.
Maintenance, cleaning, and seasonal care
Cleaning the pilot orifice (PH3)
Pilot cleaning is the single most effective maintenance task on the PH3. The manual's steps are specific and worth following exactly to avoid damaging the orifice.
- Make sure the heater is completely cold before starting.
- Remove the valve panel to access the pilot assembly. Be careful not to tug the ignition wire.
- Loosen and remove the pilot nut to separate the pilot assembly.
- Inspect the pilot and tubing for blockage. You should be able to see light through the orifice when you hold it up.
- If blocked, use a sewing needle to gently clear the orifice opening. Do not use a drill bit or anything that could enlarge the hole. Enlarging the orifice changes the gas-air mixture and will cause problems.
- Reinstall the pilot assembly, reconnect the ignition wire, and replace the valve panel.
- Relight the heater and confirm the pilot flame is steady and strong enough to heat the thermocouple.
Cleaning the burner (PH3)
At minimum once a year, and immediately if you see extreme yellow tipping or the heater isn't reaching temperature, pull the burner for inspection. The manual steps: remove the reflector and emitter assembly, remove the valve panel carefully, then remove the 1/4 NPT nut holding the burner head to the orifice fitting. Clear debris from the burner ports and venturi tube air inlet using a straightened coat hanger. Reinstall the burner centered on the fitting before tightening. After reassembly, light the heater and confirm the flame is blue with only slight yellow tipping. If the flame is heavily yellow after cleaning, there's still a blockage or the orifice may be damaged.
Keep all air openings and orifices free of dirt, spider webs, and insect nests year-round. Blocked combustion air is one of the most dangerous conditions on any gas heater, not just an efficiency problem.
Seasonal storage (PH3)
When storing the PH3 for the off-season, the manual is clear: disconnect the LP cylinder from the heater completely, remove the cylinder from the heater, and store the cylinder outdoors in a well-ventilated area. Never store a connected propane tank indoors or in an enclosed garage. Cover the heater to keep insects out of the burner and pilot during storage. When you bring it back out in spring, inspect the pilot, burner ports, and hose before the first light.
Annual inspection checklist for both models
- Inspect the hose and regulator for cracks, brittleness, or kinks (PH3) or check gas line connections and fittings (DRH-48N).
- Run a soap-and-water leak test on all gas connections before first seasonal use.
- Clean pilot orifice and burner ports of spider webs and debris.
- Check that all air inlets and combustion openings are clear and unobstructed.
- Inspect igniter electrode position and wiring connections.
- On the DRH-48N, check all wiring connections against the schematic: flame sensor (PUR), gas valve (BLU), thermostat (ORG), igniter (RED), fuse, and 24 VAC transformer.
- Verify the heater is level (especially critical on PH3 with tilt safety valve).
- Confirm flame color after first light: blue with slight yellow tipping is correct; heavy yellow or orange means cleaning is needed.
Assembly, setup, and safe operating checks
If you're assembling or setting up a DCS patio heater for the first time, or reassembling after maintenance, the manual is required reading before you turn on any gas. This isn't where you wing it.
For the DRH-48N, the installation guide covers the wiring schematic in detail. The 24 VAC transformer, ignition module, fuse, and all component terminals are labeled. If any wiring was disturbed during installation or maintenance, verify every connection against that diagram before restoring power. The DRH-48N also requires the gas piping to include a drip leg and the test gauge port upstream. If your contractor skipped either of these during installation, have them corrected before use.
For the PH3, assembly is simpler but there are still two steps that people commonly skip. First, the regulator and hose must be connected to the LP tank with the tank valve closed before opening gas. Second, a leak test at every connection point (tank connection, regulator, hose, and valve fitting) must be completed before the first light. The manual marks these test points explicitly in the assembly section. Do not assume a new hose is leak-free just because it's new.
After assembly and a successful leak test, run through the full startup sequence from your model's manual rather than guessing. If you are also looking for a different brand's guidance, the patioboss electric patio heater manual is a related option for wiring, startup, and safety checks. For the PH3, confirm the pilot lights cleanly and the main burner comes on smoothly when you turn the knob. For the DRH-48N, confirm the burner lights on the first ignition attempt without reaching lockout. Either of those conditions not being met means you have something to investigate before regular use.
DRH-48N vs. PH3: choosing the right manual and approach
| Feature | DRH-48N | PH3 (PHFS-DW-*) |
|---|---|---|
| Heater type | Built-in, permanent install | Portable, freestanding |
| Ignition system | Electronic mini-igniter + flame sensor + lockout module | Piezo igniter + thermocouple |
| Gas type | Natural gas (permanent line) | LP propane (20 lb. tank with regulator) |
| Lockout reset | Power OFF, wait 5 minutes, power ON | Control knob to OFF, wait 5 minutes, relight |
| Won't-stay-lit cause | Flame sensor or gas pressure issue | Thermocouple or blocked pilot orifice |
| Tilt safety | Not applicable (built-in) | Tilt safety valve in base |
| Manual document | 238042E + QRG-US-71531 (dcsappliances.com) | PHFS-DW Use and Care Guide (Manualzz) |
| Wiring diagram included | Yes (full schematic in 238042E) | No (mechanical/parts diagram only) |
If you've landed on this page unsure which model you have, the built-in vs. portable distinction makes it obvious. The DRH-48N is hardwired to 24 VAC and connected to a permanent gas line. The PH3 sits on your patio and hooks to a propane tank. The repair paths don't overlap, so getting the model right before you start is the single most important step. Other DCS-style patio heater manuals, including those for units like the BFC-A-SS or HSS-A-SS portable models, follow similar thermocouple-and-pilot architectures to the PH3, so the pilot cleaning and thermocouple checks described here are broadly applicable to that style of heater. If you need the Hiland patio heater manual for troubleshooting, always match the instructions to your exact model and ignition type before trying any repairs.
FAQ
Can I use the DCS patio heater manual for a similar model if I cannot find my exact dcs patio heater manual?
Yes, but only if you use the exact ignition family your heater has. DRH-48N models use electronic ignition with a flame sensor and lockout behavior, while PH3 (PHFS-DW-*) models use a piezo igniter plus thermocouple. If you follow the wrong style’s reset or wiring guidance, you can keep the heater from lighting and waste time diagnosing the wrong component.
What is the fastest way to confirm whether my heater is DRH-48N or PH3 before troubleshooting?
Do a quick label check, then confirm by behavior. DRH-48N is hardwired to 24 VAC and connected to a permanent gas line, while PH3 is tank-powered (LP) and lights with a piezo button/pilot. If your unit locks out after repeated attempts, that strongly points to the electronic ignition DRH-48N path.
I did maintenance and now the heater will not light, what should I check first?
If you remove parts or disturb connections, verify the sequence and retest the gas side before powering back on. For DRH-48N, compare each terminal to the wiring schematic (example wire colors mentioned in the guide are PUR for flame sensor, BLU for gas valve, ORG for thermostat, RED for igniter). For PH3, confirm the regulator hose is attached correctly and that the gas connections were leak-tested again.
What should I do if I notice a gas smell after connecting the heater?
A smell of gas after setup means stop and verify before you try again. Shut off the gas, do not attempt ignition, and re-check every connection with the detergent-and-water leak test. Also confirm the gas valve you use at the heater is fully open, then restart only after you see no bubbles.
My PH3 pilot lights but goes out when I release the knob, what is the most likely cause?
For the PH3, the most common reason a pilot will not stay lit after you release the knob is that the thermocouple is not being heated adequately. That typically comes from a weak or partially blocked pilot (debris in the pilot orifice or vent path). Cleaning the pilot orifice and ensuring the pilot flame reaches and heats the thermocouple correctly usually resolves this.
How do I reset the DRH-48N correctly after lockout, and why does it fail if I try again too soon?
For the DRH-48N lockout, the reset requires power cycling with a full 5-minute wait before restoring power. Skipping the wait can leave unburned gas present, and the ignition module still may not clear its safety state. After reset, also verify gas pressure and that the mini-igniter electrode position matches the guide before repeated ignition attempts.
Could low flame on a PH3 be caused by something other than the burner or pilot?
Yes, especially on PH3 portable units. Low flame and uneven glow can be caused by an LP hose that is kinked or the cylinder/regulator setup not delivering properly. Straighten the hose, check the tank level, then inspect regulator seating and connections before you disassemble the burner.
What does extreme yellow flame on a PH3 indicate, and what should I do next?
On PH3, flame color guidance is part of troubleshooting. If you see extreme yellow tipping, or the heater never seems to reach operating temperature, treat it as a blockage condition (often debris, insects, or spider activity affecting the burner ports or venturi air inlet). Cleaning the burner ports and venturi inlet is the next practical step before replacing parts.
Is there a safe method to leak-test my DCS patio heater after replacing a hose or connection?
Do not test leaks using an open flame or while smoking. Use the detergent-and-water soap solution and look for bubbles at every connection and joint, including regulator fittings and tank connection points. If you find bubbles, shut off gas immediately, fix the fitting, and repeat the test before lighting.
After cleaning the PH3 burner and venturi, how can I tell if I cleaned everything correctly?
If you suspect a blockage, cleaning is the priority, but reassembly matters. After clearing ports, reinstall the burner centered on the orifice fitting and confirm the flame returns to blue with only slight yellow tipping. If it remains heavily yellow, do not guess, the orifice may be damaged or the blockage may still be present elsewhere.
What are the correct storage steps for the PH3 during the off-season?
For off-season storage on PH3, disconnect the LP cylinder completely and store the cylinder outdoors in a well-ventilated area. Keep the heater covered to prevent insects from nesting in the burner and pilot during storage, then inspect pilot area, burner ports, and hose before the first spring light.
My DRH-48N still locks out after reset, what symptoms mean I should stop DIY troubleshooting and call a technician?
If the DRH-48N repeatedly locks out even after the correct reset, verified gas supply, and inspected/secure wiring connections, the likely next step is escalation to a qualified technician. The ignition module and flame sensor are safety-critical, and persistent lockout after basic checks usually indicates a failing module or sensor rather than routine maintenance.