The PG188H is a propane-fueled outdoor patio heater officially titled 'GAS PATIO HEATER WITH LED TABLE' and its manual is available as a PDF from Bed Bath & Beyond and Sam's Club (scene7) hosting. If you need the patio heater ph 2800 b manual, start by matching your exact model number and follow the instructions that correspond to that unit PG188H.
PG188H Patio Heater Manual: Parts, Setup, Lighting, Troubleshooting

Grant Mercer
11 Jun 2026
If you own a Patiboss electric patio heater instead of the propane PG188H, you will need the specific Patiboss electric patio heater manual for wiring, controls, and safe operation patioboss electric patio heater manual. If you have that document in hand, you're in the right place.
If not, this guide covers everything in it: how to confirm your model, where to get the manual, how to light it safely, and how to fix the most common problems including ignition failures, won't-stay-lit issues, weak flame, and safety shutdowns.
Confirming you actually have the PG188H
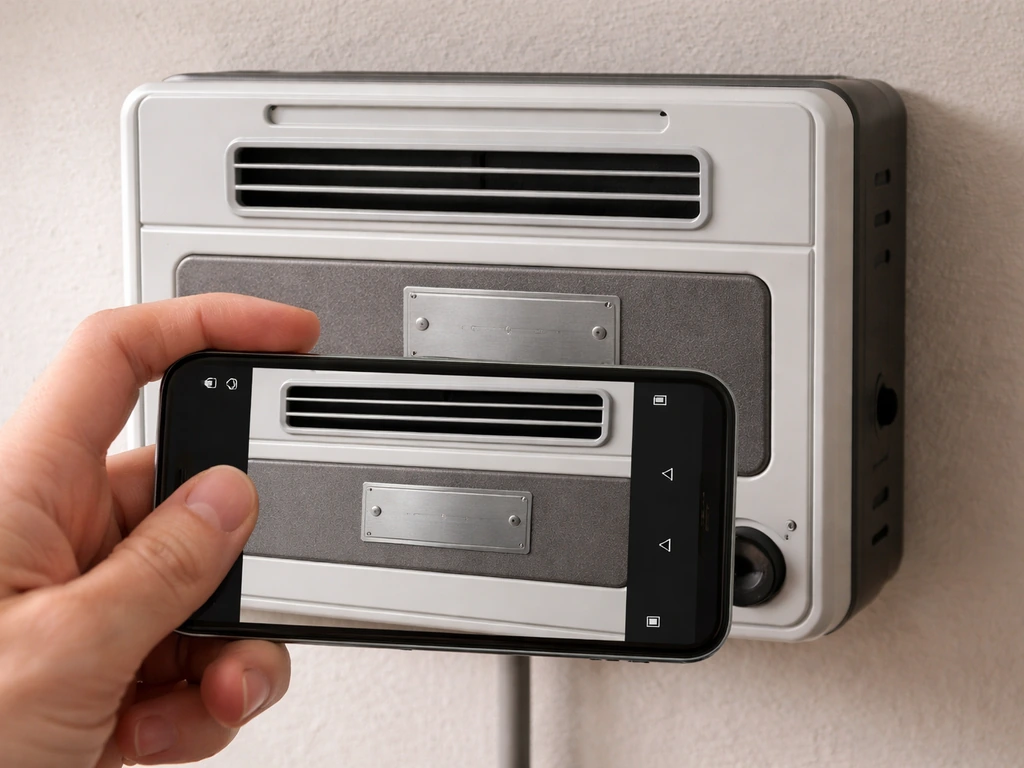
Before you follow any instructions, make sure your heater is genuinely a PG188H and not a similar-looking variant with different internals. Grab your phone and look for the model label, which is usually attached to the pole or base of the heater. The label should clearly say 'MODEL NO.: PG188H.' If yours says something like PG188 (no H), a different letter suffix, or a completely different number, the part numbers and lighting procedure may not match, and you should track down the correct manual for that specific variant.
Cross-check a few things against the known PG188H specs: it runs on propane LP gas, operates at a manifold pressure of 11 inches W.C., and its safety system includes both a thermocouple and a tilt switch. If your heater uses natural gas, has a different pressure spec, or shows only one of those safety features on its label, you've got a different model. The burner assembly part number on a genuine PG188H is 188H005, and the burner chamber assembly is 5219616. If you can see the part numbers on any stickers near the burner or valve area, those are solid confirmation.
Where to find the PG188H manual right now
The most reliable copies of this manual live on retailer-hosted PDFs. Search Google for 'PG188H patio heater manual PDF' and you'll typically find a copy hosted by Bed Bath & Beyond or on Sam's Club's scene7 CDN. If you need the HSS A SS patio heater manual instead, use the same model and document-title approach to track down the correct PDF for your exact unit.
Use the model name and part number details to locate the exact dcs patio heater manual that matches your unit’s version. The document title you're looking for is 'GAS PATIO HEATER WITH LED TABLE' and the cover page should clearly show 'MODEL NO. The PG188H manual PDF cover and header show the title “[GAS PATIO HEATER WITH LED TABLE](https://scene7. samsclub.
com/is/content/samsclub/980032946-patio-heater-pg188h-2016)” and the model number “MODEL NO. : PG188H. ” [“GAS PATIO HEATER WITH LED TABLE” and “MODEL NO. : PG188H”](https://www.
bedbathandbeyond. com/downloads/pdf/1347851670_9a43377e-6bbd-3297-a9cb-6111cf02d1ea. pdf). : PG188H.
' Both copies contain the full lighting instructions, parts list, troubleshooting table, and safety information.
If the direct PDFs are unavailable or the links have gone stale (which happens with retailer-hosted documents), try a few workarounds. Search for the part numbers themselves: 'thermocouple 2409043' or 'tilt switch 2420073' will often surface forum discussions or parts sites that link back to the manual. You can also try ManualsLib, which archives a huge range of patio heater manuals.
If you're still stuck, the burner assembly number 188H005 is a useful search term that's specific enough to get relevant results. Similar heater manuals from brands like Hiland or models like the BFC-A-SS can fill in some procedural gaps since many share the same basic gas valve and thermocouple design, but don't rely on them for part numbers. If you need the bfc-a-ss patio heater manual, use the heater’s model label to confirm you have the exact BFC-A-SS variant.
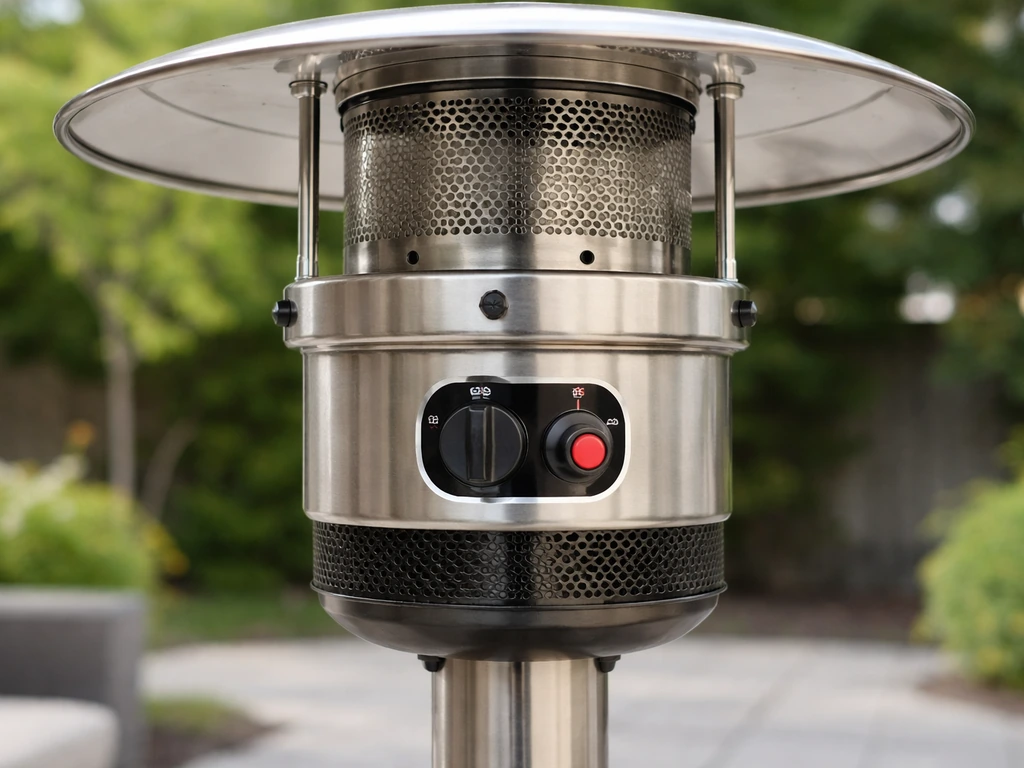
Key parts, controls, and safety features you need to know
Getting familiar with the parts before you start saves a lot of frustration. Here's what you're working with on the PG188H and what each component does.
The control knob and gas valve
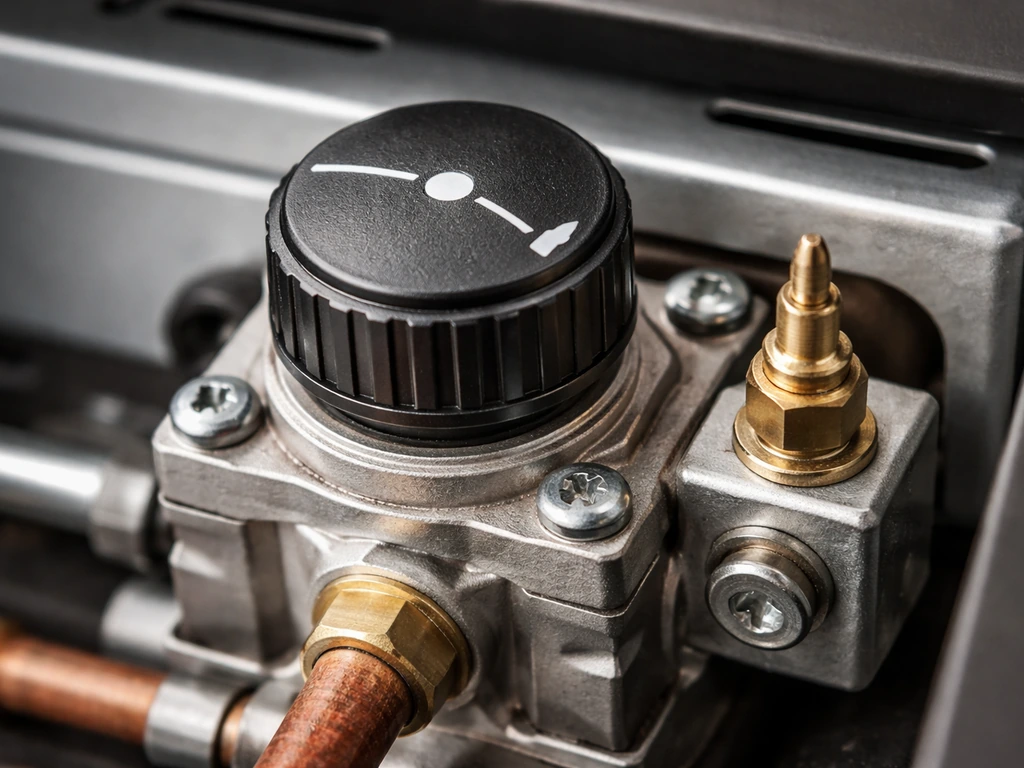
The control knob (part number 2413334) is a push-and-rotate type. You push it in to override the safety shutoff while lighting, rotate it to select OFF, PUSH (the lighting position), LOW, or HIGH. This is not a simple on/off switch. The push-and-rotate mechanism is intentional: it's what allows the thermocouple to hold the valve open once the flame is established. If you just rotate it without pushing, gas won't flow.
Thermocouple (flame sensor)
The thermocouple (part number 2409043) is a small metal probe that sits right in the burner flame. When the flame heats it up, it generates a tiny electrical voltage that signals the gas valve to stay open. If there's no flame, the voltage drops, and the valve closes automatically. This is the single most common reason a PG188H won't stay lit: the thermocouple is either dirty, misaligned, worn out, or not being held long enough during ignition to heat up properly.
Tilt switch
The tilt switch (part number 2420073) is a safety device that cuts the gas if the heater tips over or is moved too aggressively. It's a good thing to have, but it can also cause a frustrating shutdown if the heater is on an uneven surface or gets bumped. If your heater cuts out suddenly without obvious cause, the tilt switch is often the culprit.
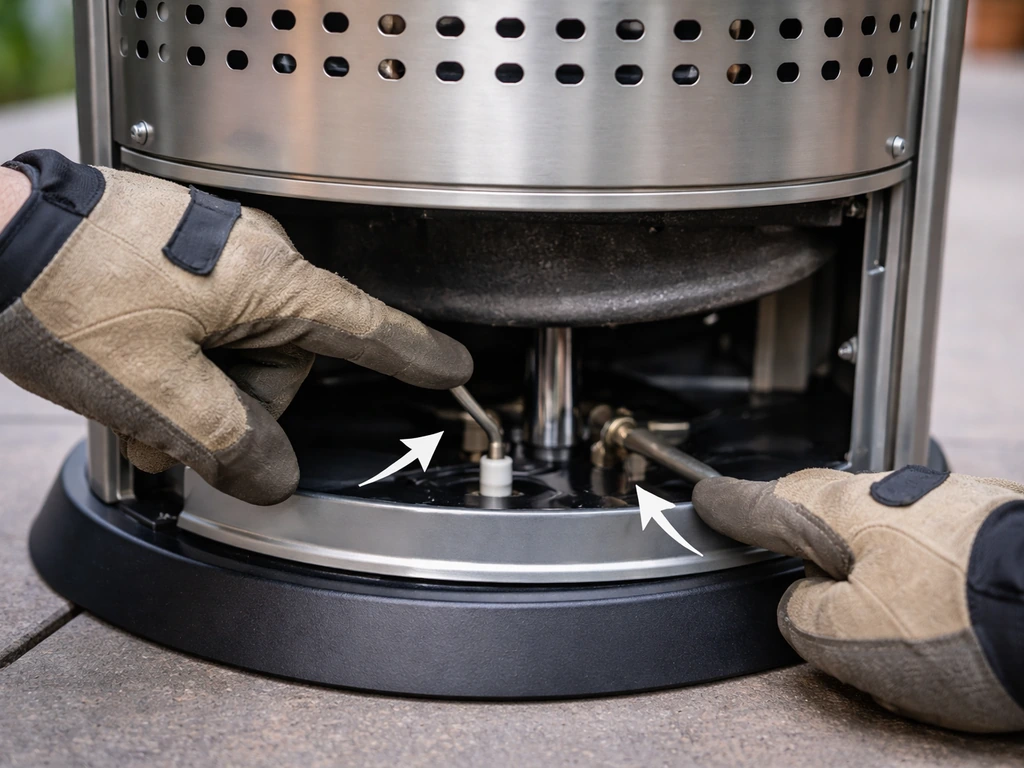
Ignition system
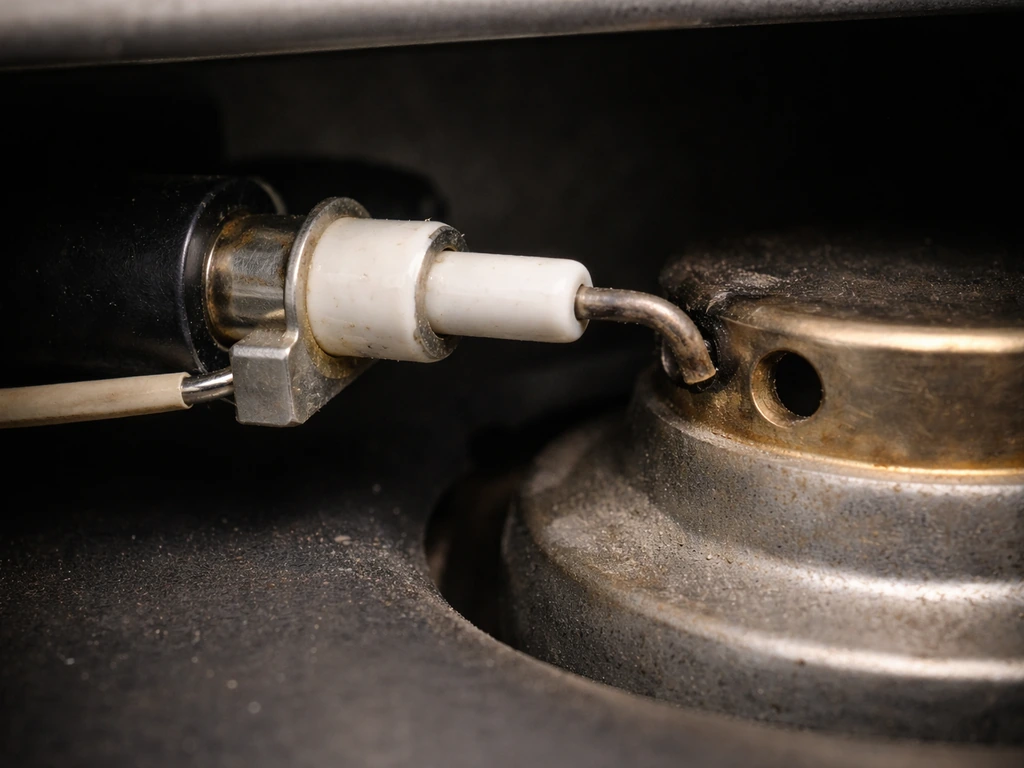
The igniter (part number 2406521) is the piezo spark generator. It connects to the ignition pin (part number 2409604), which is the electrode that actually creates the spark near the burner. When the igniter button clicks, you should hear a clear snap and see a spark if you look at the burner. No spark usually means a dead igniter, a disconnected wire, or a fouled electrode tip.
Burner assembly
The burner assembly (188H005) and burner chamber (5219616) are where the gas mixes with air and burns. The small orifice (jet) inside can get blocked by insects, debris, or corrosion, which causes weak flame or no flame at all. The burner diffuser has a small hole at the bottom specifically for manual lighting with a lighter gun if the igniter fails.
How to light the PG188H safely
Follow these steps in order, every time. Skipping steps, especially the waiting periods, is how accidents happen with propane heaters.
Pre-checks before you touch the knob
- Make sure you're outdoors in a well-ventilated space. The manual explicitly prohibits using this heater in a building, garage, or any enclosed area.
- Check clearances: the manual requires at least 3.61 feet (1100mm) of space between the heater and any combustible materials. That includes furniture, fences, umbrellas, and overhead structures.
- Inspect the gas hose for any bends, kinks, abrasion, or cuts before connecting the tank. A damaged hose is a disqualifier: replace it before proceeding.
- Do a soap-and-water leak test on new connections or after storage (see the section below for the exact procedure).
- Check that the propane tank has enough fuel. A less than quarter-full tank in temperatures below 40°F will give you a weak or non-existent flame.
Lighting steps
- Make sure the LP gas tank valve is fully OFF.
- Push the control knob in, rotate it to OFF, and wait 5 full minutes. This clears any accumulated gas from a previous failed attempt.
- Turn the LP tank valve ON.
- Push the control knob in and rotate it to the PUSH (lighting) position.
- While holding the knob pushed in, press the igniter button. You should hear a click and see the burner light.
- Keep holding the control knob pushed in for a full 30 seconds after the flame appears. This is the step most people rush and it is exactly why the heater goes out immediately after you release the knob. The thermocouple needs those 30 seconds to heat up enough to hold the valve open on its own.
- After 30 seconds, slowly release the knob. The flame should stay lit.
- Rotate the knob to HIGH or LOW as desired.
What a good flame looks like vs. a problem
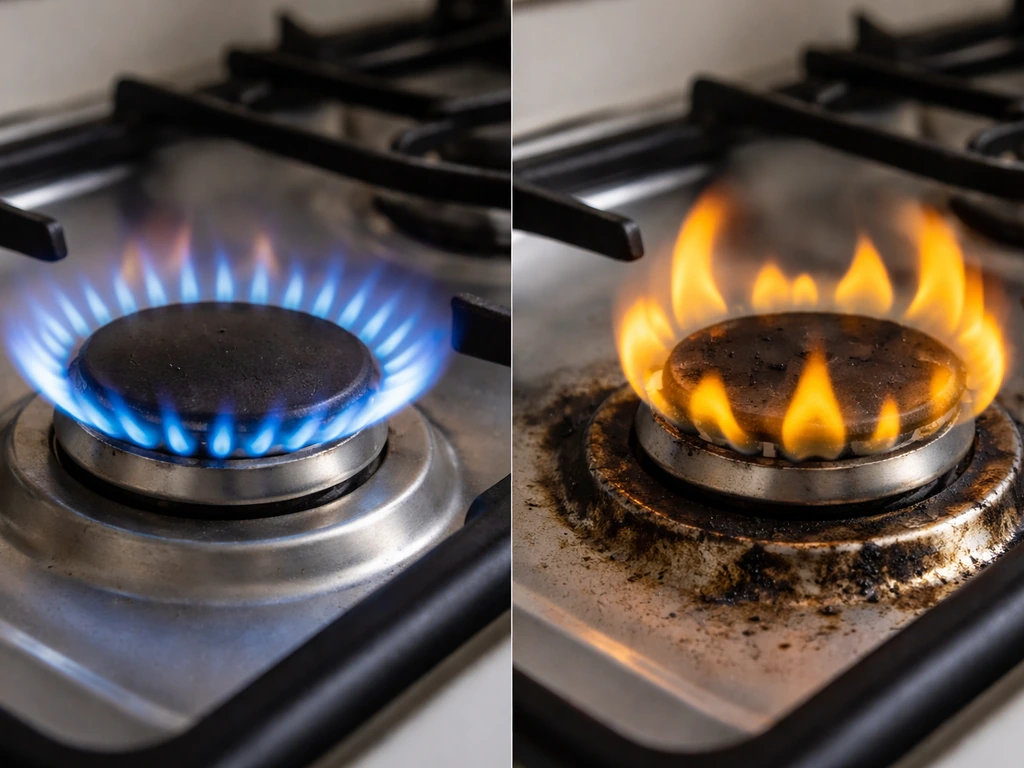
A healthy PG188H flame is blue with slight yellow tips. On LOW the flame is visibly smaller but still mostly blue. If you see a flame that's mostly yellow or orange, heavily sooty, or extremely uneven across the burner, that's a sign of a blockage or airflow problem. Extreme yellow tipping combined with a gas odor means combustion is incomplete: stop the heater, let it cool completely, and check the burner and air passages before relighting.
How to shut down properly
To shut off, rotate the knob to PUSH first, then push and rotate to OFF. After that, turn the LP tank valve off. The manual is specific about this sequence. Once the heater is off, wait at least 45 minutes before touching or moving it. The emitter and dome stay dangerously hot long after the flame is out.
Gas leak check procedure
Always do this after connecting a new tank, reconnecting a hose, or bringing the heater out of storage. Mix one part liquid dish soap with three parts water in a small bottle. Apply the solution to every connection point: where the hose meets the regulator, where the regulator meets the cylinder, and along the hose itself. Turn the tank valve ON (don't light the heater yet) and watch every connection for bubbles for at least 30 seconds.
No bubbles means the connection is safe to use. If you see bubbles at any connection, turn the tank valve off immediately, loosen that fitting, and re-tighten it firmly, then retest. If bubbles reappear after re-tightening, do not use the heater. That connection needs a new fitting, a new hose, or a service call. Never try to use a leaking heater.
Troubleshooting: won't ignite or won't stay lit
These are the two most common complaints with the PG188H and almost every other propane patio heater. Work through this systematically rather than jumping to part replacement.
Won't ignite at all
| Symptom | Most Likely Cause | Fix |
|---|---|---|
| No spark when igniter clicks | Dead piezo igniter or disconnected wire to electrode | Check the wire connection at the ignition pin (2409604) and igniter (2406521). If the wire is fine, the igniter likely needs replacing. |
| Spark present but no flame | Orifice blocked or gas not reaching burner | Turn off tank and clear the orifice/jet. Check that the tank valve is fully open and the hose isn't kinked. |
| Spark present but no flame | Control knob not rotated to PUSH position before pressing igniter | Restart the full lighting sequence. Ensure knob is pushed in AND rotated to PUSH before clicking the igniter. |
| Flame appears then dies when you release knob | Thermocouple not held long enough | Repeat from step 4 of lighting procedure and hold the knob in for the full 30 seconds. |
| Gas smell but no ignition | Gas accumulation from previous attempts | Stop. Wait 5 minutes for gas to dissipate, then restart the full lighting sequence from the beginning. |
If the igniter consistently fails to spark and you've confirmed the wire is connected, you can attempt manual ignition as the manual allows: use a long-neck lighter gun (sold separately) inserted through the hole on the bottom of the burner diffuser. Push the control knob to PUSH, hold it in, bring the flame to the burner through that access hole, and then hold for the full 30 seconds as normal.
Ignites but won't stay lit (thermocouple checks)
When the heater lights but goes out the moment you release the control knob, the thermocouple is the first place to investigate. Start by cleaning it: turn everything off, let the heater cool completely, then locate the thermocouple probe in the burner area. It's the small metal rod sitting directly in the flame path. Use fine steel wool or a clean cloth to gently clean any oxidation or buildup off the tip. Reinstall it if it was loose and make sure the tip is positioned so the flame actually hits it when burning.
If cleaning doesn't help and you're still doing the 30-second hold correctly, the thermocouple (part 2409043) is likely worn out and needs replacing. This is a straightforward DIY repair: the thermocouple unscrews from the gas valve and unclips from the burner bracket. Replacement thermocouples for the PG188H are available from parts suppliers using that part number. Match the length carefully when ordering.
Tilt switch causing unexpected shutdowns
If the heater cuts out during normal use without any other obvious cause, check the surface it's sitting on. Even a slight lean can trigger the tilt switch (part 2420073). Move the heater to a level surface and retry. If it still trips unexpectedly on a level surface, the tilt switch itself may be faulty or misaligned and needs inspection or replacement.
Troubleshooting: weak flame, burner issues, and shutdown faults
Low or weak flame
The manual's troubleshooting table covers weak flame thoroughly. Work through these checks in order before assuming a part is bad:
- Check the control knob position: it needs to be at HIGH for maximum output. If it's stuck between positions or not fully rotated, the flame will be restricted.
- Check the tank level. If it's below a quarter full and outside temperature is under 40°F, propane vaporization pressure drops and the flame goes weak. Swap in a fresh full tank.
- Inspect the supply hose end to end for any kinks or tight bends. A kinked hose significantly restricts gas flow. Straighten it and retest.
- Check the burner jet/orifice for partial blockage. Insects love to nest in patio heater orifices during storage. Turn everything off, remove the burner assembly if accessible, and use compressed air to clear the jet. Never use a metal tool to poke the orifice: it will enlarge the hole and permanently alter the flame.
- Check airflow around the burner. The manual is clear that air must be unobstructed. Make sure the ventilation openings on the cylinder enclosure are free of leaves, debris, or any obstruction.
Signs of combustion or airflow problems
The manual lists specific warning signs that tell you airflow or combustion is seriously compromised. If you notice any of these, shut the heater down and inspect before relighting:
- Gas odor combined with extreme yellow tipping of the flame
- Heater fails to reach the desired temperature even on HIGH
- The glow pattern on the emitter screen is excessively uneven
- The burner makes popping or puffing noises during operation
These symptoms together point to incomplete combustion, usually caused by a dirty burner, a blocked air passage, or a partially clogged orifice. Clean the burner assembly and air passageways, confirm nothing is obstructing the base or cylinder enclosure vents, and retest. If the symptoms persist after cleaning, the burner assembly (188H005) may need replacement.
Heater shuts down during use
Unexpected shutdown mid-use comes down to a few likely causes: the tank is running empty (check the level), the tilt switch tripped (check for level surface), the thermocouple is failing under heat (it works briefly then loses signal), or there's a gas supply issue like a regulator starting to fail. If you rule out level surface and tank, do the full thermocouple inspection and replacement process described above. A failing regulator is less common but worth checking: if the heater consistently shuts down after running for a few minutes and the thermocouple is known good, the regulator may be over-pressuring or under-delivering.
Maintenance and preventing problems before they start
The PG188H manual says to clean the heater thoroughly on a regular basis. In practice that means a proper inspection and cleaning at the start of each outdoor season and after extended storage.
Seasonal and post-storage checklist
- Inspect the gas hose along its entire length for abrasion, cuts, cracks, or worn areas. Replace the hose if you find any damage: this is not a repair situation.
- Run the full soap-and-water leak test on all connections before the first use of the season.
- Check the burner and orifice for insect nests, debris, or rust. Clear with compressed air.
- Clean the burner diffuser and all air circulation passageways. The manual specifically calls out keeping controls, the burner, and circulating air passageways free of buildup.
- Inspect the thermocouple tip for oxidation and clean with fine steel wool if needed.
- Check the tilt switch wiring for any corrosion at the connectors.
- Wipe down the emitter screen and dome. Corrosion on the emitter screen can cause uneven glow and heat distribution.
- Keep the cylinder enclosure ventilation openings completely clear of leaves, debris, and anything else that might block airflow.
Cleaning dos and don'ts
Keep the area around the burner and pilot assembly dry during cleaning. Do not submerge the control valve assembly in water for any reason. If the gas control valve ever gets submerged in water, even accidentally during cleaning or storage flooding, the manual is unambiguous: do not use it. It must be replaced before the heater is operated again. Water inside a gas valve is a serious safety issue, not something you can dry out and continue using.
Common wear items to keep on hand
If your PG188H gets regular seasonal use, it's worth having a spare thermocouple (2409043) available. It's the component most likely to need replacement after a few years and it costs very little. The igniter (2406521) is a distant second on the likely-to-fail list. Having those two parts on hand means you're not waiting on a parts order when the heater quits before a gathering.
When to stop DIY and call for service
Most PG188H issues are fixable with the steps above. But there are specific situations where continuing to troubleshoot yourself puts you in real danger. Stop and call a qualified gas appliance technician if you encounter any of the following:
- A persistent gas smell that doesn't clear after shutting off the tank valve and waiting 5 minutes. Leave the area and don't attempt to relight.
- Visible damage to the gas valve body itself, including cracks, corrosion pitting, or any deformation.
- The gas control valve was submerged in water. As noted above, this requires full valve replacement before use.
- Bubbles appear at a connection that you've re-tightened twice and they still won't stop.
- The tilt switch keeps tripping on a level surface and you've confirmed there's no obvious wiring issue.
- The regulator is suspect (heater shuts down consistently mid-use with a known-good thermocouple and full tank).
- Any repair that requires opening the gas valve itself or modifying the gas supply lines.
When you call a technician, have the model number (PG188H), the serial number from the label, a description of what the heater does and doesn't do, and a list of what you've already checked. That information cuts the diagnostic time significantly. If the heater is more than five to seven years old and needs a gas valve or burner assembly replacement, it's also worth having an honest conversation with the technician about whether repair or replacement makes more financial sense.
Other models in the same patio heater category, including various Hiland and similar propane tower heaters, share enough design DNA with the PG188H that experienced technicians can usually service them confidently. If you have a Hiland patio heater instead of the PG188H, use the Hiland patio heater manual to confirm the correct lighting and parts details.
FAQ
My heater looks like a PG188H. Can I use the PG188H patio heater manual if it might be LP or natural gas?
Check the model label first, then verify the fuel type on the regulator or hose markings. The PG188H is specified for LP propane, manifold pressure at 11 in. W.C., and it uses a thermocouple plus tilt switch. If your equipment is set up for natural gas, you cannot safely swap parts to make it equivalent, because pressure and valve behavior differ.
What should I do if I smell gas before or during lighting attempts?
If you smell propane, you should stop trying ignition immediately, shut off the tank valve, and wait for the area around the burner to fully clear before attempting any troubleshooting. Relighting with an active odor can push gas into the wrong place and worsen ignition failure or combustion problems.
Can I disconnect and reconnect the propane tank, or move the heater, without replacing parts?
Yes, but only after confirming the tank-to-regulator connection passes the bubble test and that the heater is on a stable, level surface. For storage between uses, keep the tank valve closed, disconnect if your setup allows safe storage, and do not leave hoses under tension or where they can abrade.
Why won’t my PG188H stay lit even though the burner lights briefly?
The control knob needs to be pressed into the PUSH position to allow gas flow to be stabilized for the thermocouple hold. If you rotate without fully pushing, you may hear sparking or see partial gas flow, but the valve will not stay open.
Is manual lighting safe to try if the igniter sparks but the burner does not catch?
Use a long-neck lighter gun through the bottom access hole in the burner diffuser only as a fallback when the igniter fails. Keep your face and hands positioned away from the burner opening, and still follow the full hold time so the thermocouple warms up fully.
Can I hose down or pressure-wash the PG188H while cleaning?
The safest cleaning approach is to remove loose debris from the burner and wipe the exterior surfaces, but keep the gas control valve area dry. Do not use water jets, do not soak components, and do not spray cleaners into the valve, because trapped moisture inside the gas valve can be hazardous.
What does a mostly yellow flame mean, and what should I inspect first?
If your flame is yellow or sooty, confirm the venting and that insects or debris have not clogged the burner base openings and orifice area. Also check that the burner assembly (188H005) and burner chamber (5219616) are seated correctly, because misalignment can cause uneven combustion.
If the thermocouple is clean, how can misalignment still cause it to shut off?
A good check is whether the flame is heating the thermocouple tip consistently. If the thermocouple is slightly out of the flame path, it can appear to work during ignition but fail under normal heating. Repositioning and gentle cleaning often fixes this before replacing the thermocouple.
How do I tell whether the thermocouple is failing versus the regulator?
Before replacing anything, re-test the regulator output behavior by observing whether shutdown happens after a few minutes, rather than instantly. If shutdown is delayed and the thermocouple holds during ignition but drops later, the regulator can be suspect, especially if it is older or has been exposed to inconsistent tank conditions.
What info should I have ready when I call a technician for a PG188H problem?
Prepare a short checklist for service: confirm the heater is PG188H, provide model and serial numbers, note the exact symptom pattern (won’t spark, sparks but won’t stay lit, weak flame, keeps tripping), and list what you cleaned, adjusted, and tested (bubble test results, thermocouple cleaning, level-surface test). This reduces repeat diagnostics.
Is it safe to keep using the heater after I re-tighten a connection that bubbled during the soap test?
If you see bubbles again after re-tightening, stop using the heater. That indicates a sealing problem such as a damaged fitting, incompatible threads, or a compromised hose/regulator connection that will likely leak under pressure again.
How can placement and surface level affect shutdowns on a PG188H?
Yes, and it can reduce nuisance failures from the tilt safety system. Use a stable surface, avoid soft ground and uneven pavers, and do not lean or bump the heater while it is operating, because even minor shifts can trip the tilt switch.