The Flame Pro pellet patio heater you're most likely looking for is the FlamePro 81"H Steel Patio Pellet Heater sold at Costco under Item #1713430. It's a gravity-fed, manually ignited wood pellet heater rated at 75,000 BTUs with an 18 lb hopper and roughly 4 hours of burn time. The correct manual for this unit lives on the Costco product page itself, under the "Manuals & Guides" section.
Flame Pro Pellet Patio Heater Manual Guide and Troubleshooting

Grant Mercer
15 May 2026
For the FlamePro 81" H Steel Patio Pellet Heater manual specific to this 1713430 unit, use the Costco product page manuals and guides download as the most reliable reference. If you have a Master Forge patio heater, the same idea applies: find the specific manual for your model so you follow the correct start-up and safety steps Master forge patio heater manual. If you bought it at Costco, start there.
That said, even if you've lost the manual entirely, this guide walks you through the most important sections: model identification, safe start-up, ignition troubleshooting, thermal safety components, cleaning, and knowing when to call in help instead of pushing further.
Confirm your exact model before you do anything else
"Flame Pro" is a brand name that covers more than one type of heater. There's a FlamePro tabletop propane patio heater (SKU 14306) that uses an adapter hose and runs on gas, not pellets. Costco also lists a FlamePro Table-Top Patio Heater with an adapter hose (SKU 14306), showing that FlamePro includes non-pellet tabletop propane models FlamePro tabletop propane patio heater (SKU 14306). There's also a completely unrelated product family called the Salente FlamePro that shows up in manual searches. If you grab the wrong PDF and try to follow its instructions on your pellet heater, you're going to be confused at best and unsafe at worst. So before anything else, pin down exactly what you have.
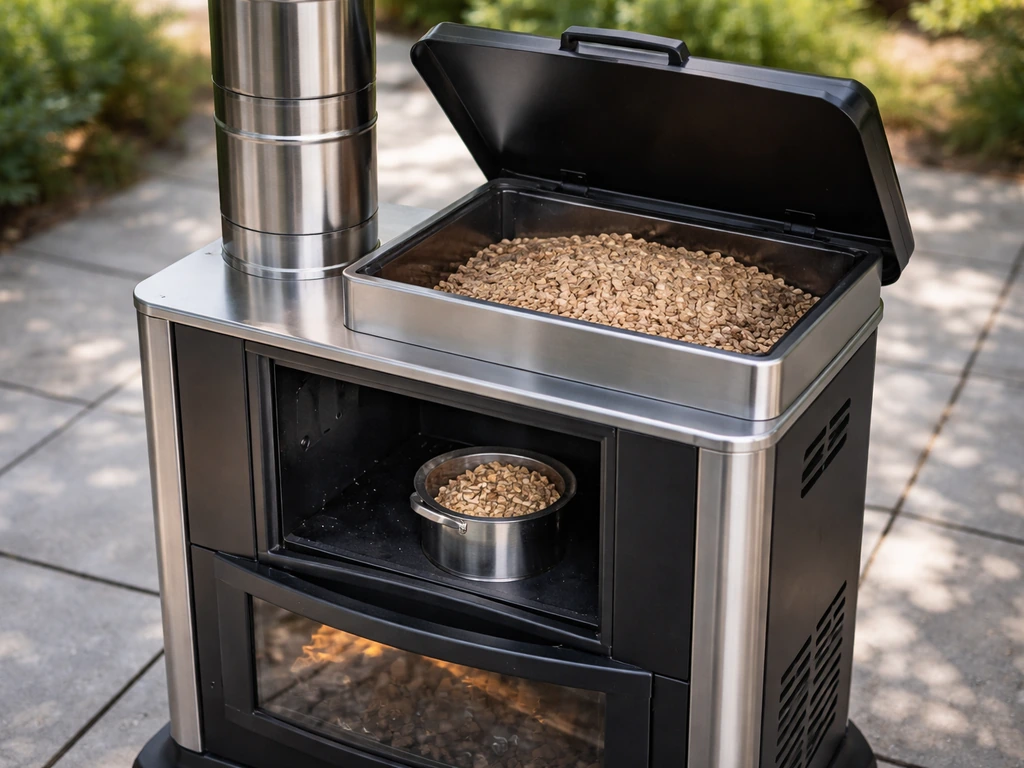
Look for the model label on the lower base or the back of the lower chimney section. The pellet unit is 81 inches tall, made of steel, and has a visible burn pot (grate firepot) inside a chimney column. It has an ash tray at the bottom, an upper/middle/lower chimney assembly, and came with a PVC protective cover. It does not have a propane tank connection, a regulator hose, or a piezo igniter button. If your model is actually a Bond propane patio heater, you'll want the Bond propane patio heater manual instead of the pellet instructions. If your heater has any of those, you have a gas heater and need a different manual entirely.
Once you've confirmed it's the pellet unit, note the item number (1713430) and check the Costco product page for the "Manuals & Guides" download. Costco Japan carries the same SKU, and the documentation is typically shared across regions, so if your region's Costco page doesn't show it, the alternate regional page is worth checking. Download and save the PDF locally so you always have it.
Reading the manual safely: controls, start-up sequence, and the warnings that actually matter
The FlamePro pellet heater uses a continuous non-electric gravity-automatic feeding system. That means pellets fall from the hopper into the burn pot by gravity at a rate controlled by the feed mechanism. There is no electronics board, no auger motor, and no igniter circuit. You light it manually with a match or lighter. This is simple but creates a specific set of risks that the manual's warning sections are written around.
Warnings you should not skip past
- Only use food-grade or standard hardwood BBQ/heating pellets. Using softwood pellets, wet pellets, or any fuel not specified in the manual increases creosote buildup and can cause flare-ups.
- Never operate the heater indoors, in a garage, under a low overhang, or anywhere with restricted airflow. This heater produces combustion gases.
- Keep the heater on a stable, level, non-combustible surface. Uneven ground causes erratic pellet feed and creates a tip-over risk.
- Do not leave a burning heater unattended, especially during the first few uses while you're learning its feed rate.
- Let the unit cool completely before moving, storing, or cleaning it.
Standard start-up sequence
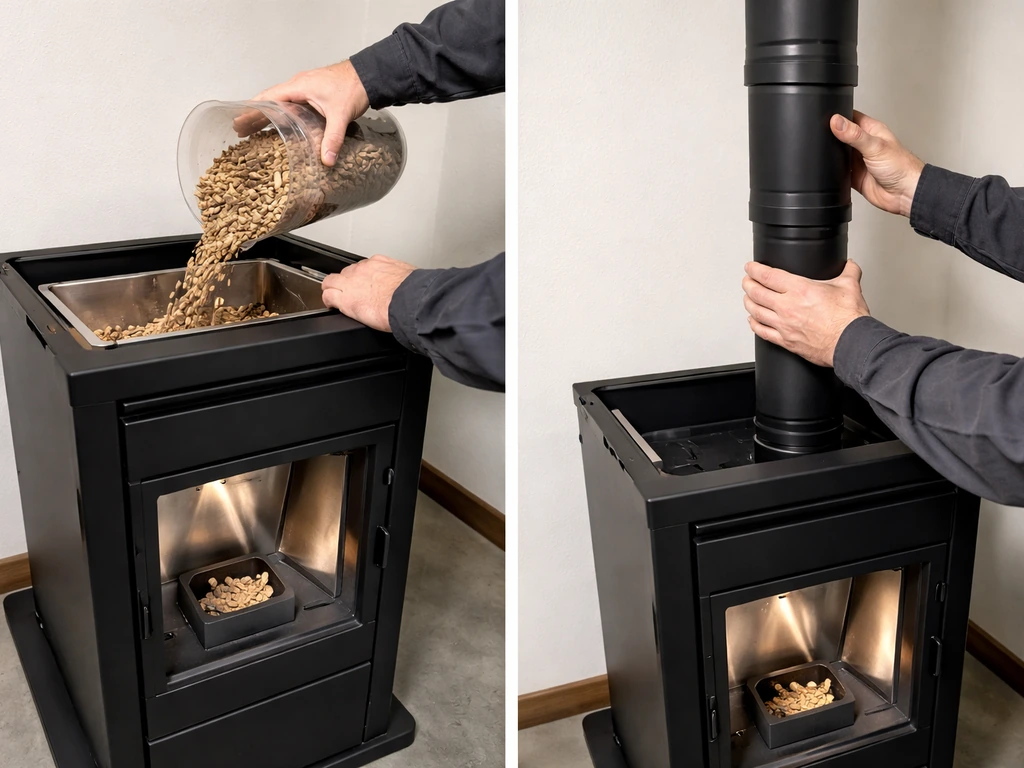
- Assemble the chimney sections (upper, middle, lower) and confirm all sections are seated and secured before loading pellets.
- Place the heater on a flat, stable, non-combustible surface outdoors with adequate clearance on all sides.
- Fill the hopper with dry hardwood pellets, but don't overfill. The 18 lb capacity is a max, not a target fill.
- Open the feed gate or adjust the feed mechanism to allow a small initial load of pellets to fall into the grate firepot. Check your manual for the specific gate position for starting.
- Use a long match or long-reach lighter to ignite the pellets in the firepot directly. Hold the flame until the pellets catch and you see consistent burning.
- Adjust the feed gate to your desired burn rate once the fire is established. A wider opening feeds more pellets and produces more heat, up to the 75,000 BTU rated output.
- Watch the first 5 to 10 minutes to confirm the pellets are feeding correctly and the flame is stable before walking away.
Troubleshooting ignition and burn problems
Most pellet heater problems come down to one of three symptoms: it won't light at all, it lights but goes out shortly after, or it burns inconsistently with low heat or excess smoke. Each has a distinct cause and fix.
Won't light
First check the pellets. Wet or high-moisture pellets will not catch reliably. Squeeze a small handful. If they feel soft, crumble easily into sawdust, or have a damp smell, they've absorbed moisture and need to be replaced. Store your pellets in a sealed container off the ground.
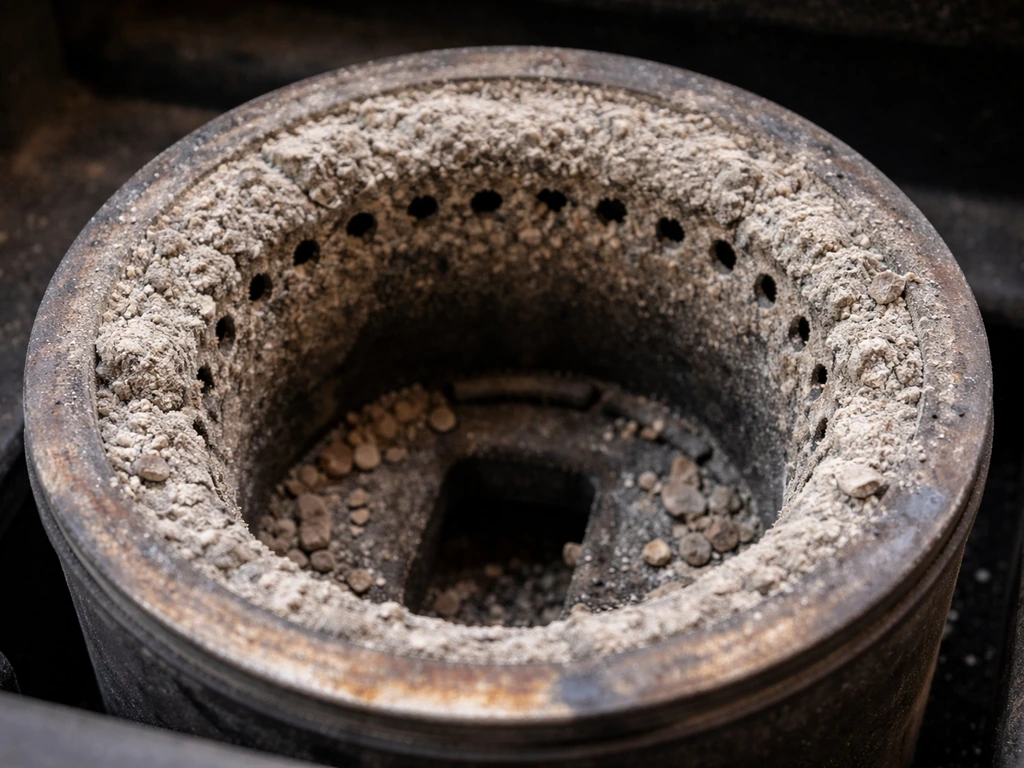
If the pellets seem dry, check the burn pot for ash buildup. A clogged firepot doesn't allow enough airflow for ignition. Even half an inch of compacted ash around the grate will prevent a good light. Empty the ash tray and clear the burn pot before trying again.
Also confirm pellets are actually reaching the burn pot when you open the feed gate. If the hopper is full but nothing is falling through, the feed channel may be blocked with fines (pellet dust) or a clump of damp pellets. Clear the channel manually with a long rod or brush, then try again.
Lights but won't stay lit
This is the most common complaint with gravity-fed pellet heaters and it almost always comes down to one of three things: the feed rate is too low, airflow is restricted, or there's ash choking the burn pot mid-burn.
- Feed rate too low: The gate or feed mechanism is barely open, so the fire consumes the initial pellets and starves before more can fall in. Open the feed gate slightly more and observe whether the flame stabilizes.
- Restricted airflow: The exhaust chimney or air intake vents are partially blocked by ash, debris, or a cover that wasn't fully removed. Check all vent openings and the full chimney length for obstructions.
- Ash accumulation during burn: If the heater runs fine for 30-60 minutes then dies, the burn pot is likely filling with ash faster than it should. This means the pellets have higher ash content than recommended, or the burn pot needs cleaning more frequently than you're doing it.
Burning with excessive smoke or low heat output
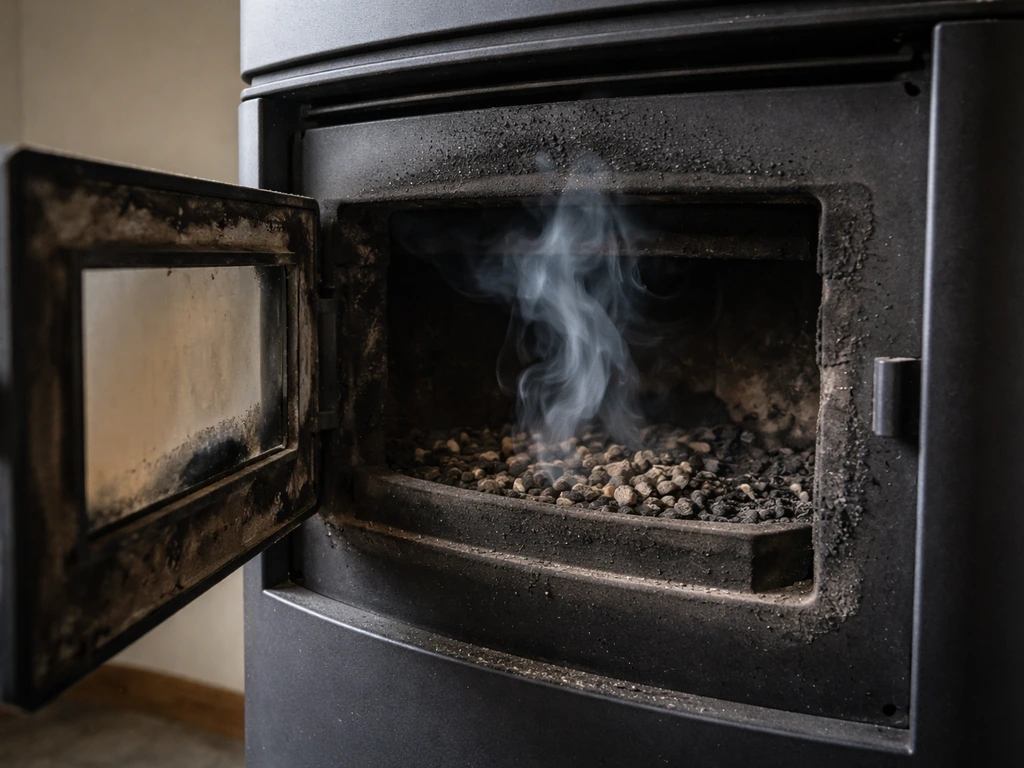
Heavy smoke during normal operation (not just at startup) usually means incomplete combustion. Check the pellet quality first, then look at airflow. If the chimney draw is weak because of a partial blockage or because the heater is sheltered from wind in a way that reduces draft, combustion efficiency drops sharply. Make sure the chimney sections are properly seated with no gaps that would let exhaust leak before it exits the top.
Thermal safety parts: what they do and what to check when they fail
Unlike gas patio heaters (like a Member's Mark or Bond propane unit, which rely heavily on thermocouples, ODS pilots, and tilt switches as part of a gas-safety circuit), the FlamePro pellet heater's safety system is more mechanical than electronic. That said, the same categories of thermal safety still apply at a functional level and are worth understanding.
Heat sensing and overheat protection
Some pellet heater models include a thermal cutoff or high-limit thermostat that shuts the feed mechanism or closes the air intake if the unit overheats. On a gravity-fed unit like this one, an overheat condition typically happens when the feed gate is opened too wide and the burn pot becomes overfired, or when ash has accumulated so heavily around the burn pot that heat can't escape normally. If your heater shuts itself down mid-burn and won't restart until it cools, that's a thermal safety event. Let it cool for 20-30 minutes, then clear the burn pot and ash tray completely before restarting.
Tilt switch
If your unit includes a tilt switch (check your manual's parts diagram for confirmation), it's designed to cut off the feed or trigger a shutdown if the heater tips beyond a safe angle. If the heater is on a slightly uneven surface and is shutting down intermittently, try leveling it first. A tilt switch stuck in the "off" position from a previous tip event is less common on pellet units than on gas heaters, but if yours has one, inspect the switch for obvious damage or a dislodged mounting position.
Thermocouple relevance on a pellet unit
On gas-fueled patio heaters, a thermocouple is a critical safety component that keeps the gas valve open only while flame is present. The FlamePro pellet heater does not use a gas valve or a thermocouple in that same way. If you've read a manual from a gas heater (like a Master Forge or a Paramount propane unit) and are wondering where the thermocouple is on this pellet heater, the answer is it doesn't have one in the traditional sense. Don't go looking for one to test or replace.
Cleaning, maintenance, and getting it ready for next season
The manual will specify cleaning intervals but as a practical rule: empty and inspect the burn pot after every 2-3 uses, do a thorough cleaning of the full chimney assembly at least once per season, and never store the heater with pellets in the hopper.
Burn pot and ash tray
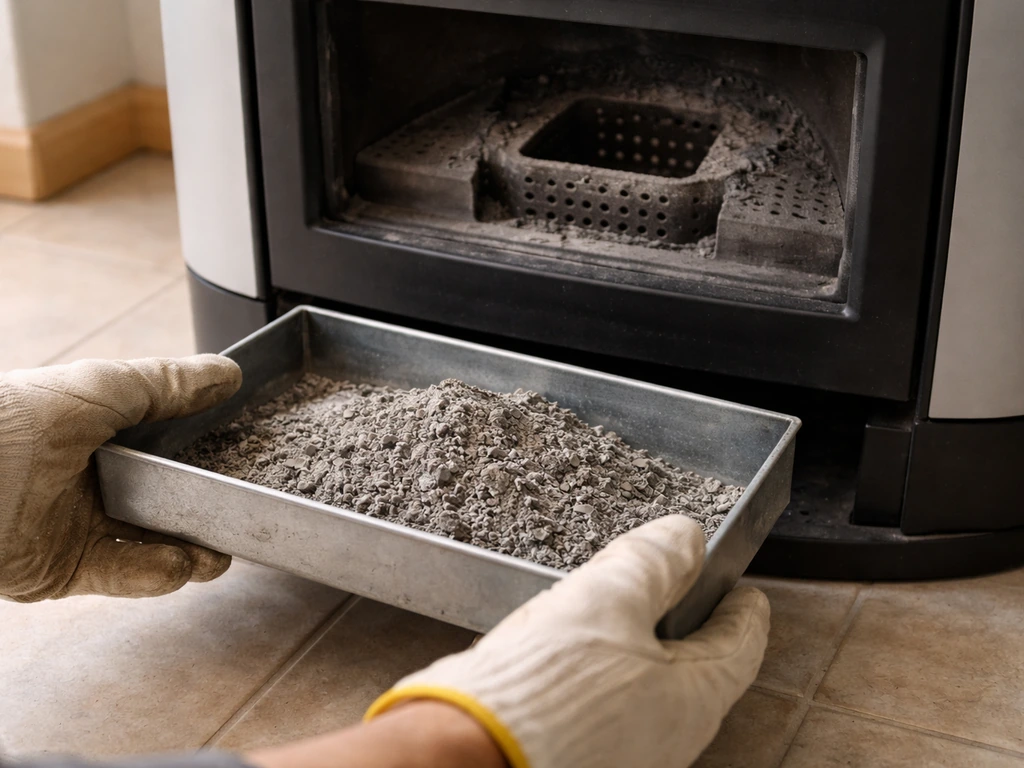
- Let the heater cool completely (at least 2 hours after the last burn).
- Remove the ash tray from the base and empty it. Tap out any compacted ash.
- Inspect the grate firepot for cracks, warping, or heavy carbon buildup. Light surface carbon is normal. Thick, crusty deposits should be scraped off with a metal brush.
- Check that the holes or slots in the grate are clear and not blocked by ash fused into the openings. A clogged grate is one of the top causes of weak ignition.
- Reassemble before adding new pellets.
Airflow and exhaust chimney
Disassemble the chimney sections (upper, middle, lower) and run a long chimney brush through each one. Creosote and ash deposits reduce draw and can become a fire hazard over time. Pay extra attention to the joints between sections, where debris tends to accumulate. Check that the chimney cap at the top is clear and not blocked by a bird nest, leaves, or other debris if the heater was stored outdoors.
Pellet quality and hopper care
Pellet quality directly affects how well this heater performs. Use hardwood pellets rated for heating, with low moisture content (below 8% is ideal). Before seasonal storage, empty the hopper completely. Any pellets left over the off-season will absorb humidity and turn into a clumped, sawdust mess that blocks the feed channel and makes start-up a nightmare the following fall.
End-of-season storage
- Empty the hopper and burn off any remaining pellets in a final session.
- Clean the burn pot, ash tray, and chimney sections as described above.
- Inspect the base and wheel assembly for rust or damage.
- Store the heater with the PVC protective cover on, ideally indoors or in a covered area.
- Do a quick inspection at the start of the next season before first use: check all chimney connections, inspect the grate for damage, and confirm the feed gate opens and closes smoothly.
What you can fix yourself vs. when to stop and get help
This heater is actually one of the more DIY-friendly options out there because it has no gas lines, no electronic ignition circuit, and no complex control board. Most problems are mechanical and visible. Here's an honest breakdown of where the DIY line sits.
| Issue | DIY safe? | What to do |
|---|---|---|
| Wet or poor-quality pellets | Yes | Replace pellets with dry hardwood heating pellets |
| Clogged burn pot or ash tray | Yes | Clean thoroughly after cooling; use a metal brush |
| Blocked chimney or exhaust | Yes | Disassemble chimney sections and brush clean |
| Clogged pellet feed channel | Yes | Clear manually with a rod or brush; replace damaged feed components if clearly broken |
| Heater won't level on surface | Yes | Move to flat, stable, non-combustible surface; use leveling shims if needed |
| Tilt switch stuck or misaligned (if equipped) | Possibly | Inspect mounting and position; replace if visually damaged and part is available |
| Thermal cutoff/high-limit thermostat failure | Possibly | Test by letting unit cool fully; if it still won't run, the thermal cutoff may need replacement — get the part number from your manual before ordering |
| Cracked or warped grate firepot | Yes, with correct part | Order a replacement grate by item number from the manual's parts list |
| Structural damage to chimney or base | Evaluate carefully | Minor dents are cosmetic; cracks in the firebox or chimney sections that could leak combustion gases need professional evaluation or part replacement before use |
| Unknown issue after multiple failed fixes | No | Contact FlamePro/the manufacturer's support line; using the heater in an unknown failure state is a fire risk |
Warranty check before you take anything apart
Check the "Manufacturer's Warranty Information" section on the Costco product page before you start replacing parts. Disassembling certain components can void coverage, and if the heater is relatively new, a warranty claim may get you a free replacement part or unit. If your heater is still within the warranty window, contact Costco or the manufacturer before doing anything beyond basic cleaning and pellet replacement.
When to call it done
If you've cleaned the burn pot, verified pellet quality, cleared the chimney, checked the feed system, and the heater still won't ignite or stay lit, and there's no obvious cracked or broken component, it's time to contact FlamePro directly with your unit's item number (1713430) in hand. Explain the symptoms clearly and ask for a diagnostic path or a parts diagram. A gravity-fed pellet heater this simple should not be a mystery once you've ruled out the most common causes. If something is wrong at the manufacturing level, that's not a DIY problem.
FAQ
I found a “FlamePro” manual online, but it looks like a gas heater. Can I use it for my pellet model anyway?
No. Even within the same “FlamePro” name, pellet and propane units use different ignition and safety systems. If your heater has no regulator hose, no propane tank connection, and no piezo igniter button, it is the pellet version and you should use the Costco item-specific pellet document (1713430) rather than any gas-heater PDF that mentions gas valve, thermocouple, or gas pilot.
How do I tell if my pellets are too wet without special testing equipment?
Do a quick squeeze and inspection. If the pellets feel soft, crumble into sawdust, or smell damp or musty, moisture is likely the issue. Also avoid pellets stored in a garage or shed without a sealed container, because humidity can creep in even if the bag was unopened.
My heater lights but goes out after 5 to 15 minutes. What should I check first?
Start with airflow and feed steadiness. Clear ash from the burn pot and empty the ash tray, then confirm pellets are actually falling into the fire area when the feed gate is opened. If pellets are bridging in the hopper or clumping near the channel, the fire gets deprived and will go out even if ignition initially worked.
What “normal smoke” should I expect at startup, and when is smoke a problem?
A brief smoke at startup can happen as the chimney begins drawing. Smoke that continues during steady operation usually indicates incomplete combustion. In that case, check pellet quality first, then look for airflow problems like a partially blocked chimney or improper seating of chimney sections that allows exhaust leaks.
How often should I clean the burn pot and chimney if I use the heater frequently?
The practical baseline is after every 2 to 3 uses for the burn pot, and at least once per season for the full chimney. If you notice recurring low heat, heavy smoke, or difficult relighting, clean sooner, because ash and creosote buildup can progress faster with certain pellet brands or higher burn settings.
Can I leave pellets in the hopper during storage or off-season?
It’s not recommended. Leaving pellets in the hopper lets them absorb humidity, turning them into clumps that can block the feed channel. Empty the hopper before storage, then clean any fines so the next start is not limited by a partially plugged feed path.
My heater shuts down and I can’t restart right away. Is that a thermal safety event?
Most likely, yes, if it stops and will only restart after cooling. Let it cool for about 20 to 30 minutes, then clear the burn pot and ash tray completely. After that, restart and avoid opening the feed gate too wide, since overfeeding on a gravity-fed unit can overfire the burn pot and trigger shutdown.
The heater is on uneven ground and seems to shut down intermittently. What should I do?
Level the heater first. Some models include a tilt-related cutoff or safety mechanism, and an uneven base can create intermittent shutdown behavior. If leveling doesn’t fix it, inspect the tilt switch mounting and wiring position only as described in your specific parts diagram, and do not bypass safety components.
I can’t get pellets to drop into the burn pot even when the hopper is full. What causes this?
The most common causes are ash or fines blocking the feed channel and pellet clumps caused by moisture. Clear the channel manually with a long rod or brush, check for compacted debris near the feed opening, then try again with a fresh batch from a dry, sealed container.
Where is the thermocouple on my FlamePro pellet patio heater, and should I test it?
There isn’t a thermocouple in the traditional gas-heater sense for this pellet design. If you’re reading a gas manual and looking for thermocouples, ODS pilots, or a gas valve circuit, those parts won’t apply. Focus troubleshooting on pellet feed, burn pot airflow, and chimney draw instead.
Do I need to remove and reassemble the chimney sections every time I clean?
For a thorough seasonal cleaning, yes, disassemble the upper, middle, and lower sections and brush each one. For day-to-day maintenance, you typically only need to empty the ash tray and inspect or clear the burn pot, without fully disassembling the chimney unless airflow problems persist.
How do I know when it’s time to stop troubleshooting and contact FlamePro or Costco?
Stop and contact support if you’ve confirmed dry pellets, cleaned ash and burn pot, cleared the feed channel, and verified chimney draw and proper seating, and the heater still will not ignite or will not stay lit. If the unit is still within warranty, check the warranty section on the Costco product page before taking things apart beyond cleaning and pellet replacement, and share your item number 1713430 with your request.