The thermocouple on a patio heater is a small safety sensor that sits in the pilot flame and generates a tiny electrical voltage, typically around 25 to 30 millivolts, to hold the gas valve open. When the flame heats the thermocouple tip, that voltage energizes an electromagnet inside the valve that keeps gas flowing. If the flame goes out, the voltage disappears, the magnet releases, and the valve snaps shut so raw gas can't escape. That's the whole job: prove the flame is there, keep the valve open; flame gone, valve closes.
How Does a Thermocouple Work on a Patio Heater?

Grant Mercer
23 Jun 2026
What a patio heater thermocouple actually does
Your patio heater has one rule: don't let gas flow unless there's a confirmed flame to burn it. The thermocouple is what enforces that rule. It works on something called the thermoelectric effect: when two different metals are joined at a tip and that tip is heated, the temperature difference between the hot tip and the cooler connection at the gas valve generates a small DC voltage. The gas valve contains a safety solenoid (basically a small electromagnet) that needs that voltage to stay energized. While voltage is flowing, the solenoid holds the valve open. Cut the voltage, and a spring inside the valve slams it shut.
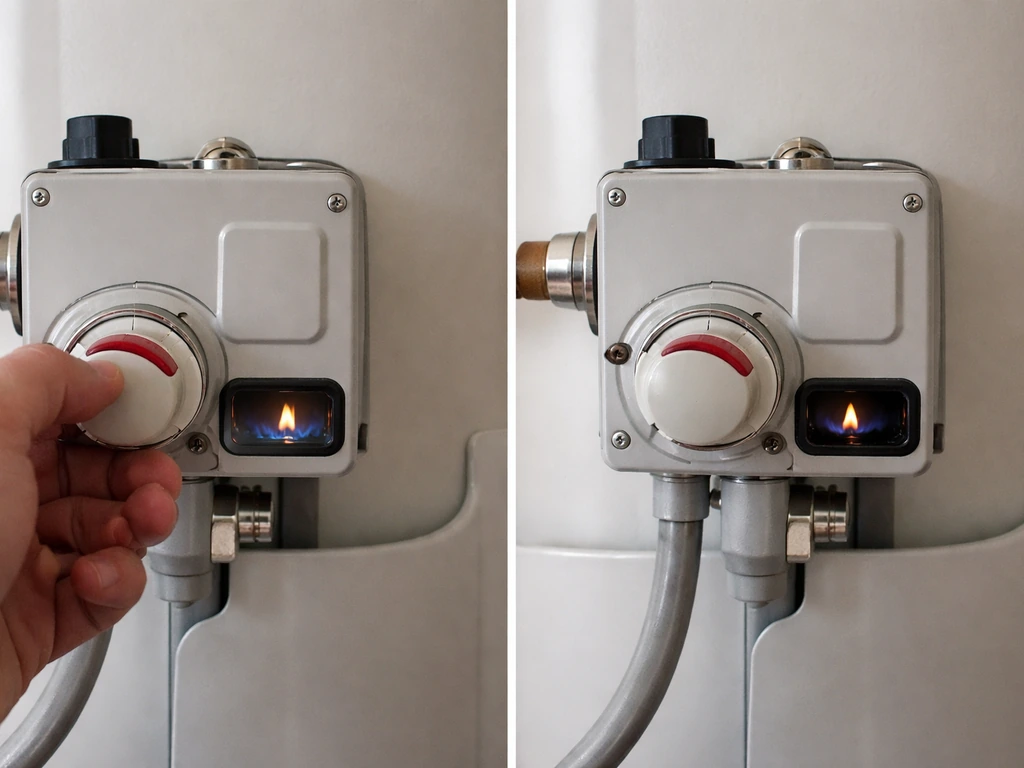
This is why you have to hold the control knob down for 30 to 45 seconds after lighting the pilot. You're giving the thermocouple time to heat up enough to reach the millivoltage threshold the solenoid needs. Let go too early, and the valve hasn't latched yet, so the gas cuts off immediately. A lot of people misread that as a broken thermocouple when the real issue is just not holding long enough.
Where the thermocouple is located on common patio heaters
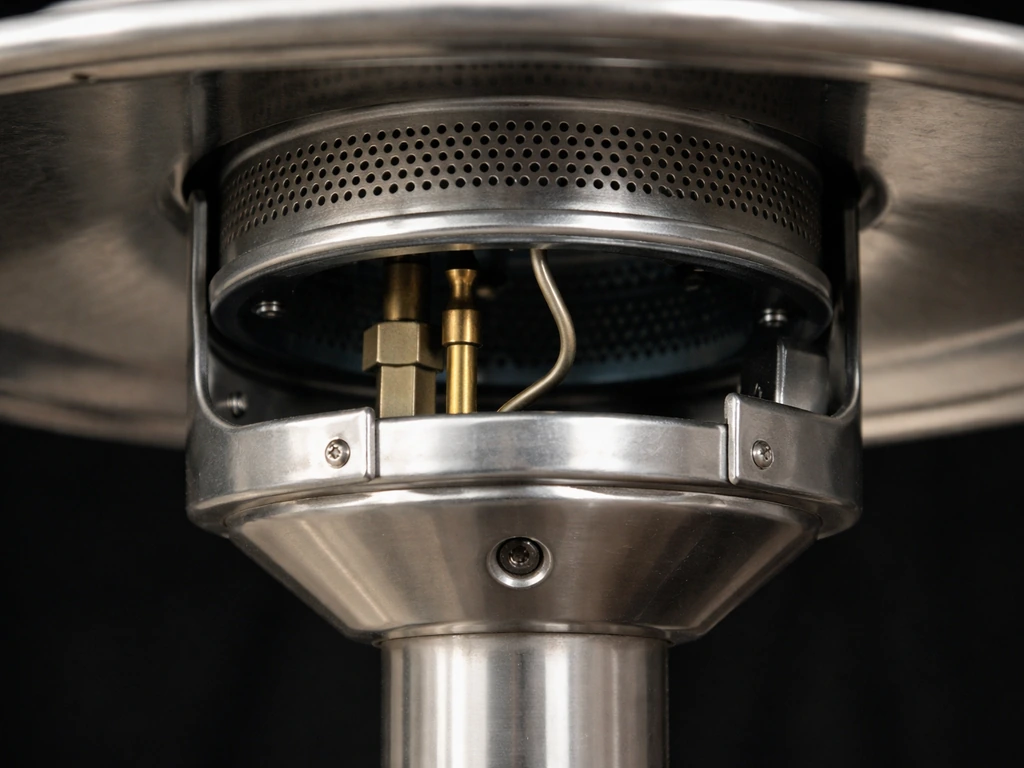
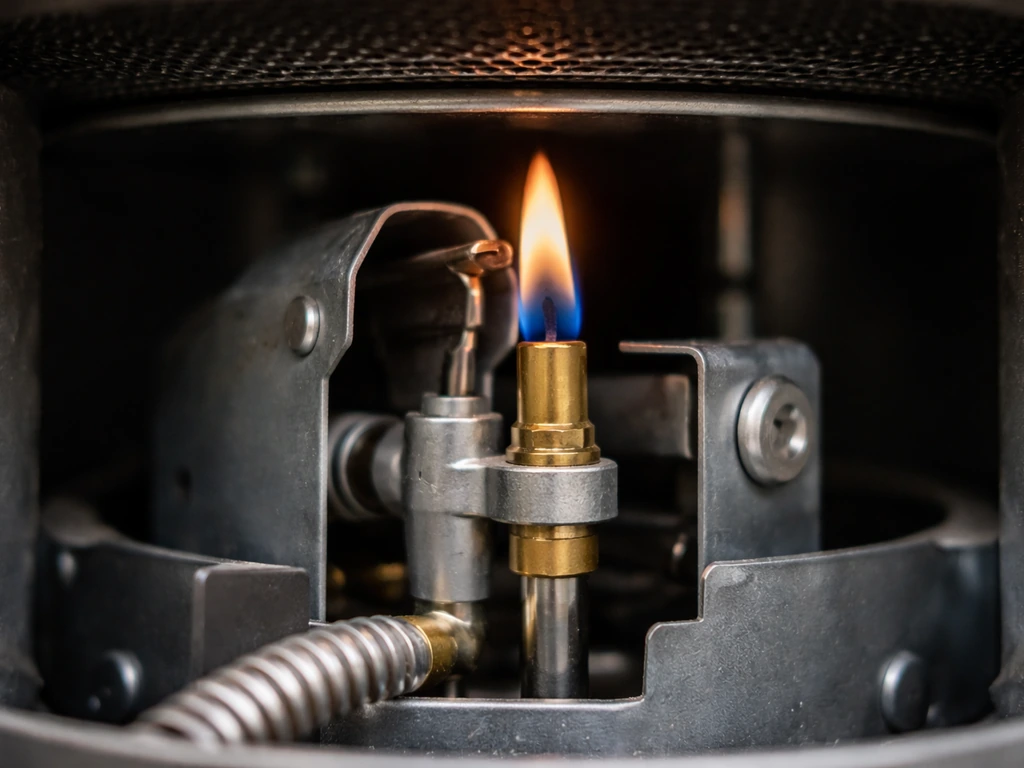
On most freestanding propane patio heaters (the mushroom-top style), the thermocouple is tucked up inside the burner head assembly, right next to the pilot tube. To clean a patio heater pilot tube safely, remove dust and soot from the pilot area and make sure the tube and tip are clear so the pilot flame can stay consistent.
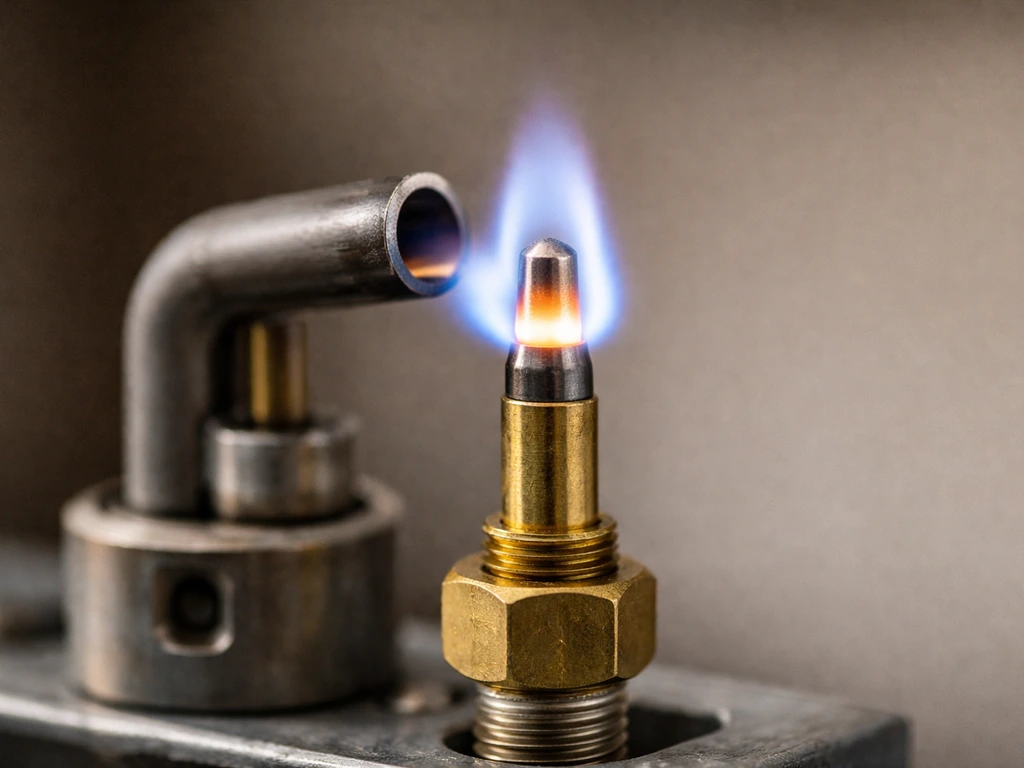
You'll see a thin metal tube, roughly the diameter of a pencil, with a small pointed tip that pokes directly into or right beside the pilot flame. It's usually held in place by a small clip or bracket that's part of the pilot assembly. The other end of that tube runs down through the pole and connects to the gas control valve near the base of the unit, threading in with a small hex nut.
On manual-knob models (the most common type), the thermocouple connects directly to the safety port on the side of the gas valve. On push-button electronic ignition models, the setup is identical in terms of the thermocouple's location and function, the only difference is how the spark is delivered to the pilot. Wall-mounted or infrared panel heaters follow the same principle, but the pilot and thermocouple are typically mounted behind a perforated screen near the burner face. If you're not sure which type you have, look for the thin metallic tube near the pilot flame: that's your thermocouple.
How the thermocouple generates power and tells the gas valve to stay open
The thermocouple is essentially a tiny self-powered generator. It doesn't need batteries or an external power source. The pilot flame heats the hot junction at the tip of the thermocouple, and the cold junction sits at the gas valve connection. That temperature difference, which can be several hundred degrees, drives a small but critical flow of DC current. A healthy thermocouple under flame generates roughly 25 to 30 millivolts. That voltage travels down the thermocouple tube to the gas valve, where it powers the safety solenoid magnet.
The solenoid magnet pulls a small plunger open inside the valve. As long as the magnet is energized by the thermocouple voltage, the plunger stays open and gas can flow. The moment the thermocouple cools, voltage drops, the magnet can't hold the plunger, and the spring pushes it shut. Robertshaw-style troubleshooting procedures flag anything under about 8 millivolts as insufficient to hold the valve reliably. Other service guidelines put the replacement threshold at under 9 to 10 millivolts. Below that range, you'll get intermittent shutoffs or a heater that won't stay lit at all.
One thing worth understanding: the pilot flame has to hit the right part of the thermocouple. Specifically, the flame should envelope roughly the top 7/8 of an inch of the thermocouple tip. If the flame is too small, or if the thermocouple has shifted so the flame only licks the lower part of the tip, you won't get enough heat to generate the voltage the valve needs.
This is one of the most common reasons a patio heater lights and then shuts off after you release the knob. If your propane patio heater lights and then shuts off right after you release the knob, start by checking the thermocouple flame contact and then test its millivolt output how to fix propane patio heater.
Symptoms of a bad thermocouple and other causes that mimic it
The most tell-tale symptom of a thermocouple problem is: the pilot lights fine, the heater runs while you hold the control knob in, but the moment you let go, it shuts off. That's almost always a thermocouple issue. But a few other things can produce identical symptoms, so it's worth knowing the full list before you start pulling parts.
- Heater lights but shuts off immediately when the knob is released: classic thermocouple failure or the thermocouple tip isn't in the flame properly.
- Heater runs for a few minutes then shuts off: the thermocouple may be partially working but not generating enough sustained voltage, or the pilot flame is marginal.
- Pilot won't stay lit even with extended hold time: the thermocouple may be damaged, corroded, or the connection at the valve is loose.
- Intermittent operation, works one day and not the next: dirty or corroded thermocouple connection is a common cause here.
- Tilt switch tripping: on many patio heaters, a tilt switch also cuts the gas if the unit tips. If the heater shuts off unexpectedly, check whether the tilt switch is the culprit before blaming the thermocouple.
- Blocked or dirty pilot tube: a clogged pilot tube produces a weak or misdirected flame that doesn't heat the thermocouple adequately, mimicking a bad thermocouple.
- Faulty gas valve: if the thermocouple tests fine but the valve won't hold, the solenoid magnet inside the valve itself may be worn out.
The key diagnostic question is always: does the pilot flame actually touch the thermocouple tip? Get a flashlight and look before assuming the thermocouple is dead.
Safety steps before troubleshooting a gas patio heater
Stop here and do these before touching anything else. Gas appliance work is not the place to skip the safety checklist.
- Turn the control knob to OFF and then close the shutoff valve on your propane tank or the dedicated gas supply line. Don't rely on the control knob alone.
- Wait at least 10 to 15 minutes for the burner head, thermocouple tip, and surrounding components to cool down completely. The thermocouple tip gets very hot during normal operation.
- Move the heater to a well-ventilated area away from ignition sources before opening any connections.
- Before reassembling after any work, check every gas connection you touched with soapy water or a dedicated gas leak detection solution. Bubbles mean a leak. Never use an open flame to check for gas leaks.
- If you smell gas at any point during inspection, stop immediately, move away from the heater, and ventilate the area before continuing.
- Never bypass or jumper the thermocouple safety circuit. Its job is to shut off gas when there's no flame, and defeating it removes a critical protection against gas buildup.
How to inspect and fix thermocouple positioning and connection
Once the heater is cool and the gas is off, start with a visual inspection. This fixes the problem more often than you'd expect.
Check the thermocouple tip position
Look at where the thermocouple tip sits relative to the pilot flame outlet. The tip should be positioned so the pilot flame fully wraps around the top portion of it when lit. If the tip has been bent away from the pilot, or if the bracket has shifted, the flame may not be making proper contact.
If adjusting the tip placement doesn't fix it, the next step is to test the thermocouple voltage with a multimeter flame may not be making proper contact. Gently bend the tip closer to the pilot flame outlet using pliers, just a small adjustment is usually enough. Don't force it or bend it sharply. You want the flame envelope to cover the top 7/8 of an inch of the tip when the pilot is running.
Inspect the thermocouple for visible damage
Look the thermocouple tube over from tip to connection. Signs that it needs replacement rather than just adjustment: the tip is visibly burned through, cracked, or corroded heavily; the tube is kinked or has a sharp bend that may have damaged the inner conductor; or the outer sheath is flaking or has obvious heat damage beyond normal discoloration.
Check and tighten the connection at the gas valve
The thermocouple threads into the gas valve with a small hex nut, usually tightened finger-tight plus a quarter turn with a wrench. A loose connection here can drop enough millivoltage to prevent the valve from holding even if the thermocouple itself is fine. Unscrew the nut, check the contact point for corrosion or debris, and clean it gently if needed. HVAC Basics recommends checking for corrosion or debris at the thermocouple connection at the [gas valve](https://hvacbasics.
com/thermocouple-and-thermopile/) and cleaning the contact gently if needed. If you suspect dirt or corrosion on the thermocouple tip or its connection, cleaning it is often the first step before testing or replacing it. Reconnect and tighten snugly, but don't overtighten since the fittings on these are fairly delicate.
DIY testing and when to replace vs call for service
If the visual inspection and positioning fix didn't solve the problem, a basic multimeter test can tell you definitively whether the thermocouple is producing enough voltage.
How to test the thermocouple with a multimeter
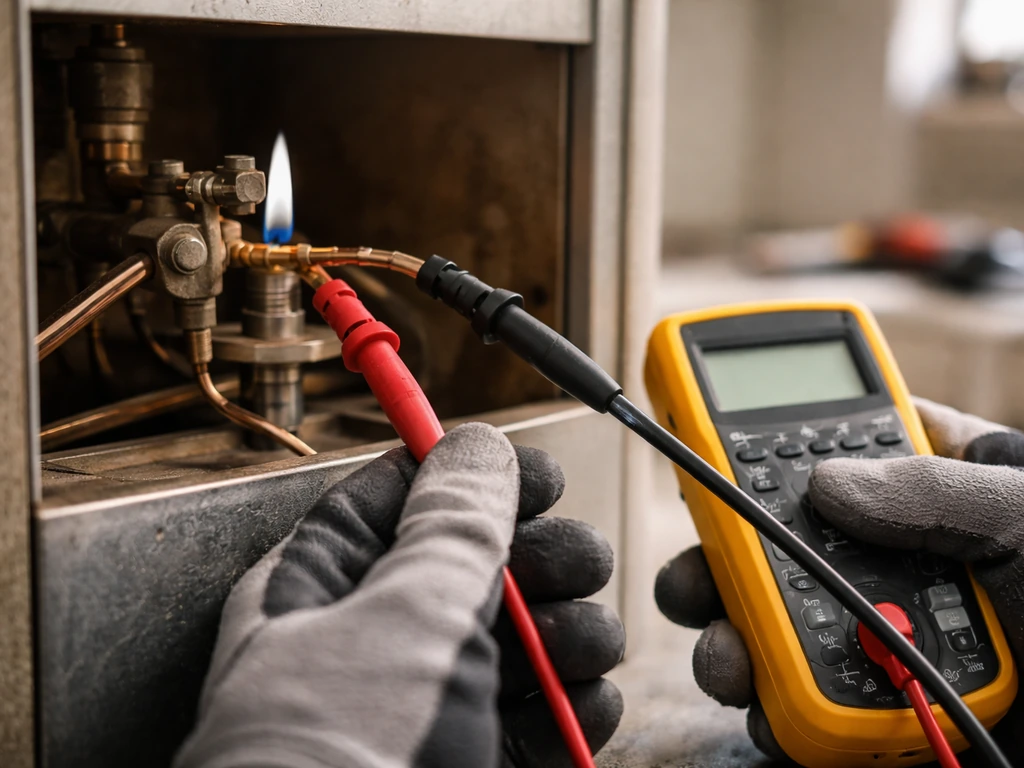
- Set your multimeter to DC millivolts (the mV DC setting).
- Disconnect the thermocouple nut from the gas valve.
- Light the pilot and hold the control knob in as you normally would, so the thermocouple is being heated by the flame.
- Touch the multimeter probes to the thermocouple connector: one probe to the center terminal and one to the outer fitting.
- After 30 to 45 seconds of flame contact, read the voltage. A healthy thermocouple should show 25 to 30 millivolts. Anything above 10 millivolts is generally considered passing by most service manual standards.
- If you're reading below 9 to 10 millivolts with the flame fully on the tip, the thermocouple is weak and should be replaced.
- If you're getting a good reading but the valve still won't hold, the problem is likely inside the gas valve itself, not the thermocouple.
Replace or call for service: how to decide
| Situation | What to do |
|---|---|
| Thermocouple reads below 9–10 mV under flame | Replace the thermocouple. It's a straightforward DIY swap. |
| Thermocouple reads 25–30 mV but valve won't hold | The gas valve solenoid may be failing. Consider calling a service technician. |
| Tip is visibly burned, cracked, or corroded | Replace the thermocouple regardless of voltage reading. |
| Connection was loose and cleaning/tightening fixed it | Test the heater. No replacement needed if it now holds correctly. |
| Flame is weak or misdirected from pilot tube | Clean or replace the pilot tube before replacing the thermocouple. |
| You smell gas and can't identify the source | Stop. Close the tank valve, ventilate, and call a professional. |
| Multiple components seem faulty at once | Call a qualified gas appliance technician rather than replacing parts blindly. |
Replacing the thermocouple itself is one of the easier DIY repairs on a patio heater. You unscrew the tip bracket at the pilot assembly, unthread the nut at the gas valve, pull the old one out, and thread in the new one. Universal replacement thermocouples are available at hardware stores and are inexpensive. Just match the length of the original. If you need a walkthrough of the full replacement process, that's covered in detail in the guide on how to fix a thermocouple on a patio heater. If you want the full step by step, use this guide on how to fix a patio heater thermocouple.
One thing worth noting: if your patio heater is shutting off and you're not sure whether it's the thermocouple or the tilt switch, those two issues are easy to separate. The tilt switch cuts gas when the heater is knocked or tilted past a certain angle, so if the shutoff only happens when there's any vibration or lean to the unit, check the tilt switch first. If the heater shuts off consistently after you release the knob regardless of tilt, that points squarely at the thermocouple or gas valve safety circuit. If you still have problems after checking the thermocouple basics, you may also need to look at how to replace battery in patio heater for other ignition components.
If you've confirmed the thermocouple is working but the regulator looks suspect or the heater still has inconsistent gas pressure, a failing regulator can also reduce pilot flame strength enough to under-heat the thermocouple. If the regulator is the suspect, follow the heater's manual for how to replace the regulator on a patio heater and make sure all fittings are leak-checked after installation how to replace regulator on patio heater. That's a separate issue worth investigating if the thermocouple checks out clean.
FAQ
My heater has an igniter, but I still see a flame. Is it still a thermocouple system?
Most patio heaters use a thermocouple with a pilot flame, but some units use an electronic ignition system with a separate flame-sensing element (thermopile or flame rod). If your heater has a pilot flame you can see, the thermocouple concept applies. If it does not have a visible pilot and instead uses an igniter to light the main burner, confirm the parts type before replacing anything, because the correct sensor and wiring differ.
What if the thermocouple tests OK, but it still shuts off right after releasing the knob?
If the thermocouple is generating voltage but the valve still closes when you release the knob, the issue is often the gas valve safety solenoid circuit or a weak connection at the valve. Check the thermocouple mounting point at the valve for corrosion or looseness, and verify you are measuring the voltage at the correct two points on the thermocouple, not across the valve body.
Why can a thermocouple meter reading be near normal, but the heater still won’t stay lit?
A normal multimeter reading can look “close” yet still fail under real conditions if the flame contact is marginal. Recheck the flame envelope relative to the top portion of the tip (about the top 7/8 inch) while the pilot is running, then take the voltage reading immediately. Also consider heater drafts, blocked burner ports, or soot, all of which can reduce pilot heating even if the thermocouple itself is intact.
Could soot or a partially blocked pilot tube cause the same symptoms as a bad thermocouple?
Yes. A dirty pilot assembly can cause the pilot flame to be smaller, lifted, or misdirected, so it does not heat the thermocouple properly. Cleaning should focus on soot and dust in the pilot area and keeping the pilot tube clear so the flame pattern reaches the tip. If the pilot flame is correct after cleaning, then you can move on to voltage testing and physical tip alignment.
How can I tell the thermocouple is failing even if the pilot flame seems to touch it?
If you see the pilot flame wrapping the tip but it still drops out, the thermocouple may be damaged internally even if the outer sheath looks fine. Signs include intermittent voltage, cracked/burned tip, kinks in the tube, or corrosion at the threaded connection. In those cases, replacement is usually more reliable than repeated bending.
What are safe “next steps” if I need to loosen and retighten the thermocouple connection?
For safety and accuracy, confirm that the gas is fully off and the heater is cool before you tighten or loosen any fittings. If you suspect leaks after work, check for leaks at the connection points using soapy water, and never use an open flame to test. Also, when tightening the hex nut, stop once it is snug, overtightening can damage delicate threads and reduce contact quality.
How do I distinguish a tilt switch problem from a thermocouple problem?
Some heaters have multiple safety shutdowns, like a tilt switch and a flame safety circuit. If shutoff occurs only when the unit is knocked, leaned, or vibrates, prioritize the tilt switch. If shutoff happens consistently every time you release the knob while the heater remains upright, that pattern points to the flame safety side (thermocouple, valve, or pilot contact).
Does the position of the thermocouple tip relative to the flame really change the outcome?
Yes, and it matters. If the flame is too small or the tip has shifted so the flame only heats the lower portion, voltage can fall below what the solenoid needs, even if the heater “kind of” lights. The most reliable fix is repositioning the tip so the flame fully wraps roughly the top 7/8 inch of the tip, then retesting behavior by holding the knob for the specified warm-up time.
Do I ever need to replace batteries for the thermocouple to keep the heater running?
A thermocouple is self-powered, so it does not need battery replacement. Battery-related issues typically apply to ignition spark generation or controller components, not to keeping the gas valve open. If the heater lights with a pilot but shuts off when you release the knob, that is generally not a battery issue.