
To anchor a patio heater, match your method to the surface: bolt it to concrete with wedge or adhesive anchors, lag-bolt it to structural deck joists, drive auger anchors into soil, fill the base with sand or water for portability, or add guy-wire straps to anything tall and slender. For step-by-step instructions and anchor options, see how to secure a patio heater. Each approach works well when you pick the right hardware and hit the right depth. The wrong choice, or skipping it entirely, means a 40-plus-pound heater can tip in a 20 mph gust and become a serious fire hazard. For practical tips on preventing falls and securing units, see our guide on how to keep a patio heater from tipping over.
How to Anchor Patio Heater: Secure Methods for Homeowners

Grant Mercer
16 Jul 2026
Why anchoring matters and when you actually need it
Most freestanding gas patio heaters are 85 to 92 inches tall with a relatively narrow base, usually 16 to 18 inches across. The mushroom-cap emitter head sits at the top and acts like a sail in wind. If you’re curious what is a flat emitter on a patio heater and how it compares to the mushroom-cap design, read our short explainer on flat versus mushroom emitters. Even models certified under ANSI Z83.26/CSA 2.37, the U.S. consensus standard for gas-fired outdoor infrared patio heaters, include a tilt switch that shuts off the gas if the unit falls, but that switch is a last-resort safety device, not a reason to skip anchoring. A falling heater can still start a fire in the fraction of a second before the tilt switch cuts fuel, and it can injure anyone nearby.
You need to actively anchor a patio heater in any of these situations: the heater is in an exposed location where gusts regularly exceed 15 to 20 mph; the base sits on an uneven or sloped surface; children or pets share the space; the unit will be left unattended while running; or the manufacturer's installation manual explicitly requires a fixed installation. For occasional use on a calm, flat patio with adults present, a filled or weighted base may be enough. For anything else, a mechanical anchor is the right call.
Picking the right anchoring method for your heater and surface
There is no single universal anchor. The correct method depends on two things working together: the heater's base design and the surface it sits on. Getting this combination right before you buy any hardware saves a wasted trip to the hardware store and prevents damage to your deck or patio.
Freestanding vs. portable heaters
A freestanding gas patio heater, the classic mushroom-style propane unit, typically has a cross-base or tripod base with bolt holes or a central post with a weighted round base. Most bolt-to-concrete and bolt-to-deck approaches apply to these. Portable or tabletop electric heaters are lighter and lower, so a heavy-duty mounting bracket or anti-tip strap is usually enough. Pole-mounted or wall-mounted electric heaters bypass the tipping question entirely, but they require structural attachment to a post or wall stud, which is its own installation task covered by the manufacturer's bracket instructions.
Gas vs. electric considerations
Gas heaters, whether natural gas hard-piped or propane cylinder-fed, involve flammable fuel, so the stakes for a tip-over are higher. You must disconnect or close off the fuel supply before any anchoring work. Hardwired electric heaters require disconnecting power at the breaker. Infratech and similar brands specify in their installation manuals that all field wiring must comply with NEC/NFPA-70, and most require a licensed electrician for the hardwired connection itself, even if you do the mechanical anchoring. Plug-in electric heaters are the least complex to anchor since you just unplug before working.
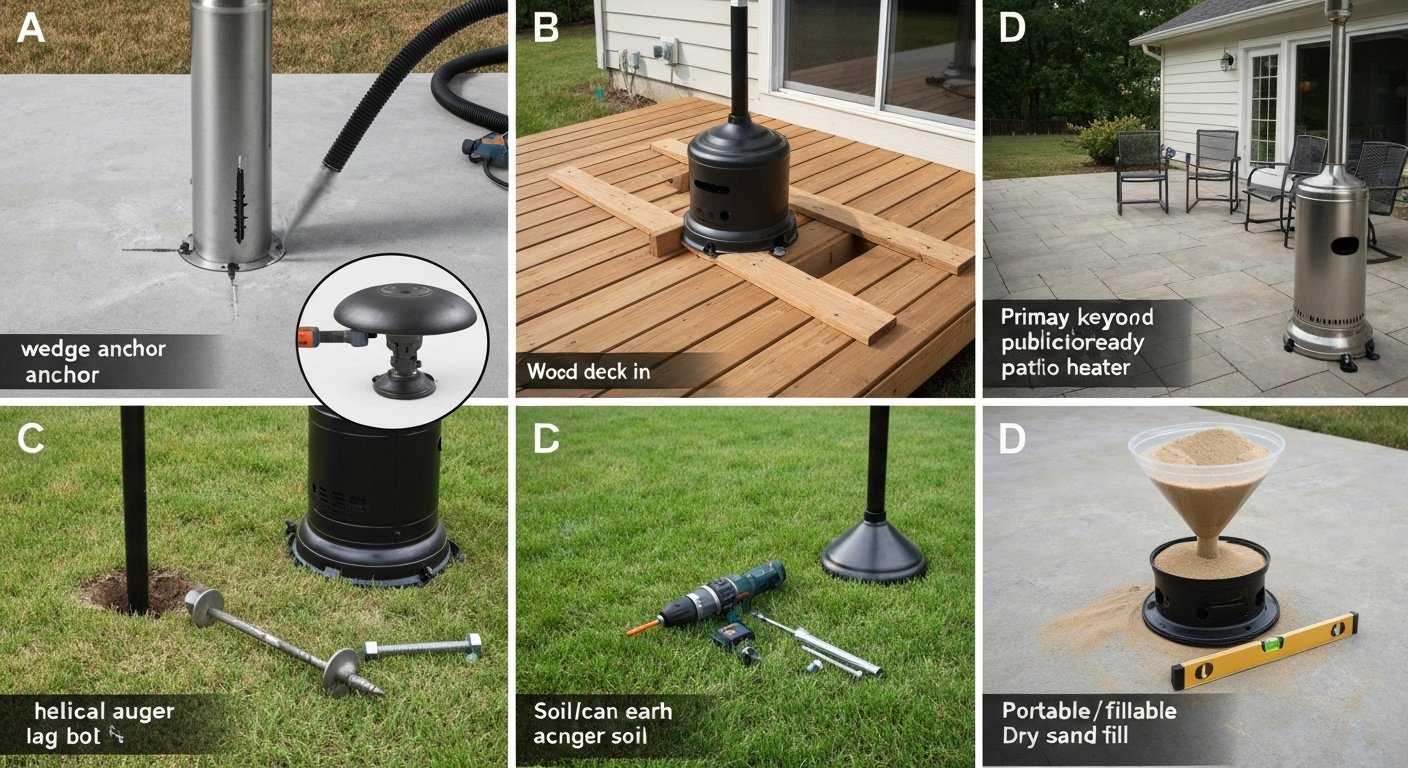
Surface guide: which anchor type to use where
| Surface | Recommended Anchor Type | Notes |
|---|---|---|
| Poured concrete slab | Wedge anchor or adhesive (chemical) anchor bolts | Minimum 3.5 in. embedment; follow Hilti or Simpson torque specs for the anchor diameter chosen |
| Wood deck / joist | Lag bolts or through-bolts into structural joist or rim joist | Never fasten into decking boards alone; use blocking if joists don't align with base holes |
| Soil / grass | Auger anchor (earth anchor) with coupler rod | Minimum 24 in. depth in average soil; holding capacity varies widely by soil type |
| Interlocking pavers | Concrete footing below paver layer, or broad base plate spanning multiple pavers | Do not anchor into paver units; they shift and crack under point loads |
| Portable / no fixed surface | Fillable weighted base (sand or water), or anti-tip ground strap | Sand adds more weight per volume than water; suitable for grass, gravel, or temporary setups |
Tools and materials checklist
Gather everything before you start. Stopping mid-job because you're missing a torque wrench or the right drill bit is how anchors end up improperly installed and half-torqued.
- Rotary hammer drill with carbide-tipped masonry bits (for concrete) or standard drill/driver with spade or twist bits (for wood)
- Torque wrench (0 to 50 ft-lbs range covers most anchor bolt sizes)
- Socket set and combination wrenches (3/8 in. and 1/2 in. drive)
- Measuring tape and carpenter's square
- Marker or chalk for layout
- Level (4-inch torpedo level at minimum)
- Wedge anchors or adhesive anchor system (Hilti HIT-HY 200 or equivalent) for concrete, sized to base hole diameter
- Lag bolts (5/16 in. or 3/8 in. x 3 in. minimum) or through-bolts with washers and nuts for wood deck work
- Auger earth anchors with coupler rod and carabiner or D-ring for soil installs
- Stainless steel hardware throughout, 304 or 316 grade, to prevent rust-jacking and corrosion in outdoor use
- Concrete anchoring adhesive or thread-locking compound as required by the anchor type
- Outdoor-rated silicone sealant for sealing bolt entry points on concrete or wood to prevent water intrusion
- Safety glasses, work gloves, and hearing protection (rotary hammers are loud)
- Shop vacuum or compressed air for clearing drill holes in concrete
- Anti-tip straps or guy-wire kit if using as supplemental anchoring
How to bolt a patio heater to concrete
This is the most secure and most permanent anchoring method. Once done correctly, a bolted base on concrete can resist several hundred pounds of lateral load, which is overkill for normal wind, but that margin is exactly what you want. This process uses mechanical wedge anchors because they're the most common DIY option and easier to install correctly than two-part adhesive systems. If you're working with a cracked, thin, or aging slab, switch to an adhesive anchor like Hilti HIT-HY 200, which handles compromised concrete better, but follow the product's technical supplement exactly for hole size and cure time.
- Close the propane tank valve fully and disconnect the regulator hose, or switch off the circuit breaker for electric units. Do not skip this step.
- Position the heater base on the slab exactly where you want it. Use a level to confirm the concrete surface is flat. Mark through each base mounting hole with a marker or scratch awl.
- Move the heater aside. Check each mark: maintain at least 6 times the anchor diameter as edge distance from the slab edge (so for a 3/8 in. anchor, stay at least 2.25 in. from any edge), and at least 10 times the diameter between anchor centerlines.
- Select a wedge anchor diameter to match your base holes, typically 3/8 in. or 1/2 in. For a 3/8 in. anchor, use a 3/8 in. carbide masonry bit. Drill to a depth equal to the anchor embedment length plus 1/2 in. clearance, minimum 3.5 in. embedment for a 3/8 in. wedge anchor per Simpson Strong-Tie guidance.
- Vacuum or blow out all dust from each hole. Concrete dust prevents proper anchor expansion and dramatically reduces holding capacity.
- Insert the wedge anchor through the base hole and into the concrete hole. Tap down with a hammer until the nut and washer sit against the base plate.
- Tighten the nut with a socket wrench. For a 3/8 in. wedge anchor, torque to approximately 25 ft-lbs. Check the specific torque value on your anchor's packaging. Do not retorque wedge anchors after the initial installation; retorquing can break the expansion mechanism.
- Apply a bead of outdoor-rated silicone sealant around each bolt where it meets the base plate to prevent water pooling and corrosion at the fastener.
- Reconnect fuel or restore power, then gently push the heater laterally at head height to confirm there is no movement at the base.
How to bolt a patio heater to a wood deck or joist
The key rule with wood deck anchoring: decking boards are not structural. They flex, split, and have almost no resistance to the upward pull that a tall heater generates during a tip. Your lag bolts or through-bolts must go into a joist, a rim joist, or dedicated blocking you install between joists. See Deck Center, Simpson Strong‑Tie (installation details and connector guidance) for guidance on blocking, engineered mounting plates, and fastener selection when anchoring to decks Deck Center — Simpson Strong‑Tie (installation details and connector guidance). This is non-negotiable.
- Locate the joists beneath your deck surface using a stud finder. Mark their centerlines with chalk or tape. If your heater's base mounting holes don't align with joists, you'll need to install blocking, which means cutting two short sections of joist-depth lumber (typically 2x8 or 2x10) and nailing or screwing them between adjacent joists to create a solid anchor point.
- Position the heater base with at least two of its mounting holes directly above joists or blocking. Four-hole bases should hit four solid points.
- Drill pilot holes through the decking boards and into the joist below using a bit 1/32 in. smaller than your lag bolt shank diameter. For a 3/8 in. lag bolt, use a 23/64 in. pilot bit. Pilot holes prevent splitting and make driving much easier.
- Use 3/8 in. diameter lag bolts at minimum, 3 in. long to achieve at least 1.5 in. of thread engagement in the joist. In wet or coastal climates, use 316 stainless steel or hot-dip galvanized hardware. Stainless exterior screws are not sufficient, use lag bolts for this load.
- Drive each lag bolt with a socket wrench, not an impact driver alone. An impact driver can easily strip the threads in the wood or snap the bolt if you're not watching torque. Snug is firm resistance, not maximum force. Overtightening crushes wood fibers and weakens the connection.
- Add a flat washer under each lag head to distribute the load across the base plate rather than letting the head pull through.
- Once tightened, test by pushing firmly at the heater's head in four directions. There should be no movement at the base. A small amount of very slight flex in the deck itself is normal; rotation or rocking at the base plate is not.
- Apply a bead of paintable exterior silicone sealant around each bolt entry through the deck surface to prevent water intrusion, which rots the joist from above.
How to install earth spikes and auger anchors in soil
Auger anchors are the right solution when you want stability on grass, gravel, or dirt without any permanent construction. They're genuinely useful for seasonal setups, but understand their limitation: pulling force varies by an order of magnitude depending on soil type. Loose, sandy, or waterlogged soil can cut holding capacity to a fraction of the rated value. USDA Forest Service pullout tests confirm that anchor performance in soft soils can be dramatically lower than manufacturer specs, which are usually measured in firm, dry soil. You can roughly triple your margin by going deeper and using two anchors per base leg.
- Clear the installation area of rocks, roots, or hardpan within the anchor footprint. Hitting an obstruction mid-install bends the anchor shaft and compromises holding strength.
- Position the heater and mark where each base leg sits on the ground. Most freestanding heaters have three or four base legs; plan one anchor point per leg.
- Drive each auger anchor by hand (for smaller spike designs) or with a drill and hex adapter (for helical auger anchors) to a minimum depth of 24 inches in average loam or clay soil. Sandy or loose soil warrants 30 to 36 inches. Shallower than 18 inches in any soil type is not adequate for a top-heavy unit.
- Once the anchor head is flush with or just below the ground surface, attach the coupler rod or extension if needed to bring the connection point up to the base leg height. Use a carabiner or load-rated D-ring rated for at least 300 lbs to connect the anchor to the base leg.
- For corrosion protection, choose hot-dip galvanized or powder-coated auger anchors. Bare steel anchors start rusting within one season in damp soil and can fail during the following year even if they looked fine when you pulled them in fall.
- After installation, check each anchor by pulling straight up with full body weight. There should be no movement. If you feel any give, drive the anchor deeper or choose a different spot with firmer soil.
- When removing for storage, use a soil auger or crowbar to work the anchor free rather than yanking straight up, which bends the shaft.
How to secure with a weighted or fillable base
Many freestanding propane heaters are designed so the propane cylinder itself sits inside the base column and acts as ballast. When the manufacturer's design incorporates the cylinder as ballast, stick with that approach and use the factory base. Don't add improvised weight like stacked bricks or cinder blocks on the outside of the base; those can shift and create a worse instability problem. If your heater has a separate fillable base or you're buying an aftermarket weighted base, here's how to do it right.
- Place the base on a flat, level surface before filling. Use your torpedo level to confirm it's not sitting on a high spot or uneven ground. Fill it while tilted and it will cure crooked.
- Sand is the preferred fill for permanent or semi-permanent setups. Dry play sand runs about 100 lbs per cubic foot. A typical 10-gallon fillable base holds roughly 80 to 100 lbs of sand, compared to about 80 lbs if filled with water. Sand won't slosh, won't evaporate, and won't freeze and crack the base the way water can.
- Water is acceptable for summer-only use in climates where freezing is not a concern. If your climate sees below-freezing temperatures, drain water bases fully before cold weather or the expanding ice will crack the base shell.
- Fill to the manufacturer's maximum indicated line, not above it. Overfilling raises the center of gravity and reduces the leverage benefit.
- After filling, reassemble the heater and use a level at the base plate to confirm the unit is plumb. Adjust the surface under the base rather than shimming the heater itself.
- Periodically check that sand fill has not compacted and shifted to one side. This can happen in vibration-prone environments or after heavy rain. Top up as needed.
How to use guy-wires and anti-tip straps
Guy-wires and anti-tip straps are the right supplemental method when you can't or don't want to permanently anchor the base, but still need resistance to tipping. They work by connecting the upper portion of the heater pole to fixed anchor points at ground level or low on a wall. Done right, they're invisible from a few feet away and can dramatically reduce tip risk in gusty conditions. Done wrong, they become trip hazards. Plan the layout carefully before you run any hardware.
- Identify three anchor points spaced roughly 120 degrees apart around the heater, ideally at ground level or attached to low wall brackets. The anchor points should be 4 to 6 feet from the heater base to create an effective restraint angle. Anchors set too close to the base provide almost no leverage against tipping.
- Use 3/16 in. or 1/4 in. braided stainless steel cable or rated nylon anti-tip straps, not rope or zip ties. Attach to the heater pole at a point roughly 60 to 70 percent of the total heater height using a stainless loop clamp or the manufacturer's strap attachment point if one is provided.
- At each ground anchor point, use a ground stake rated for at least 150 lbs pullout in your soil type, or attach to a fixed structural element like a deck post base or concrete anchor eye bolt.
- Tension each strap or cable so it is taut but not pulling the heater out of plumb. Use a turnbuckle on cable installations so you can fine-adjust tension without re-cutting cable. All three cables should have equal tension; unequal tension cants the heater and defeats the purpose.
- Route cables close to the ground surface and mark them with bright flagging or rubber cable covers anywhere foot traffic is possible. Ankle-height wire is a serious fall hazard, especially at night.
- Check tension monthly. Cables loosen as anchor stakes settle and as thermal expansion and contraction cycles the hardware.
Measurements, layout planning, and clearance requirements
Before drilling a single hole, measure twice and confirm clearances. Most gas patio heaters require a minimum of 36 inches of horizontal clearance from combustible materials (walls, fences, overhangs, fabric) and a minimum of 24 inches of vertical clearance above the emitter head. Your specific model's label and manual will state the exact numbers, and those override any general guidance. Failing to maintain clearances is both a fire risk and a warranty-voiding modification according to most manufacturer warranties, including AZ Patio Heaters and similar brands.
For base footprint planning, measure the heater's base leg span, not just the base plate diameter, because the legs extend outward and determine where your anchor holes actually land. On a deck, confirm those points fall over joists before you commit to a location. Mark the hole layout on the surface and double-check with a square before drilling. For concrete anchors, add an edge-distance check (at minimum 6x anchor diameter from any slab edge or crack). A 3/8 in. anchor needs at least 2.25 in. from the edge; a 1/2 in. anchor needs 3 in.
Heater height matters for guy-wire attach points and wind load planning. Most mushroom-style gas heaters are between 85 and 92 inches tall. Attaching a restraint strap at 60 inches (roughly two-thirds up the pole) on an 88-inch heater gives you a good leverage ratio against tipping forces without putting stress on the emitter housing. Note the base footprint diameter and make sure any anchor hardware keeps you at least 18 inches from the base perimeter so feet don't snag the hardware.
Safety and warranty notes before and during any installation
Disconnect fuel or power before every step of any installation. For safe ignition tools and to learn what a long stem lighter for patio heater is and when to use one, see our short guide on long-stem lighters for patio heaters. For propane, close the tank valve, disconnect the regulator hose, and move the cylinder away from the work area before drilling, hammering, or torquing anything. NFPA provides model guidance for portable LPG storage and use, see Outdoor Heater Safety, NFPA fact sheet (references NFPA 58/NFPA 54 requirements) Outdoor Heater Safety — NFPA fact sheet (references NFPA 58/NFPA 54 requirements). For natural gas hard-piped heaters, shut off the supply valve at the gas line, not just at the heater control. For electric units, trip the breaker for that circuit and use a non-contact voltage tester to confirm the circuit is dead before touching any wiring.
Use stainless steel hardware for everything that goes outdoors. Zinc-plated or cadmium hardware corrodes rapidly in outdoor conditions, especially near pools or in coastal climates, and corroded fasteners can fail without visible warning. 304 stainless is sufficient for most inland applications; 316 stainless is worth the extra cost in high-humidity, coastal, or pool-adjacent settings.
Do not modify the heater's base, pole, or gas line connections as part of anchoring. Drilling additional holes in the base plate, welding brackets to the pole, or rerouting the gas hose to make anchoring easier will void your warranty under nearly all manufacturer terms and can compromise the unit's safety certifications under ANSI Z83.26/CSA 2.37. If the factory base holes don't align with your preferred anchor points, solve that with a mounting adapter plate, not by modifying the heater itself.
After installation, verify the tilt switch is functional. With the heater off and the tank valve closed, tip the heater 30 to 45 degrees: you should hear or feel the tilt switch click open. Return it to vertical and you should hear it click closed. If it doesn't respond, the tilt switch needs to be tested and potentially replaced before the heater is used. The tilt switch is your last line of defense if the anchoring ever fails.
Wind limits are real: most consumer gas patio heaters are not rated for operation above 15 to 20 mph wind speeds. Anchoring keeps a heater from falling over in gusty conditions, but it does not make it safe to run in high winds. High winds disrupt combustion, can blow the flame out before the thermocouple trips the safety valve, and can push the infrared heat sideways onto nearby combustibles. Turn the heater off and secure or store it whenever wind advisories are in effect.
Inspection and maintenance schedule
An anchor is only as good as its condition. Hardware loosens, corrodes, and settles over time, and a fastener that was fine last spring may be compromised today. Build a quick inspection into your routine, not just when something looks wrong.
| Frequency | What to Check |
|---|---|
| Before each use | Visually check base for wobble; inspect gas hose and fittings for cracks or kinks; confirm tilt switch responds (lean heater slightly) |
| Monthly during season | Check all visible anchor fasteners for tightness; inspect stainless hardware for surface rust or corrosion; check guy-wire/strap tension if installed |
| Start of each season | Remove and inspect concrete or deck anchor bolts for corrosion; retorque wood lag bolts (wood shrinks and swells seasonally); test tilt switch fully; inspect gas hose end-to-end for UV cracking; check auger anchors for frost heave or soil movement |
| End of each season | Drain water-filled bases before freezing; apply a thin coat of anti-corrosion spray to exposed metal fastener threads; inspect all sealant beads around bolt penetrations and reapply if cracked |
Troubleshooting: still wobbling or tipping after anchoring
If the heater still wobbles after installation, work through these common causes before assuming the anchor method is wrong.
- Loose anchor bolts: check torque on all fasteners first. Concrete wedge anchors back out slightly during initial cure; a retorque at 24 hours after installation can help (check your specific anchor's instructions since some forbid retorquing). Wood lag bolts should be re-snugged at the start of each season.
- Insufficient embedment in concrete: if you drilled the minimum depth but the concrete has a compressible surface layer (old, porous, or spalled concrete), effective embedment is shallower than measured. Switch to an adhesive anchor system in poor-quality concrete.
- Uneven base or unlevel surface: use a level at the base plate. If the base isn't flat on the surface, the heater will rock on two of its four contact points. Grind down high spots on concrete or shim low spots on wood with stainless steel shim plates, not wood shims that compress and rot.
- Wind exposure underestimated: if the heater is in an exposed corner, on a rooftop deck, or at the edge of a fence line, it's receiving more wind load than a sheltered location. Add anti-tip straps as supplemental restraint or relocate to a more sheltered spot.
- Soil anchor pulling out: if earth anchors are failing, the soil is too soft or the embedment is too shallow. Increase depth to 30 to 36 inches or switch to a larger diameter auger anchor with a larger helix plate for better bearing area in loose soil.
- Base design mismatch: some portable heaters have bases that flex intentionally and aren't designed for rigid anchoring. If your base plate has rubber feet and flexes noticeably, contact the manufacturer before drilling through it.
Anchoring vs. storing: what changes when you anchor a heater
Permanently anchoring a patio heater to concrete or a deck means it stays put through winter unless you unbolt it. For most homeowners in climates with harsh winters, a removable anchor solution makes more sense: wedge anchors can be removed by unbolting, but the holes remain in the concrete. Lag bolts in a deck can be removed seasonally. If you're planning to store the heater in a garage or shed off-season, design your anchoring system with removal in mind from the start. See our guide on how to store patio heater for step-by-step storage and seasonal removal tips (internal ref a708e06c-33ec-4f2d-86a5-a2c9020bbb6c). Use a nut-and-bolt through-anchor rather than a flush-set concrete insert that can't be easily disconnected.
When transporting an anchored or semi-anchored heater, reconnect all base hardware before moving it and secure the propane cylinder with its protective cap in place. Never transport a heater with the cylinder connected to the regulator. Store the propane cylinder upright in a ventilated area, not in an enclosed vehicle or garage. Proper off-season storage, including protecting the emitter head and gas connections, keeps the heater in better condition and reduces the chance of corrosion that could affect anchoring hardware and safety systems alike when you reinstall it in spring.
When to stop and call a professional
Most anchoring work is well within DIY capability. A rotary hammer, a torque wrench, and one careful afternoon covers the majority of installations. But there are situations where stopping and calling a licensed contractor is the right call, not because the work is complicated, but because the consequences of getting it wrong are serious.
- Natural gas hard-piped connections: if you're installing a permanently piped natural gas heater and need to run or modify the gas line, that work must be done by a licensed plumber or gas fitter in virtually every jurisdiction. NFPA 54 (National Fuel Gas Code) and NFPA 58 govern this work and local building departments enforce it. Don't improvise gas piping.
- Structural uncertainty about a deck or slab: if you don't know the thickness of your concrete slab, whether the joists are in adequate condition, or whether the deck was engineered to carry a concentrated load, get a structural assessment before bolting a heavy appliance to it. A rotted joist or a 2-inch-thick slab over fill won't hold anchor bolts safely.
- Hardwired electric heater wiring: as noted, most manufacturers including Infratech explicitly require a licensed electrician for hardwired connections per NEC and local codes. Do the mechanical bracket anchoring yourself if you want, but leave the wire connections to a licensed pro.
- Uncertain substrate conditions: post-tension concrete, concrete over radiant tubing, or concrete with hidden conduit all present drilling hazards that you cannot assess without a concrete scan (GPR). In those cases, hire a professional who can scan before drilling.
FAQ
What factors should I consider when choosing an anchoring method for a patio heater?
Decide by heater type (gas freestanding with cylinder base, electric hardwired, or portable propane) and the surface (concrete, wood deck/joist, soil/grass, pavers). Consider permanence (permanent vs temporary), wind exposure, local codes, and manufacturer instructions/warranty. Match anchor strength to expected overturning forces (higher in exposed, windy sites). For gas heaters, preserve cylinder ballast and the tilt‑switch safety; for hardwired electric units follow NEC/local electrical code or hire an electrician. When in doubt, follow the heater manufacturer’s installation manual—improper anchoring can void warranties and compromise listed safety features.
Which anchoring methods are recommended for each common surface?
Surface → Recommended anchor types: Concrete: mechanical wedge/ sleeve anchors or chemical (epoxy) anchors into a concrete pad. Wood deck/joist: bolt through into structural joists or rim with a mounting plate + through‑bolts or lag screws into blocking; avoid fastening to deck boards only. Soil/grass: earth auger anchors/ground spikes sized to soil type or a dedicated concrete footing under the heater; use multiple anchors or guy lines for high wind. Interlocking pavers: pour a small concrete pad under pavers and anchor into that pad, or use a wide mounting plate that spans multiple pavers and anchors into supporting concrete. Weighted/portable: manufacturer‑approved weighted/fillable bases or using the factory cylinder as ballast for propane models; do not modify fuel or pressure systems for ballast.
What tools, fasteners and materials will I typically need for anchoring to concrete?
Checklist: hammer drill with correct diameter masonry bit, concrete wedge anchors or sleeve anchors (or adhesive anchor kit and threaded rods), torque wrench or breaker bar, cold chisel/brush to clean hole, caulk/sealant for top of anchor if desired, measuring tape, marker, level, and protective gear (glasses, gloves). Follow anchor manufacturer drill diameter, embedment depth, and torque specs exactly.
Step‑by‑step: How do I bolt a patio heater to concrete (permanent)?
1) Confirm heater base geometry and mark bolt pattern on the concrete. 2) Verify concrete thickness/support—anchors need full embedment into structural concrete (not thin pavers). 3) Drill holes using the anchor spec diameter to the required depth. Clean dust from holes. 4) For mechanical anchors: insert anchor, set per product instructions and torque to specified value. For adhesive anchors: install threaded rod per adhesive manufacturer curing and hole prep instructions. 5) Place heater base over bolts, use washers and locknuts, torque to manufacturer‑recommended values but don’t over‑stress base. 6) Seal around bolt heads if needed; test stability and re‑check torque after first week of use. Always follow both anchor and heater instructions.
Step‑by‑step: How do I anchor a heater to a wood deck or joist?
1) Locate structural members—do not anchor into decking boards alone. 2) If possible, install a mounting plate that spans two joists or bolt through the rim/ledger into blocking; add blocking beneath the base footprint if needed. 3) Drill pilot holes sized per fastener manufacturer. Use through‑bolts (carriage or hex) with washers and nuts or heavy lag screws sized per the load (commonly 3/8" to 1/2"). 4) Tighten fasteners to recommended torque. 5) If permanent below‑deck support is feasible, consider pouring a small concrete pad beneath the deck (below frost line if required) and anchor into the pad. 6) Inspect periodically for rot around connections and re‑tighten fasteners.
How do I use earth spikes or auger anchors in soil or grass?
1) Select an auger/earth anchor rated for your soil class and expected load (check manufacturer spec sheet). 2) Drive or screw the anchor into the ground to the recommended depth—use a T‑bar, ratchet, or powered auger for larger models. 3) Attach a rated connector (wire rope, strap, or shackle) to the heater base or to a ground‑anchored mounting plate. For better holding, use multiple anchors placed radially and connect to the base with guy wires to resist overturning. 4) Note that pullout capacity varies broadly with soil type—sandy or loose fill has much lower holding power than dense clay; if in doubt, use a concrete footing.