Most patio heaters tip because they're sitting on an uneven surface, have a loose or incorrectly assembled base, or are getting hit by wind they weren't designed to handle. Fix those three things and you'll solve 90% of tipping problems without spending a cent. The steps below will help you figure out exactly which one is causing your problem, then walk you through the right fix for your heater type.
How to Keep a Patio Heater From Tipping Over Safely

Grant Mercer
31 May 2026
Quick diagnosis: why your patio heater is tipping
Before you buy weights, anchors, or anything else, spend five minutes doing a quick check. Most tipping problems fall into one of four buckets, and identifying yours first saves you from solving the wrong problem.
- Surface problem: the heater rocks on grass, gravel, pavers that aren't level, or decking boards with a flex. Push gently on the pole near the top — if the base shifts or rocks even slightly, this is your issue.
- Assembly problem: the legs, base plate, or ballast plate weren't fully tightened during assembly, or a bolt has loosened over time. Grab each leg and try to wiggle it. Any play means a loose fastener.
- Wind problem: the heater is stable on calm days but tips or wobbles the moment there's a breeze. Tall mushroom-style heaters act like sails and need either placement shelter or added ballast in windy spots.
- Wrong heater for the setup: some heaters are designed for hard, flat surfaces only and simply aren't stable enough for outdoor conditions without anchoring. Check your manual for the rated mounting angle — the Patio-Pal PH Series, for example, specifies the unit must be level side-to-side and mounted between 0° and 30°. If you're outside that range, the heater was never going to stay put.
Run through those four checks first. If you find more than one issue, fix the surface and assembly problems before adding any weights or anchors, ballast on a wobbly base just gives you a heavier wobbling heater.
Prep the ground: leveling, pads, and surface checks
Every major patio heater manufacturer says the same thing: the heater must always be used on firm, level, and stable ground. That's not just boilerplate. A standard freestanding propane heater stands around 7 to 8 feet tall with the center of gravity sitting surprisingly high. Even a slight lean multiplies the tipping force dramatically.
Grass and gravel are the worst offenders. Grass compresses unevenly under the base feet and gets worse after rain. Gravel shifts. If your heater is currently sitting on either of those, relocating it is the single most effective thing you can do. Move it to concrete, tile, or a solid wood deck surface. If that's not an option, a rubber anti-fatigue mat or a thick composite patio pad under the base feet can help level minor dips, but it's a workaround, not a proper fix.
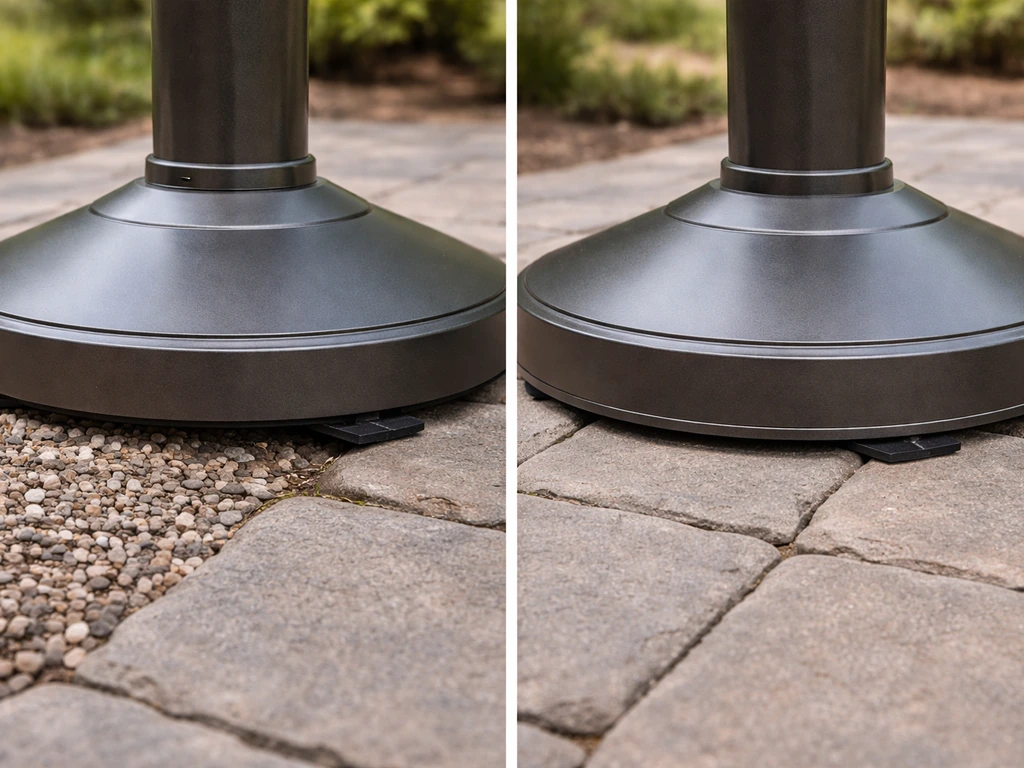
- Set a small bubble level on top of the base housing or the flat top of the tank collar. It should read level in both directions.
- If it doesn't, check whether the ground itself is sloped or whether one foot is sitting on a raised spot like a paver edge.
- For sloped concrete or tile, use thin rubber shims under the low-side feet. Get the bubble centered before moving on.
- For decks with springy boards, move the heater so its feet sit over joists, not between them. The flex under a single board is enough to make a tall heater unstable.
- Once it's level, try the gentle push test again from the top. If there's still movement, the surface is fine and your problem is elsewhere.
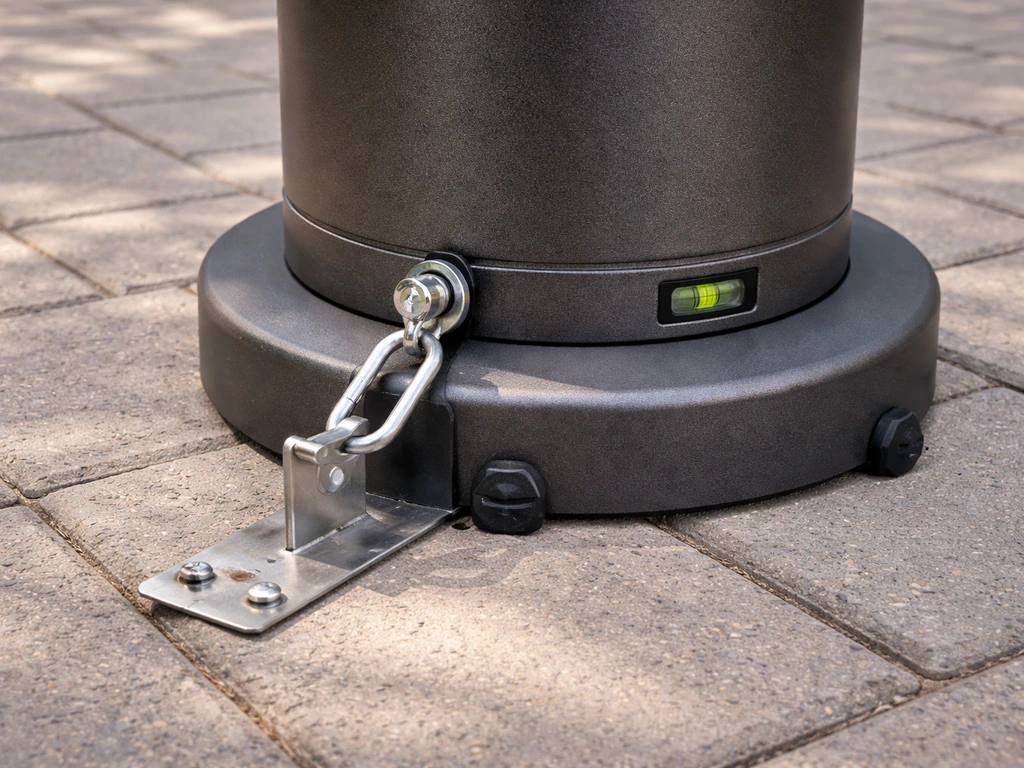
Correct assembly and base/foot hardware inspection
A lot of tipping issues trace back to assembly day. Most freestanding heaters ship with legs that bolt onto a central base plate, and those bolts need to be genuinely tight, not just snug. If you assembled the heater quickly or haven't checked it since last season, this inspection is worth doing right now.
Start at the feet and work your way up. On a typical mushroom-style LP heater, you'll have three or four legs that bolt to a center base ring. Check every bolt. If any spin freely or have visible gaps at the joint, tighten them with the appropriate wrench or socket.
Many models also include a weight plate that sits on or around the base ring, this plate has holes that align with the base for optional anchor bolt installation. Make sure it's seated flat and bolted down if your model includes that hardware. Some LP models also come with a tank retention chain that clips around the propane cylinder to stop it shifting inside the base cabinet, if yours has one and it's not clipped, connect it now.
Check the pole sections too. Most heaters have a two or three-piece pole that slides and locks together. If those sections aren't fully seated and locked, the upper section can pivot, which makes the whole unit feel unstable even though the base is fine. Push each section together firmly until it clicks or locks, then verify any set screws are tightened.
One model-specific note: if your heater has a tilt-switch (common on electric models like the SereneLife SLOHT24 and some LP models), confirm the switch mechanism hasn't been tampered with or bypassed. blank" rel="noopener noreferrer">The tilt switch is a safety cut-off, not a stability feature, but a heater that shuts off every time a passing gust moves it slightly is telling you the unit is less stable than it should be. Fix the stability first. Never disable or bypass the tilt switch.
Weight, ballast, and stability upgrades that actually work
Once the surface is level and the assembly is solid, you can look at adding weight if the heater still feels too light for your conditions. This is especially worth doing if you're in a breezy spot or if your heater is a lighter-weight model.
Sandbags and base weights
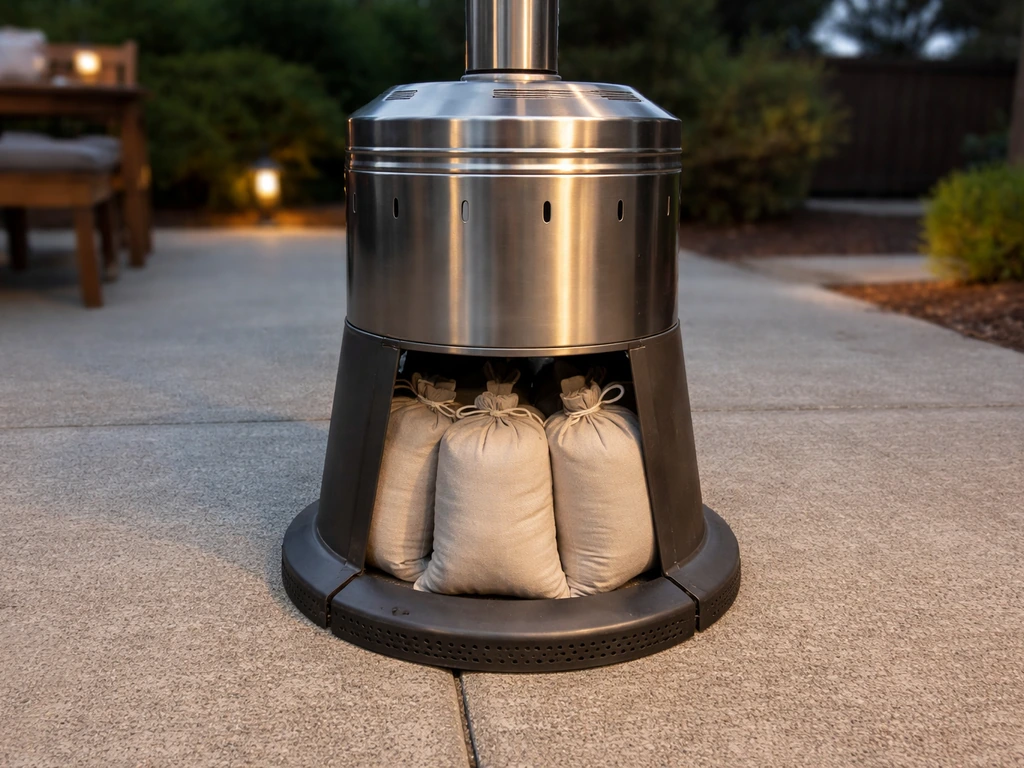
The most practical and reversible option is sandbags. If you are comparing patio heater stability options, it also helps to understand what a flat emitter on a patio heater is and how it affects heat distribution. Use purpose-made flat sandbags designed to lay across the base feet, or fill small fabric bags yourself with playground sand. Place them symmetrically around the base, one on each foot position, not piled on one side.
Uneven weight makes things worse. For a standard three-leg heater, three bags of 10 to 15 pounds each is usually enough to make a noticeable difference. You can also buy purpose-made steel or cast-iron base weights sold specifically for patio heater bases. These are cleaner looking and stay put better than sandbags, though they cost more.
Water-fillable base weights
Some heaters and aftermarket accessories include hollow base weights you fill with water or sand through a plug. Water gives you around 8 pounds per gallon, so a ring-style base weight that holds 2 gallons adds about 16 pounds. These are easy to drain if you need to move the heater. Just note that water freezes, so empty them before winter storage.
What not to do with ballast
- Don't stack random heavy objects like bricks or concrete blocks on the base. They can shift, fall, and become a separate hazard.
- Don't add weight to the upper part of the heater or the pole. Raising the center of gravity makes tipping worse, not better.
- Don't lean the heater against a wall or fence to compensate for instability. It won't stay in place and could topple both the heater and the structure.
Windproofing and placement best practices
Wind is responsible for more patio heater tip-overs than people realize, and it's also the trickiest to plan for because gusts are unpredictable. A tall freestanding heater with a wide reflector at the top functions almost exactly like a sail. That's not a flaw in the design, it's just physics working against you.
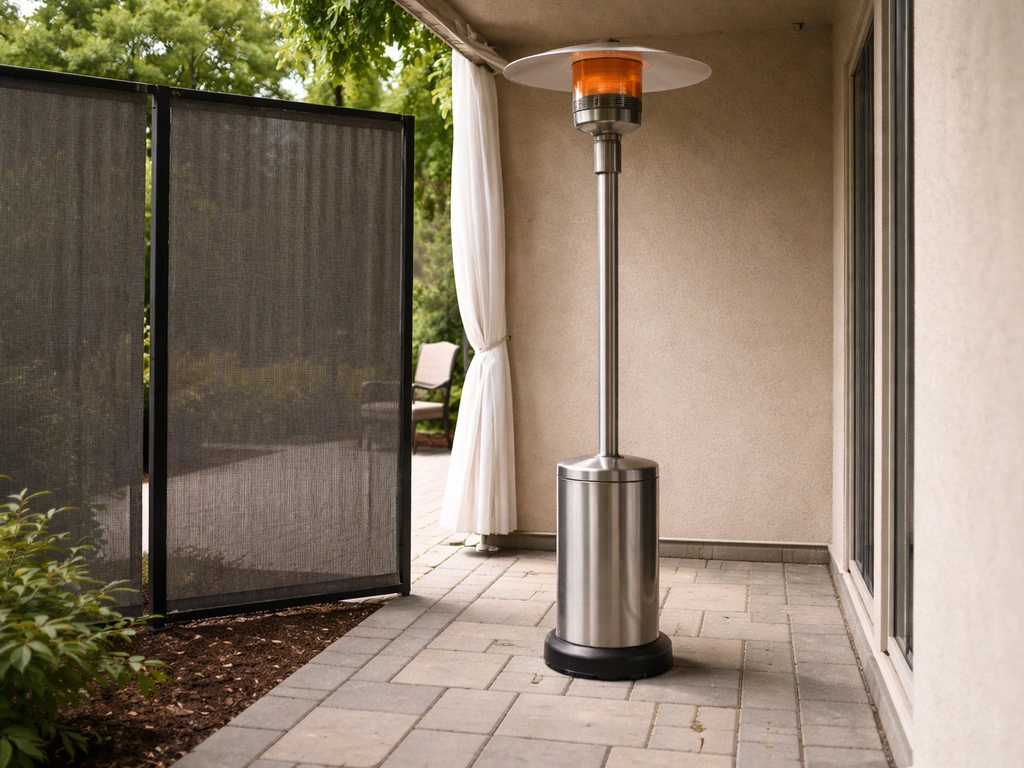
Placement is your first line of defense. Position the heater in a spot that has some natural wind break, like the corner where two walls meet, or on the sheltered side of a fence. Keep it at least 27 inches away from any combustible surface (walls, furniture, umbrellas, fabric awnings) per typical manufacturer clearance requirements, but choose the spot that also puts something solid between the heater and your prevailing wind direction. On open patios, think about where gusts typically hit hardest and avoid that corner.
Heater orientation matters too. If your heater has a reflector that can rotate, angle it so the broad face points away from the wind rather than into it. This reduces the sail effect without you needing to move the whole unit.
For electric patio heaters, check the manufacturer's guidance on outdoor rating before placing in any spot exposed to wind-driven rain. Using an electric heater with an inappropriate extension lead or placing it in an exposed spot that creates water ingress is a real hazard that goes beyond just tipping.
Finally, get in the habit of bringing the heater in or laying it down during high-wind warnings. No anchor or weight system is rated for extreme wind conditions, and a burning heater falling over in a windstorm is a serious fire risk.
Anchoring and anti-tip devices: choosing and installing
If you want a more permanent solution, especially for a heater that lives in one spot all season, anchoring is the most reliable option. If you are planning a more permanent setup with anchoring, you may also want to understand what is a long stem lighter for patio heater for easier, safer ignition in awkward positions. Anchoring a patio heater is especially helpful when you want it to stay put through windy weather all season. There are a few different approaches depending on whether your setup is permanent or you need to stay mobile.
| Method | Best for | Tools needed | Reversible? |
|---|---|---|---|
| Anchor bolts through base plate | Permanent spot on concrete or tile | Drill, masonry bit, anchor bolts | No (or difficult) |
| Ground stakes with base strap | Soft ground, grass, or gravel spots | Mallet | Yes |
| Anti-tip strap to wall or post | Decks, patios near a wall | Drill, wall anchors, strap kit | Yes |
| Sandbags or base weights | Any surface, portable use | None | Yes |
| Water-fill base ring | Flat hard surfaces, semi-permanent | None | Yes (drain first) |
Installing anchor bolts (concrete or tile)
Many LP heater base plates come with pre-drilled holes specifically for anchor bolts. If yours does, this is the cleanest permanent solution. Position the heater exactly where you want it, mark the hole positions through the base plate onto the surface, then move the heater aside. Drill into the concrete with a masonry bit at the correct diameter for your anchor hardware. Insert the concrete anchors, reposition the heater, and bolt down through the base plate. Check that the base sits flat with no rocking before final tightening. Some models include a separate weight plate with aligned holes for this exact purpose, use it if it came with your heater.
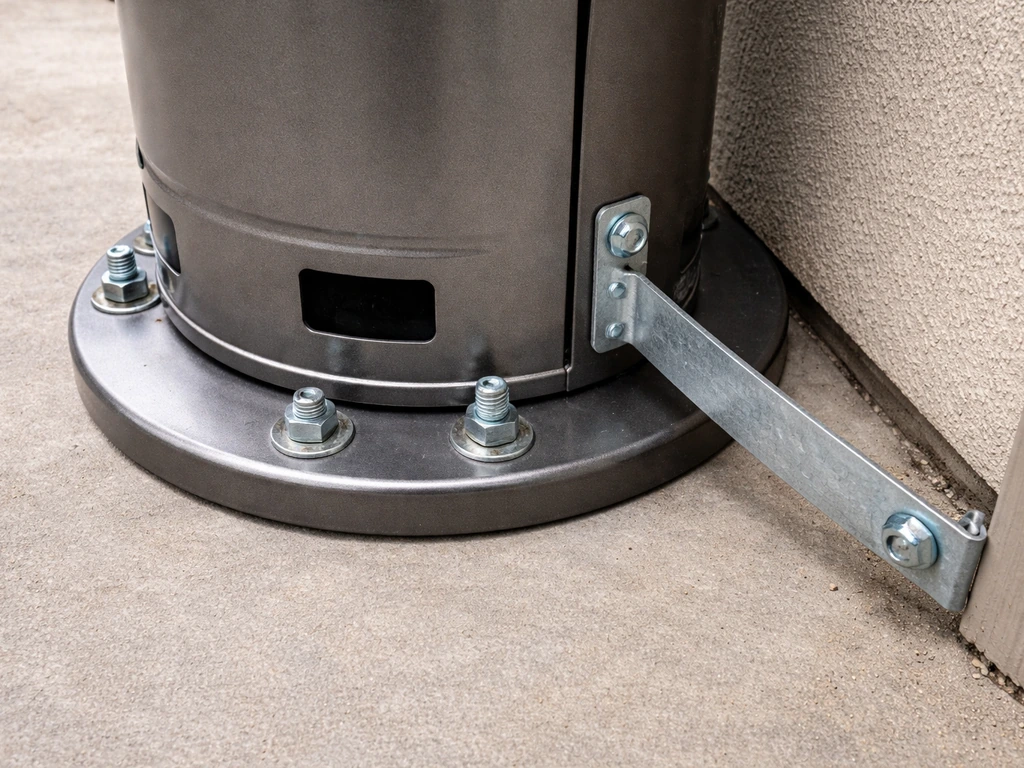
Anti-tip straps to a wall or post
For heaters on a deck near a wall or post, a simple anti-tip strap is quick and reversible. Use a heavy-duty eye bolt screwed into a wall stud or post, then run a steel cable or ratchet strap from that point to the heater pole. Keep the strap taut but with enough slack that the heater can sit perfectly vertical. This won't prevent every movement, but it stops a full tip-over. It's a similar principle to how people secure tall furniture and appliances in earthquake-prone areas. The strap should attach at pole height roughly mid-way up, not at the very top where leverage works against you.
Securing and anchoring a patio heater properly is a topic that goes deeper than just tip prevention, if you want to explore full securing strategies, there's more detail available on how to secure a patio heater and how to anchor a patio heater specifically.
Safety checks and when to call for help
Any time you've moved, disassembled, or worked around the base of an LP gas heater, do a leak check before relighting it. This is non-negotiable. Mix dish soap with water (about one part soap to ten parts water), then brush or spray it on all gas connections including the regulator inlet, the hose fittings, and the valve connection. Turn the gas on without igniting the heater and watch for bubbles. Bubbles forming or growing mean there's a leak. Turn the gas off immediately, tighten the connection, and retest. If bubbles continue after tightening, stop and replace the fitting or hose. Never test for gas leaks with a match or open flame.
If you smell gas at any point during your stabilization work, stop what you're doing, turn off the propane tank valve, move away from the heater, and let the area ventilate before going back to troubleshoot.
Here's when to stop and get professional help rather than pushing through on your own:
- You smell gas and can't identify the source after a thorough soap-and-water leak check.
- The regulator hose shows visible cracking, kinking, or damage. Replace the hose and regulator as a set — don't patch them.
- The heater's tilt-switch or safety shut-off isn't working correctly. This is a safety system, not a convenience feature. A faulty tilt-switch on an LP heater means the burner won't shut off if the heater falls — that's a professional repair.
- The base, pole, or main structural components are cracked, bent, or rusted through. Ballast and anchoring won't make a structurally compromised heater safe.
- You've corrected the surface, tightened all hardware, and added ballast, but the heater still tips or wobbles noticeably. Some older or lightweight heaters simply weren't designed for outdoor wind exposure and may need to be replaced rather than patched.
One final practical note: when you store the heater at the end of the season, take that opportunity to inspect all the hardware you tightened this year, clean the base feet, and check the leg bolts again. A heater that went into storage solid will come out in spring ready to set up safely. To make your off-season storage safer, keep the patio heater dry, store it upright or as the manual specifies, and cover it to prevent water buildup. Proper off-season storage also protects the base components from the rust and corrosion that can make legs wobbly over time.
FAQ
How can I tell whether my patio heater is tipping because of the ground or because of assembly issues?
Do a stability test after you move it to a hard, flat surface like concrete or tile. If it still wobbles, focus on leg bolts and pole locks. If it is stable on hard ground but unstable on grass or gravel, the surface is the cause (or part of it), and ballast alone can make the wobble heavier without fixing the lean.
Is it safe to use improvised weights like bricks or random pavers to keep a patio heater steady?
It is better not to. Bricks and loose pavers can shift on uneven surfaces and create uneven loading, which increases tipping risk. If you need extra mass, use purpose-made patio heater base weights or symmetrical sandbags designed to sit across the base feet, so the weight transfers evenly.
Where should sandbags or base weights be placed so they actually prevent tipping?
Place weight to match the base foot positions, for most three-leg models that means three bags or three weight contact points spaced evenly. Avoid piling more weight on one side, because uneven center of mass can make the heater tip in the opposite direction you intended.
Can I anchor a patio heater on a deck instead of concrete?
Sometimes, but only if the deck structure and hardware are rated for it. A common approach is an anti-tip strap to a structural post or a load-bearing framing member, not just the deck boards. If you cannot attach to studs or posts, anchoring to the deck surface can loosen or pull out under wind load.
How tight should the leg bolts be, and how often should I recheck them?
Tighten leg bolts firmly using the manufacturer’s wrench or socket size, so they are genuinely tight without leaving visible gaps at the joints. Recheck before the first use each season and after any movement, disassembly, or “quick” reassembly, because vibration can loosen partially tightened hardware.
My heater has a wobble even on level concrete, what else should I check besides bolt tightness?
Check that the base is seated flat with no rocking, then verify the pole sections are fully inserted and locked (including any set screws). If your model uses a tank retention chain, confirm it is clipped so the cylinder cannot shift and change the heater’s balance.
Is the tilt switch on my electric or some LP heaters a stability fix I can adjust?
No. A tilt switch is a safety shutoff, and disabling or bypassing it removes protection. If the heater triggers shutoff from minor movement, treat it as a stability problem (surface, pole lock, wind placement), then leave the safety feature intact.
How far from walls, furniture, and umbrellas should a patio heater be when I’m trying to prevent tipping?
Use the manufacturer clearance guidance as your baseline, commonly 27 inches or more from combustibles. Also, placement matters for wind, so you may need to choose a spot with a wind break even if it means slightly repositioning the heater within the allowed clearance zone.
Will angling the reflector help stop tip-overs in windy conditions?
Often, yes. If your heater’s reflector can rotate, aim the broad face away from the prevailing wind so the “sail” effect is reduced. This can cut tipping forces without moving the unit, but you should still relocate for wind shelter if the heater still feels unstable.
Can an extension cord or wet conditions cause issues that look like tipping problems on electric heaters?
They can. If an electric heater is used outside its outdoor rating or near wind-driven rain, water ingress and electrical hazards can become the real problem. Check the outdoor rating, keep connections protected, and follow the cord guidance, because a safety issue can be more serious than a tip-over risk.
What’s the right way to test for a gas leak after adjusting the base of an LP heater?
Use the soap-and-water method and watch for new bubbles at every gas connection (regulator inlet, hose fittings, valve connection). Do the test with the gas turned on but without lighting, and if bubbles persist after tightening, stop and replace the suspect fitting or hose rather than continuing to relight.
Should I always anchor or strap a patio heater in windy areas?
Not always. For occasional use, placement in a sheltered spot and proper leveling may be enough. For a heater that stays in one location all season, anchoring or an anti-tip strap provides a more reliable “stops a full tip-over” layer, but no system is designed for extreme wind warnings.
What should I do during high-wind warnings if my heater is anchored or weighted?
Bring it in or lay it down according to the manual. Even anchored heaters can fail under extreme gusts, and a burning heater falling over is a fire risk. Weights and straps are not rated for storm-level wind conditions.
How should I store the patio heater at season end to avoid future tipping or wobble?
Store it upright or exactly as the manual specifies, keep it dry, and cover it to prevent water buildup. Before storing, inspect and re-tighten any hardware you adjusted, clean the base feet, and check leg bolts again, because rust and corrosion can loosen or create uneven contact over time.