
To connect a propane tank to a patio heater, thread the regulator's QCC1 (ACME) nut onto the cylinder valve hand-tight until it stops, route the hose to the heater's gas inlet and tighten that fitting snugly, then perform a soap-and-water leak test before you ever open the burner valve or touch the igniter. That's the whole job in one sentence, but doing it correctly and safely takes a few minutes of prep, the right parts, and a deliberate sequence. This guide walks you through every step.
How to connect propane tank to patio heater safely: step-by-step

Grant Mercer
29 Jul 2026
Who this guide is for
This is written for homeowners and renters assembling or re-connecting a freestanding propane patio heater that runs on a standard 20-lb DOT cylinder. You don't need HVAC training or any special tools. You do need to follow the sequence carefully, because propane is unforgiving when connections are done out of order or skipped. If your heater runs on natural gas, this guide isn't for you, and if you're thinking about converting your propane heater to natural gas, that requires a certified conversion kit and in most jurisdictions a licensed installer. It is not a DIY swap covered here. Similarly, this guide covers connecting and operating a manufactured heater, not building one from scratch or physically altering its fuel-delivery components. If you are considering building one from scratch, see our separate article on how to make a propane patio heater for DIY construction steps and safety guidance.
Safety, local codes, and placement before you touch anything
Before you pull the regulator out of the box, get these basics settled. Propane is heavier than air, which means any leak pools at ground level near ignition sources instead of rising and dispersing. That makes placement and ventilation genuinely important, not just fine-print boilerplate.
- Use the heater outdoors only, in a well-ventilated space. Never operate it in a garage, under a low awning that traps fumes, or indoors.
- Keep the heater at least 3 feet from combustible materials (furniture, umbrellas, curtains, dry vegetation) and at least 24 inches from any structure overhead, per most manufacturer manuals.
- Set up on a stable, level, non-combustible surface. Patio heaters have tip-over (tilt) switches that will cut gas flow if the unit leans beyond a certain angle, but the switch is a last resort, not a substitute for stable placement.
- Check your local fire code. Some municipalities, HOAs, or apartment communities restrict propane appliance use on balconies or shared patios. A quick call or web search for your city's fire code takes two minutes.
- Keep a working ABC fire extinguisher within reach any time you are working with the cylinder or running the heater for the first time.
- Never smoke or have open flames nearby during connection or leak testing.
- Do all connection work with the cylinder valve closed and the heater control knob in the OFF position.
Parts and tools you'll need
Most freestanding patio heaters ship with the regulator and hose assembly already included. Start there. If yours is missing or damaged, you need to source a replacement that matches the heater's BTU input rating and the cylinder connection type. Here's what to gather before you start.
| Item | What to look for | Notes |
|---|---|---|
| 20-lb DOT propane cylinder | OPD valve (triangular/pie-shaped handwheel) | Most manufacturer manuals specifically call for a standard 20-lb cylinder; do not use non-DOT or non-OPD cylinders |
| Regulator and hose assembly | Low-pressure (LP) type rated to 11" W.C. output; BTU capacity at or above the heater's input rating | Use the assembly supplied with the heater or a manufacturer-specified replacement; do not substitute unapproved assemblies |
| QCC1 (Type-1/ACME) fitting | External ACME nut on the regulator inlet | Standard on modern 20-lb grill cylinders in the U.S.; confirms hand-tight connection, no tools on the nut |
| Dish soap and water | 1 part dish soap to 3 parts water, mixed in a small bowl or spray bottle | Used for the mandatory leak test |
| Soft brush or sponge | Any clean small brush | For applying soap solution to fittings |
| Adjustable wrench or open-end wrench | Sized to the heater-side gas inlet fitting | For the heater inlet fitting only, not the QCC1 cylinder nut |
| Thread sealant (if applicable) | Yellow PTFE gas-rated tape only | Only if your heater's inlet uses NPT threaded fittings and the manual calls for it; never on QCC1/ACME connections |
| Manufacturer's owner's manual | Specific to your heater model | Download from the manufacturer's site if you've lost it; always follow model-specific instructions over generic guidance |
A quick note on BTU ratings: the regulator's flow capacity needs to meet or exceed your heater's rated input. Many common replacement regulators (such as the Mr. Heater F276136) are rated for up to around 75,000 BTU/hr at 11" W.C. output. A typical freestanding mushroom-style patio heater runs at 40,000 to 48,000 BTU/hr, so that regulator has sufficient capacity. If you're unsure of your heater's input rating, it's printed on the rating label, usually on the base or emitter housing, and always in the owner's manual.
Confirming compatibility before you connect
Skipping the compatibility check is how people end up with a regulator that fits the cylinder but won't mate to the heater, or vice versa. Spend two minutes on this.
Cylinder valve type
Look at your cylinder's handwheel. If it has a triangular or three-lobed (pie-shaped) handwheel, it has an OPD (Overfill Protection Device) valve, which is required by DOT regulation on all 4-to-40-lb cylinders sold or refilled in the U.S. today. Virtually all 20-lb grill cylinders you'll encounter have QCC1/ACME external threads at the service port. This is the connection your regulator's inlet nut threads onto. If you have an older cylinder with only a POL (Prest-O-Lite, internal left-hand thread) fitting and no external ACME threads, the standard patio heater regulator will not fit. Retire the old cylinder and get a current OPD-equipped one.
Regulator pressure and BTU rating
Consumer patio heaters use second-stage (appliance-side) regulators that output at a nominal 11 inches of water column (approximately 0.4 psi). Confirm the regulator in your kit is rated for 11" W.C. output (it will say so on the label or in the spec sheet). Do not use a high-pressure regulator, a two-stage RV regulator, or an unlabeled substitute. The heater's burner and orifice are sized for 11" W.C., and the wrong pressure will either starve the flame or produce a dangerously oversized one.
Hose length and routing
Most patio heater hose assemblies are between 3 and 6 feet long. Confirm the hose reaches from the cylinder's storage location (usually inside the base cabinet) to the heater's gas inlet without stretching tight or having to curl back on itself. Kinked hose restricts flow; a hose under tension is a pull-out waiting to happen. If the supplied hose is too short for your setup, use only a manufacturer-approved extension or replacement hose of the correct pressure rating. Never use plumbing-grade flexible connectors.
Preparation checklist: inspect before you connect
Run through this checklist every time you connect a cylinder, whether it's a new setup or you're swapping in a fresh tank after winter storage.
- Heater control knob: confirm it is in the fully OFF position.
- Cylinder valve: confirm it is fully closed (turn clockwise until snug, do not overtighten).
- Hose: inspect the full length for cracks, abrasions, kinks, or scorch marks. Any visible damage means replace before use.
- Regulator body: look for cracks, corrosion, or physical damage. A dented or corroded regulator should be replaced.
- Fittings and O-rings: check the O-ring or seating surface on the QCC1 inlet nut. Most QCC1 couplings have a small nylon or rubber seat inside the nut; if it's cracked, hardened, or missing, replace the O-ring or the regulator before connecting.
- Cylinder: check the exterior for rust, dents, or damage. Inspect the cylinder valve for dirt or debris in the port. Wipe the port clean with a dry cloth if needed.
- Dust caps: remove and set aside the protective cap from the cylinder valve port and any cap on the heater's gas inlet.
- Site: confirm the heater is on a level, stable surface and there are no ignition sources (grills, candles, cigarettes) nearby.
Step-by-step: attaching the regulator and hose
Follow this sequence exactly. The order matters because it keeps everything in the safest state at each stage.
- Confirm both the heater control knob and the cylinder valve are in the OFF/closed position before touching any fittings.
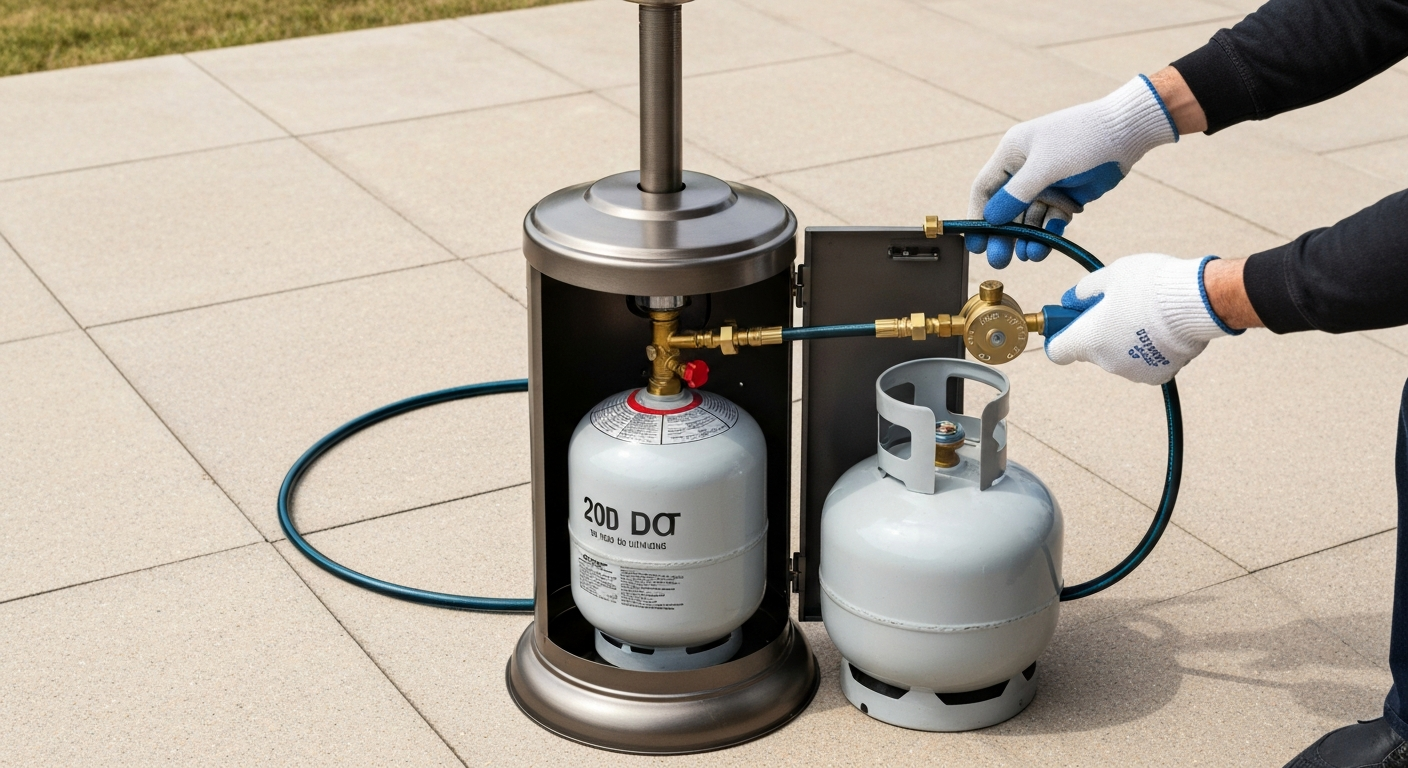
- Connect the hose's heater-side fitting to the gas inlet on the heater's valve body. This is typically a male flare or NPT fitting. Hand-start the threads to avoid cross-threading, then snug with a wrench. Do not overtighten, but this fitting does require tool contact, unlike the cylinder side.
- Route the hose through or along the base frame as the manual shows, avoiding sharp bends and contact with any hot or abrasive surfaces. Leave enough slack that the hose won't pull taut when the heater shifts slightly.
- Seat the regulator's QCC1 (ACME) inlet nut onto the cylinder valve. Insert the nipple straight into the port, then thread the external ACME nut clockwise by hand. Tighten it hand-tight until it seats firmly and stops. Do not use a wrench on the QCC1 nut. This fitting is designed to seal with hand pressure; applying a wrench can damage the internal seat or O-ring.
- Double-check that the hose is not kinked, pinched under the base frame, or routed over a sharp edge.
- Do not open the cylinder valve yet. Proceed immediately to the leak test.
A word on thread direction: the QCC1/ACME nut is a standard right-hand thread (clockwise to tighten). This is different from older POL fittings, which use left-hand threads. If the nut won't thread smoothly by hand, stop and check that you have the right fitting type for your cylinder. Forcing a mismatched fitting will damage both parts.
How to perform the leak test
Never skip this step. A small leak you can't smell yet becomes a serious hazard the moment you light the heater. The soap-solution method is what every manufacturer manual specifies, and it works.
Mixing the solution and testing
- Mix 1 part liquid dish soap with 3 parts water in a small bowl or spray bottle. You want a solution that produces bubbles easily when agitated.
- Make sure the heater control knob is still in the OFF position.
- Open the cylinder valve slowly, no more than one full turn from closed. Turning it too fast can trigger the regulator's excess-flow safety lockout, which will cut gas flow and require you to close the valve and wait 30 seconds before trying again.
- Apply the soap solution generously to all connection points: the QCC1 nut at the cylinder, both ends of the hose where it meets the fittings, and the heater inlet fitting. Use a brush, sponge, or spray bottle to get full coverage around each joint.
- Watch every joint for 30 to 60 seconds. Bubbles forming and growing indicate a gas leak at that joint.
- If no bubbles appear at any joint after 60 seconds, the connections are sealed. You can proceed to lighting.
If you find a leak
Close the cylinder valve immediately. Do not attempt to light the heater. Move away from any potential ignition sources, then address the leaking joint. At the QCC1 connection, confirm the nut is hand-tight and the internal seat or O-ring is intact. At the heater inlet, confirm the fitting is properly threaded and snugged with a wrench. After re-tightening, repeat the full soap test from Step 3. If the leak persists after re-tightening, disconnect the assembly, inspect the O-ring or seating surface for damage, and replace the damaged component. Do not operate the heater until the leak test shows zero bubbles at every joint. If you can't stop the leak by re-tightening or replacing an O-ring, contact the manufacturer or a qualified technician. Do not use an open flame to check for leaks under any circumstances.
Lighting the heater and initial run checks
Once the leak test passes, you're ready to light. Follow your specific heater's ignition sequence from the manual. The steps below reflect the typical procedure for the most common freestanding mushroom-style heaters, but some models vary slightly.
- Open the cylinder valve fully (or to the manufacturer's specified position). Slow and steady on the first turn.
- Push the control knob in and turn it to the PILOT position (usually marked with a flame icon or 'pilot' text). Keep the knob depressed throughout the lighting process.
- Press the igniter button repeatedly (typically up to 3 to 5 clicks) while holding the knob in. You should see a pilot flame ignite at the pilot assembly near the burner head.
- Once the pilot is lit, continue holding the control knob depressed for at least 30 to 60 seconds. This heats the thermocouple or thermopile sensor enough to generate the millivoltage that holds the gas valve open. Releasing too soon is the most common reason a pilot goes out immediately.
- After holding, slowly release the knob. The pilot should remain lit. If it goes out, repeat the lighting sequence and hold the knob for a longer period.
- With the pilot established, turn the control knob from PILOT to the LOW or HIGH setting. The main burner should ignite from the pilot flame.
- Observe the flame pattern for the first two to three minutes. A healthy burner flame should be mostly blue with minor orange tips, evenly distributed across the burner ring. An orange or yellow flame that flickers excessively suggests low gas pressure, a partially blocked orifice, or a regulator issue.
What to monitor during the warm-up period
Stay within sight of the heater for the first 10 to 15 minutes of the initial run. Watch for any smell of gas (rotten egg or sulfur odor), which should prompt immediate shutdown and a re-test. Check that the emitter screen glows evenly. Listen for any hissing at connections. Also confirm the heater doesn't shut off unexpectedly, which can indicate a tilt switch that's not fully reset (make sure the unit is level) or a thermocouple that isn't getting enough heat from the pilot flame.
Troubleshooting common problems after connection
Won't light at all
First confirm the cylinder has propane in it; lift it slightly to feel the weight or check a gauge if fitted. Then confirm the cylinder valve is actually open. Next, check that the regulator connection is hand-tight at the cylinder and that the leak test passed. If those are fine, the most common culprit on a fresh connection is a regulator excess-flow lockout triggered by opening the cylinder valve too quickly. Close the valve, wait 30 seconds, then reopen slowly. If the igniter sparks but no pilot flame appears, the pilot orifice may be blocked by debris or spider webs (especially after storage). A can of compressed air directed into the pilot tube assembly usually clears it. Patio Heater Troubleshooting Guide, common diagnostic sequence (Wano Co.) summarizes the common 'won't light'/'won't stay lit' flow: confirm cylinder not empty; verify regulator/hose hand‑tight and leak‑free; confirm control knob/pilot procedure and that tilt switch isn’t tripped; check thermocouple/thermopile voltage and pilot flame alignment; inspect orifice/pilot tube for blockage Patio Heater Troubleshooting Guide — common diagnostic sequence (Wano Co.).
Lights but won't stay lit
This almost always points to the thermocouple or thermopile not generating enough millivoltage to hold the gas valve open. Light the pilot and hold the knob for a full 60 seconds before releasing. If it still won't hold, let the pilot cool completely, then use a multimeter on the millivolt (mV) DC setting to test across the thermocouple leads with the pilot running. A single thermocouple in a healthy state produces about 20 to 30 mV when fully heated. Thermocouples and How to Test Them, Johnstone Supply / HVAC support lists typical outputs of about 20–30 mV for a single thermocouple and roughly 250–750 mV for thermopile assemblies Thermocouples and How to Test Them — Johnstone Supply / HVAC support. A thermopile should read 500 to 750 mV open-circuit. Readings well below those thresholds mean the sensor needs replacement. Also check that the pilot flame is actually impinging on the thermocouple tip; a misaligned pilot tube that blows the flame away from the sensor is an easy fix.
Tilt switch issues
If the heater shuts off whenever you're not actively holding the knob, check whether the heater is perfectly level. Even a slight lean can trip the tilt switch. Some models require you to reset the tilt switch by returning the knob to OFF, making sure the unit is upright and level, and then relighting. Never bypass or disconnect a tilt switch; it is a primary safety device.
Low or weak flame
A weak flame that won't reach full output usually means either a low or near-empty cylinder, a faulty regulator, or a partially blocked main orifice. Try a fresh cylinder first. If the problem persists with a known-full cylinder, replace the regulator assembly. If a new regulator doesn't fix it, the main burner orifice may need cleaning or replacement, which is covered in detail in the heater's service manual.
Visible leak smell during operation
Turn the cylinder valve off immediately, move away from the heater, and do not operate it again until you've re-tested all connections with soap solution and identified the source. If you smell gas but can't find the source with a soap test, the leak may be inside the valve body, which requires professional service.
A note on conversions and modifications
A few related questions come up regularly, and it's worth being direct about the limits here. Converting a propane patio heater to run on natural gas is not a simple hose swap. If you want to convert propane patio heater to natural gas, note that it is possible only with a manufacturer-certified conversion kit and, depending on local code, installation or inspection by a licensed gas technician. It requires a manufacturer-certified conversion kit (which changes the orifice size and regulator for the different operating pressure of natural gas) and in most areas must be done or inspected by a licensed gas technician. The consequences of an improper conversion range from a heater that doesn't work to a genuine fire or explosion hazard. Similarly, shortening or modifying the heater's structural pole, burner assembly, or fuel-delivery components without manufacturer approval voids safety certifications and creates real hazards. The heater's geometry is engineered to keep the emitter at the right distance from combustibles and to maintain the correct draft for the burner. Altering that without manufacturer guidance is not advisable. If your heater is the wrong height for a space or you need a different fuel source, the right move is to find a heater built for your needs, not to modify one that wasn't.
Routine maintenance and storage tips
Keeping the connections in good shape long-term takes only a few minutes per season. Before your first use each spring and before storing for winter, run through the pre-use checklist above and do a fresh leak test. Inspect the hose for any cracking or stiffening that developed during cold storage. Rubber and polymer hose materials degrade over time, and most manufacturers recommend replacing the hose and regulator assembly every few years or any time the hose shows visible deterioration.
- Store the cylinder outdoors in an upright position, away from any heat source, in a well-ventilated area. Never store a connected cylinder indoors or in an enclosed space.
- When disconnecting for storage, close the cylinder valve first, then disconnect the regulator from the cylinder. Replace the dust cap on the cylinder valve port.
- Store the regulator and hose coiled loosely inside the heater's base or in a bag to protect the fittings from dirt and physical damage.
- Clean the burner emitter screen and pilot assembly with a soft brush at the start and end of each season. Spiders and insects are notorious for nesting in pilot tubes during storage.
- Check all fasteners on the base frame and pole sections for tightness before each use. A structurally loose heater is a tip-over risk regardless of the tilt switch.
- Always consult your specific owner's manual for model-level maintenance intervals and any service procedures that apply to your unit.
Always start with your manual
This guide covers the general connection and safety process that applies across most consumer propane patio heaters, but every model has specific quirks: different knob positions, different pilot hold times, different orifice placements. Your manufacturer's owner's manual is the authoritative source for your specific unit. If you've lost it, virtually every major brand (Fire Sense, AZ Patio Heaters, Blumfeldt, Sure-Heat, Devanti, and others) hosts manuals as free PDF downloads on their support pages. Look up your model number from the rating label and download the manual before you do anything else. Find model-specific propane patio heater instructions on the manufacturer's support page for safe, step-by-step guidance. For deeper troubleshooting on specific failure modes like thermocouple replacement, tilt switch testing, or igniter repair, the detailed service guides on this site walk through those repairs step by step.
FAQ
What parts and tools do I need to connect a 20‑lb propane cylinder to a freestanding patio heater?
Required parts: the heater’s supplied hose and low‑pressure regulator assembly (or a manufacturer‑approved replacement), standard 20‑lb (DOT) propane cylinder with OPD valve, and any factory gasket or seal that came with the hose/regulator. Tools/supplies: soapy water leak‑test solution (dish soap + water), soft brush or spray bottle, adjustable wrench only for non‑ACME fittings if manufacturer allows (most QCC1/ACME connections must be hand‑tightened), clean rag, flashlight, and a multimeter if you plan to test thermocouple/thermopile. Do not substitute unapproved hoses, regulators, or fittings.
How do I confirm compatibility between my tank, regulator, hose, and heater?
Check the heater manual first: it will state the required cylinder type and regulator specifications. Most consumer freestanding patio heaters are designed for a standard 20‑lb DOT cylinder and are supplied with a low‑pressure regulator rated to ~11 in. W.C. (typical appliance outlet) and a BTU capacity equal to or greater than the heater input. Identify your cylinder coupling type: QCC1/ACME (external nut) is the common modern consumer coupling; some tanks also expose a POL internal port. Ensure the regulator outlet pressure and BTU rating meet or exceed the heater’s required input. If in doubt, use only the manufacturer‑supplied or specified replacement regulator/hose. Manufacturer manuals repeatedly advise: use the supplied hose/regulator.
Step‑by‑step: how do I safely attach the regulator and hose to the heater and tank?
1) Place the heater on a flat, stable surface, outdoors and away from combustibles. 2) Confirm heater controls are OFF and the cylinder valve is closed. 3) Inspect hose/regulator for damage and confirm gasket present. 4) Attach the regulator to the heater inlet per the manual (usually hand‑thread or push‑fit). 5) Seat the cylinder nipple (QCC1) if applicable, then hand‑thread the ACME/QCC1 nut until it stops—manufacturers explicitly warn not to use a wrench on ACME/QCC1. For POL, follow the regulator’s instructions; a wrench may be required only per manufacturer guidance. 6) Orient hose to avoid kinks and away from heat sources; secure hose to prevent tripping. 7) Open the cylinder valve slowly (partial turns) to pressurize the hose and to avoid regulator lockout. If any step feels uncertain, stop and consult the heater manual or a qualified technician.
How do I perform a proper leak test after connecting the regulator and tank?
Make a soapy water solution (about 1 part dish soap to 3 parts water). With the heater control OFF, slowly open the cylinder valve. Apply the soap solution to all connections: cylinder/regulator interface, regulator body, hose ends, and heater inlet. Watch for steady bubbling at any fitting—bubbles mean a leak. If you see bubbles: close the cylinder valve immediately, wipe dry, hand‑tighten the fitting and retest. If leaking persists, disconnect and replace the leaking part or contact the supplier/technician. Never use an open flame to test for leaks. Manuals from many manufacturers describe this exact procedure (see example manuals below).
How do I light the heater and what checks should I do on initial run?
Follow the heater’s lighting procedure exactly. Typical steps: confirm controls are OFF, cylinder valve partially open, set control to pilot and press/hold per manual while igniting the pilot. Once lit, hold the control for the recommended interval (often 30–60 seconds) to allow the thermocouple/thermopile to heat. Release and confirm the pilot remains lit before advancing to the main burner setting. Initial checks: steady pilot flame properly contacting the thermocouple/thermopile, no hissing or sniff of propane, normal burner flame (blue with small yellow tips), no unusual sounds or odors, and hose positioned well clear of heat. If the pilot won’t light or won’t stay lit, follow the troubleshooting checklist below.
What should I do if the heater won’t light or won’t stay lit?
Basic diagnostic order: 1) Confirm cylinder has fuel (try a known‑good cylinder). 2) Verify cylinder valve is open and regulator/hose are correctly and hand‑tightly attached and passed the leak test. 3) Check tilt switch or tip sensor hasn’t tripped and heater is perfectly level. 4) Inspect pilot orifice and pilot tubing for blockage or insect nests; clean per manual. 5) Confirm correct lighting procedure and that you’re holding the control long enough for the thermocouple/thermopile to heat. 6) If applicable, measure thermocouple/thermopile voltage with a multimeter after heating (thermocouple tens of mV; thermopile typically hundreds of mV; compare to manual or typical thresholds). 7) If regulator seems to shut off (excess flow/lockout), close and reopen the cylinder valve slowly; replace regulator if faulty. If these steps don’t resolve the issue, contact the manufacturer or a qualified service tech.