To safely use a propane patio heater: identify your model and its key parts, assemble it completely before connecting any gas, attach the regulator hose to your propane tank and do a soap-and-water leak check on every connection, then follow the push-and-hold ignition sequence (usually 20 to 30 seconds) to let the thermocouple heat up before releasing the knob. If it won't light or won't stay lit, the fix is almost always a low tank, air in the line, a cold or dirty thermocouple, or a misaligned pilot flame. Everything you need to work through all of that is below.
Propane Patio Heater Instructions: Setup, Lighting, and Troubleshooting

Grant Mercer
9 Jun 2026
Identify your heater model and get familiar with its parts
Before you touch a knob or connect a tank, know what you're working with. Propane patio heaters come in a few distinct styles: tall freestanding mushroom-style heaters (the most common), tabletop versions, wall-mounted units, and pyramid/glass-tube models. The lighting sequence, thermocouple placement, and safety features differ meaningfully between them, so matching the steps below to your specific unit matters.
Your model number is usually on a sticker on the base or lower pole of the heater. Common brands include Mr. Heater, Hampton Bay, Dyna-Glo, and Desa/Desatech. If you can't find the sticker, search the brand name plus any numbers printed on the control knob panel or the regulator hose label. Manufacturer PDFs for most of these are freely available and worth downloading before you start.
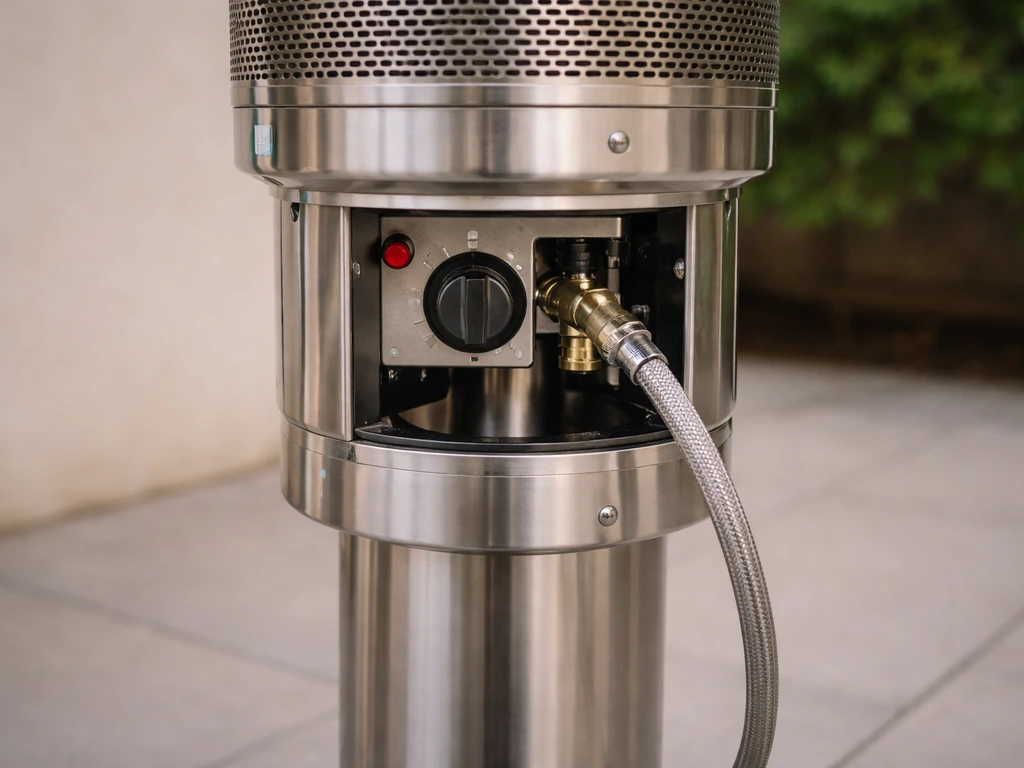
Here are the key parts you need to identify on your specific unit before doing anything else:
- Burner head: the emitter at the top (mushroom style) or center of the unit where heat radiates outward
- Control knob: usually on the lower panel or base, with OFF, PILOT, LOW, and HIGH positions
- Pilot assembly: a small tube and orifice that stays lit continuously to ignite the main burner
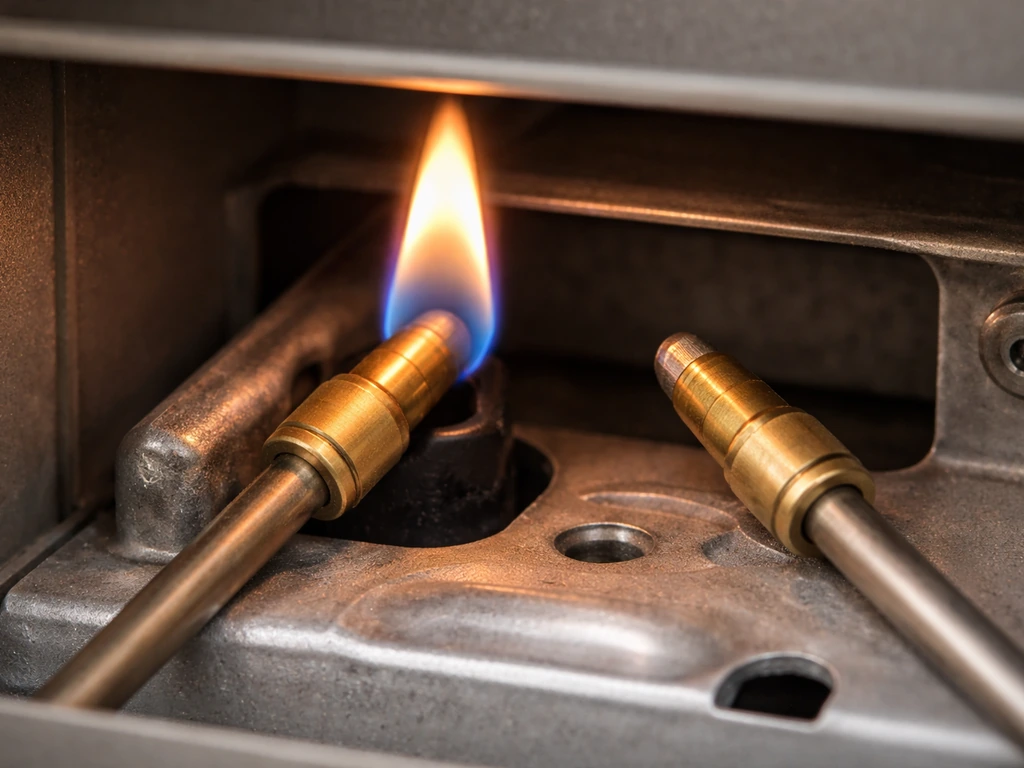
- Thermocouple: a metal probe sitting in the pilot flame; it generates a tiny voltage that holds the gas valve open — this is the most common failure point
- Igniter/electrode: the spark-generating tip next to the pilot, used for electronic ignition
- Tilt switch: a safety cutoff (often magnetic or ball-and-socket type) that shuts gas off if the heater tips over
- Regulator and hose: the pressure-reducing connector between your propane tank and the heater's gas valve
- Tank compartment or base: where your 1 lb or 20 lb propane cylinder sits or attaches
Dyna-Glo models like the DGPH301BL and DGPH302SS specifically warn not to attempt assembly or operation if any parts are missing or visibly damaged. Dyna-Glo’s DGPH301BL/DGPH302SS owner’s manual specifically warns not to attempt assembly or operation if parts are missing or damaged, and it emphasizes safety checks like leak checking and verifying assembly completeness before use DGPH301BL and DGPH302SS specifically warn not to attempt assembly or operation if any parts are missing or visibly damaged.. That's good advice for every brand. Do a quick visual check now, before assembly, and set aside anything with cracked hoses, bent pilot tubes, or a corroded thermocouple tip.
Unbox, assemble, and set up safely
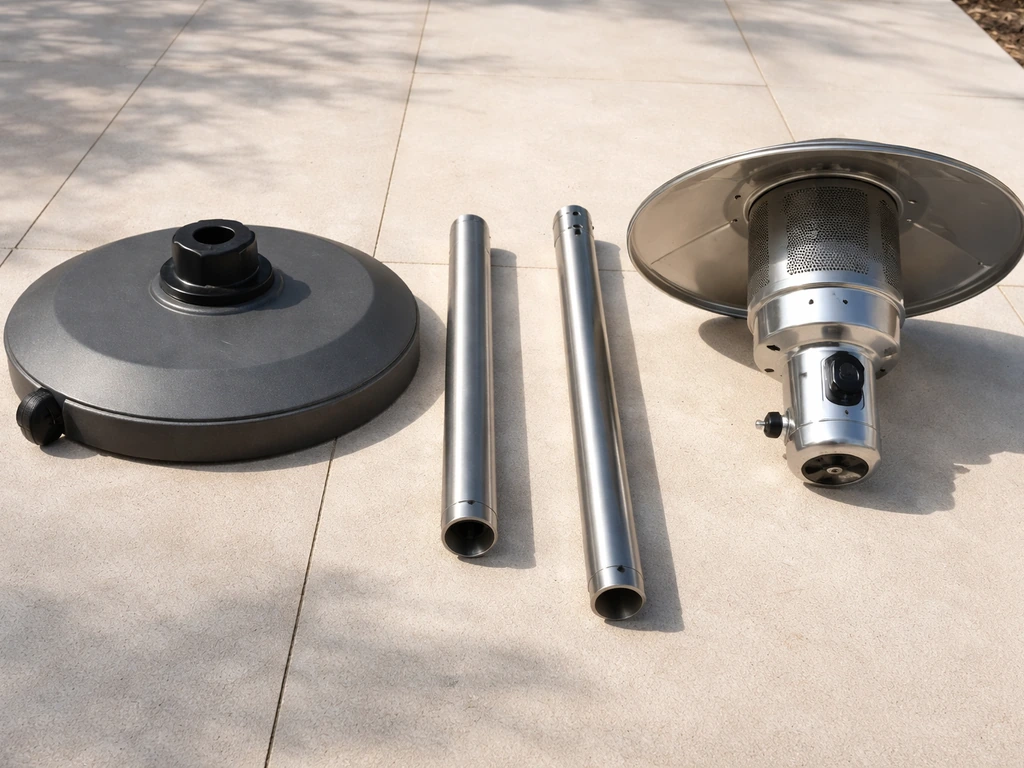
Most freestanding patio heaters ship in several sections: a base (often with wheels), one or two pole segments, an upper housing with the burner and emitter, and a separate hardware bag. Assembly typically takes 20 to 30 minutes with just a wrench and a screwdriver. Do not connect the propane tank until every bolt is tightened and the heater is fully assembled and standing upright.
- Lay out all parts on a flat surface and check them against the parts list in your manual. Note any missing hardware before you start.
- Attach the base and secure the wheels or leveling feet if included. The base needs to be stable on level ground before you add height.
- Thread the lower pole section into the base and tighten the collar bolt or set screw firmly. A loose pole is a tip-over risk.
- Attach the middle pole section if your model has one, then mount the upper housing with the burner, emitter, and control panel.
- Route the gas supply hose from the regulator fitting (usually at the base or lower pole) up through the pole or along the exterior, depending on your model. Make sure it isn't kinked.
- Attach the reflector/emitter hood at the top. Most models use a simple bolt pattern; hand-tighten first, then snug with a wrench.
- Stand the heater upright and confirm it doesn't rock. Adjust the leveling feet if your surface isn't perfectly flat.
- Place it in your intended operating location before connecting gas — moving a connected heater is an unnecessary risk.
On placement: the Mr. Heater MH-0042-P manual specifies minimum clearances from combustible materials, and most manufacturers require at least 24 to 36 inches of clearance on all sides and 36 to 48 inches of overhead clearance. Keep the heater away from overhangs, pergola fabric, umbrellas, and low-hanging branches. Never use a propane patio heater indoors, in a garage, or in any enclosed space, even partially.
Connect the propane tank and do your leak check
This step is non-negotiable: you must do a leak check every time you connect a new tank or reattach an existing one. Learn the exact step-by-step process for connecting a propane tank to your patio heater, including regulator attachment and safe leak testing leak check. A slow propane leak outdoors will smell before it accumulates to a dangerous level, but under certain wind conditions you might not catch it. Soapy water testing is cheap, fast, and reliable.
Connecting the regulator
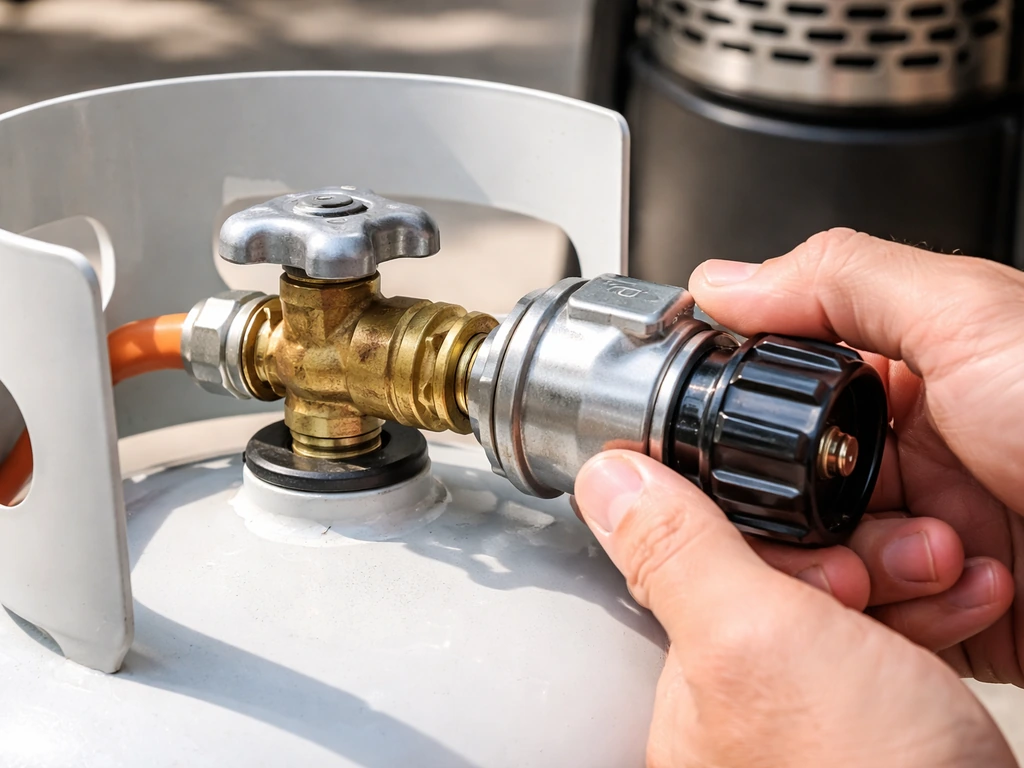
Most full-size patio heaters use a standard POL or Type-1 (QCC1) regulator that threads onto the tank valve. Hand-tighten the connection firmly, then give it a quarter-turn snug with a wrench. Do not overtighten or use thread tape on these connections. If your heater uses a 1 lb disposable cylinder, it screws directly into the inlet fitting, again, hand-tight plus a snug quarter-turn.
One important note: propane cylinders sold in the U.S. since the late 1990s are required to have an OPD (Overfilling Prevention Device) valve, identifiable by the triangular handwheel on the tank valve. OPD valves have a built-in safety shutoff that can occasionally prevent gas flow if the valve is opened too quickly. Open the tank valve slowly, about a quarter turn at a time, until fully open.
Leak check procedure
Mix your leak-check solution. Mr. Heater's MH-0042-P manual specifies 1 part liquid dish soap to 3 parts water. Hampton Bay's manual calls for a 50/50 mix. Either ratio works fine. Apply it generously with a brush or spray bottle to every connection point: the regulator-to-tank fitting, the regulator-to-hose connection, and the hose-to-heater inlet. Then slowly open the tank valve.
- Bubbles forming slowly or rapidly at any joint mean gas is escaping — close the tank valve immediately
- Tighten the leaking connection and retest before proceeding
- If a connection still leaks after re-tightening, the regulator, hose, or fitting may be damaged and needs replacement
- No bubbles after 60 seconds means the connection is sound
- Never use an open flame to check for leaks
- Perform all leak checks outdoors
Per the MH-0042-P manual: do not use the heater until all connections have passed the leak check. That's the rule. If a connection won't seal, stop and fix it first.
Lighting your propane patio heater (electronic and manual ignition)
The lighting sequence is almost identical across brands, but the hold time matters more than most people realize. Rushing this step is the number-one reason heaters fail to stay lit on the first try.
Standard electronic ignition sequence
- Open the tank valve slowly all the way (counterclockwise).
- Wait 5 seconds for gas to reach the regulator.
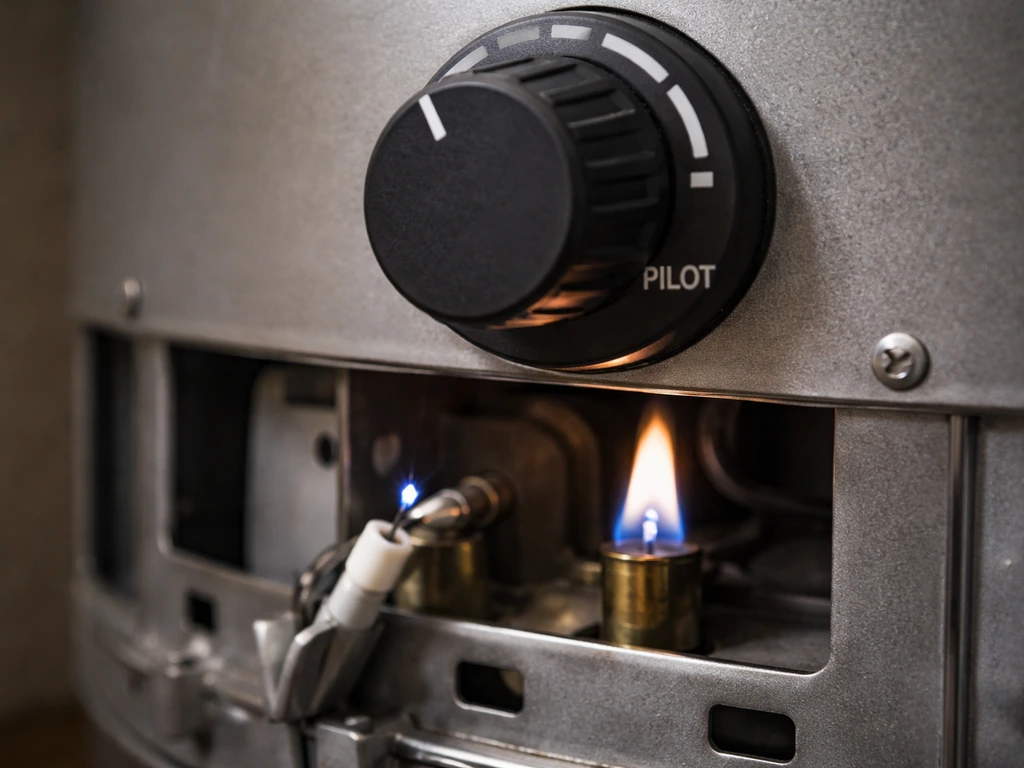
- Turn the control knob to the PILOT position. If your model requires pushing down to unlock the knob, press and hold it down before turning.
- While holding the knob fully depressed in the PILOT position, press the igniter button repeatedly (once per second) until the pilot lights. You should hear a soft 'whomp' and see a small blue flame at the pilot orifice.
- Keep holding the knob down for at least 20 to 30 seconds after the pilot ignites. Hampton Bay specifies a minimum of 20 seconds; Mr. Heater's MH-0042-P manual specifies at least 30 seconds. The thermocouple needs this time to heat up enough to hold the gas valve open on its own.
- Slowly release the knob. If the pilot stays lit, you're ready to turn to LOW or HIGH.
- Turn the knob to LOW first, confirm the main burner ignites (you'll hear it and see the emitter begin to glow), then adjust to your desired heat setting.
Manual/match lighting
If your heater has a manual lighting port or if the igniter has failed, you can usually light the pilot with a long fireplace match or a barbecue lighter. Hold the flame near the pilot orifice before turning the knob to PILOT and pressing down. Once you see the pilot catch, remove the match and continue holding the knob for the full 30 seconds as described above. The Desa SPC-21PHTSA manual notes that you should wait briefly after lighting for the burner to ignite properly, don't panic if there's a 2 to 3 second delay.
If it won't ignite at all
Work through these checks in order before giving up or calling anyone:
- Check the tank: shake it to confirm there's propane inside. An empty or nearly empty tank is the most common reason for a no-light situation.
- Check for air in the line: after connecting a new tank, there can be a pocket of air between the regulator and the pilot. Purge it by holding the knob to PILOT and pressing down for 10 to 15 seconds before attempting ignition.
- Check the igniter electrode: look at the tip next to the pilot orifice. It should be about 3 to 5 mm from the pilot hood. A cracked ceramic insulator or a corroded tip means no spark — replace the electrode or switch to manual lighting.
- Check the pilot orifice: spider webs, debris, and insect nests can block this tiny hole, especially at the start of the season. Turn off the gas, let the heater sit for 10 minutes, then use a thin wire or a can of compressed air to clear the orifice. Never drill it out.
- Check the regulator: if you hear no gas flow at all when the knob is in the PILOT position with the tank open, the regulator may have triggered its internal bypass limiter. Close the tank valve completely, wait 30 seconds, then slowly reopen it before trying again.
- Check for wind: even light breezes can prevent a pilot from catching. Shield the lower panel from the wind during lighting — the Hampton Bay manual specifically calls this out for reliable ignition.
If the pilot still won't light after all of the above, close the tank valve and wait at least 5 minutes before another attempt (this is the MH-0042-P protocol). Propane that didn't ignite needs time to disperse safely before you try again.
Getting and keeping a steady flame
If you can light the pilot but it goes out the moment you release the knob, the thermocouple is almost always the culprit. The thermocouple is a thin metal rod, usually bronze or steel, positioned so the tip sits directly in the pilot flame. When it gets hot enough, it generates a small millivolt signal that keeps the gas valve open. If the signal drops, because the thermocouple is cold, dirty, misaligned, or failing, the valve closes and the flame dies.
Thermocouple checks
- Confirm the pilot flame is actually touching the thermocouple tip. Mr. Heater's MHVFIH10LPT manual specifically notes that the pilot flame pattern must contact the thermocouple — if it's not, the rod never heats to the threshold voltage.
- Look at the thermocouple tip for a grey or white coating (oxidation) or sooty black buildup. Light sanding with fine-grit sandpaper can restore conductivity on a mildly fouled tip.
- Check the thermocouple connection at the gas valve (a threaded nut fitting). Finger-tighten plus a snug quarter-turn with a wrench. Loose connections drop the millivolt signal below the threshold.
- If none of the above works, the thermocouple itself has likely failed. Replacements are inexpensive (typically $10 to $20) and the correct length and thread size are listed in your manual. This is a straightforward DIY swap.
Pilot and valve behavior
Some heaters have a two-stage gas valve: PILOT lets a small amount of gas through to the pilot only, and LOW/HIGH opens the main burner. If the pilot stays lit when you hold the knob but the main burner won't ignite when you turn to HIGH, the issue is usually the main valve orifice (check for blockage) or low gas pressure from a near-empty tank. If the heater has been stored for a season, the valve stem can also stick slightly, a couple of gentle full rotations through the range of positions can sometimes free it up.
Operating your heater day to day
Placement and clearances
Set the heater on a firm, level, non-combustible surface. Pavers, concrete, and tile are all fine. Decking is acceptable if the heater is stable and clearances are maintained, but check that no wooden planks are directly below the emitter. Keep at least 24 to 36 inches of clear space on every horizontal side and a minimum of 36 inches (ideally more) of unobstructed space above the emitter. Avoid placing the heater under a covered patio roof without serious clearance headroom.
Controls and heat output
Most full-size freestanding heaters offer LOW and HIGH positions, with some models adding a MED setting. Start on LOW to confirm stable operation for the first few minutes, then turn to HIGH if needed. The emitter screen will glow orange to red when operating normally. A yellow or flickering flame at the burner usually means incomplete combustion from low gas pressure or a dirty burner orifice, not a safety emergency, but it does need attention. Close the tank valve and inspect the burner orifice if this persists.
Wind and weather
Wind is a propane patio heater's worst enemy during operation. It disrupts the pilot flame, cools the thermocouple, and causes inconsistent heat output. If you're in a consistently breezy environment, position the heater so a wall, fence, or windbreak is upwind of the pilot assembly (usually on the lower portion of the unit). Shielding the base during lighting, as Hampton Bay's manual recommends, is especially important. In very high winds (sustained above 15 mph), it's safer to shut the heater off entirely than risk repeated pilot outages.
Shutting down safely
To shut down: turn the control knob to OFF, then close the tank valve by turning it clockwise until it stops. Don't just close the tank and leave the knob in a heat position, the residual gas in the line will burn off, but the valve should always be in the OFF position when not in use. If you're storing the heater or anticipate a long period of non-use, disconnect the regulator from the tank and store the hose coiled loosely indoors.
Troubleshooting the most common failures
Most problems fall into one of four categories. Here's how to diagnose and fix each one.
| Symptom | Most Likely Cause | What to Do |
|---|---|---|
| Won't ignite at all | Empty tank, air in line, blocked pilot orifice, or dead igniter electrode | Check tank level, purge air, clear pilot orifice, test igniter spark, or switch to manual lighting |
| Lights but goes out when knob is released | Thermocouple not heating (misaligned, dirty, or failed) | Confirm pilot flame touches thermocouple tip; clean tip; check connection nut; replace if needed |
| Lights and stays on but shuts off randomly | Tilt switch triggering, wind extinguishing pilot, or loose thermocouple connection | Level the heater on firm ground; shield from wind; check tilt switch wiring and thermocouple nut |
| Gas smell without ignition | Gas escaping from a loose connection or damaged hose | Close tank valve immediately; ventilate area; re-do soap test on all connections; replace damaged components before relighting |
| Spark clicks but pilot won't catch | Pilot orifice blocked, gas not reaching pilot, or spark gap wrong | Purge air from line; clear orifice; check electrode gap (3 to 5 mm); try manual light to separate ignition from gas supply issues |
| Main burner won't ignite (pilot stays lit) | Near-empty tank, blocked burner orifice, or stuck main valve | Check tank level; inspect burner orifice for debris; cycle valve through full range a few times; replace valve if stuck |
| Yellow or orange flame at burner | Low gas pressure or dirty/partially blocked burner orifice | Replace near-empty tank; clean orifice; check regulator output pressure if you have a gauge |
Tilt switch: what it does and when it's the problem
The tilt switch is wired in series with the thermocouple circuit. According to troubleshooting guidance from Wano Co, if either the tilt switch or the thermocouple fails, the heater won't stay lit, the gas valve has no signal to stay open. If you've confirmed your thermocouple is fine but the heater still shuts off, the tilt switch is the next check. Most tilt switches are a small magnetic or ball-and-socket device in the base or lower pole. Turn off the tank valve and disconnect the regulator before accessing internal components. Test the switch with a multimeter set to continuity, it should show continuity when the heater is upright and break continuity when tipped past about 30 to 45 degrees. A switch that shows no continuity when the heater is level needs replacement.
Odors and gas smells
Propane has an added odorant (ethyl mercaptan) that gives it a distinctive rotten-egg or skunk-like smell. A faint whiff at startup when gas first reaches the pilot is not unusual. A persistent or strong gas smell after the heater is running is not normal. Close the tank valve immediately, move away from the heater, and don't use any open flames or electrical switches nearby. Re-do your full soap-water leak check on every connection once the smell has cleared (5 to 10 minutes outdoors). If you can't find and fix the source of the leak, stop using the heater and contact the manufacturer or a qualified service technician.
Regulator and gas control valve issues
A service manual example from Empire/Desa describes a situation where spark occurs at the pilot but there's no ignition, which typically points to the gas not reaching the pilot at the correct pressure. If you hear clicking but see no gas at all, the regulator may have locked out. Close the tank valve, wait 60 seconds, then reopen slowly. If the regulator consistently fails to deliver gas or if you can measure output pressure with a manometer and it's outside the specified range (usually 11 inches water column for most propane patio heaters), replace the regulator. These are not serviceable items and they're inexpensive enough that replacement makes more sense than attempting a repair.
When to stop DIYing and call for help
Most patio heater issues are genuinely fixable at home with basic tools and replacement parts that cost under $30. Thermocouples, electrodes, tilt switches, and regulators are all fair game for DIY. What you should not attempt: welding or brazing cracked burner components, repairing a physically damaged gas valve body, or continuing to operate a heater that has a gas connection you cannot get to seal. Propane is safe when handled correctly and very unforgiving when it isn't. If you've worked through this guide and still have an unexplained gas smell or an ignition failure you can't trace, the right answer is a new regulator/hose assembly or a call to the manufacturer's support line.
If you're looking at more specific modifications or upgrades, related topics worth exploring include how to connect a propane tank to a patio heater for hose and fitting compatibility details, and whether converting your propane unit to natural gas makes sense for your setup. If you want the most practical walkthrough, start with how to make a propane patio heater by selecting a safe location, assembling the parts, then connecting the tank and checking for leaks before lighting it. If you are trying to convert propane patio heater equipment for natural gas use, you will need to verify compatibility and follow the correct conversion approach for your specific model converting your propane unit to natural gas. For heaters that seem too tall for your space, there are also guides on adjusting pole height. If you want to change how tall the flame looks or spreads, start with adjusting pole height before you try any other modifications.
FAQ
Can I use a propane patio heater with a non-standard regulator or hose?
Use only the regulator type and hose assembly specified for your exact heater model. Mixing components can change gas pressure and cause unreliable pilot heating or incomplete combustion. If your regulator hose label or inlet fitting doesn’t match the model’s instructions, stop and replace the regulator with the correct one, or contact the manufacturer support line for the compatible part number.
Why does my heater light once, then won’t stay lit after I adjust the knob?
This usually comes from the thermocouple not being hot long enough or not positioned in the pilot flame. Confirm you hold the control knob down for the full hold time, then check that the thermocouple tip is centered in the pilot flame and not bent away. If it still shuts off quickly after the hold, test for a failing thermocouple or check the tilt switch continuity when the unit is upright.
What should I do if I smell propane but the leak check shows no bubbles?
First shut off the tank and do not attempt relighting. Let the area ventilate, then re-check with fresh soapy solution and pay special attention to the hose-to-heater inlet connection and any brass fittings, not just the regulator joints. If the odor persists after another full inspection, treat it as a leak you cannot locate and contact the manufacturer or a qualified technician.
Is it safe to light the heater again immediately after a failed ignition?
No, close the tank valve and wait before trying again. Propane that didn’t ignite needs time to disperse safely. A good rule is to wait at least 5 minutes for a no-pilot condition, and for regulator-related lockout or odd behavior, wait around 60 seconds before reopening the valve slowly.
How can I tell whether my pilot flame is correctly adjusted?
A properly positioned pilot flame should consistently heat the thermocouple tip without blowing sideways. If the pilot is weak, yellow, or repeatedly goes out when you release the knob, it often indicates misalignment, dirt at the pilot orifice, or wind disrupting the flame. Avoid adjusting parts unless your model’s manual allows it, otherwise cleanings and replacement are safer than ad hoc adjustments.
What if my tank valve has an OPD and gas seems hard to start flowing?
Open the tank valve slowly in small increments (about a quarter turn at a time). OPD valves can temporarily restrict flow if the valve is opened too quickly. If you notice consistent restriction or repeated ignition issues after slow opening, stop using the heater and have the regulator and hose checked or replaced.
Should I use a match or lighter every time the igniter fails?
Manual lighting can be a temporary workaround, but if the igniter or electrode system is failing repeatedly, plan to replace the igniter parts rather than keep relying on a flame. When manually lighting, keep the flame near the pilot orifice and still hold the knob down for the full thermocouple warm-up time so the safety shutoff is not triggered.
Can wind cause the heater to shut down while I’m using it?
Yes, wind can cool the thermocouple and extinguish the pilot, causing the valve to shut off when you release the knob or after ignition. Position the heater with a wall or windbreak upwind of the pilot assembly, shield the base during lighting, and if wind is very strong (sustained above about 15 mph), shut the heater off rather than repeatedly attempting relights.
What’s the correct shutdown method if I’m leaving it off for the night?
Turn the knob to OFF, then close the tank valve fully. Do not leave the knob on a heat position, even briefly, because residual gas can continue to burn. For storage, disconnect the regulator from the tank, store the hose coiled loosely indoors, and keep the heater on a stable, non-combustible surface when unattended.
Do I need to do a leak check every time I disconnect and reconnect the tank?
Yes. Even if the connection previously passed, each reattachment can shift the seal or introduce debris. Do a full soap-and-water check on every connection point before lighting, and if you ever smell propane, re-check after the odor clears.