To warm up your outdoor patio fast, fire up your patio heater at least 10-15 minutes before you plan to sit outside, position it within 6-8 feet of your seating area, and shield it from wind on at least one side. If it won't light or shuts off unexpectedly, the fix is almost always one of three things: an empty or closed fuel supply, a tripped tilt switch, or a dirty thermocouple. This guide walks you through the whole process, from first ignition to diagnosing why it isn't heating, based on the type of heater you have. A patio heater works by generating heat from either a fuel burner or an electric element, then using controls and safety shutoffs to keep that heat steady how does a patio heater work.
How to Warm Up Outdoor Patio: Fast Setup and Troubleshooting

Grant Mercer
29 Jun 2026
Quick warm-up checklist and safety first
Before you touch any controls, run through this checklist. It takes less than two minutes and it catches 90% of the problems that prevent a heater from working or cause a dangerous situation.
- Smell for gas near the base and burner head. If you detect any gas odor, do not attempt to light the heater. Shut off the gas valve immediately, move everyone away from the area, and call your gas supplier or the fire department. Do not re-light until the source has been found and fixed.
- Check that the heater is standing straight and stable on a level, non-combustible surface. A tilted heater triggers the built-in tilt switch and will refuse to ignite or will shut off.
- Confirm clearances: most manufacturer manuals, including AZ Patio Heaters models, require a minimum of 36 inches from combustible materials on all sides and at least 24 inches overhead. Check your specific manual for exact figures.
- For gas heaters: verify the tank or gas line valve is open and the tank has fuel.
- For electric heaters: confirm the unit is plugged into a GFCI-protected outdoor outlet and the circuit breaker has not tripped.
- Inspect the reflector and burner area for debris, spider webs, or insect nests. These can block gas flow or create a fire hazard.
- Make sure everyone nearby knows the heater is about to be lit, especially children and pets.
One more rule that applies to any type: never attempt to service or repair a heater without first shutting off the fuel or disconnecting the power. For electric models specifically, manufacturers like Infratech explicitly prohibit any service while the power source is still connected. Take that seriously.
Identify your patio heater type before you do anything else
The steps you need depend entirely on what kind of heater you have. To get started, you should also follow the specific setup steps for your heater type and fuel source what kind of heater you have. Getting this wrong wastes time. Here is how to identify yours quickly.
| Heater Type | How to Identify It | Fuel/Power Source | Common Brands |
|---|---|---|---|
| Propane (LP gas) | Cylindrical mushroom-style tower or tabletop unit with a tank compartment at the base; uses a standard 20 lb propane tank | Liquid propane tank (refillable or swap) | AZ Patio Heaters, Fire Sense, Hiland, Hampton Bay |
| Natural gas (NG) | Permanently mounted unit with a fixed gas line running from the house; no tank | Household natural gas line | AZ Patio Heaters, Napoleon, Bromic |
| Electric infrared (wall/ceiling mount) | Flat rectangular or tube panel, usually mounted overhead or on a wall; has a power cord or hardwired connection | 120V or 240V electricity | Infratech, Dr. Infrared, Bromic Tungsten Electric |
| Electric freestanding | Tower or umbrella-style unit with a power cord; no tank | 120V electricity | AmazonBasics, Trustech, various imports |
| Natural gas tabletop | Small tabletop burner with a fixed gas line connection underneath | Natural gas line | Various commercial brands |
If you are not sure whether your fixed gas unit runs on propane or natural gas, check the rating label on the burner assembly or base. It will say 'LP' or 'NG.' Do not interchange them without a proper conversion kit, as jet orifice sizes are different for each fuel type.
Get heat working now: start-up steps by heater type
Propane patio heater (the common tower or mushroom style)
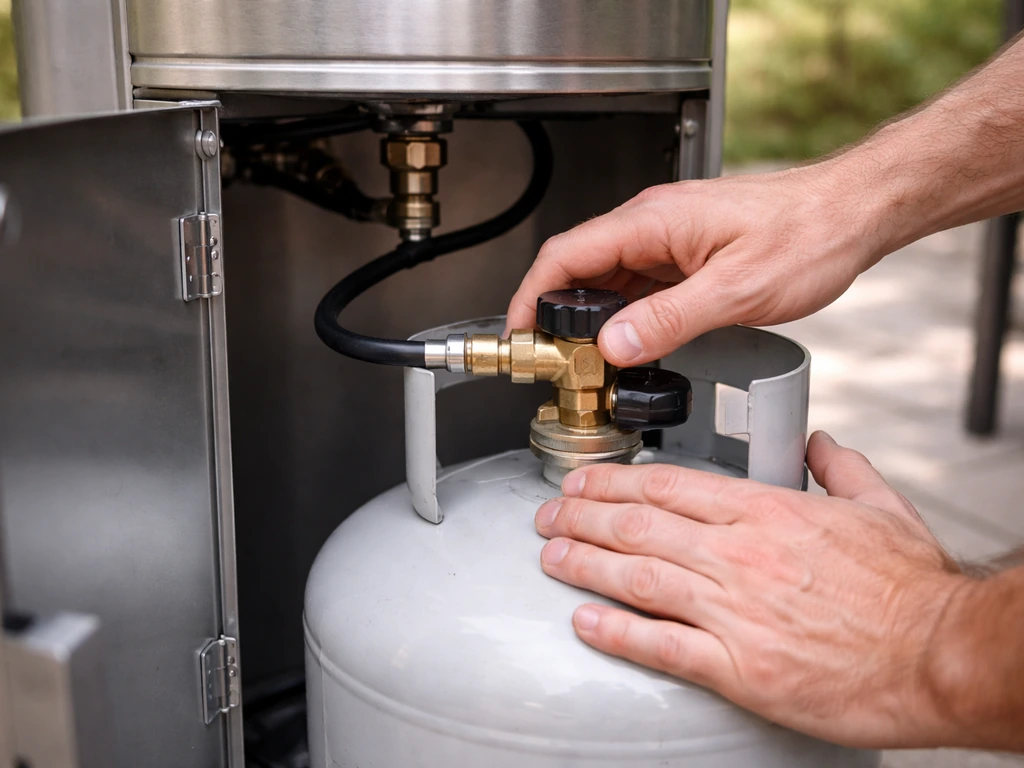
- Open the access door at the base and confirm the propane tank is seated correctly and the POL or QCC1 connector is hand-tight on the tank valve.
- Turn the tank valve counterclockwise to fully open it, then wait about 5 seconds for gas to reach the valve assembly.
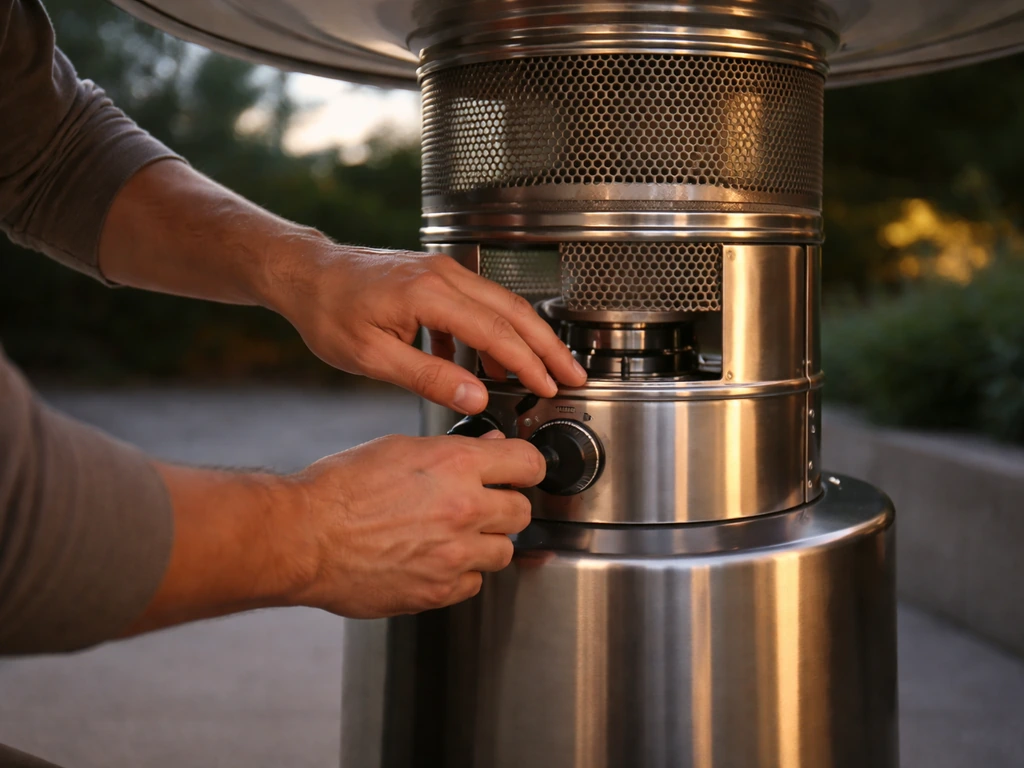
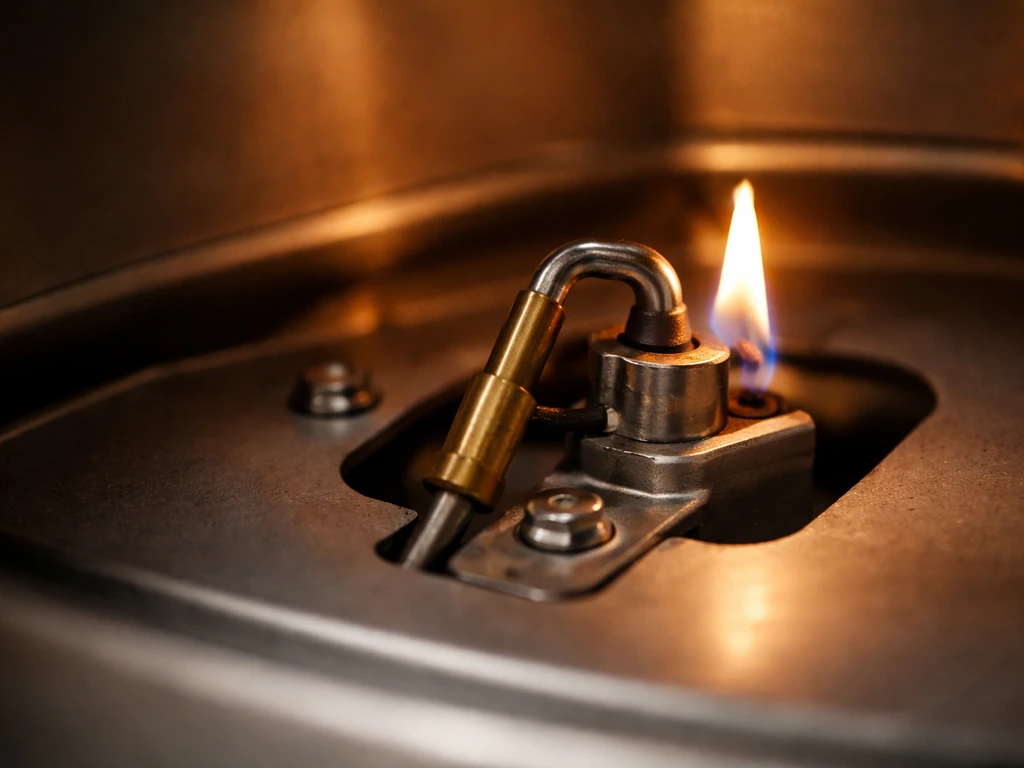
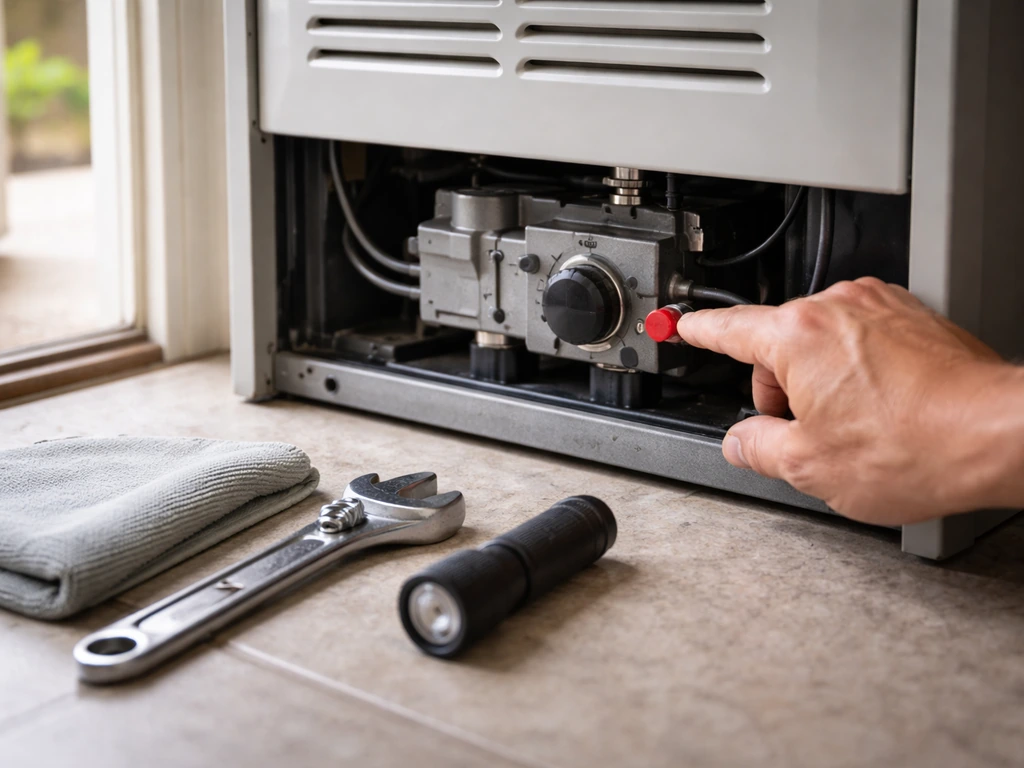
- Locate the control knob on the burner panel. Turn it to the 'pilot' position and press it in to open the gas supply to the pilot.
- While holding the knob in, press the igniter button repeatedly (or hold a long-reach lighter to the pilot port) until you see a small flame. Keep holding the knob for 30 seconds after the pilot lights to heat the thermocouple.
- Release the knob slowly. If the pilot holds, rotate the knob to 'low' or 'medium' and the main burner should ignite.
- Once running, let the heater warm up for 5 minutes on low before turning it to high. This reduces thermal stress on the emitter screen.
Natural gas patio heater (hardwired line)
- Confirm the shutoff valve on the gas line (usually a quarter-turn ball valve near the heater base) is open, with the handle parallel to the pipe.
- Follow the same pilot and control knob procedure as a propane unit. The ignition sequence is identical; only the fuel source differs.
- If the unit uses electronic ignition without a standing pilot, turn the knob to the 'on' position and press the igniter until the burner lights.
Electric infrared heater (wall, ceiling, or freestanding)
- Verify the outlet or circuit breaker is live. Plug in the unit or confirm hardwired connections are intact.
- Turn the power switch to 'on.' Most electric infrared heaters have a short 1-2 minute warm-up period before they reach full output. The element will glow orange-red when operating correctly.
- For units with a remote or thermostat, set the target temperature 5-10 degrees above the current ambient temperature so it actually runs instead of idling.
- If the heater has a timer or delay-start feature, make sure it is not engaged.
If it won't light or won't stay lit: common causes to check right now
This is where most people get stuck. The heater clicks, nothing lights, or the flame comes on for a few seconds and then dies. Here are the most common causes in order of likelihood.
Won't ignite at all
- Empty or nearly empty propane tank: even if the gauge shows some fuel, a low tank in cold weather may not have enough vapor pressure to flow. Swap to a known full tank to confirm.
- Gas valve still closed: double-check both the tank valve and any inline shutoff. It is surprisingly easy to miss a half-closed valve.
- Igniter battery dead or electrode dirty: the piezo igniter on most tower heaters uses a small AAA battery accessed from the control panel. Replace it. Also check that the igniter electrode near the pilot port is clean and positioned about 3/16 inch from the pilot nozzle.
- Burner orifice clogged: insects and spiders love gas orifices. Use a can of compressed air to clear the pilot orifice. Never use a metal object to probe the orifice or you will enlarge it and create a dangerous fuel-air mixture problem.
- Electric heater: tripped GFCI outlet. Press the reset button on the outlet itself. If it trips again immediately, stop and have an electrician look at it.
Lights but immediately goes out
- Not holding the knob in long enough: you need to hold the pilot button depressed for a full 30 seconds after the flame appears to allow the thermocouple to heat up. Most people let go too soon.
- Low gas pressure: if the tank was recently refilled and is very cold, or if it is undersized for the BTU rating, pressure may be too low. Warm the tank slightly by bringing it indoors for 30 minutes (never use an open flame or hot water to warm a propane tank).
- Wind blowing out the pilot: even a mild breeze can extinguish a standing pilot. Try cupping your hand around the burner head area during ignition, or light it with the heater oriented away from the wind direction.
- Regulator issue: if the propane regulator is in thermal protection mode (which can happen if the tank valve was opened too fast), close the tank valve, disconnect the regulator, wait 30 seconds, reconnect, and open the tank valve slowly.
Check your safety shutoffs: tilt switch, flame sensor, and thermocouple
Modern patio heaters have multiple safety devices that will shut the unit down automatically. If you want to build your own patio heater, start by choosing a compatible fuel type and design that meets local safety codes patio heaters. They are doing their job, but they can also cause confusing behavior if they malfunction or are triggered by a normal condition you can fix.
Tilt switch
The tilt switch is a mercury or ball-bearing switch inside the heater base that cuts gas flow if the heater tips beyond a set angle (usually around 8-10 degrees from vertical). If your heater refuses to light or shuts off after a few seconds for no obvious reason, the first thing to check is whether the unit is sitting perfectly level. Place a small spirit level on the base. If it is off even slightly, adjust the feet or move the heater to a flatter surface. On some units, the tilt switch can also fail in the 'open' position due to corrosion, making the heater act permanently tilted. Testing and replacing a tilt switch is a straightforward DIY job on most tower heaters.
Thermocouple
The thermocouple is a small metal probe that sits in the pilot flame. It generates a tiny electrical voltage when heated, which holds the gas valve open. If the pilot flame is not hitting the thermocouple correctly, or if the thermocouple has degraded, the valve closes and the flame dies within 30 seconds of releasing the knob. To test it: watch where the pilot flame is landing. It should be wrapping around the tip of the thermocouple probe (the copper tip at the end of the small wire near the pilot burner). If the flame is off to one side, gently bend the thermocouple bracket so the tip is centered in the flame. If positioning it correctly doesn't help, the thermocouple itself likely needs replacing. They cost $10-20 and screw in with a 5/16-inch or 7/16-inch wrench depending on the model. This is one of the most common repairs on any gas patio heater and is fully within DIY ability.
Flame sensor (electronic ignition models)
Heaters with electronic ignition use a flame sensor (sometimes called a flame rod or ODS sensor) rather than a thermocouple. The ODS (Oxygen Depletion Sensor) on propane heaters will also shut the burner down if carbon monoxide or oxygen levels drop below a safe threshold. If your heater lights and then shuts off within a minute and you are in an enclosed or partially enclosed space, this sensor may be working correctly and warning you that the space needs more ventilation. Move the heater to a more open area. If the unit shuts off in a well-ventilated space, the sensor itself may be dirty or failed and needs inspection.
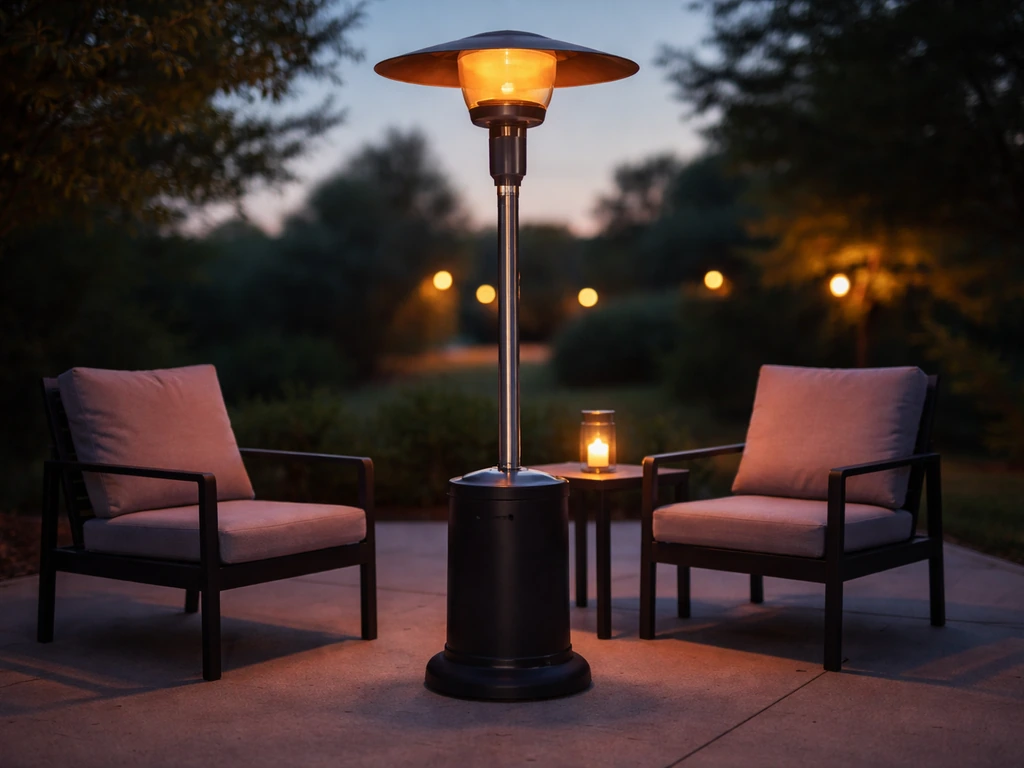
Make the most of your heater: positioning, wind, and settings
Even a perfectly functioning heater delivers weak results if it is placed badly. If you want to know how to keep patio warm in winter, the right placement and wind control make a big difference even when your heater is working perfectly placed badly. Infrared heat travels in a straight line and warms objects and people directly, not the air around them, so placement matters more than most people realize.
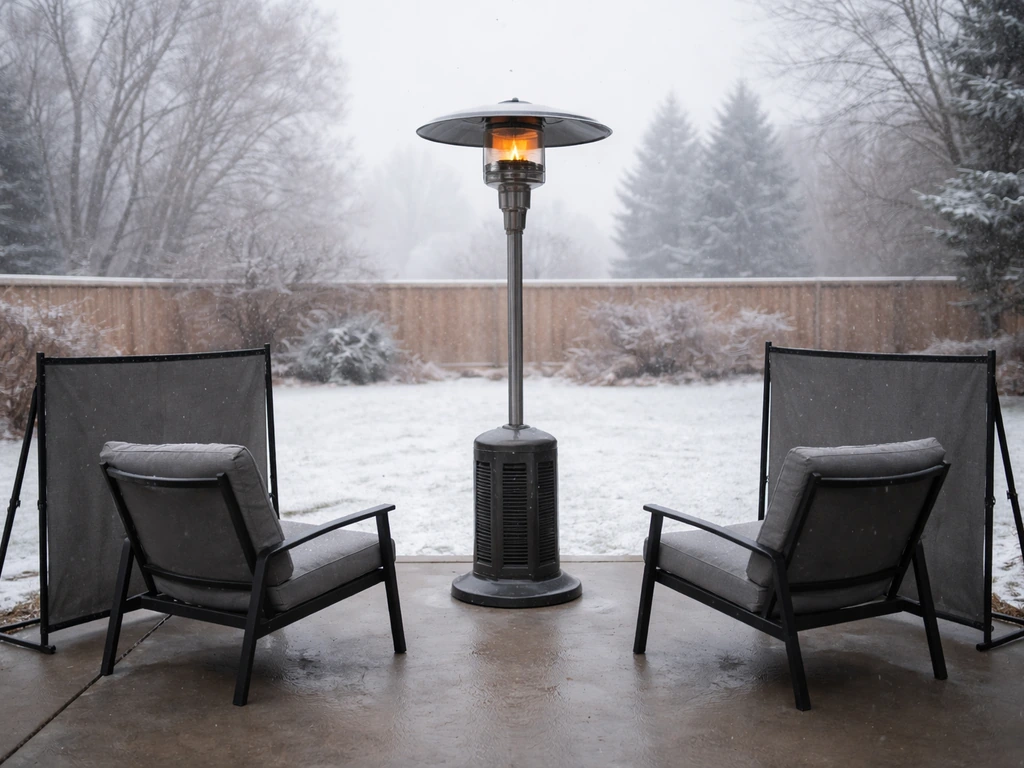
- Distance: the sweet spot for most 40,000-48,000 BTU freestanding propane heaters is 5-8 feet from seated guests. Beyond 10 feet you lose most of the radiant effect.
- Height: the emitter head on a tower heater should be overhead, not at chest height. If the reflector is aimed at a wall rather than your seating area, you are wasting heat. Adjust the tilt of the emitter if your model allows it.
- Wind: this is the single biggest enemy of outdoor patio heat. Even a 5 mph breeze can carry away 30-40% of the effective warmth. Use a patio umbrella, a freestanding windbreak, or a half-wall on the upwind side. If you cannot block the wind, position the heater so its back faces the wind direction.
- Multiple heaters: for a seating area larger than about 150 square feet, one tower heater is rarely enough. Two heaters placed on opposite ends of the space at 45-degree angles to the seating area will heat far more evenly than one heater on high.
- Electric infrared: ceiling or wall-mounted electric heaters (like Infratech units) are far more wind-resistant than gas tower heaters because the element is enclosed. For covered patios, an overhead electric heater is often the most efficient choice.
- Heat settings: do not immediately crank to high. Starting on medium and letting the heater run for 10 minutes before adjusting upward extends emitter screen life and gives you a more stable, even output.
Maintenance that prevents warm-up failures before they happen
Most patio heater problems that happen mid-season are entirely preventable with 20 minutes of maintenance at the start of the season. For the initial setup, follow a proper how to install patio heater process so the heater is positioned safely and connected correctly. Here is what to do.
- Clean the burner and pilot assembly: remove the emitter screen and burner head (varies by model; refer to your owner's manual). Brush out any debris with a soft bristle brush and use compressed air on the pilot orifice and main burner ports. Do not use water or liquid cleaners near gas components.
- Inspect the thermocouple: look for cracks or dark discoloration on the probe tip. If it looks corroded or the coating is flaking, replace it before the season starts rather than troubleshooting mid-evening with guests present.
- Check gas connections with soapy water: apply soapy water to all gas connections (tank fitting, regulator, hose, and burner inlet). Turn on the gas and watch for bubbles. Any bubble is a leak. Tighten the connection or replace the hose and retest before operating.
- Test the tilt switch: gently rock the heater about 10 degrees from vertical while it is running. It should shut off. If it doesn't, the switch needs replacement.
- Inspect the regulator hose: rubber hoses degrade in UV light and cold temperatures. Any cracking, brittleness, or discoloration means the hose needs replacing. A replacement LP regulator and hose assembly typically costs $15-25.
- For electric heaters: wipe down the heating element with a dry cloth. Check the power cord for any cuts, kinks, or damage near the plug. Test the GFCI outlet by pressing its test/reset buttons.
- Store properly at end of season: store propane heaters with the tank removed and the burner covered. Store electric heaters indoors or under a weather-resistant cover. Off-season storage is the biggest factor in how reliably a heater starts the next season.
If you have gone through all of these steps and your heater still will not produce heat, the issue is likely a failed gas valve, a failed electronic control board, or an internal regulator problem. These are situations where the repair cost often approaches the cost of replacement, especially on lower-priced heaters. Check whether your unit is still under manufacturer warranty before spending money on parts. For higher-end or permanently installed natural gas units, a licensed gas technician is the right call rather than a DIY repair. If you are deciding which patio heater to buy, focus on fuel type, heating area, and safety features before making a purchase a licensed gas technician is the right call.
FAQ
How long should I preheat my outdoor patio heater before guests arrive?
Start it 10 to 15 minutes early for most units, then do a quick “aim and check” at the 5 minute mark to confirm you are getting warm directly where people sit. Windy nights often need closer to 20 minutes because airflow pulls heat away from occupants.
What is the safest way to manage wind around a patio heater?
Shield only the heater, not the seating area, and keep airflow paths from being blocked on the heater’s intake or vent side (if equipped). Use a windbreak panel or an anchored umbrella positioned behind or beside the heater, and leave the front and controls unobstructed.
Can I use a patio heater on a covered patio without ventilation?
Avoid using gas patio heaters in enclosed spaces where exhaust and safety shutoff rely on oxygen availability. If your heater shuts off quickly, treat it as a ventilation problem first, then move the heater farther from walls and any overhead obstructions to improve airflow.
My gas heater lights but shuts off after releasing the knob. What should I check first?
Confirm the pilot flame consistently wraps the thermocouple tip when the knob is held down. If the flame is off to one side, adjust the thermocouple bracket gently until it sits centered in the pilot flame, then try again after fully holding the knob for the manufacturer’s recommended time.
Do I need to convert a propane heater to natural gas (or the other way around)?
Yes, do not swap fuel sources without the correct conversion kit. The burner or jet orifice sizes differ, so using the wrong fuel without conversion can cause improper flame behavior and trigger safety shutoffs.
How do I know if my heater is too close to people or surfaces?
Keep the heater within its manufacturer’s stated clearance distances to walls, furniture, and fabrics, and do not place it where it can be touched or bumped easily. If you are using an infrared model, also avoid letting drapes, cushions, or umbrellas sit in the direct line of infrared output.
What should I do if my electric patio heater is on but barely warm?
First, confirm the element and controls are set for full output, then check for a tripped breaker or a timer/thermostat mode that is cycling power. Also inspect for blocked airflow or obstructions near the heater’s front and rear vents, since restricted airflow can reduce effective heating.
Is it okay to leave a patio heater running overnight?
Do not leave it unattended unless the manufacturer explicitly allows it. For gas units, safety sensors are not meant to replace supervision, and overnight conditions like heavy wind gusts or unstable seating contact can increase shutdown or fault risk.
How often should I clean a gas patio heater to prevent mid-season problems?
Plan on about 20 minutes of maintenance at the start of the season, and spot-check the pilot area periodically if you notice slow ignition. Cleaning focus areas typically include the burner/pilot region and any sensors or sensor access points, following your manual for correct methods.
What’s a quick test to see if my heater is level enough to avoid tilt-switch shutdown?
Place a small spirit level on the heater base or the flat mounting platform, not the ground around it. If you see more than a slight tilt, adjust feet or relocate the heater to a flatter surface before retrying ignition.
Should I try to repair or replace parts while the heater is connected?
No. Shut off the gas supply and disconnect power before touching internal components. If you are working on gas controls, verify the area is clear and the unit has cooled fully before removing any covers or adjusting wiring/sensors.
If I’ve tried ignition and shutdown fixes, what is the next most likely failure?
If it still fails after confirming fuel supply, level, pilot coverage, and sensor cleanliness, the next suspects are usually the gas valve, the ignition/control electronics, or an internal regulator issue. At that point, check warranty coverage first, because replacement and labor can exceed the heater’s value.