To fix your Sunjoy patio heater, you need the manual that matches your exact model number, not a generic one. Sunjoy sells multiple propane heater lines (A306006401, A306000410, A306004300, A306007600, A306007400, and others), and the ignition procedures, parts diagrams, and troubleshooting tables differ between them. Find your model number first, then pull the right PDF, and you'll have step-by-step lighting instructions, a leak-check procedure, a troubleshooting table, and maintenance intervals all in one place. If you need a patio glow fire pit manual, use the model number and locate the matching PDF for your specific unit.
Sunjoy Patio Heater Manual: Find Your Model and Fix Problems Fast

Grant Mercer
2 Jul 2026
Identify your exact Sunjoy patio heater model
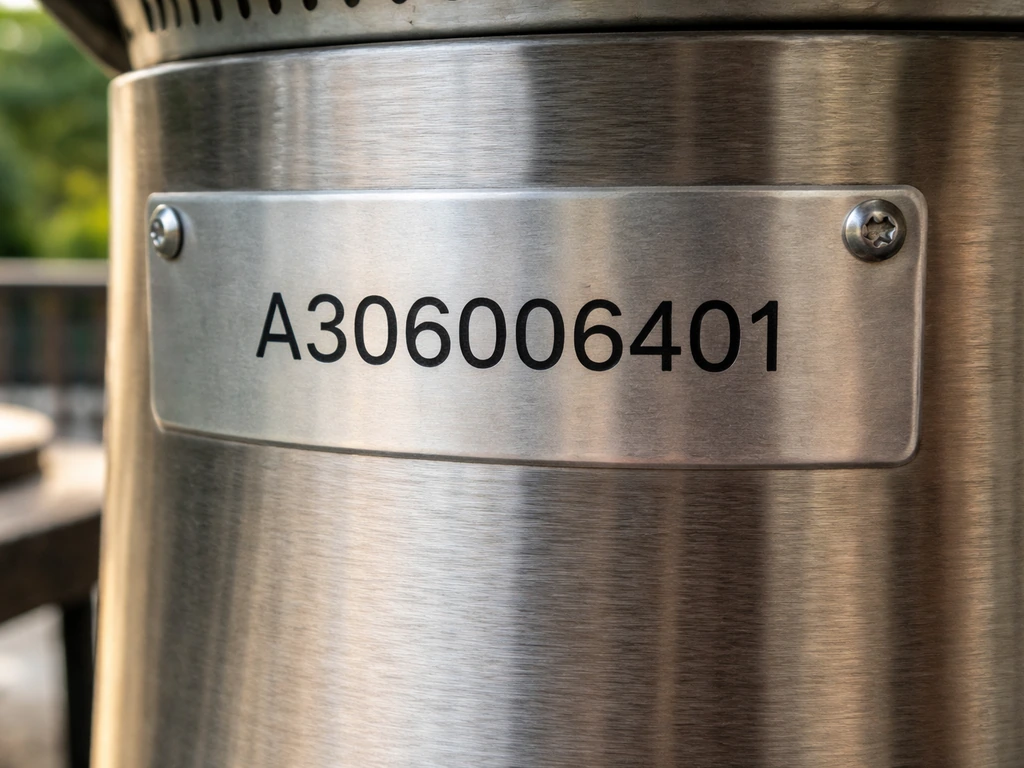
This is the step most people skip, and it causes real problems. A manual written for the A306006401 will have a slightly different ignition sequence and parts diagram than one written for the A306000410 or the A306007400 offset heater. Use and care guide PDFs for Sunjoy Patio Heater A306006401 use the model identifier “A306006401” in the document A306006401 model identifier. Using the wrong one means you might miss a step or misidentify a part.
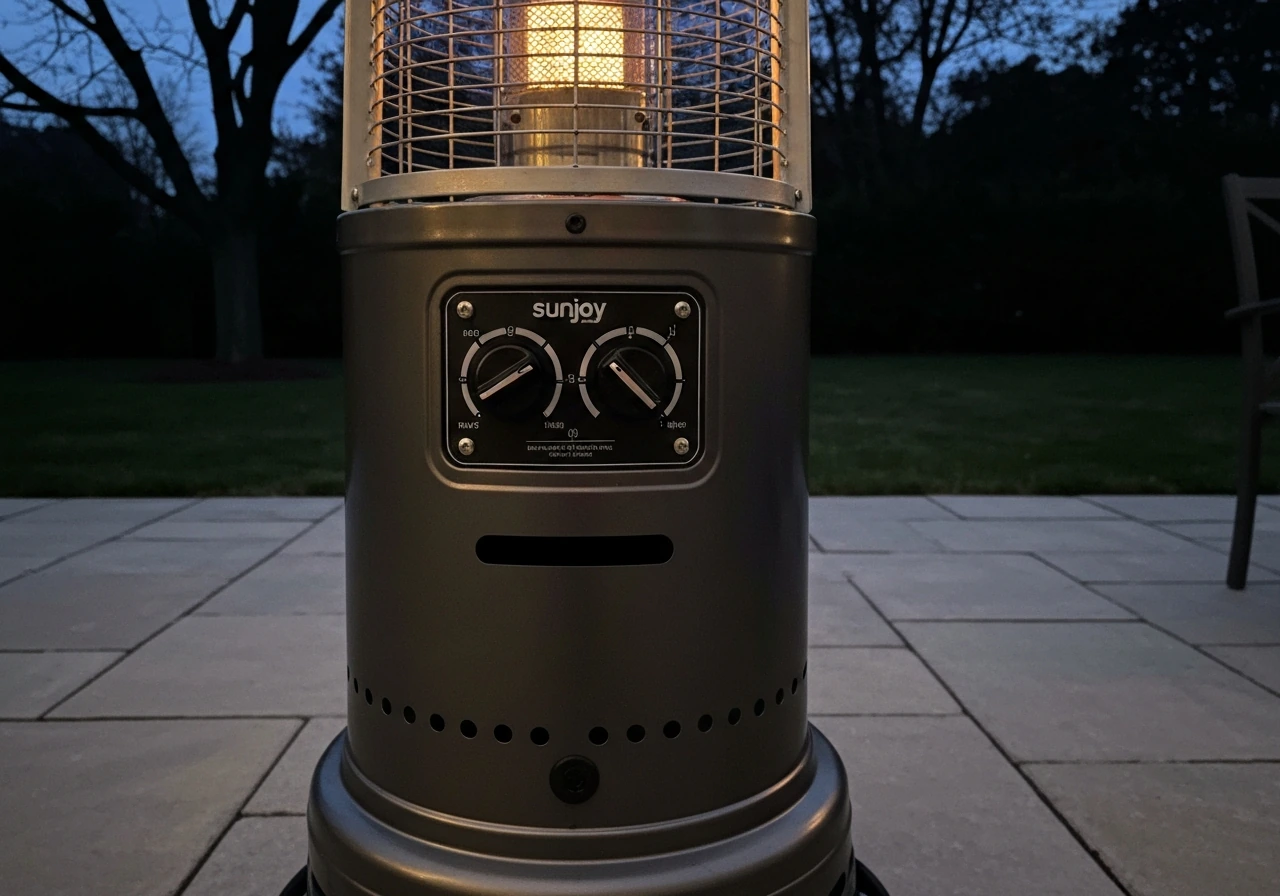
Look for the rating plate or product label on the heater itself. On most Sunjoy standing propane heaters, this sticker is on the base of the pole, on the back of the emitter housing, or on the underside of the burner assembly. It will show the item number (formatted like A306XXXXXX), sometimes a separate SKU number (like SKU# 810523103), the BTU rating, and the gas type. Take a photo of it before you do anything else.
If the sticker is worn or missing, use these appearance cues to narrow it down:
- Standard upright mushroom-style standing heater with table top ring: likely A306004300 (gray frame, 40,000 BTU) or A306007600 (black frame, 40,000 BTU)
- Offset propane heater with wheels: likely A306007400 (black steel, 45,000 BTU)
- Model listed in the manual PDF as 'Patio Heater A306006401': this is a commonly documented use-and-care variant sold through Wayfair
- Model showing 'ITEM#: A306000410' and 'SKU# 810523103' on the label: this matches a separately published owner manual with its own assembly instructions
Write down or photograph the full model number and SKU before moving on. That string of characters is the only reliable way to pull the correct manual.
Where to find the correct Sunjoy patio heater manual
Sunjoy does not maintain a single public manual library, so you need to check a few places depending on where you bought the heater. If you have a Fire Sense model like the fire sense patio heater manual 60788, you will typically need to use the item number or model code on the rating label to locate the exact PDF.
- Sunjoy's own website (sunjoygroup.com): search your model number in the search bar or navigate to the product page. The product detail page often has a downloadable PDF linked under 'Documents' or 'Resources.'
- The retailer where you bought it: Lowe's, Wayfair, Home Depot, and similar retailers frequently host the manufacturer's PDF directly on the product page. Search the retailer's site for your model number or SKU and look for a 'Manual' or 'Documents' tab.
- Third-party manual repositories: sites like device.report and ManualsLib index Sunjoy PDFs by model number. Searching 'A306004300 manual' or your specific item number usually surfaces the right file.
- The box the heater came in: Sunjoy packs a printed use-and-care guide with most units. If you still have the box or the original packaging, check inside for the booklet.
Once you have the PDF open, the sections you want immediately are: Assembly/Installation (to confirm your setup is correct), the Hose/Regulator section (dedicated page with an illustration showing which regulator and cylinder setup is required), the 'To Light' procedure, and the Troubleshooting table near the back. The maintenance interval guidance is usually in the Care section. If your PDF doesn't have a troubleshooting table, you've probably got the wrong manual for your model.
Safe setup, gas connection, and lighting steps from the manual
Before touching the igniter, get the setup right. The manual is specific: you must use the pressure regulator and hose assembly supplied with the heater. Don't swap in a generic regulator from a grill or another heater brand. Place the heater on a firm, level surface outdoors, away from overhangs, combustibles, and anything that could restrict airflow around the base.
Gas connection and leak check
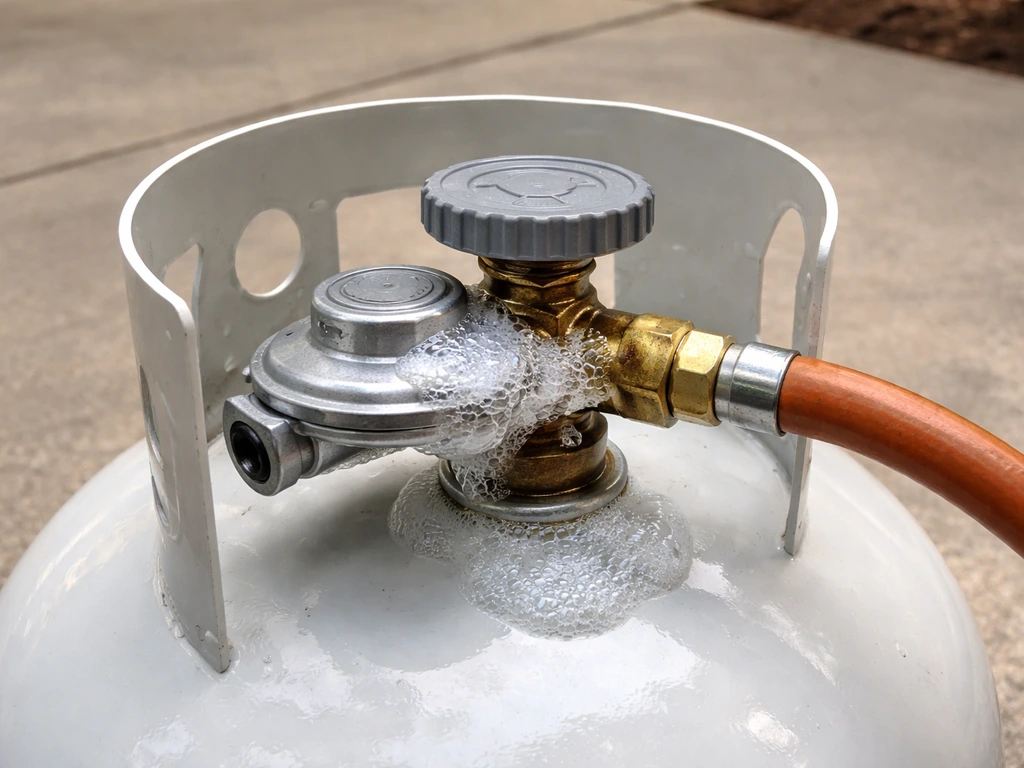
Connect your propane cylinder to the regulator hand-tight, then do a soap-and-water leak check before lighting anything. The manual specifies mixing one part liquid dish soap with three parts water to make about 2 to 3 ounces of leak solution. Apply it at two points: where the hose attaches to the regulator, and where the regulator connects to the cylinder. Open the cylinder valve slowly and watch both spots for 30 seconds. If you see bubbles forming, close the cylinder valve immediately, do not attempt to light the heater, and find and fix the leak before proceeding. A leaking connection on a heater you're about to ignite is genuinely dangerous.
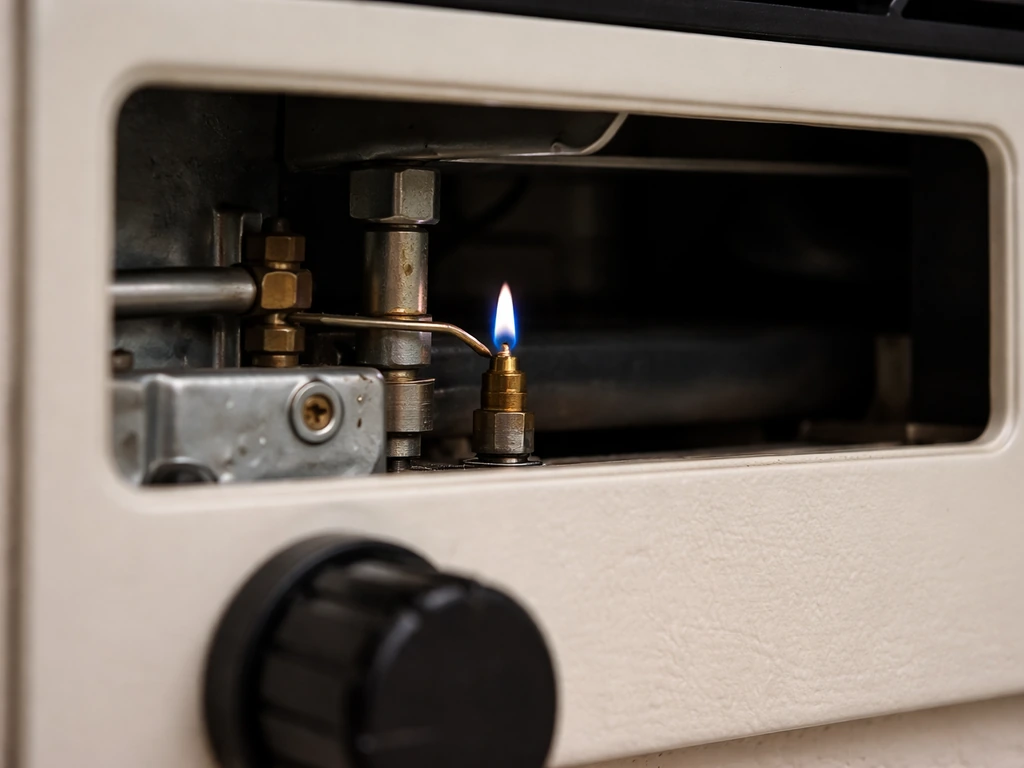
Lighting the heater (standard ignition procedure)
- Open the valve on the propane cylinder.
- Press and turn the variable control knob to the HI position.
- Press the control knob down and hold it depressed, then press the igniter button repeatedly (several times) until the burner head flame ignites.
- Keep holding the control knob down for 10 seconds after the flame lights, then release.
- If this is a new or recently reconnected tank, allow at least one full minute for air to purge from the gas line before trying to light.
- Watch the flame through the viewing hole in the base to confirm it is burning steadily.
- Let the heater run on LO for about 5 minutes before adjusting to your desired temperature.
- If the flame blows out at any point, turn the control knob to OFF, wait at least 5 minutes for gas to fully dissipate, and then restart from step 1. Do not skip the wait. Residual gas near a spark source can ignite explosively.
Troubleshooting failed ignition: spark, igniter, and control valve checks
If you follow the lighting procedure above and nothing happens, work through these checks in order before assuming you need a new part.
No spark at all
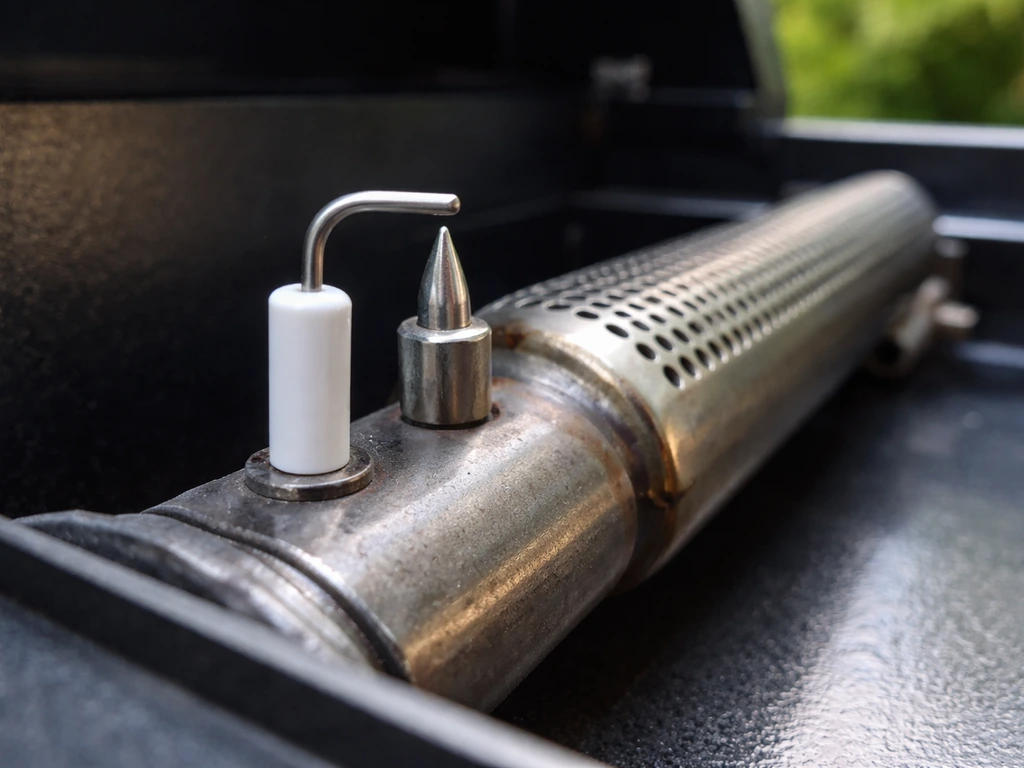
Look at the igniter electrode tip near the burner. It should be clean and positioned about 3 to 4mm from the burner surface. If it's coated in rust, carbon, or debris, clean it carefully with a dry cloth or fine steel wool. The igniter wire can also work loose from vibration during transport or use. Trace it from the push-button igniter down to the electrode and make sure the connection is firm at both ends. If you press the button and hear clicking but see no visible spark, the electrode gap may be too wide or the electrode is cracked and needs replacement.
Spark present but burner won't ignite
The Sunjoy troubleshooting table points to two main causes here. First, the burner injector may be clogged. The injector is a small brass orifice that meters gas into the burner tube. Dirt, spider webs, and dried debris can partially or fully block it. Turn off and disconnect the gas, remove the burner assembly per your model's manual, and inspect the injector. A clogged injector can often be cleared with compressed air (never use a wire or pin, as you'll enlarge the orifice and change the gas/air ratio). Second, the main burner carryover ports can clog. These are the small holes that allow the flame to travel from the pilot area across the burner. Clean these with compressed air as well.
Also check that gas is actually flowing. Open the cylinder valve fully, confirm the regulator is properly seated, and make sure the control knob is pressed down firmly (releasing it prematurely cuts gas flow). If you replaced an empty tank, remember the one-minute air-purge rule before expecting ignition.
Delayed ignition
If there's a noticeable lag between clicking the igniter and when the flame actually catches, the most common cause is a partially clogged injector or carryover ports, as described above. Gas is getting through but slowly, so it takes a few seconds to build enough concentration near the igniter. Clean the injector and ports, and the delay usually disappears.
Troubleshooting won't stay lit: thermocouple, gas flow, and safety shutoff
The heater lights but dies within a few seconds of releasing the control knob. This is almost always the thermocouple. The thermocouple is a small temperature-sensing probe positioned in the flame path. When the flame heats it, it generates a tiny voltage that holds the gas valve open. If the thermocouple is faulty, coated with oxidation, or not positioned correctly in the flame, that signal drops and the valve closes as a safety measure.
Thermocouple checks
- Turn off and disconnect gas. Let the heater cool completely.
- Locate the thermocouple tip, which should sit directly in the path of the pilot or burner flame. If it has shifted position, gently bend it back so the tip is inside the flame envelope.
- Inspect the tip for heavy carbon buildup or corrosion. Light oxidation can be cleaned with fine steel wool or emery cloth. Heavy scaling usually means the thermocouple needs replacement.
- Check the thermocouple connection at the gas valve. It screws in finger-tight plus a quarter turn. A loose connection gives the same 'lights then dies' symptom as a failed thermocouple.
- If cleaning and repositioning don't fix it, replace the thermocouple. It's a straightforward part swap and typically costs under $15 for a compatible universal unit. Match the length and connection type to your model's manual diagram.
Low gas pressure and supply issues
The Sunjoy troubleshooting table lists 'low gas supply pressure' as a cause for the flame going out immediately after ignition, with the recommended action being to call your gas supplier. This is worth taking seriously. A nearly empty tank, a frozen regulator on a cold day, or an undersized regulator can all produce this symptom. Check the tank weight (a standard 20lb propane cylinder weighs about 37 lbs when full and 17 lbs empty). Also check that the supply hose isn't bent, kinked, or twisted. A bent hose restricts flow enough to cause a low, unstable flame that trips the thermocouple. Straighten it, then perform a leak test as described above before relighting.
Inadequate combustion and air supply
If the heater stays lit but the flame looks weak, yellow, or produces soot, the troubleshooting table points to insufficient air reaching the burner. Check that the air passageways and burner ports aren't blocked by dirt, dust, or debris. Use compressed air to blow through them. Don't operate the heater if you see black spots accumulating on the burner mesh or reflector, or if flames are extending beyond the mesh. The manual is direct on this point: turn the heater off and don't use it again until it has been serviced.
Fixing the tilt/auto-shutoff switch and safety sensor problems
Every current Sunjoy standing and offset propane heater (including the A306004300, A306007600, and A306007400) includes a safety auto-shutoff tilt valve. This is a mercury or ball-bearing switch in the base that cuts gas flow if the heater tips over. It's a genuine safety feature, but it also causes frustrating false shutoffs when it gets out of alignment, collects debris, or when the heater is used on uneven ground.
If your heater keeps shutting off even though it hasn't tipped, start here:
- Turn off the gas and let the heater cool. Place it on a known flat, level surface (use a level tool if needed). Even a 2 to 3 degree lean can trip a sensitive tilt switch.
- Check the base for debris. The switch mechanism sits inside the base housing. Dirt, moisture, or rust buildup around the switch can cause it to trip at minor vibrations. Remove the base cover (usually 3 to 4 screws) and inspect the switch assembly.
- Look for a ball-bearing style switch: a small metal ball that sits in a cup. If the ball is corroded or the cup is dirty, clean both with a dry cloth. Do not use oil or lubricants on the switch contacts.
- Check that the switch wire connections are secure at both the switch terminal and the gas valve. A loose wire causes intermittent shutoffs that feel random.
- If the switch physically rattles, feels loose, or fails to reset after cleaning, the switch itself needs replacement. Order the part specific to your Sunjoy model using the parts diagram in your manual.
- Never bypass or disable the tilt switch. It exists to cut gas if the heater falls over. Bypassing it on a propane heater is a serious fire and explosion risk.
Gas odor when the control knob is in the OFF position is a separate but related concern. The Sunjoy troubleshooting table identifies two causes: an active gas leak (locate and correct immediately) or a defective gas control valve (replace the gas control). If you smell gas with the knob off and no connections are loose or leaking, the valve itself has failed internally and needs replacement by a qualified technician. Do not continue using the heater.
Maintenance and cleaning to prevent repeat failures
The Sunjoy manual sets a clear service interval: every 100 hours of use or annually, whichever comes first. Most homeowners hit the annual threshold before they hit 100 hours, so a once-a-year check at the start of patio season covers it. Here's what that maintenance visit should include.
Annual maintenance checklist
- Disconnect the propane tank before doing anything else. This is non-negotiable.
- Visually inspect the burner head and emitter screen for spider webs, insect nests, rust, and carbon buildup. These are the most common cause of clogged injectors and ports.
- Clean burner ports and air passageways with compressed air. A can of canned air works; a small compressor is better.
- Wipe down the reflector and emitter screen with a dry cloth. Do not use water on hot surfaces and do not use chemical cleaners on the burner components.
- Inspect the hose and regulator for cracks, kinks, or brittleness. Propane hoses degrade over time. If yours is more than 5 years old or shows visible cracking, replace it.
- Check all gas connection points and re-do the soap-and-water leak test when you reconnect the tank at the start of each season.
- Test the tilt switch by gently rocking the heater while lit (with a partner spotting) to confirm the shutoff activates.
- Check the igniter electrode position and clean the tip if needed.
- Inspect the thermocouple tip for corrosion and verify it's correctly positioned in the flame path.
Storage
When storing for the off-season, disconnect and remove the propane tank and store it outdoors in a ventilated area, never indoors or in an enclosed garage. Cover the heater with a weatherproof cover to keep moisture and insects out of the burner assembly. Do not store the heater with the tank connected, and keep it away from any ignition sources during storage.
When to stop DIY and call for service
Some situations are beyond reasonable DIY scope, and the Sunjoy manual is honest about this. If you smell gas with the valve closed, if flames extend beyond the burner mesh, if you see flame lift-back or flashback, or if black soot is accumulating on the reflector, stop using the heater and contact a local authorized service agent. The same applies if you've replaced the thermocouple and the heater still won't stay lit, or if the gas control valve appears to be internally leaking. Gas valve internals are not a DIY repair. Similar boundaries apply to other brand heaters in this category, whether you're working on an Endless Summer, Garden Treasures, Fire Sense, or another standing propane heater. For the correct endless summer patio heater manual, match the exact model number on your unit and use it to find the right PDF for lighting, regulator setup, and troubleshooting. The diagnostics are similar across brands, but always follow the manual specific to your exact model.
Parts should be sourced through Sunjoy's authorized channels or a reputable parts supplier that lists your exact model number as compatible. Using off-brand regulators, valves, or hose assemblies that aren't rated for your heater voids the safety certifications and can create new hazards. If Sunjoy no longer supports your model and you can't source the part, that's a legitimate signal to replace the heater rather than improvise a fix on a gas appliance.
FAQ
Where exactly do I find the sunjoy patio heater manual model number if the label is unreadable or rusted?
Check the rating plate locations the article mentions (base of the pole, back of the emitter housing, underside of the burner assembly) and also look for a second sticker on the regulator housing or the underside of the control panel cover. If all labels are damaged, use your original purchase receipt listing the item number, then match that string to the PDF. Don’t guess based on BTU alone, because BTU can be shared across different valve and ignition variants.
Can I use a different Sunjoy PDF if my heater lights but the symptoms keep changing?
If the manual’s troubleshooting table does not match your exact problem pattern, stop using it and re-verify the item number on the label. Different models can share parts that look similar but have different electrode gaps, carryover port layouts, or regulator requirements, so using the wrong procedure can lead to repeated cycling and soot buildup.
What should I do if the leak test shows bubbles only during or after I loosen and re-tighten the regulator?
That usually indicates an imperfect seal or a damaged regulator or hose fitting (the O-ring or connection surface). Close the cylinder, vent the area, and do not light. Replace any worn regulator connection components specified by your model’s parts diagram, then repeat the two-point soap solution leak check before trying again.
My igniter clicks and I see a faint glow, but there is no sustained flame. How do I tell if it is a gas-flow issue or an electrical gap issue?
Run the sequence in the article order, then focus on timing. If clicking starts but flame takes several extra seconds, it points to slow gas delivery (often injector or carryover ports). If there is absolutely no gas-related ignition at all, re-check the electrode position and gap (about 3 to 4 mm per the manual) and confirm the control knob is fully pressed down for gas flow.
Is it safe to try to light the heater multiple times if it fails to stay on?
You can repeat the attempts only after correcting the likely cause from the troubleshooting table, because repeated ignition attempts with a failing thermocouple can dump unburned gas into the air. If it dies within seconds after releasing the knob, treat that as a thermocouple signal problem, clean/position it per the manual, and perform a fresh leak check if anything was adjusted.
What’s the “one-minute air-purge rule,” and do I always need to wait it out?
It applies after changing an empty propane tank because air in the line delays proper gas concentration at ignition. If you already had a connected tank previously and it still requires long waits, that suggests restricted flow (kinked hose, regulator seating issue, or partially clogged injector/ports) rather than normal air purge.
How can I confirm the safety auto-shutoff tilt valve is causing the shutdown and not a thermocouple or gas-control issue?
If it shuts off immediately and the heater is on uneven ground, adjust leveling and re-test. Also verify the thermocouple-related symptom pattern from the article (dies right after knob release). If leveling fixes it consistently, the tilt valve alignment is likely the cause. If it still shuts off after leveling, proceed with thermocouple and gas-flow checks.
If the flame is weak or yellow, can I keep using it while I clean ports and air passages?
No. The article notes to turn the heater off if you see soot accumulation or flame behavior beyond the burner mesh, and not resume use until service is completed. Weak yellow flame plus soot can indicate incomplete combustion, which increases the chance of unsafe byproducts and further clogging.
What if I smell gas when the knob is OFF but I cannot find any leaks at the hose or regulator connections?
If gas odor persists with the valve in OFF and the external connections are not leaking, the troubleshooting logic points to an internal gas control valve failure. Stop using the heater and have a qualified technician replace the gas control valve. Do not keep testing with repeated lighting attempts, because the risk is internal leakage into the burner area.
How often should I check and clean the igniter electrode and burner carryover ports beyond the 100-hour or annual service?
Use the 100-hour/annual interval as the minimum, then add quick visual checks whenever you notice performance changes (delayed ignition, yellow flame, soot, or weak carryover). If you store the heater covered but in a humid or insect-heavy area, check sooner, because debris and oxidation can affect the electrode gap and the injector/ports between services.
When should I stop DIY work and switch to replacing the heater if parts are unavailable?
If your model’s parts are no longer supported and you cannot source an exact compatible regulator, hose assembly, thermocouple, or valve for that item number, the article suggests replacement rather than improvising. The decision point is when you would otherwise use an off-brand or unverified rated component, because that can void safety certifications and create new leak or combustion hazards.