
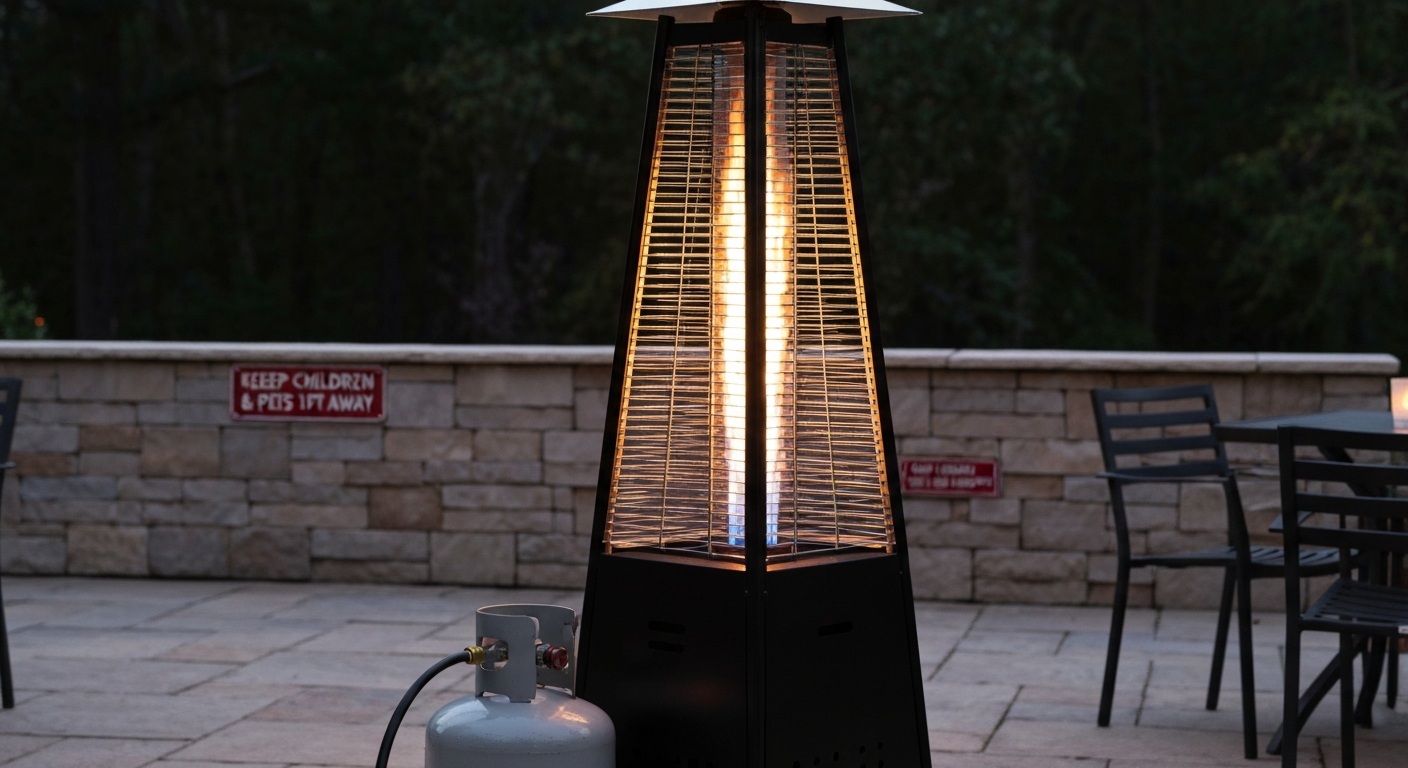
The Thermo Tiki outdoor propane patio heater (model HEATER-FLR-PH650-BLK, ASIN B00D3P0P5Y) does not have a dedicated manufacturer support website, so finding the manual, sourcing parts, and troubleshooting common faults all fall on you. The good news is that this pyramid-style floor heater follows the same propane appliance conventions as most name-brand units, and the repairs most people need, thermocouple replacement, tilt-switch testing, spark electrode service, are genuinely DIY-friendly with the right steps and a little patience.
Thermo Tiki Outdoor Propane Patio Heater Manual & DIY Guide

Grant Mercer
24 Jul 2026
What this guide covers and who it's for
This is a hands-on manual for homeowners and DIYers who want to assemble, set up, diagnose, and repair a Thermo Tiki propane patio heater without paying for a service call. I've structured it like a workshop session: safety first, then assembly, then first-fire setup, then fault-by-fault troubleshooting, then maintenance and storage. I treat this heater as a repairable appliance, not a disposable one, because that's exactly what it is. If you've landed here with a different brand, the same structure applies, other guides on this site cover the Cuisinart tabletop patio heater, Bali Outdoors portable heater, Belleze, and similar units.
One honest caveat upfront: I'll tell you clearly when a repair crosses the line from DIY-appropriate into professional territory. Propane is not forgiving of shortcuts, and some jobs, manifold repairs, gas valve internals, any work requiring leak-testing of a repaired connection you're uncertain about, belong with a qualified LP technician.
Safety first: PPE, gas rules, and immediate shutdown
Before you touch a fitting, read this section completely. Propane is heavier than air, which means it pools at ground level and can ignite from a source you can't see. The Thermo Tiki is designed for outdoor use only, never operate it in a garage, enclosed porch, tent, or any space without full open-air ventilation. This is not a legal technicality; it's a carbon monoxide and explosion risk.
Required PPE and workspace rules
- Safety glasses: wear them any time you're working near the burner assembly, tightening gas fittings, or performing a leak test.
- Nitrile or latex gloves: protect hands from sharp sheet-metal edges on the reflector and emitter screen.
- Closed-toe shoes: a 40-lb heater falling during assembly causes serious foot injuries.
- Work in daylight or with a battery-powered work light — never use an open-flame light source near propane connections.
- Have a working ABC-rated fire extinguisher within arm's reach during first-fire tests.
- Keep children and pets at least 10 feet away during assembly and initial lighting.
Gas safety rules that are non-negotiable
- Never test for leaks with an open flame. Use soapy water or a commercial leak-detection solution only.
- If you smell gas at any point: shut the valve on the propane cylinder immediately (clockwise), move away from the area, do not operate any electrical switches or devices (including phones), and call your propane supplier or 911 from a safe distance.
- Always turn the cylinder valve fully off before disconnecting the regulator.
- Follow NFPA 58 (the Liquefied Petroleum Gas Code) and your local fuel-gas code for installation and leak-testing requirements.
- The Thermo Tiki is governed by ANSI Z21.97, the US standard for outdoor decorative gas appliances. The manual's clearance and operating requirements reflect that standard.
- Maintain a minimum clearance of 36 inches (91 cm) from all combustibles on every side of the heater. Verify the exact clearance in your model's manual, as specifications can vary.
Immediate shutdown checklist
- Turn the control knob to OFF.
- Close the propane cylinder valve fully (clockwise until snug — do not overtighten).
- Allow the heater to cool completely before touching the emitter, reflector, or burner assembly.
- If the heater has tipped over, do not attempt to relight until you've inspected the tilt switch and all gas connections.
- If you suspect a gas leak and cannot confirm the source, do not relight — call a qualified LP technician.
Finding your Thermo Tiki model number and getting the right manual
Thermo Tiki does not operate a manufacturer support portal, so you will not find a PDF on an official brand website. The primary confirmed model is HEATER-FLR-PH650-BLK (Amazon ASIN B00D3P0P5Y), and its owner's manual is available through third-party manual aggregators. See the Tall Mocha Mainstays patio heater manual for a similar assembly and parts diagram. The most reliable source I've found is manuals.plus, which hosts a scanned version of the original document including safety warnings, assembly steps, product specs, and basic troubleshooting.
Step-by-step manual lookup
- Check the sticker on the base of your heater. The model number is usually on a label near the base plate or the gas valve housing — write it down exactly as printed.
- Search the exact model number (e.g., HEATER-FLR-PH650-BLK) in a search engine followed by the word 'manual' or 'PDF'.
- Try manual aggregator sites: manuals.plus, manualslib.com, and manualmachine.com all index propane appliance manuals from retailer-submitted PDFs.
- If your label shows a different SKU, search the Amazon ASIN (found in the product URL when you look up your unit) — the retailer listing often links to or hosts the manual PDF.
- As a fallback, contact the retailer you purchased from. Many large online retailers (Amazon third-party sellers, Ubuy, etc.) retain the original manual PDF and will email it on request.
- If you still cannot locate a model-specific manual, the HEATER-FLR-PH650-BLK manual covers the core assembly and safety procedures for this heater family and is the best available substitute.
Once you have the PDF, save a local copy. Manual archive links go dead, and you'll want to reference the parts diagram during any repair session without depending on an internet connection.
Tools and materials to have ready before you start
You don't need a specialty toolkit for this heater. Everything here is available at a hardware store or online. Having the right supplies before you start prevents the frustrating mid-assembly run to the store.
| Item | Why you need it | Notes |
|---|---|---|
| Adjustable wrench (8" or 10") | Tightening regulator nut and all gas fittings | Do not use pliers — they round off brass fittings |
| Flathead and Phillips screwdrivers | Fastening base bolts, hood screws, and guard clips | Magnetic tip saves dropped screws inside the pole |
| Needle-nose pliers | Positioning thermocouple tip, handling small clips | — |
| Digital multimeter (millivolt-capable) | Testing thermocouple and thermopile output | Must read down to single mV; most $15+ meters do |
| Soap-bubble leak-test solution (non-ammoniated) | Leak testing all gas connections | Ammoniated solutions attack brass — use specifically labeled leak-test fluid |
| Small soft-bristle brush | Applying leak solution to fittings | A cheap paintbrush works fine |
| Thread-seal tape (PTFE, yellow gas-rated) | Sealing any threaded pipe joints if you disassemble them | Only yellow gas-rated tape — white plumber's tape is not rated for gas |
| Replacement thermocouple (universal 24" lead) | On-hand for the most common failure part | Match the thread size to your existing fitting before ordering |
| Replacement spark electrode/ignitor module | If spark fails and module tests faulty | Note the ceramic insulator size and wire connector type |
| Tilt switch / dump switch (FD4-style) | On-hand if tilt-switch fault is suspected | FD4-style switches are widely available and inexpensive |
| New propane hose-and-regulator assembly (type 1 POL or QCC1) | If the existing hose shows cracking or age damage | Replace the whole assembly — never patch a propane hose |
Unboxing and checking your parts
Before you assemble anything, lay every part out on a clean flat surface and compare it against the parts list in your manual. The Thermo Tiki HEATER-FLR-PH650-BLK typically ships with the base unit (with wheels), lower pole section, upper pole section, burner/valve assembly, emitter screen, reflector hood, decorative cap, and a hardware bag. Don't assume all hardware is present just because the box looks intact, shipping damage and missing hardware both happen.
What to inspect before assembly
- Inspect the hose for any kinks, cuts, abrasions, or signs of rodent damage. If it arrived damaged, do not use it — order a replacement before proceeding.
- Check the regulator inlet for any damaged threads or debris in the fitting.
- Examine the burner venturi (the metal mixing tube beneath the burner) for packing material or debris that may have been pushed in during shipping.
- Verify the thermocouple tip is straight and the probe hasn't been bent sharply — a kinked thermocouple will fail quickly.
- Check the emitter screen and reflector for deep dents; minor cosmetic dents are acceptable, but a reflector badly warped out of shape will reduce heat output noticeably.
- Document any damage with photos before assembly if you intend to file a claim with the retailer.
Step-by-step assembly
The Thermo Tiki PH650 assembles from the base up. Work on a flat, stable surface. Have a helper available if possible, holding the upper pole sections while threading fasteners is much easier with two people.
1. Base and lower pole
- Set the base on a level surface and attach the wheels if they're shipped separately, using the provided fasteners.
- Insert the lower pole section into the base collar and align the mounting holes.
- Thread the bolts through the collar and pole, then tighten firmly but do not overtighten — you're threading into aluminum or steel, not a wood post, and stripping the threads here creates a serious stability problem.
- Verify the base is stable and the pole stands plumb before continuing.
2. Upper pole and burner assembly
- Route the gas supply hose through the pole sections before joining them — you cannot thread the hose through after assembly.
- Connect the upper pole to the lower pole and secure with the provided bolts.
- Mount the burner/valve assembly to the top of the upper pole. The gas fitting on the hose connects to the valve inlet — hand-tighten first, then snug with an adjustable wrench (do not over-torque brass fittings).
- Confirm the thermocouple lead wire and ignition wire are routed cleanly and are not pinched by the pole sections.
3. Reflector, emitter screen, and guard
- Attach the reflector hood to the burner assembly frame using the provided screws or clips. The reflector should sit level and centered over the emitter.
- Install the emitter screen (the mesh or perforated plate above the burner) — this protects the flame from wind and is a critical safety component; do not omit or modify it.
- Fit the wire guard or safety cage around the emitter screen. This is what prevents accidental contact with the hot emitter surface and is required for safe operation.
- Install the decorative finial cap at the very top.
- Do a final wiggle test on every section — nothing should feel loose or wobbly before you connect gas.
Fastener tips
- Use a drop of medium-strength thread locker (blue Loctite) on structural bolts if you plan to move the heater frequently — vibration during transport loosens them over time.
- Keep the hardware bag sorted by stage; mixing M6 and M8 bolts wastes time and damages threads.
- If a bolt will not thread in smoothly, stop and inspect for cross-threading rather than forcing it.
Connecting the propane cylinder
Choosing the right cylinder
The Thermo Tiki PH650 is designed to run from a standard 20 lb (4.73-gallon) propane cylinder, the same type used for most gas grills. Do not use a 1 lb disposable camping canister; the regulator and hose assembly on this heater is sized for a full-size QCC1 (Type 1) tank fitting. A 20 lb cylinder gives you roughly 8 to 10 hours of runtime at full output, depending on ambient temperature (cold weather reduces tank pressure and output).
Regulator types and pressure
Your Thermo Tiki ships with a regulator. Unless that regulator is damaged, use the OEM-supplied unit, it is pre-set for the correct outlet pressure. For reference, propane appliances like this heater operate at approximately 11 inches water column (roughly 0.4 psi) at the appliance inlet. If you ever need to replace the regulator, purchase a two-stage propane regulator rated for 11" W.C. output that fits QCC1/Type 1 tank connections. Do not use a high-pressure regulator, you will exceed the design pressure of the valve and create a hazardous condition.
Connecting the hose and regulator
- Make sure the cylinder valve is fully closed before connecting.
- Thread the QCC1 regulator nut onto the cylinder outlet — this is a standard right-hand thread. Hand-tighten, then snug with an adjustable wrench. Do not use PTFE tape on QCC1 connections; the fitting seals on an O-ring.
- Connect the other end of the hose to the heater's gas inlet valve. This connection is typically a flare fitting — use an adjustable wrench to tighten firmly (hand-tight plus about a quarter turn).
- Inspect the hose for kinks or sharp bends before opening the valve — a kinked hose restricts flow and can starve the burner.
- Do not open the cylinder valve yet — perform a leak test first (see the next section).
Leak testing the system
This is the most important step of first-time setup. A leak test takes five minutes and can prevent a fire or serious injury. Perform this test after every assembly, after every tank change, and after any repair that involves disconnecting a gas fitting. This is standard practice per NFPA 58 and is specified in propane appliance installation guidance across every major manufacturer.
Static (pre-ignition) soap-bubble test
- Make sure the heater control knob is in the OFF position.
- Apply your non-ammoniated leak-detection solution or soapy water generously to every gas connection: the regulator-to-cylinder connection, the hose-to-regulator connection, the hose-to-heater valve connection, and any additional fittings in the gas path.
- Slowly open the cylinder valve fully (counterclockwise). Do not light anything yet.
- Watch every connection point for 30 seconds. Any bubble formation — no matter how small — indicates a leak.
- If no bubbles appear after 60 seconds, the static test is passed.
- Close the cylinder valve and note the results.
Dynamic (under-flow) test
- Re-open the cylinder valve fully.
- Turn the control knob to the pilot/ignition position (do not ignite yet) to allow gas to flow through the valve body.
- Re-apply leak solution to all connections and the valve body itself.
- Watch for bubbles for 30 to 60 seconds.
- If no bubbles appear, proceed to lighting. Close the valve and dry the fittings before igniting.
If you detect a leak
- Do not attempt to ignite the heater.
- Close the cylinder valve immediately.
- If the leak is at a threaded fitting: disconnect, inspect the threads for damage, apply yellow gas-rated PTFE tape, and reconnect. Re-test.
- If the leak is at a flare fitting: tighten an additional quarter turn and re-test. Do not over-tighten.
- If the leak is at the hose body, the regulator body, or any point you cannot resolve by tightening: replace the component. Do not use a leaking hose or regulator.
- If you cannot locate or stop the leak: leave the cylinder valve closed, move the cylinder to an open outdoor area away from ignition sources, and call a qualified LP technician or your propane supplier.
First lighting: normal operating procedure
With your leak test passed and the heater positioned at least 36 inches from any combustible material on a stable, level surface, you're ready for first fire. The Thermo Tiki uses a push-and-hold piezo ignition with a thermocouple safety system. Understanding how the thermocouple works makes the lighting procedure make sense: the thermocouple is a heat-sensing probe in the pilot flame. Until it reaches operating temperature, it tells the gas valve to stay closed. This is why you must hold the knob in for a sustained period after the pilot lights.
- Open the cylinder valve fully.
- Push the control knob in and turn it to the pilot symbol (or the lowest setting, per your manual).
- While holding the knob depressed, press the piezo ignitor button repeatedly until the pilot lights — you should see a small blue flame at the pilot assembly.
- Continue holding the control knob in for 30 seconds after the pilot lights. This gives the thermocouple time to heat up and signal the valve to stay open.
- After 30 seconds, slowly release the knob. If the pilot stays lit, turn the knob to your desired heat setting.
- If the pilot goes out when you release the knob, repeat from step 2. If it fails after three attempts, move to the thermocouple diagnostics section below.
Diagnosing and fixing common faults
Fault 1: Heater won't light at all (no spark)
If you press the ignitor and hear no click or see no spark, start simple before replacing anything.
- Check that the cylinder valve is open and the tank is not empty. A cold, low tank can drop pressure enough to prevent ignition.
- Inspect the spark electrode tip. It should be positioned about 3 to 4 mm from the pilot burner. If it's bent out of position, carefully bend it back using needle-nose pliers.
- Look at the ceramic insulator around the electrode. Cracks in the ceramic allow the spark to ground out before it reaches the pilot — a cracked insulator means the electrode needs replacing.
- Check for moisture or debris at the electrode tip. Dry it with a cloth and try again.
- If the electrode is clean and correctly positioned but still produces no spark: test the piezo module. Disconnect the wire from the electrode and hold it 3 to 4 mm from a metal ground while pressing the ignitor — if no spark jumps, the piezo module is faulty and needs replacement.
- Replacement piezo/ignitor modules for patio heaters are inexpensive and widely available. Match the connector type and thread size of the original.
Fault 2: Pilot lights but won't stay lit (thermocouple failure)
This is the most common fault on any standing-pilot propane heater, including the Thermo Tiki. The thermocouple generates a small DC voltage (roughly 20 to 30 millivolts on a healthy unit) when its tip is in the flame. If the voltage is too low, the gas valve closes and the pilot dies the moment you release the control knob.
- First, verify the pilot flame is actually touching the thermocouple tip. A weak or misaligned pilot that doesn't impinge on the sensor is a common cause of this symptom — and it's an easy fix. Look at the flame with the pilot lit: the thermocouple tip should be bathed in the blue inner flame, not just in the outer envelope.
- Check that the thermocouple fitting at the gas valve is tight — hand-tight plus a quarter turn. A loose fitting increases resistance and reduces the voltage the valve sees.
- Hold the control knob in for the full 30 seconds. If you've been releasing it at 10 to 15 seconds, the thermocouple may simply not have reached operating temperature.
- If the above steps don't fix it: test the thermocouple with a digital multimeter set to millivolts (DC). Connect the meter leads to the thermocouple's two terminals at the valve connection and light the pilot while holding the knob in. After 30 seconds, a healthy thermocouple should read approximately 20 to 30 mV. A reading below 10 to 12 mV indicates a failing thermocouple that needs replacement.
- Replace with a universal 24-inch thermocouple of matching thread size. Thread the new unit into the valve fitting (hand-tight plus a quarter turn) and position the tip in the pilot flame path. Re-test.
Fault 3: Heater shuts off on its own (tilt switch / tip-over switch)
The Thermo Tiki is fitted with a tip-over safety switch (commonly an FD4-style mechanical dump switch) that cuts gas flow if the heater leans beyond a safe angle. This is a genuine safety device, do not bypass it. But it can also trigger incorrectly due to wear, debris, or a heater placed on an uneven surface.
- First, check placement. Place the heater on a truly level surface. Even a small slope can keep the tilt switch in a partially triggered state, causing intermittent shutoff.
- Locate the tilt switch — on most units it's near the base, connected in series with the thermocouple circuit. Consult your manual's wiring diagram for the exact location.
- With the cylinder valve closed, gently rock the heater side to side and listen for a mechanical click from the switch. You should hear it click in and out as the heater tilts and returns to level. If there's no click in either direction, the switch may be stuck or failed.
- To test the switch with a multimeter: set the meter to continuity or resistance, disconnect the switch leads, and probe the switch terminals. With the heater perfectly level, the switch should show continuity (closed circuit). Tilted beyond its threshold, it should show open circuit (no continuity).
- If the switch shows open circuit while the heater is level, the switch has failed in the open position and needs replacement. FD4-style dump switches are available as replacement parts from patio heater parts suppliers.
- Replace the switch by matching wire gauge and connector type, route the leads so they are not pinched, and re-test before relighting.
Fault 4: Low heat output or uneven flame
- Check tank level first. A low propane tank delivers reduced pressure, especially in cold weather, resulting in a weak flame.
- Inspect the burner ports (the small holes in the burner ring) for spider webs, dirt, or oxidation. Clean with a stiff wire brush or a can of compressed air with the cylinder valve closed and the heater cool.
- Check the venturi tube (the mixing tube below the burner) for blockage — spiders particularly love this tube in outdoor appliances. Clear it with a pipe cleaner or compressed air.
- Confirm the regulator is functioning correctly. A failing regulator can under-deliver pressure. If you have access to a manometer, verify outlet pressure is near 11 inches W.C. under light load.
- If output is still low after the above steps, the gas valve may be partially clogged or failing — this is a professional service item.
Fault 5: Thermopile (if fitted)
Some Thermo Tiki variants use a thermopile rather than a single thermocouple. A thermopile is a series of thermocouples generating significantly higher voltage, typically 125 to 350 mV or more, and is often used to power an electronic gas valve or remote control system. If your unit has a thermopile, the diagnostic approach is the same as for a thermocouple (millivolt test with a meter), but the healthy output threshold is much higher. Consult your specific manual for the minimum acceptable thermopile voltage for your valve type. A thermopile reading below the minimum indicates replacement is needed, and the procedure is identical to thermocouple replacement.
Parts, schematics, and ordering replacements
Because Thermo Tiki does not operate a dedicated parts portal, sourcing replacements requires a slightly different approach than for OEM-supported brands. The key is matching part specifications, not necessarily part numbers. For example, interactive exploded views and parts lists such as the PartStore interactive exploded view / parts list example (GE/retailer parts portal) show how retailer portals present diagrams and ordering information to match part specifications.
- Start with your manual's parts list and exploded view diagram. The diagram shows part names and positions — use the component description (e.g., 'thermocouple probe, M9x1 thread, 24-inch lead') rather than a proprietary part number when searching.
- Search patio heater parts retailers using the description. Sites like PartStore and dedicated patio heater parts suppliers carry universal and cross-compatible components for most floor-standing propane heaters.
- For the gas valve itself: note the brand and model number stamped on the valve body. Gas valve manufacturers (like SIT, Honeywell/Resideo, and similar) sell valves with standard interface dimensions, and their part numbers can be cross-referenced.
- For hose and regulator assemblies: match the inlet connection (QCC1/Type 1 for standard 20 lb cylinders), the hose length, and the outlet pressure rating (11" W.C. for this application).
- Amazon product listings for your ASIN (B00D3P0P5Y) sometimes list compatible accessories and replacement parts in the 'Customers also bought' or 'Sponsored products' sections — a practical starting point.
- When in doubt: bring the failed part to a gas appliance parts supplier in person. A knowledgeable counter person can cross-reference on the spot.
Routine maintenance schedule
Most Thermo Tiki problems I see are caused by deferred maintenance. A 30-minute checkup at the start and end of each heating season prevents the majority of ignition failures and unplanned shutoffs.
| Task | Frequency | What to check |
|---|---|---|
| Visual inspection of hose and fittings | Before each use | Cracks, abrasions, kinks, loose fittings |
| Leak test | After every tank change, after any repair | All gas connections — soap bubble test |
| Burner port cleaning | Start and end of season | Clear debris, spider webs, oxidation from ports |
| Venturi tube inspection | Start and end of season | Blockage from insects or debris |
| Thermocouple tip inspection | Start of season | Oxidation, physical damage, correct positioning in pilot flame |
| Electrode gap check | Start of season | 3 to 4 mm gap; no cracks in ceramic insulator |
| Tilt switch function test | Start of season | Continuity test as described in fault 3 above |
| Reflector cleaning | Monthly during use | Wipe with damp cloth — do not use abrasives |
| Structural fasteners | Start of season | Check all pole bolts for tightness; apply thread locker if loose |
| Regulator/hose replacement | Every 5 years (or if damaged) | Replace entire hose-and-regulator assembly |
Seasonal storage
- Allow the heater to cool completely after last use of the season.
- Close the cylinder valve and disconnect the regulator. Store the propane cylinder outdoors in a well-ventilated area — never store it indoors, in a vehicle, or in an enclosed garage.
- Clean the emitter screen and reflector with a dry cloth to remove carbon deposits, dust, and moisture.
- Inspect and lightly oil any exposed steel fasteners to prevent rust.
- Cover the burner opening with a plastic bag secured with a rubber band to prevent insects from nesting in the venturi tube — this single step prevents a large percentage of 'won't light' calls in spring.
- Store the assembled heater upright in a dry location, or partially disassemble to the base-and-pole level for compact storage.
- Label the hardware bag and keep it with the heater so you don't lose fasteners during storage.
- Before the first use next season: perform the full maintenance checklist above, including a leak test, before lighting.
When to call a professional, and not try to DIY
I believe strongly in DIY repair, but there are clear lines I don't recommend crossing without professional training. The following situations require a qualified LP gas technician:
- Any gas leak you cannot stop by tightening or replacing a hose, regulator, or external fitting.
- Repair or replacement of the internal gas valve mechanism — the valve body is a safety-critical component and is not a user-serviceable part.
- Any damage to the regulator body (cracks, impact damage, corrosion through the housing).
- Suspected manifold or orifice damage from impact or corrosion.
- Any situation where you are not confident the leak test passes cleanly after a repair.
- A heater that has been involved in a fire or heat event — structural integrity and valve condition must be evaluated professionally before reuse.
- Local codes in your area that require a licensed technician for certain gas appliance work — check with your local authority.
Your propane supplier is a practical first call for safety questions. Propane Education & Research Council (Propane.com) provides consumer safety guidance on how to respond if you smell gas, leak‑detection and safe handling advice, PPE recommendations, and when to call your propane supplier. Most suppliers offer basic technical guidance and can refer you to a qualified service technician if the repair is beyond DIY scope.
Finding manuals for other patio heater brands
The manual-lookup challenge with Thermo Tiki is common across many patio heater brands that sell through online retail channels without dedicated support sites. The same aggregator-and-ASIN approach I described above applies to most of them. This site covers step-by-step guides for a range of other brands: if you need to work on a Cuisinart tabletop patio heater, a Bali Outdoors portable model, a Belleze unit, or an Infinity Glo heater, you'll find brand-specific guides here. If you need documentation for that model, check the Infinity Glo patio heater manual for the parts diagram, wiring, and troubleshooting steps. If you need the Cuisinart tabletop patio heater manual, consult the Cuisinart tabletop patio heater manual for model-specific assembly, parts diagrams, and troubleshooting (document ID 0c6ca2c6-8342-45aa-8f2f-41554dbe32e9). The Sunbeam Patio Master manual is also available in the same manual archive, useful if you're cross-referencing parts or procedures. See the belleze patio heater manual for Belleze-specific assembly diagrams and parts lists. The Sunbeam Patio Master and Mainstays tall mocha heater are also covered separately, and if your unit uses a quartz glass tube emitter rather than a standard emitter screen, the quartz glass tube patio heater instruction manual guide addresses the specific differences in that burner type. The diagnostic principles, thermocouple testing, tilt switch service, spark electrode gaps, are consistent across all of these units, so the skills you build on your Thermo Tiki translate directly.
FAQ
What primary document sources must I locate to create an accurate, safety‑first DIY manual for Thermo Tiki outdoor propane patio heaters?
• Official OEM owner/installation manuals and parts schematics for each Thermo Tiki model (ASIN/SKU listings, retailer PDF, manual archive copies). • Exploded parts lists and replacement‑parts diagrams (from retailer parts pages or third‑party parts portals). • Third‑party manual archives and verified retailer product pages when no OEM site exists. • Comparable OEM manuals (Mr. Heater, Summerset, AZ Patio Heaters) for standard procedures and templates when model‑specific details are missing. • Industry standards and codes: ANSI Z21.97 (outdoor decorative gas appliances), NFPA 58 (Liquefied Petroleum Gas Code), and pertinent NFPA guidance (NFPA 1) for safety and installation constraints. • Propane industry safety resources (Propane Education & Research Council) for leak response, PPE and emergency procedures. • Technical reference sources for regulator pressures, manometer testing, thermocouple/thermopile millivolt norms and ignition/ignitor service guidance.
Which specific research questions should be answered about model and manual lookup?
• What are the exact model numbers/ASINs/SKUs for Thermo Tiki heaters being covered? • Where are official/retailer PDFs or manual archive copies for those model numbers located? • Do model manuals include exploded diagrams, parts lists, and specifications (gas inlet size, regulator spec, clearance requirements)? • Is there an OEM support site or authorized parts dealer? If not, which third‑party repositories are trustworthy for downloads?
What must be verified for step‑by‑step assembly and first‑time setup (regulator, hose, leak tests)?
• Confirm OEM assembly sequence and torque/fastening notes from the specific model manual. • Regulator type and outlet pressure required by the model (typical patio heaters use an 11" W.C. regulator unless the manual specifies otherwise). • Correct hose type, length, and LPG fittings (POL vs. OPD 20 lb fitting vs. 1/4" flare, per model). • Leak‑test procedure: use an approved soapy‑water or commercial leak detector on all fittings and the tank connection; never use a flame. • Manometer test procedures for verifying regulator outlet pressure under load, if specified or when diagnosing low fire.
What safety standards and code references must the manual cite and follow?
• ANSI Z21.97 for outdoor decorative gas appliances (design and safety context). • NFPA 58 (Liquefied Petroleum Gas Code) and NFPA 1 for installation, fuel handling, and when professional installation is required. • Propane Education & Research Council guidance for consumer propane safety, odor recognition, and emergency response. • Model‑specific clearance and outdoor‑use warnings taken directly from the manufacturer's manual.
Which diagnostics and stepwise repairs should be researched and included for failed ignition and pilot issues?
• Ignitor/piezo/spark checks: verify spark presence, inspect electrode gap (~3–4 mm), electrode insulation and grounding, continuity of sparker module; document safe replacement steps. • Failed pilot/standing pilot: verify pilot flame shape and position relative to thermocouple/thermopile; stepwise hold‑time test (push‑and‑hold timing per manual); tighten thermocouple nut (hand + 1/4 turn); test millivolt output where applicable. • Thermocouple vs. thermopile testing: expected millivolt ranges for healthy sensors (thermocouple ~20–30 mV; thermopile hundreds of mV depending on valve) and how to measure with a DMM. • Spark/no‑spark troubleshooting sequence: confirm battery or piezo mechanism, inspect wiring and grounding, replace module or electrode as required.
What must be addressed about tilt/anti‑tip safety switches and related faults?
• Identify the model of tip‑over/tilt switch used or confirm the equivalent (e.g., FD4 style) from parts diagrams. • How to safely test the tilt switch (de‑energize gas, test continuity with multimeter at various tilt angles or simulate activation per manual). • Replacement and re‑mounting steps for tilt switch and guidance on verifying correct switch operation after reassembly. • Emphasize never bypassing or defeating tilt/safety devices and calling a professional if the switch is integrated into sealed valve assemblies.