To find the right AZ Patio Heaters manual, locate the model number on your rating plate (usually a sticker on the pole or base), then search ManualsLib for that exact string or download the PDF directly from AZ Patio Heaters' site. Once you have the correct manual in hand, it will walk you through the lighting sequence, thermocouple reset, and safety shutoff procedures specific to your unit. The sections below show you exactly how to do all of that, then how to use those procedures to diagnose and fix the most common failures.
AZ Patio Heaters Manual Guide to Fix Common Issues

Grant Mercer
5 Jun 2026
Identify your exact heater model and which manual you actually need
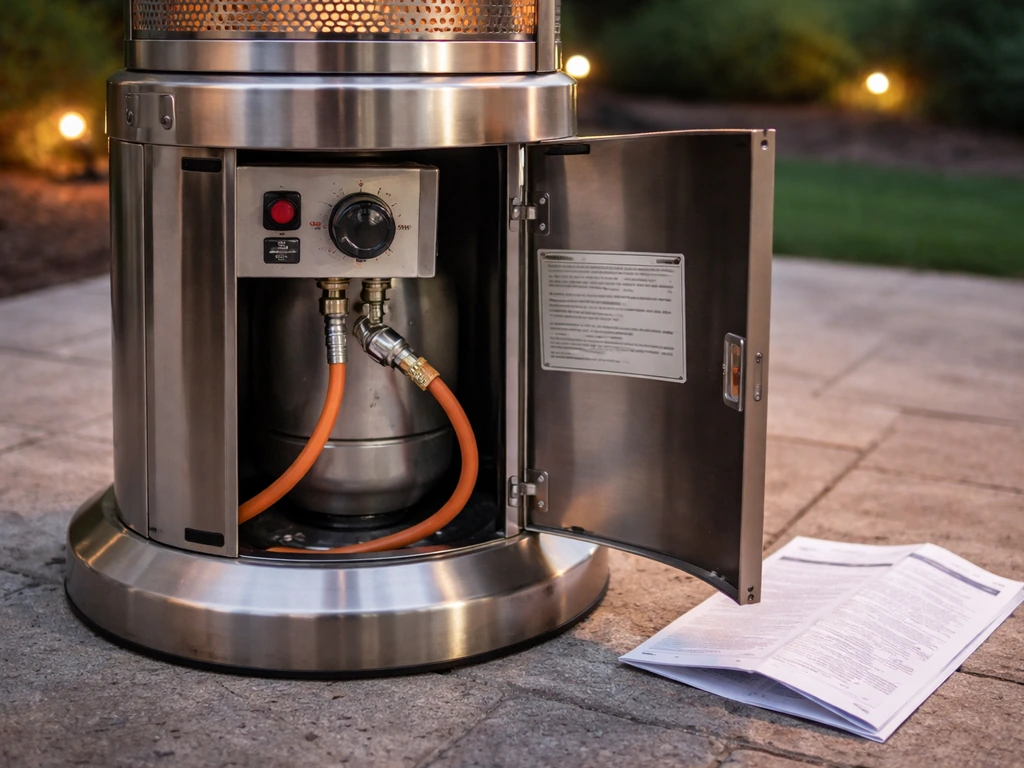
AZ Patio Heaters is the main brand name, but you may also see "Enders" on some units sold in Europe or through certain retailers. They share very similar burner and valve assemblies, but the manuals are not always interchangeable, especially for gas type (propane vs. natural gas) and BTU rating. Before you download anything, find the rating plate on your heater. On most freestanding tower models it is on the lower pole section or on the base panel itself. On tabletop and wall-mount units, check the underside of the burner head or the back of the mounting bracket.
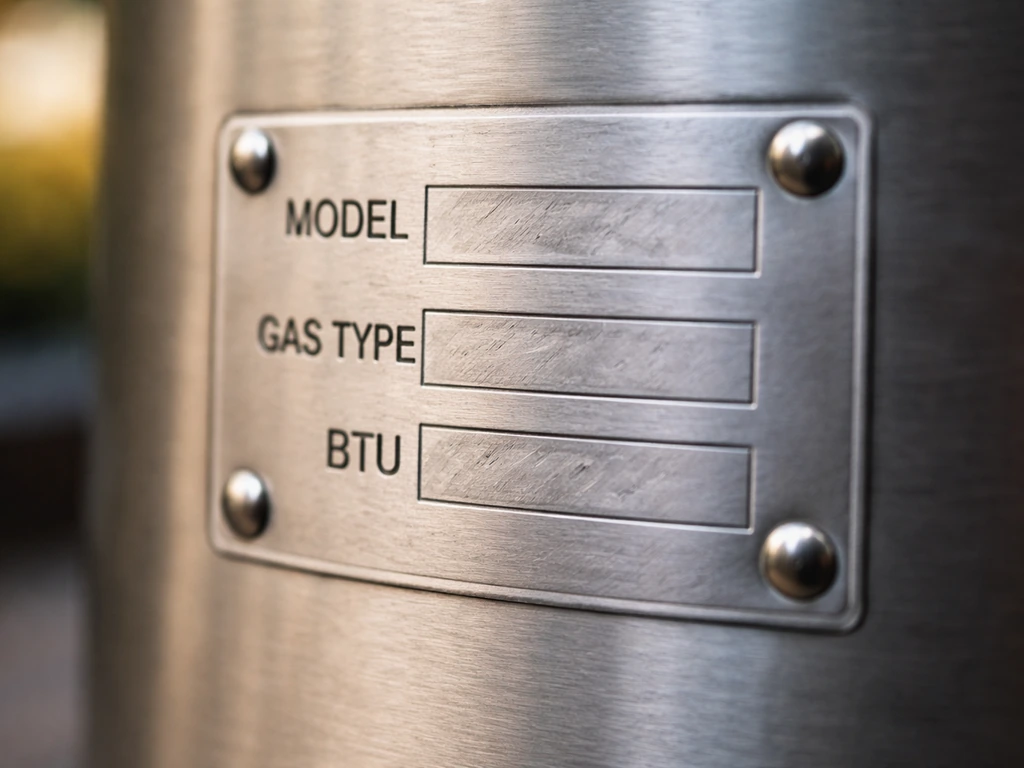
The rating plate will give you four things you need: the model number, the gas type (LP for propane, NG for natural gas), the BTU input rating, and the serial number. Write all four down before you search for anything. AZ Patio Heaters names its models with a base identifier plus a finish suffix.
For example, HLDS01 is the base model and the suffix tells you the finish: GTSS for stainless, GTCB for carbon black, GTPC for hammered copper, and GTHG for hammered gold. A single owner's manual PDF covers the entire HLDS01 family (HLDS01-GTHG, GTPC, GTSS, GTCB), so you may see multiple suffixes in one document title.
Natural gas versions use a completely separate manual and model prefix, such as NG-GT-BRZ for a bronze NG tower.
If you see "Enders" on the label, cross-reference the BTU rating and burner configuration against the AZ manual. In many cases the Enders OEM unit matches an AZ model closely enough that the AZ troubleshooting steps apply, but always confirm the gas orifice size and valve type match before following any part-replacement steps.
How to find the right manual and confirm it matches your unit
ManualsLib hosts a dedicated AZ Patio Heaters brand library with multiple model-specific PDFs available for free download. Search there first by typing your full model string (for example, "HLDS01-GTSS" or "NG-GT-BRZ"). If you have a nexgrill patio heater, use the Nexgrill patio heater manual for model specific steps before troubleshooting. The result page will show the document title before you download, so check that the model string in the title matches your rating plate exactly.
AZ Patio Heaters also publishes a separate service manual (document 102712104) that covers safety, component identification, and service procedures across a range of their products. AZ Patio Heaters publishes “AZ Patio Heaters 102712104 Service Manual. pdf” as a service manual that includes safety, component identification, and service procedures for their heaters [publishes a separate service manual (document 102712104)](https://assets. unilogcorp.
com/187/ITEM/DOC/AZPatioHeaters102712104Service_Manual. pdf). That is worth downloading as a second document even if you already have the owner's manual, because it goes deeper on valve and thermocouple testing.
- Pull the rating plate data: model number, gas type, BTU rating, serial number.
- Go to ManualsLib and search the AZ Patio Heaters brand page for your model number.
- Open the PDF and check the cover or first page for the model list. Confirm your model and gas type appear.
- Cross-check the BTU rating listed in the manual against your rating plate. They must match.
- Download the AZ Patio Heaters service manual (102712104) as a supplementary reference.
- If your plate says Enders, compare the burner diagram in the Enders manual to the AZ manual before using either for parts guidance.
One thing that catches people out: AZ sells both propane and natural gas versions of visually identical heaters. The gas orifice size is different, the valve may be different, and the ignition sequence can vary slightly. Using the LP manual on an NG unit (or vice versa) for anything beyond lighting instructions is a real safety risk. If you are not certain which gas type your unit runs, the rating plate will say LP, LPG, or Propane for propane, and NG or Natural Gas for the other. Do not guess.
Safety basics before you touch anything
Gas appliance troubleshooting has a hard rule: if you smell gas at any point during inspection or testing, stop immediately. Turn the control knob to OFF, close the tank valve, move away from the heater, and ventilate the area. Do not use the heater again until you have found and fixed the source of the leak. Soap-bubble testing every gas connection before and after any repair is not optional.
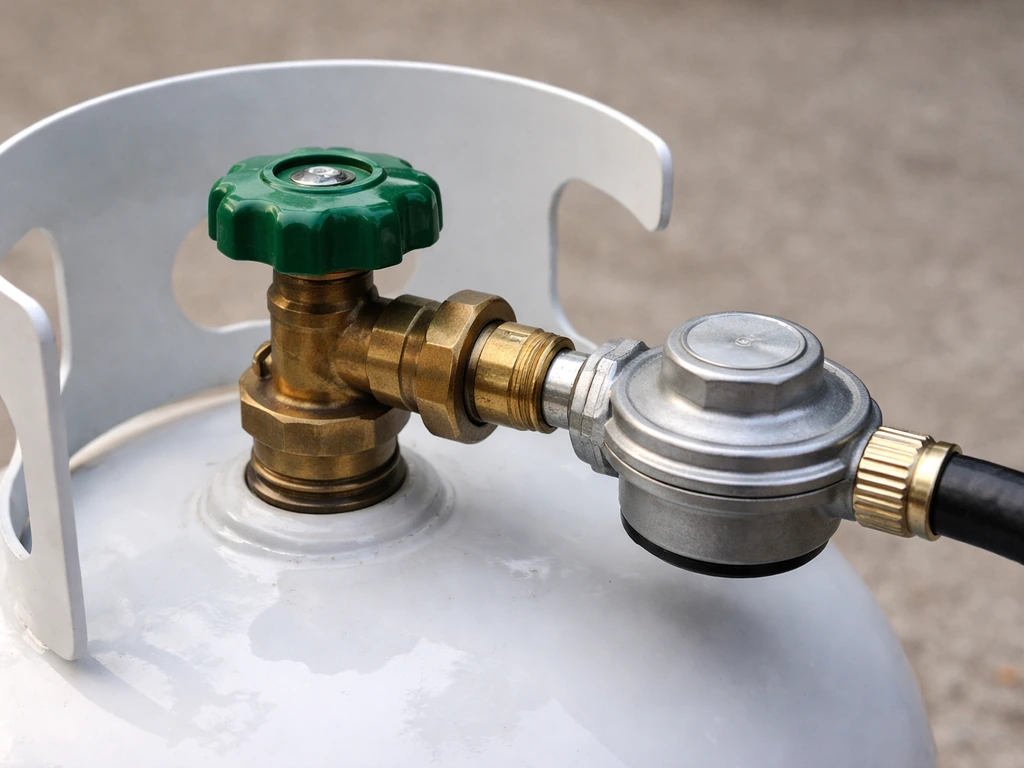
- Always close the propane tank valve before disconnecting or reconnecting the regulator hose.
- Never test for gas leaks with an open flame. Use soapy water or a dedicated gas leak detector.
- Keep the heater upright during operation. The tilt switch is a safety device, not a suggestion.
- Outdoor patio heaters are not approved for indoor or enclosed-porch use. Combustion in a confined space produces carbon monoxide.
- Allow the burner head and emitter screen to cool completely before inspecting or cleaning.
- Do not operate with a damaged or cracked emitter screen. Flying debris from a failed screen can cause burns or fire.
- If the igniter uses a AA battery, check that the battery terminals are clean and the polarity is correct before assuming the igniter is faulty.
One practical step a lot of people skip: before you start troubleshooting, run a full visual inspection in good daylight. Look for spider webs or insect nests in the burner orifice (extremely common after winter storage), corrosion on the igniter tip, cracked or deteriorated regulator hose, and any physical damage to the tilt switch wire harness. Clearing a blocked orifice costs nothing and fixes a surprising number of "no-ignition" calls.
Troubleshooting failed ignition: no spark, no gas, or nothing at all
Failed ignition almost always traces back to one of three things: no gas reaching the burner, no spark at the igniter, or both. Work through them in order because there is no point checking the igniter if the gas valve is still closed.
Check the gas supply first
- Confirm the propane tank valve is fully open (turn counter-clockwise until it stops).
- Check that the tank has fuel. A 20 lb tank that feels very light is likely empty. Weigh it if you are unsure (empty 20 lb tank weighs about 17 lbs, full about 37 lbs).
- Inspect the regulator. If you recently filled the tank and then opened the valve fast, the OPD (overfill protection device) inside the regulator may have tripped. Close the tank valve, disconnect the regulator, wait 30 seconds, reconnect, then open the tank valve slowly.
- Set the control knob to the PILOT or START position as described in your manual's lighting sequence. Do not skip to HIGH.
- Listen for a faint hiss of gas at the burner when the knob is in the pilot position and you press it in. If you hear nothing after 5 seconds, the issue is upstream (regulator, valve, or supply line).
Check the igniter and spark

- In low-light conditions, press the igniter button while watching the igniter tip near the burner. You should see a visible blue-white spark.
- If there is no spark, check the battery (most AZ models use a single AA in a compartment on the pole or control panel). Replace with a fresh alkaline battery.
- Inspect the igniter electrode tip. If it is coated with white or gray deposits, clean it gently with fine steel wool or a dry cloth. The gap between the tip and the burner ground should be about 3-4mm (check your manual for the exact spec for your model).
- Check the igniter wire connection from the electrode back to the piezo module. A corroded or loose push-on terminal will kill the spark entirely.
- If you have spark but no ignition, the issue is gas delivery, not the igniter. Return to the gas supply steps.
A spark that is weak, orange, or intermittent (rather than sharp, blue, and consistent) usually points to a dirty electrode tip or a failing piezo module. Piezo modules are inexpensive and easy to swap. Your manual will show the mounting location and the wire routing.
Troubleshooting a heater that won't stay lit
The heater lights, burns for a few seconds, then goes out the moment you release the control knob. This is a thermocouple problem about 90% of the time. The thermocouple is a small sensor probe that sits in the pilot flame. It generates a tiny millivolt signal that tells the gas valve the pilot is lit and it is safe to stay open. If the thermocouple is faulty, the valve gets no signal and shuts off as a safety measure.
Thermocouple checks and reset
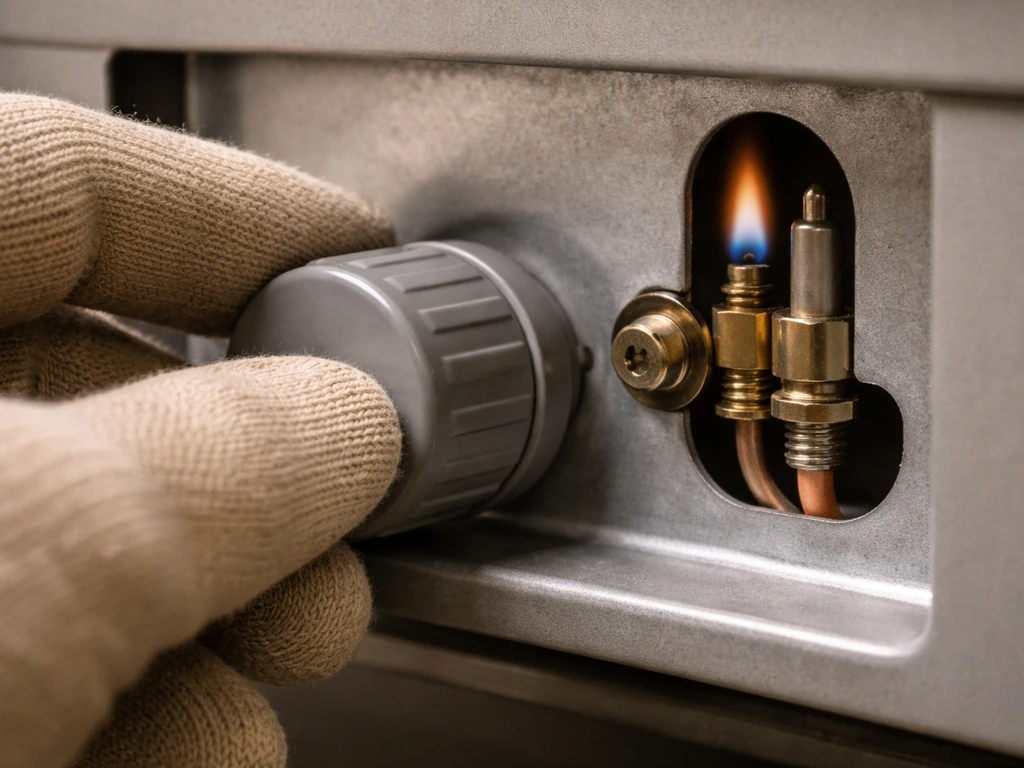
- Hold the control knob fully pressed in for at least 30-45 seconds after the pilot lights. Many people release too soon. The thermocouple needs time to heat up and generate enough voltage to hold the valve open.
- Look at the pilot flame while holding the knob in. The flame should be fully engulfing the thermocouple tip. If it is off to the side or weak, gently bend the thermocouple bracket so the tip sits directly in the flame.
- Check the thermocouple connection at the gas valve. The threaded nut at the valve end should be finger-tight plus a quarter turn with a wrench. A loose connection is a common cause of intermittent shutoff.
- If the above steps do not work, test the thermocouple output with a multimeter set to millivolts DC. With the pilot lit and the tip fully heated, a working thermocouple produces 15-30 mV. Below 10 mV and it needs replacement.
- Thermocouple replacement is a straightforward DIY job: unscrew the valve connection, unhook the tip from the bracket, and install the new unit in reverse. Match the length and thread size to your manual's parts diagram.
Other reasons a heater goes out after lighting
If the thermocouple tests good but the heater still dies, check the main burner flame pattern. A flame that lifts off the burner (yellow, wavy, blows out in light wind) points to a partially blocked orifice or a dirty burner head. Remove the emitter screen and burner head per your manual's disassembly instructions, clear the orifice with compressed air (never a metal probe), and clean the venturi tube of spider webs or debris. Also check that the gas valve control knob moves smoothly through all positions without binding. A sticky valve that will not hold the pilot detent position is a replacement item, not a repairable one.
Fixing tilt switch and other safety shutoff issues

AZ Patio Heaters tower models include a tilt shutoff switch, typically a mercury or ball-bearing type mounted inside the base or lower pole section. If the heater is level and functioning normally but cuts out randomly, or will not stay lit even with a good thermocouple, the tilt switch is a strong suspect.
- Set the heater on a hard, level surface and check it with a small bubble level placed on the base ring. Even a 2-3 degree lean can trip some tilt switches.
- Locate the tilt switch in your manual's parts diagram. On most AZ tower models it is inside the base housing, wired in series with the gas valve circuit.
- Disconnect the switch and use a multimeter set to continuity. With the unit perfectly upright, the switch should show continuity (closed circuit). Tilt it to about 30 degrees and it should open (no continuity). If it fails either test, replace it.
- Inspect the wiring harness from the tilt switch to the valve. The wires run down through the pole and are vulnerable to pinching during assembly or transport. Look for any section where insulation is chafed through.
- After replacing or re-seating the tilt switch, reinstall the base cover and run the full startup sequence from your manual before declaring the fix complete.
Some AZ models also include a separate thermal cutout that trips if the reflector or burner head overheats, usually due to a blocked emitter or debris on top of the reflector. If the heater runs for 20-30 minutes and then shuts off, check the reflector surface and the gap between the emitter screen and the reflector hood. Clear any debris and make sure the screen is not sagging into the reflector.
When the manual is not enough: parts, professional help, and keeping things running
Some repairs are genuinely worth doing yourself with the manual in hand: thermocouple swap, electrode/piezo replacement, cleaning the orifice and burner, replacing the tilt switch, and regulator hose replacement. These parts are widely available and the procedures in the AZ manual are clear. For a Charmglow patio heater, the process is similar, but you should follow the correct Charmglow patio heater manual for your model when troubleshooting and safety steps.
Stop and call a qualified gas appliance technician if you find any of the following: a gas valve body that is cracked, corroded through, or leaking from the valve stem; a regulator that leaks at the crimped fitting; a burner head with burn-through holes; or any repair that requires you to cut or resplice gas supply tubing. These are not DIY scenarios regardless of your comfort level with tools.
For sourcing parts, start with the AZ Patio Heaters parts list in your service manual (document 102712104 is particularly useful here). Many components like thermocouples are universal-fit items available at any hardware store if you match the thread size and tip length. Model-specific parts like the gas valve, regulator assembly, and emitter screen are best ordered directly through AZ Patio Heaters customer service or through an authorized parts supplier using the part numbers in the manual.
Maintenance steps that prevent most failures
- At the start of each season, inspect the regulator hose for cracks, softening, or brittleness, and replace it if it is more than 5 years old.
- Clean the burner orifice and venturi tube with compressed air before first use each year, especially if the heater was stored without a cover.
- Check the igniter electrode gap and clean the tip each spring.
- Tighten the thermocouple valve connection at the start of the season.
- Store the heater with a fitted cover or in a dry location to slow corrosion on the igniter tip and valve fittings.
- Test the tilt switch operation annually by gently tipping the heater to confirm it shuts off as expected.
If you have worked through all of the above and still have a heater that misbehaves, the AZ service manual (102712104) has a diagnostic table that maps symptoms to components in a way the owner's manual does not. Worth a second read before you give up. And if you are comparing notes on similar heaters from other brands, the troubleshooting logic for thermocouples, tilt switches, and igniter electrodes is largely the same across brands like Fire Sense, East Oak, Nexgrill, and Charmglow, even though the specific part numbers and manual procedures differ.
Quick next-steps based on your symptom
| Your symptom | First thing to check | Likely fix |
|---|---|---|
| No spark when pressing igniter | Battery and electrode tip condition | Replace battery or clean/gap electrode |
| Spark present but no ignition | Gas supply and regulator OPD reset | Open tank valve slowly, reset OPD, check for blocked orifice |
| Lights then goes out immediately | Thermocouple position and valve connection | Hold knob in longer, reposition tip in flame, tighten valve nut |
| Thermocouple replaced but still goes out | Tilt switch continuity and wire harness | Level the unit, test and replace tilt switch if faulty |
| Runs 20-30 min then shuts off | Reflector/emitter screen for debris or thermal cutout | Clean reflector, check emitter screen fit |
| Weak or yellow flame | Orifice blockage and venturi tube | Clear with compressed air, clean venturi |
| Gas smell during operation | All connections with soapy water | Stop use, find and fix leak before restarting |
FAQ
I found an AZ Patio Heaters PDF, but the model string on the download title doesn’t exactly match my rating plate. Is it still safe to use it?
Don’t use the rating plate’s gas label as a hint only. Confirm LP versus NG on the plate, then match the full model string including the finish suffix (like HLDS01-GTSS). If the manual title has a different gas type or a different model prefix, stop and find the exact match before following any valve or regulator steps.
When should I do soap-bubble testing during repairs, and do I need to repeat it after the heater ignites?
Use the soap-bubble test after you reconnect or replace any gas-related part, but also once more after the first successful ignition attempt. A tiny leak can open under heat, so a final check after the heater runs briefly can prevent a repeat shutdown or a dangerous accumulation of gas.
My heater won’t ignite. If I see an odd spark color, should I still test the thermocouple first?
Yes, if the manual tells you to test in a specific way. In general, aim to clean or dry the electrode area and check the ignition wiring for looseness or corrosion first. If the spark is still weak, intermittent, or orange after cleaning, replace the piezo module (and verify the electrode gap per the manual) instead of continuing to troubleshoot the thermocouple.
Can I clean the burner head or orifice right after the heater shuts off, or do I need to wait?
Turn off the control and gas supply, then wait for the heater to cool before disassembly. If you clean the burner or orifice while parts are hot, you can warp the burner head or damage gaskets and seals, which can later cause poor flame pattern and repeating shutdowns.
The heater lights and then goes out when I release the knob. How do I know if it is a bad thermocouple or a positioning issue?
If the control knob releases and the pilot goes out immediately, focus on the thermocouple and its pilot flame position. A common mistake is mis-seating the thermocouple tip so it does not stay in the pilot flame, which makes the valve think the pilot is not lit even when the thermocouple is new.
My heater cuts out randomly even though the thermocouple tests good. What should I check before swapping the tilt switch?
If random shutoffs happen, check that the base is level and that nothing is preventing the tilt mechanism from moving freely. Dirt, spider web debris, or a slightly jammed wire harness can mimic a failed tilt switch, so inspect and clear the tilt switch area before replacing it.
If my unit lights using a propane-focused troubleshooting guide, can I continue with the rest of the fixes?
For LP and NG units, the orifice and valve characteristics differ. Even if the heater lights using the wrong manual, the flame may be unsafe or unstable, and regulator behavior can be incorrect. Only proceed with any gas-valve or burner-orifice-related steps when the gas type on your rating plate matches the manual exactly.
My heater runs for 20 to 30 minutes, then shuts off. Besides cleaning, what specific part alignment should I verify?
If you suspect airflow or overheating due to a delayed shutdown, don’t just clean the top area. Check the emitter screen condition and whether it is sagging toward the reflector, then verify the gap described in your manual, because incorrect spacing can trip the thermal cutout repeatedly.
I see a cracked regulator hose. Can I patch it or replace just the damaged section?
Always replace regulator hoses and fittings using the hose type and length specified in the manual, and do not cut and re-use old hose ends. If a hose is cracked or brittle, treat it as a whole replacement item, and after replacement perform a full leak test on every connection.
The service manual diagnostic table lists several possible causes for my symptom. How should I prioritize what to test or replace first?
If the diagnostic table suggests multiple possible components, start with the items that affect the symptom immediately and require the least risk to test, for example ignition electrode or piezo and obvious wiring connections. Save gas-valve or regulator replacement for when you have confirmed a matching symptom, because those parts are more expensive and failure to match the manual steps can create new faults.