To get the right Nexgrill patio heater manual, flip your heater upside down or check the base pole for a silver label with a model number like 920-0010, 920-0049, PTH106-SS, or NG-GT-B. Once you have that exact number, search ManualsLib, ApplianceFactoryParts, or the Home Depot support page for your specific model's PDF. That model-matched manual is the only one you should trust for assembly steps, parts diagrams, and troubleshooting tables, because Nexgrill makes several heater variants and the ignition procedures, thermocouple specs, and tilt switch behavior differ between them.
Nexgrill Patio Heater Manual Guide: Find Your Model Fast

Grant Mercer
6 Jun 2026
Find the right manual by matching your model number first
Nexgrill sells multiple patio heater models that look similar from a distance but use different gas controls, ignition systems, and safety interlocks. Using the wrong manual is worse than using no manual at all, because you might follow a procedure that simply does not apply to your heater. Before you download anything, go get the actual model and serial number from your unit.
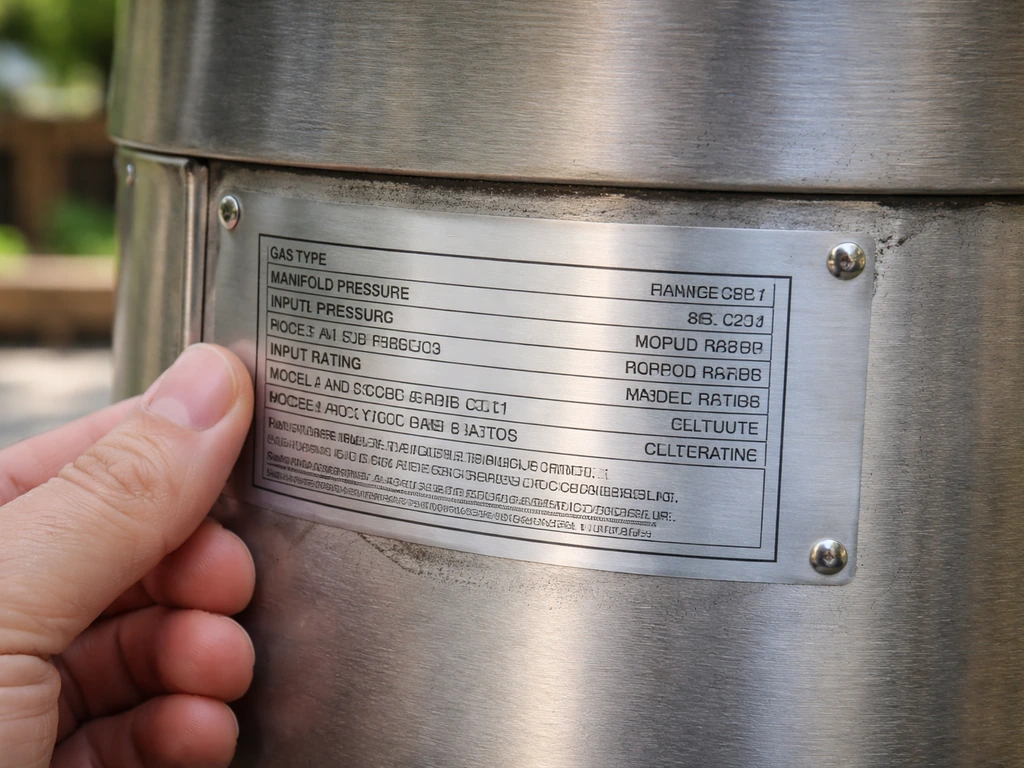
Look for the rating/data label in one of these three places: on the underside of the base, on the lower section of the main pole, or on the back of the control knob housing. The label will show a model number, a serial number, gas type (usually LP/propane), BTU rating, and a manufactured date. Write all of that down. If the label is faded, a flashlight and a phone camera with zoom can usually recover the number.
Common Nexgrill patio heater model numbers include 920-0010, 920-0049, PTH106-SS, and NG-GT-B. Each has a separate manual with its own troubleshooting table. The 920-0010 and 920-0049 manuals are both available on ManualsLib and ApplianceFactoryParts. The NG-GT-B manual is hosted as a PDF through Home Depot's support system. The PTH106-SS manual is available through ApplianceFactoryParts as well. Search the exact model number in quotes to avoid landing on the wrong document.
What the Nexgrill manual actually contains and what to look for
Most Nexgrill patio heater manuals are 18 to 25 pages and follow a consistent structure. Knowing how they are laid out helps you skip to the right section quickly instead of reading the whole thing when your heater is cold and dark and you want a fix now. The Nexgrill 920-0010 owner’s manual PDF includes a Trouble Shooting section organized by specific maintenance and safety topics like gas leak testing and burner installation steps.
The 920-0010 manual, for example, has a table of contents that maps almost perfectly to the typical repair workflow: Gas Requirement and Leak Testing, Safety Checks, Burner Installation and Pilot Cleaning, Trouble Shooting, Part List, and Limited Warranty. The NG-GT-B manual and the 920-0049 manual follow the same general pattern. Assembly diagrams are usually in the first third of the document, while troubleshooting tables appear near the end, just before the parts list.
- Assembly section: step-by-step with torque and fit notes, plus hardware identification. Use this if you are reassembling after storage or a move.
- Parts diagram: exploded view with part numbers. Cross-reference this when ordering a replacement thermocouple, igniter, or regulator.
- Gas requirement and leak testing: pressure specs and leak-check procedure. Read this before you do any gas-side work.
- Trouble Shooting table: lists symptom, possible cause, and corrective action in three columns. This is the fastest path to a diagnosis.
- Safety checks and maintenance: cleaning intervals, what to inspect, and how to shut down for the season.
- Limited warranty: tells you which parts are covered and the contact number for Nexgrill customer service.
When you open the PDF, jump straight to the Trouble Shooting section for a diagnosis problem. Jump to Burner Installation and Pilot Cleaning when you need to physically access the pilot assembly. Jump to the Parts List when you need a part number. That workflow will save you 20 minutes of reading every time.
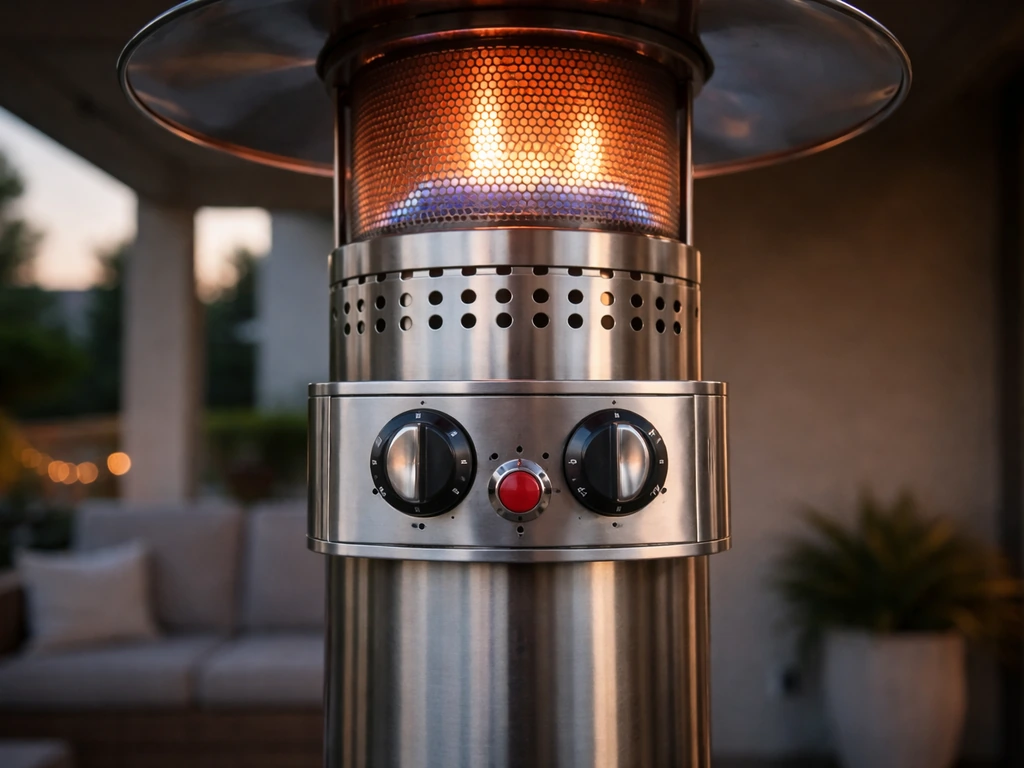
How to actually use your Nexgrill patio heater (controls and ignition)
Before getting into what goes wrong, it helps to know what going right looks like. The startup sequence on most standing Nexgrill propane patio heaters is the same basic pilot-light-then-burner process, but there are specific physical steps the manual requires and that many people skip.
- Open the propane tank valve slowly, one full turn counterclockwise. Do not crank it wide open all at once.
- Wait 30 to 60 seconds. This lets any air that entered the gas line during storage bleed out as the gas reaches the control valve.
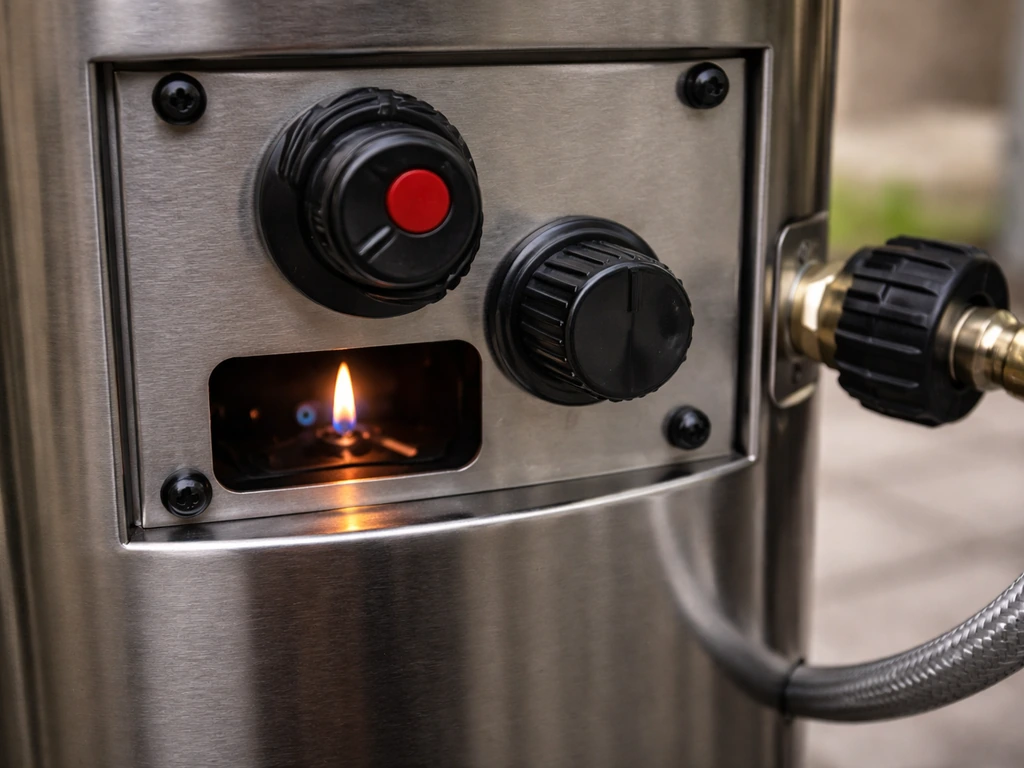
- Turn the control knob to the PILOT position. On most Nexgrill models this is marked with a flame symbol smaller than the HIGH/LOW marks.
- Press the control knob fully inward and hold it down. This opens the pilot gas valve and also bypasses the thermocouple safety circuit while the thermocouple heats up.
- While holding the knob in, press the igniter button repeatedly (once per second) until the pilot lights. You should see a small blue flame at the pilot burner.
- Keep holding the knob pressed in for 30 to 45 seconds after the pilot lights. This gives the thermocouple time to reach operating temperature and hold the gas valve open on its own.
- Release the knob slowly. The pilot should stay lit. If it goes out, repeat from step 4.
- Once the pilot is stable, turn the knob from PILOT to LOW, then adjust to HIGH or your desired output level.
- To shut down: turn the knob back to PILOT, then to OFF. Close the propane tank valve.
One thing the manual specifically calls out: the heater must be standing fully upright on a level surface before you attempt ignition. The tilt switch on models like the PTH106-SS and the 920-0010 will cut the gas supply if the heater is even slightly off-vertical, and it will prevent ignition or cause the flame to cut out mid-use. If your heater is sitting on uneven pavers, fix that first.
The most common problems Nexgrill manuals troubleshoot
The troubleshooting table in the 920-0010 manual is one of the most complete I have seen for a patio heater. It breaks problems into three categories: pilot won't light, pilot won't stay lit, and burner-related issues. The NG-GT-B manual covers the same two main categories. Here is what each one actually means in practice.
Pilot won't light at all
The 920-0010 manual lists over a dozen causes for this symptom, and working through them in order is genuinely the fastest way to a fix. The most common causes and their practical meaning:
| Manual Cause | What It Means in Practice | Quick Check |
|---|---|---|
| Air in gas line | Propane was just connected or tank was recently changed | Wait 60 seconds after opening tank valve, then retry |
| Gas line turned OFF or low gas pressure | Tank is nearly empty or valve is closed | Check tank weight or gauge; open valve fully |
| Control knob not in PILOT position | Knob is between positions | Feel for the detent click at PILOT before pressing in |
| Control knob not pressed in while in PILOT | Skipping the press-hold step | Press knob fully inward before hitting the igniter |
| Pilot orifice clogged | Debris or spider web in the tiny pilot jet | Clean with compressed air (see Burner/Pilot Cleaning section) |
| Igniter electrode positioned wrong | Electrode tip too far from pilot | Check gap against manual spec, usually 3 to 4 mm |
| Broken igniter electrode or cable | Physical damage, cracks, or pinched wire | Visually inspect electrode ceramic and full cable run |
| Igniter cable not connected to gas control | Plug came loose | Press connector firmly onto the gas control terminal |
| Tilt switch in trip angle or OFF position | Heater is tilted or switch is faulty | Level the heater; if level and still tripped, test switch |
Pilot lights but won't stay lit
This is the most frustrating symptom because it looks like progress. The flame appears, you release the knob, and then it goes out within a few seconds. Both the 920-0010 manual and the NG-GT-B manual point to one primary cause for this: the thermocouple is not operating correctly. A worn or dirty thermocouple does not generate enough millivoltage to hold the gas valve open after you release the control knob. The fix is usually cleaning the thermocouple tip first, and replacing the thermocouple if cleaning does not solve it.
The secondary cause is the tilt switch. On the PTH106-SS and 920-0010, if the safety interlock trips during operation (say, a gust of wind rocks the heater), the gas cuts off immediately. If your heater keeps going out and you notice it rocking slightly, the tilt switch may be cutting power to the gas valve. The manual's corrective action is to make sure the heater is vertical and then reset by returning the knob to OFF and restarting the full ignition sequence.
Repair guidance straight from the manual sections
Thermocouple: cleaning and replacement
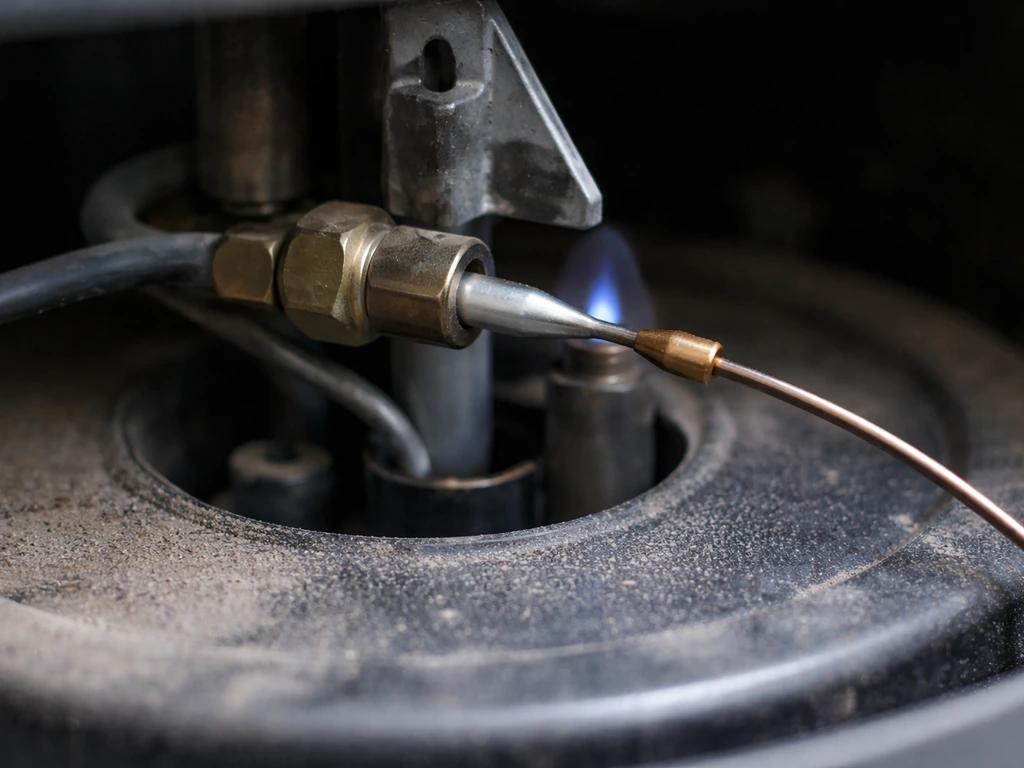
The thermocouple is a thin metal probe that sits in the pilot flame. Heat from the flame generates a small electrical current that tells the gas valve it is safe to stay open. When the thermocouple fails, the valve closes and the pilot drops. This is a safety feature, not a defect. The manual's Burner Installation and Pilot Cleaning section covers access to this component.
- Turn the control knob to OFF and close the propane tank valve. Wait 10 minutes for the heater to cool completely.
- Access the burner assembly by removing the reflector dome and emitter screen per your model's assembly diagram.
- Locate the thermocouple: it is the probe closest to the pilot flame, with a thin copper tube running down to the gas control valve.
- Clean the thermocouple tip with fine steel wool or an emery cloth. Remove any carbon buildup or oxidation from the sensing tip.
- Reassemble and test. If the pilot still won't stay lit after cleaning, the thermocouple needs to be replaced.
- To replace: unscrew the thermocouple nut from the gas control valve (usually 7/16 inch or 1/2 inch wrench) and unclip the probe from the pilot bracket. Install the new thermocouple in reverse order. Do not overtighten the nut at the valve, snug plus a quarter turn is enough.
- Relight and test. The pilot should now hold after a 30-to-45-second warmup.
Make sure you order a thermocouple that matches your model's part number from the parts list section of your manual. For the Nexgrill 920-0010, ApplianceFactoryParts hosts an Owner's Manual (General) PDF and includes a model-specific replacement parts list to help you match the correct part number parts list section of your manual. A universal thermocouple can work in a pinch, but it needs to be the correct length and connection type for your gas control valve. The 920-0010 parts list on ApplianceFactoryParts shows the exact part number to search.
Tilt switch: testing and reset
The tilt switch is a small safety device, usually a mercury or ball-bearing switch inside the base, that cuts gas flow if the heater tips past a certain angle. The PTH106-SS manual specifically lists the corrective action as: reset the heater, keep it in the vertical position. If your heater is upright and level but the tilt switch keeps tripping, the switch itself may be faulty.
To test: with the heater cold and the gas off, locate the tilt switch in the base per your parts diagram. Most tilt switches are inline in the igniter cable circuit. Use a multimeter set to continuity mode and test across the switch terminals while the heater is perfectly vertical. You should get continuity (a beep). Tip the heater past about 30 degrees and continuity should break. If it reads open even when perfectly vertical, the switch has failed and needs replacement. This is a straightforward swap if you are comfortable using a multimeter and working with low-voltage wiring.
Gas valve and regulator issues
If you have confirmed that the thermocouple and tilt switch are fine but the heater still will not light or stay lit, the gas control valve or the regulator may be the problem. The manual's Gas Requirement and Leak Testing section is where to go here. Low gas pressure from a cold tank or a failing regulator will present exactly like a clogged pilot orifice or a dead thermocouple, so rule those out first.
A regulator that has gone into bypass mode (triggered by detecting a leak or by fast-opening the tank valve) restricts flow to near zero. The fix is to close the tank valve, disconnect the regulator from the tank, wait 60 seconds, then reconnect and open the tank valve slowly. If the heater still has very low flame or no ignition with a full tank, the regulator is likely worn and needs replacement. Regulators on most Nexgrill standing heaters are a standard POL or Type 1 connection and are inexpensive to replace. Gas control valves are a bigger job: if the valve body is cracked, leaking, or simply stuck, that is a job for a qualified gas appliance technician. Do not try to repair a gas control valve internally.
Maintenance and safety checks the manual actually tells you to do
The Safety Checks and Maintenance sections of Nexgrill manuals are not filler. They describe real failure points that cause the exact problems covered in the troubleshooting table. If you do these checks at the start and end of each season, you will avoid most of the ignition and won't-stay-lit issues entirely.
Leak check before every season and after any gas connection work
Mix dish soap and water (roughly 1 part soap to 1 part water) and brush it onto every gas connection: the regulator-to-tank fitting, the hose connections at both ends, and the inlet to the gas control valve. Open the tank valve slowly. Bubbles mean a leak. If you see bubbles, close the tank valve immediately, tighten the connection, and re-test. Never use a flame to check for gas leaks. If you cannot stop a leak by tightening the fitting, replace the hose and regulator assembly.
Cleaning the pilot and burner
At the start of each season (and any time ignition becomes unreliable), clean the pilot orifice and burner. The manual's Burner Installation and Pilot Cleaning section walks through disassembly. In practice: remove the emitter screen and reflector, use a soft brush to clear debris from the burner ports, and use a can of compressed air to blow out the pilot orifice. Never use a wire or pin to ream the pilot orifice opening, that enlarges it and changes the gas flow rate. If the orifice is blocked with something compressed air won't shift, replace the pilot orifice assembly using the part number from your manual's parts list.
Spider and insect nest inspection
This sounds trivial but it is genuinely one of the top causes of ignition failure after storage. Spiders build nests inside the pilot tube and the burner orifice area, and the fine webbing and egg sacs completely block gas flow. Before lighting a heater that has been stored for more than a few weeks, visually inspect the burner area with a flashlight and use compressed air to clear it out.
Seasonal storage shutdown
The manual's storage guidance is consistent across Nexgrill models: turn the control knob to OFF, close the propane tank valve, then disconnect the regulator from the tank. Store the propane tank separately outdoors in a ventilated area, never in an enclosed space. Cover the heater with a breathable cover to keep insects and moisture out of the burner assembly. Do not store the heater with the regulator connected to the tank.
When to call a professional instead of DIYing it
Most thermocouple swaps, igniter replacements, and regulator changes are well within DIY capability. But there are a few situations where you should stop and call a gas appliance technician or Nexgrill customer service directly. The 920-0010 manual includes a Nexgrill Industries customer service number for exactly these situations. Call or get professional help if: you smell gas and cannot locate the source after a leak check, the gas control valve is leaking at the valve body itself, the burner flame is yellow or orange rather than blue (indicating combustion problems that cleaning does not fix), or any gas-carrying component is cracked or physically damaged. These are not risks worth taking for the cost of a service call.
A note on model differences and other brands
Everything in this guide is based on documented Nexgrill manual content, but the specific steps, part numbers, and corrective actions genuinely vary between models. The 920-0010 troubleshooting table has more entries than the NG-GT-B table. The PTH106-SS tilt switch reset procedure differs from the 920-0010 procedure. Always cross-check any step here against your model's specific PDF before you do the work. If you are researching manuals for other patio heater brands, the same model-matching approach applies whether you are dealing with Fire Sense, East Oak, AZ Patio Heaters, or Charmglow units, each of which publishes brand-specific manuals with their own troubleshooting tables and part numbers. If you are using a Charmglow patio heater, look for the Charmglow patio heater manual for your exact model before following any steps. If you need help decoding your AZ Patio Heaters manual, use the exact model number from your rating label to find the matching PDF and troubleshooting table. If you are specifically using an East Oak patio heater, you can apply the same model-matching approach to find the correct east oak patio heater manual for your exact unit. If you are dealing with a Fire Sense patio heater, use the Fire Sense patio heater manual for the exact model-specific ignition, safety, and troubleshooting steps.
FAQ
What if I cannot find the model number or the rating label is unreadable on my Nexgrill patio heater?
Use a flashlight and your phone camera zoom on all label locations (underside of the base, lower pole section, and behind the control knob housing). If the number still will not read, take clear photos of the control knob housing, igniter area, and the base tilt safety area, then contact Nexgrill support with those images and any serial digits you can make out, since the manual depends on the exact model family.
Can I use a Nexgrill patio heater manual from a different fuel type, like LP versus natural gas?
Do not. Even if the exterior looks the same, fuel type changes burner orifice sizes, regulator behavior, and safety expectations. If your heater label does not clearly match LP/propane, stop and confirm the gas type on the rating label before following any ignition or troubleshooting steps.
My heater will light once, then goes out when I release the knob. Is it always the thermocouple?
Thermocouple failure is the most common cause, but also confirm you are holding the knob long enough for the pilot flame to heat the thermocouple, and that the pilot flame is properly positioned on the thermocouple tip. A weak pilot from clogged or improperly cleaned pilot components can mimic a thermocouple problem.
How do I tell whether the pilot is clogged or the burner is blocked?
If you see no sustained pilot flame or the pilot flame looks feeble, suspect pilot orifice blockage or pilot tube obstruction. If the pilot stays lit but the main burner does not ignite or stays weak, focus on burner ports and emitter screen/reflector cleanliness. Use the manual’s sections to match your exact symptom category.
What should I do if my Nexgrill heater keeps tripping the tilt switch even though it is upright?
First confirm the heater base is on a level surface, then re-check that it is fully upright and not slightly resting on uneven pavers or a sloped surface. If it still trips while perfectly vertical, the tilt switch can be faulty. The safest next step is to follow your model’s parts diagram for exact tilt switch location and replacement instructions.
Is it safe to clean the pilot orifice with a wire or pin if airflow seems blocked?
No. Enlarging or deforming the orifice changes gas flow rate and can cause unsafe combustion. If compressed air cannot clear debris, replace the pilot orifice assembly using your model’s listed part number.
Can I test the tilt switch with a multimeter if I am not experienced with wiring?
Only if you are comfortable working with low-voltage wiring and keeping everything dry and properly disconnected. If you cannot clearly identify the terminals per the parts diagram and ensure the heater is cold and gas is off, it is better to use a technician, because incorrect probing can lead to repeated trips or damaged components.
What leak-check soap mixture should I use, and how long should I watch for bubbles?
A simple dish soap and water mix works, but after you open the tank valve slowly, watch the connections long enough for bubbles to appear and stabilize (not just a brief shimmer). If bubbles form, close the tank valve immediately and retighten or replace the leaking hose/regulator assembly. Avoid flame checks entirely.
My flame looks yellow or orange. Can I fix it with cleaning only?
Yellow or orange flames often indicate combustion or airflow problems that cleaning might not resolve, such as incorrect gas regulation or burner issues that require deeper troubleshooting. Stop using the heater and use your manual’s gas requirement and safety checks first, then call support or a technician if the flame color does not normalize.
How should I shut down and store the heater to prevent ignition issues after the next season?
Turn the control knob to OFF, close the propane tank valve, and disconnect the regulator from the tank. Store the propane tank separately outdoors in a ventilated area, never in an enclosed space, and keep the heater covered with a breathable cover. Avoid storing the heater with the regulator connected, since it can increase risk and contribute to clogged pilot issues.
When should I stop DIY and call a gas technician or Nexgrill support?
Call for help if you smell gas and cannot quickly locate the source after leak testing, if the gas control valve itself appears to leak, if any gas-carrying component is cracked or physically damaged, or if combustion stays abnormal after doing the manual’s cleaning and checks. Also use professional help if you find regulator problems that persist after resetting tank valve opening slowly.
Where exactly in the manual should I look first for diagnosis, not assembly?
Use the model-matched manual and jump to the Troubleshooting or Problem Diagnosis section first, then only open the assembly or pilot/burner cleaning section for the specific symptom you matched. This prevents you from performing steps intended for a different model variant or a different symptom category.