If you have a Charmglow patio heater and need the manual, head to ManualsLib and search 'Charmglow 82300' or your specific model number. That single manual (PDF file 171380-1) actually blank" rel="noopener noreferrer">covers six models: 62100, 62900, 82300, 82300C, GWT501A, and GWT801B. So if your model is in that list, you already have what you need. If your heater isn't in that group, keep reading because I'll walk you through finding the right document and, more importantly, fixing the most common problems you're probably dealing with right now.
Charmglow Patio Heater Manual: Setup and Troubleshooting

Grant Mercer
8 Jun 2026
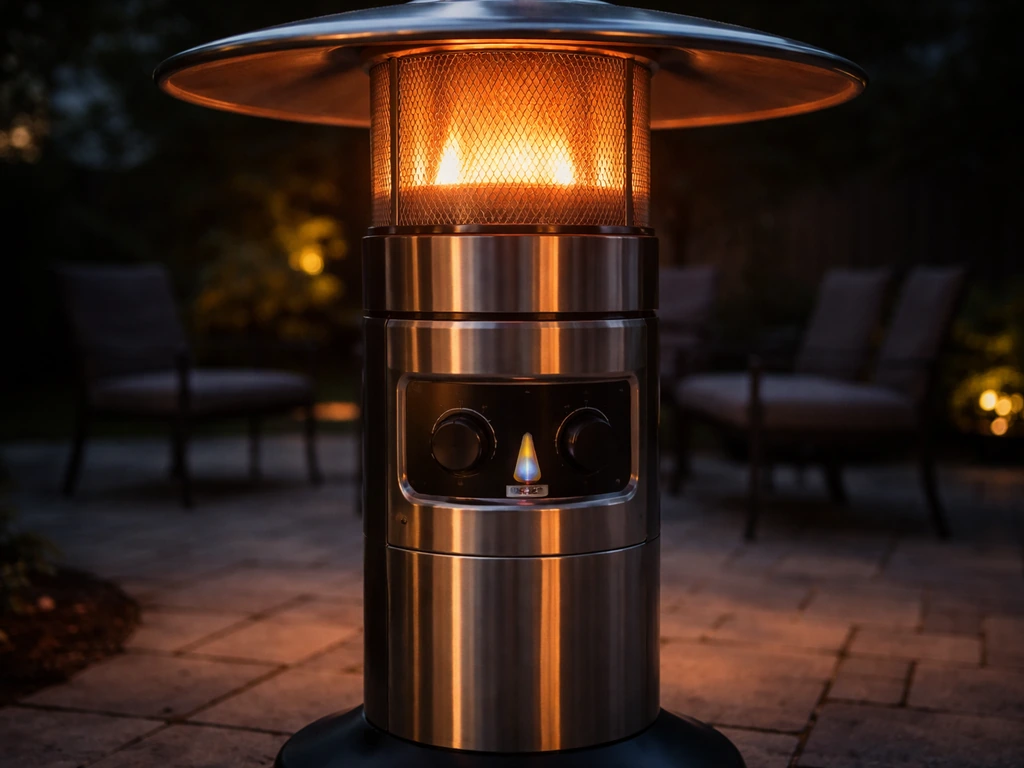
Figure out which Charmglow model you actually have
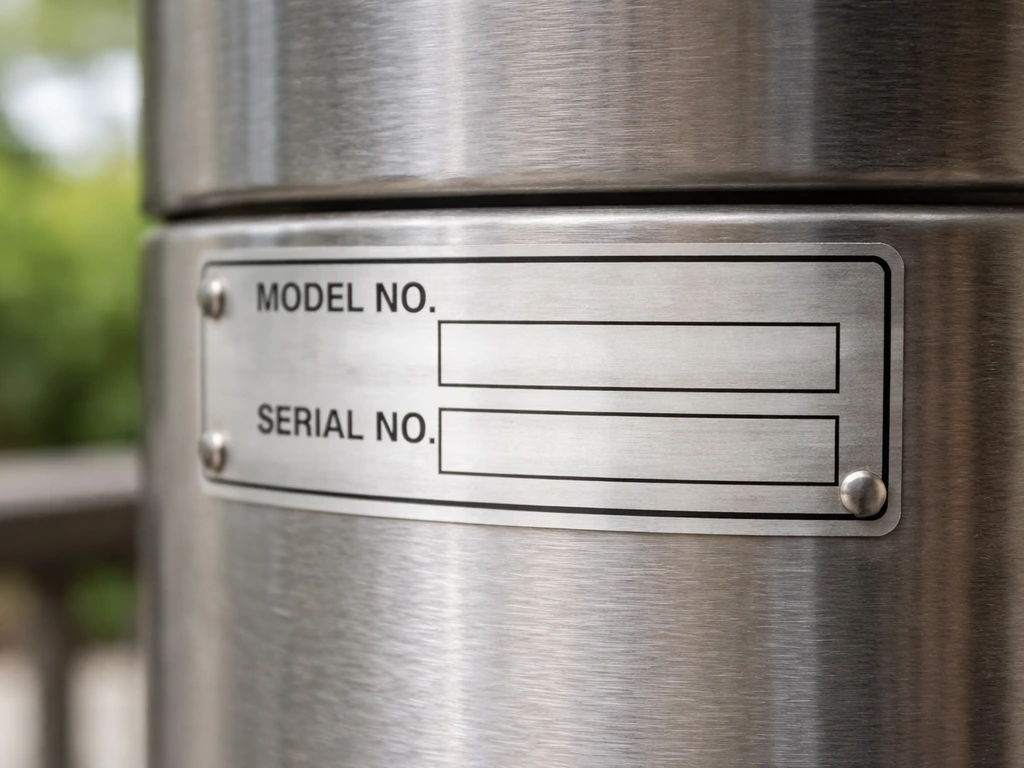
Before you hunt for a manual, you need the exact model number and serial number off your heater. Charmglow made quite a few variants over the years, and the manuals are not interchangeable for everything, even when the heaters look nearly identical. The label is usually on a sticker attached to the base pole or on the bottom of the base housing. It will say something like 'Model No.' followed by a string of numbers or alphanumeric characters like 82300 or GWT801B.
Write both the model number and serial number down before you do anything else. The manuals themselves actually say 'Please have your owner's manual and serial number available for reference,' which is good advice because if you end up calling Charmglow's support line (1-800-762-1142), they'll ask for both. The serial number also matters for warranty questions and for confirming you're ordering the right replacement parts.
Once you have the model number, you need to decide what kind of documentation you're actually looking for. Most people searching for a Charmglow patio heater manual fall into one of two camps: they're setting up a unit for the first time and need assembly and lighting instructions, or they're troubleshooting something that stopped working. The manual covers both, but if you're in troubleshooting mode, the most useful pages are the symptom-cause-action table near the back of the document, not the front-end assembly section.
Where to find your Charmglow manual online
ManualsLib is the most reliable starting point. Search for 'Charmglow 82300' and you'll find the full owner's manual with a table of contents that includes Assembly Instructions, Installing LP Gas Tank, Lighting, and Re-Lighting sections. It's free to view and download without an account. If your model is the 82300 specifically, there's also a directly hosted PDF with the filename 'Charmglow82300.pdf' floating around on repair and parts sites. That filename is a reliable signal that you've found the right document when you're searching.
For the multi-model manual covering 62100, 62900, 82300, 82300C, GWT501A, and GWT801B, the PDF is named 171380-1.pdf on some hosting sites. If you search that filename plus 'Charmglow' you'll often land on it directly. There's also a version hosted at Learn.MyGrillParts for the Charmglow 820-0002 (2008 model year) that includes clear propane cylinder connection and first-use lighting instructions, which is a solid fallback if your exact model's manual is proving hard to find.
If you have a GWU9300H or a Blue Rhino-branded Charmglow variant, ManualsLib also hosts that manual along with an exploded parts view and parts list. That exploded diagram is genuinely useful if you're trying to identify a thermocouple, ODS pilot assembly, or valve part for a replacement order. Search 'Blue Rhino Charmglow GWU9300H' to find it.
When you think you've found the right manual, verify it by checking three things: the model number appears on the cover or first page, the troubleshooting table is included (not all versions are complete), and the LP cylinder connection steps match the type of connection your heater has (either a standard 20 lb tank regulator or a smaller canister-style fitting). If those all match, you're good.
Assembly, fuel connection, and first ignition
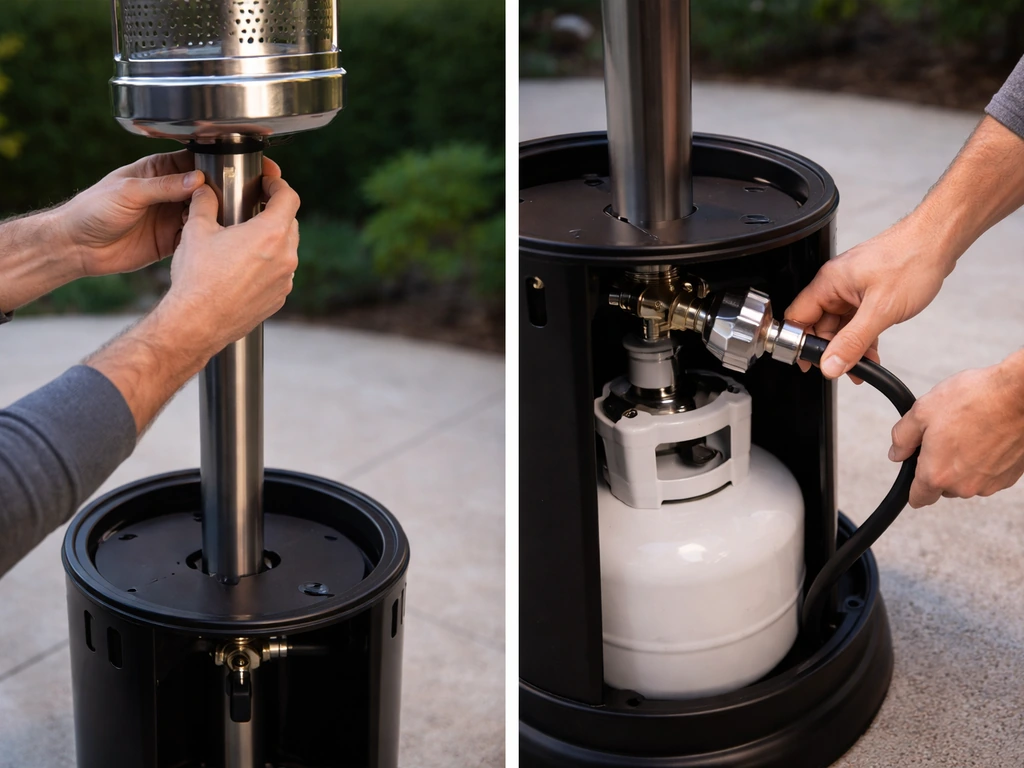
If you're doing a first-time setup, the assembly process is straightforward. The pole sections and base go together with the included hardware, and the emitter/burner head attaches at the top. The manual's assembly diagrams walk through the order of operations. Nothing tricky there, just work from base to top and make sure each connection is snug before moving to the next section.
The LP cylinder connection is where people sometimes make mistakes that cause problems later. The manual is specific: use only the regulator and hose assembly that came with the heater, not an aftermarket one. Before connecting the tank, make sure the control knob is in the OFF position. Then line up the regulator fitting with the tank valve and thread it on clockwise by hand. Hand-tight is all you need here, never use a wrench on the regulator-to-tank connection or you risk damaging the fitting.
For first ignition, open the tank valve slowly (counterclockwise, usually one full turn), wait about 30 seconds to let gas reach the valve, then push the control knob in and turn it to the pilot or ignite position. While holding the knob depressed, press the igniter button repeatedly (some models require 3 to 5 clicks before a spark catches the pilot). Once you see a pilot flame, hold the knob in for 30 to 45 seconds to heat the thermocouple, then release. If the pilot stays lit, turn the knob to the desired heat setting. If it goes out when you release the knob, the thermocouple hasn't heated enough yet. Push in and hold again for a longer count before releasing.
Heater won't ignite at all: what to check first
No spark or no ignition is the most common complaint I hear about Charmglow heaters, and the manual's troubleshooting table breaks it down into a clear list of causes. Work through these in order before assuming anything is broken.
- Check that the control knob is actually in the ON or pilot position. It sounds obvious, but the knob has a detent and it's easy to stop just short of the correct position.
- Check gas pressure. If the propane tank is less than a quarter full or if outdoor temperature is below 40°F (5°C), pressure drops and the heater may not light. Swap in a fresh tank and try again.
- Check for blockage in the venturi tube. Spiders and insects nest in venturi tubes during storage. With the tank disconnected and the knob off, look down the tube with a flashlight. A thin wire or pipe cleaner can clear a partial blockage.
- Check the burner openings for debris. Dust, rust flakes, and insect nests can block the small ports. A soft brass wire brush clears these without damaging the burner.
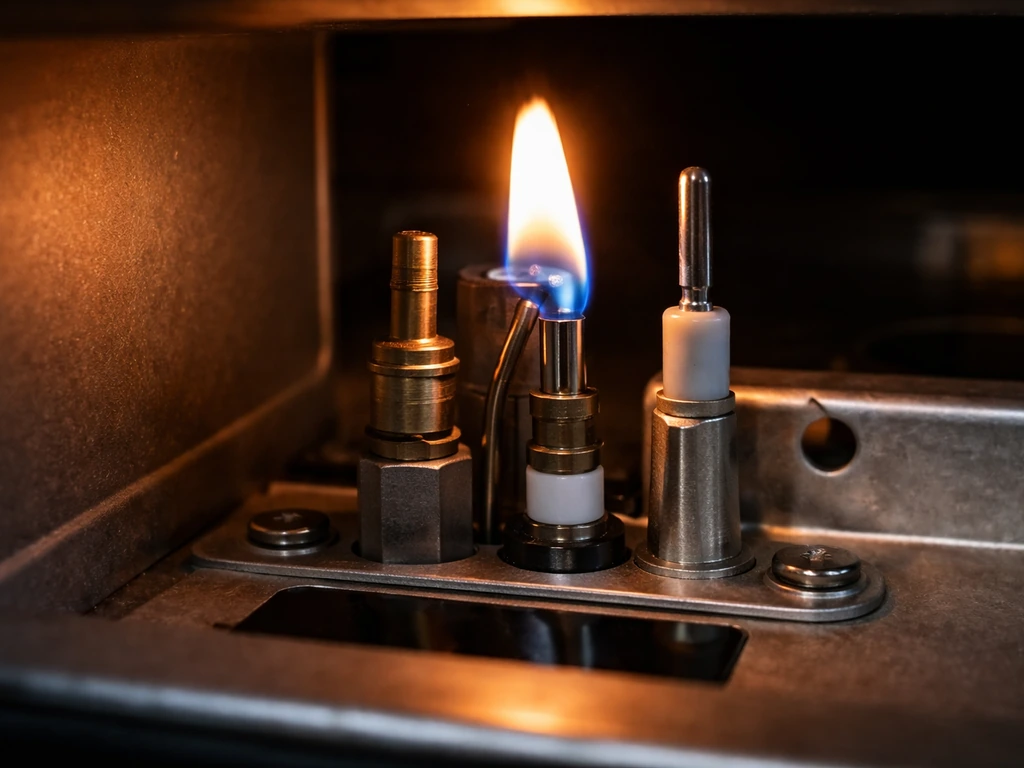
- Check the igniter electrode. The ceramic-tipped electrode near the pilot should be positioned about 3 to 6 mm from the pilot hood. If it's been knocked out of position, bent away, or has a cracked ceramic, it won't produce a reliable spark. You can usually reposition it carefully by hand.
- Check for blockage in the gas line itself. With everything disconnected, inspect the hose for kinks or crushing from storage. A kinked hose restricts flow enough to prevent ignition.
If you hear clicking from the igniter but see no spark at the electrode, the igniter module may be faulty or the electrode wire may have come loose. Trace the wire from the igniter button down to the electrode and confirm it's connected at both ends. A loose push-on terminal at the electrode end is a surprisingly common fix.
Heater lights but won't stay lit: thermocouple, ODS, and tilt switch
If your Charmglow lights but goes out when you release the control knob (or shuts off shortly after), the thermocouple or ODS pilot assembly is almost certainly involved. This is the most common real-world failure on these heaters, and the manual specifically calls it out.
How the thermocouple and ODS work together
The thermocouple is a small metal probe that sits in the pilot flame. When it gets hot, it generates a tiny electrical signal that holds the gas valve open. If it doesn't get hot enough, or if the signal is too weak, the valve closes and the heater shuts off. The ODS (oxygen depletion sensor) is a modified pilot that also senses oxygen levels and shuts the heater off if oxygen in the area drops too low. On Charmglow heaters, these two functions are often combined into one pilot/ODS assembly.
The manual's troubleshooting table lists four specific causes for 'burner won't stay lit': a bad thermocouple, corrosion at the thermocouple connection, the pilot flame not touching the thermocouple tip, and low gas pressure. The fixes, in order, are: replace the thermocouple or ODS assembly, clean the thermocouple contact point, reposition the thermocouple so the flame tip contacts it, and check/replace the propane tank.
How to check and fix the thermocouple
With the heater off and cool, look at the pilot assembly. The thermocouple tip (a small bulb or rod) should be sitting directly in the path of the pilot flame, not off to the side. If it's been bent away from the flame, gently bend it back toward center. There's usually enough flex in the mounting to do this by hand. After repositioning, relight the pilot and hold the knob in for a full 45 to 60 seconds before releasing. If it holds, you've solved it.
If repositioning doesn't help, check for corrosion on the thermocouple tip and at the connection where the thermocouple wire meets the gas valve. Corrosion looks like greenish or whitish buildup. Clean the tip gently with fine sandpaper or steel wool and clean the connection terminal with a small wire brush or fine grit. Reconnect and test.
If it still won't stay lit after repositioning and cleaning, the thermocouple itself is likely worn out. These are inexpensive parts (typically under $15) and are the number-one consumable on outdoor LP heaters. The manual specifies using only Blue Rhino Global Sourcing factory authorized parts, so use a Charmglow-compatible ODS/thermocouple assembly rather than a generic one. Getting the right part number from the exploded diagram on ManualsLib will save you a return trip.
Tilt switch and auto-shutoff issues
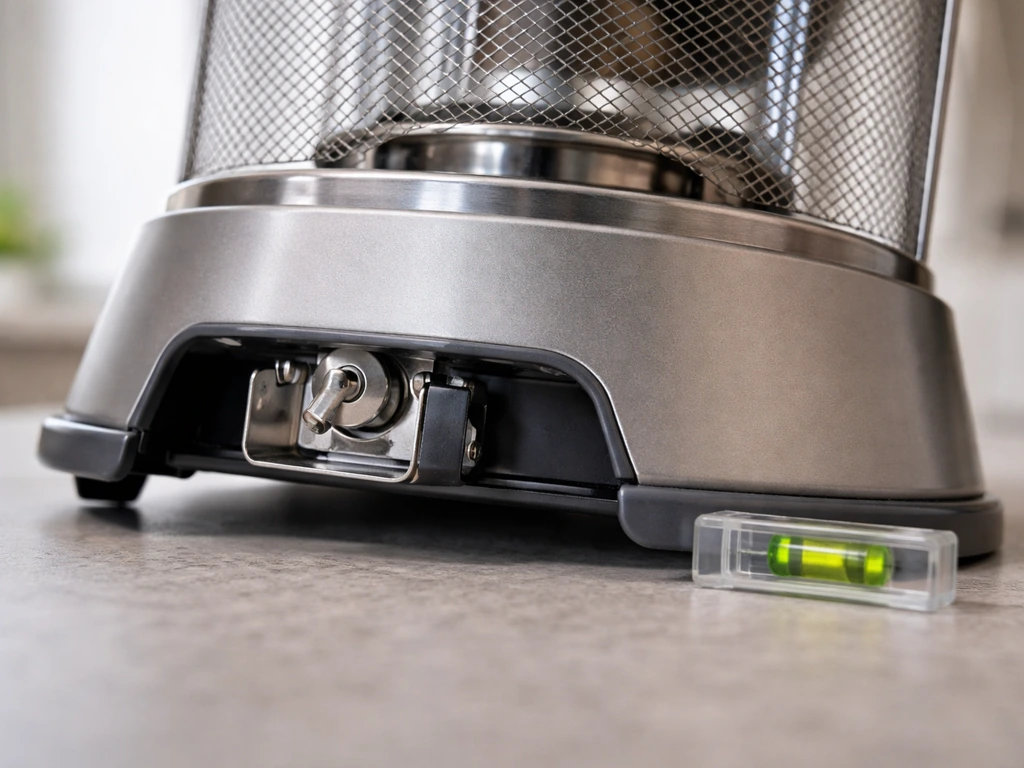
The tilt switch is a safety device that cuts gas if the heater tips over more than a set angle. If your heater shuts off randomly but isn't actually tipping, the tilt switch may be sticking, misaligned, or faulty. First, make sure the heater is sitting on a genuinely level surface. The manual lists 'heater not level' and 'burner tilted' as causes of uneven emitter glow and flame-out issues, so a slight lean on soft ground can trigger the tilt switch even without a full tip-over. Adjusting the feet or moving to a firm, level surface often resolves this without any disassembly.
If the surface is level but the heater still cuts out intermittently, the tilt switch itself may need to be inspected or replaced. The switch is usually a small mercury or ball-bearing mechanism near the base. If you're comfortable disassembling the base housing and testing continuity with a multimeter, you can confirm whether the switch is the problem. If not, this is a good point to call Charmglow support at 1-800-762-1142 rather than guessing.
Keeping it running: maintenance and seasonal care
Most Charmglow heater problems I've seen come from lack of maintenance rather than actual component failure. A heater that sat in a garage or shed over winter is going to need a quick inspection before you fire it up in spring. Here's what to check and clean on an annual basis.
- Venturi tube: disconnect the tank, remove the burner if accessible, and clear any spider webs, debris, or insect nests from the venturi. This is the single most common cause of 'worked fine last year, won't light this year' problems.
- Burner ports: use a brass wire brush to gently clean the small holes around the burner ring. Clogged ports cause uneven flame, uneven emitter glow, and yellow/orange instead of blue flames.
- Thermocouple and ODS tip: clean lightly with fine steel wool to remove any oxidation. Inspect the tip for pitting or cracking. If it looks worn, replace it proactively.
- Regulator and hose: inspect the hose along its full length for cracking, brittleness, or kinks. A hose that looks cracked or feels stiff from UV exposure should be replaced before the season starts. Inspect the regulator for damage or corrosion at the fittings.
- Emitter screen: check the screen on the top of the heater for rust, tears, or deformation. A damaged screen can affect heat distribution and is a fire risk.
- Pilot orifice: if the pilot flame is very small or irregular after cleaning, the pilot orifice may need to be cleaned with a fine needle. Never enlarge the hole.
For seasonal storage, close the tank valve, allow the heater to run until the remaining gas in the line burns off, then disconnect the tank and store it upright outdoors or in a ventilated area away from the heater. Cover the heater with a breathable cover, not a plastic bag, which traps moisture. Store the heater upright, not on its side, to avoid disturbing the tilt switch mechanism.
Safety checks, leak testing, and when to stop DIY
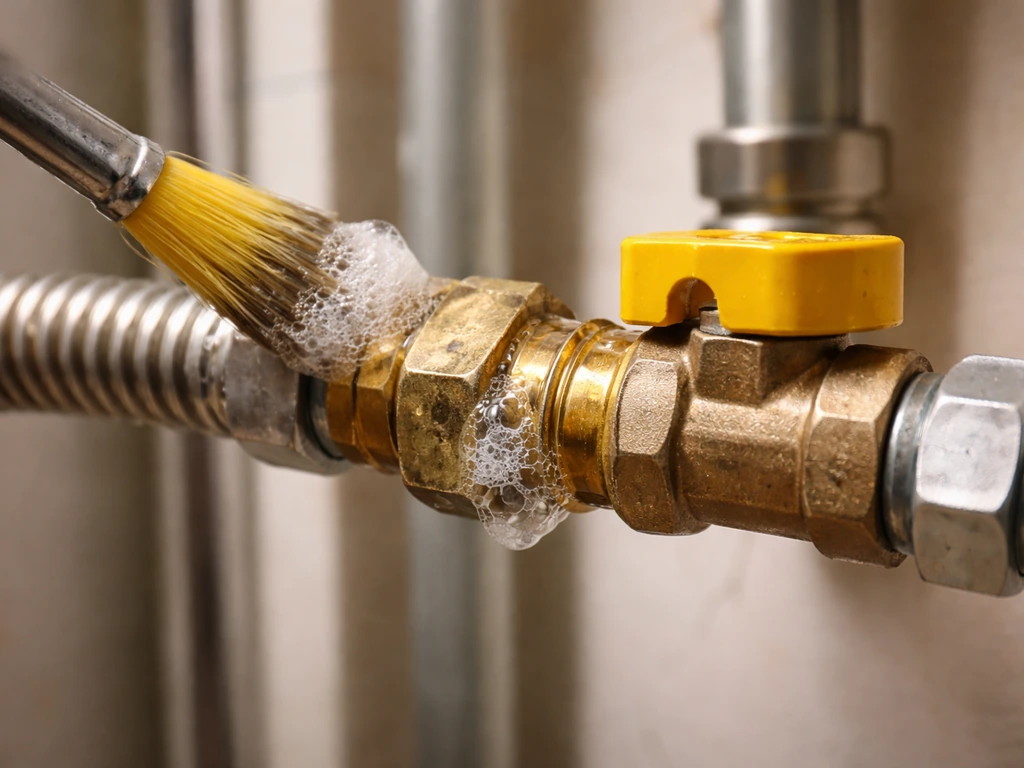
Before every season and after any fuel line work, do a leak test. With the tank connected and valve open, brush a soapy water solution (dish soap works fine) over every connection point: tank valve to regulator, regulator to hose, and hose to the heater's inlet fitting. Bubbles forming at any joint mean you have a leak. Shut off the tank immediately, let the area air out completely, then tighten the connection and retest. Never test with an open flame.
The manual is direct about the gas-smell protocol and it's worth repeating here: if you smell gas at any point, do not try to find the leak by lighting anything. Turn off the gas at the tank, don't touch any electrical switches, move away from the area, and call your gas supplier or fire department. This is not a situation where you troubleshoot first.
There are a few situations where DIY stops being the right call. If you've replaced the thermocouple and the heater still won't stay lit, the gas valve itself may be failing, and gas valve repairs or replacements on outdoor heaters are not DIY-friendly without specific training and tools. Similarly, if the regulator feels soft when you press on it, hisses continuously, or smells of gas even when the tank is closed, replace it entirely and don't try to repair it. A new compatible regulator and hose assembly is inexpensive compared to the risk.
If you've gone through every check in this guide and the heater still isn't working correctly, call Charmglow support at 1-800-762-1142 with your model and serial number ready. For parts identification, the exploded view diagram in the ManualsLib listing for the GWU9300H or your specific model is your best resource for getting the right part number before you order anything. Other patio heater brands like Fire Sense, East Oak, and AZ Patio Heaters use similar thermocouple and ODS systems, so if you've worked through this process on a Charmglow before, the diagnostic logic transfers well across brands. If you are also looking for the az patio heaters manual for setup or troubleshooting, the same model and fuel-type details will help you pick the correct document. If you also need an East Oak patio heater manual, you can usually find the model-specific PDF by searching your exact model number and “manual” on major manual sites or the manufacturer’s support page. If you need a Fire Sense patio heater manual, the quickest way is to match the model number on your unit to the correct PDF before troubleshooting.
| Symptom | Most Likely Cause | First Action |
|---|---|---|
| Won't ignite, no spark | Electrode misaligned or wire disconnected | Reposition electrode, check wire connection |
| Won't ignite, spark present | Gas flow blocked or low pressure | Check tank level, clear venturi and burner ports |
| Lights, goes out on release | Thermocouple not heated / mispositioned | Hold knob in 45-60 sec; reposition thermocouple tip into flame |
| Lights, goes out after a few minutes | Bad or corroded thermocouple | Clean tip and connection; replace thermocouple/ODS assembly |
| Shuts off randomly, no tip | Tilt switch triggering on unlevel surface | Move to firm level ground; inspect tilt switch |
| Uneven emitter glow | Clogged burner ports or low gas pressure | Clean burner ports; check tank level |
| Flame low, won't reach full heat | Low gas pressure or cold temps below 40°F | Replace or warm tank; not a heater fault |
FAQ
Which Charmglow patio heater models are covered by the multi-model manual (171380-1 / 171380-1.pdf)?
That PDF is for six specific models (62100, 62900, 82300, 82300C, GWT501A, and GWT801B). If your label shows a different model number, do not rely on the multi-model version, because gas connection style and valve components can differ even when the heaters look similar.
Where exactly do I find the model number and serial number on my heater?
Most units have the label on a sticker attached to the base pole or on the bottom of the base housing. Record both values exactly as printed, including any letters, since those characters determine the correct parts and the correct troubleshooting table in the manual.
What if my model number is “close” to one in the manual, but not exact?
If the model number on your cover or first page does not match yours, stop and find the exact manual. Using a near-match can lead to incorrect regulator or pilot steps, which may cause repeated flame-out or misdiagnosed issues.
Do I need the propane tank to be on “OFF” before I connect the regulator and hose?
Yes. Before threading the regulator onto the tank valve, ensure the heater control knob is in the OFF position. Then connect by hand only (clockwise), and avoid using tools on the regulator-to-tank fitting.
How long should I hold the control knob after the pilot lights to heat the thermocouple?
Hold it for about 30 to 45 seconds initially, if the manual for your model follows that sequence. If the pilot goes out when you release, hold it longer and fully, a common next step is increasing to about 45 to 60 seconds before releasing to confirm the thermocouple is getting enough heat.
My igniter clicks, but the pilot never lights. What’s the first check?
Confirm the electrode wire is fully connected at both ends (from the igniter module down to the electrode). A loose push-on terminal at the electrode end is a common cause of clicking with no spark, and it often fixes the issue without replacing parts.
If the burner lights but shuts off when I release the knob, is it always the thermocouple?
It’s usually either the thermocouple (or combined thermocouple/ODS assembly) or an alignment issue where the pilot flame does not contact the thermocouple tip. Corrosion at the thermocouple connection can also cause the gas valve to close quickly after release.
What are the most common causes of “burner won’t stay lit” on these heaters?
The manual’s symptom table commonly points to four areas in order: a bad thermocouple or ODS assembly, corrosion at the thermocouple connection, pilot flame not touching the thermocouple tip, and low gas pressure (often from the tank). Your fastest success usually comes from checking placement and cleaning before buying parts.
How do I tell if the thermocouple is positioned correctly relative to the pilot flame?
With the heater cool, the thermocouple tip should sit directly in the pilot flame path, not to the side. If it has been bent away, you can often gently reposition it by hand so the flame contacts the tip, then relight and hold the knob longer before releasing.
Can I clean a corroded thermocouple connection myself?
Yes, you can usually clean light corrosion using fine sandpaper or steel wool on the contact area, and a small wire brush or fine grit on the terminal connection. After cleaning, reconnect securely and test, but stop if you see pitting or damage that would prevent a reliable connection.
When should I replace the thermocouple/ODS assembly instead of continuing to adjust it?
If repositioning the thermocouple and cleaning the connection does not restore a stable pilot after repeated attempts, the thermocouple/ODS assembly is likely worn out. In that case, replacing the assembly is typically more effective than further bending or cleaning.
What parts should I buy for the thermocouple or ODS replacement?
Use a Charmglow-compatible factory authorized part for your model line. Avoid generic replacements, because the pilot/ODS assembly can be shaped differently or require a specific part number, and using the wrong one often leads to continued flame-out.
My heater shuts off randomly. Could it be the tilt switch even if it never fully tips over?
Yes. Even if it did not “tip over” completely, a slightly uneven setup on soft ground can cause the tilt switch to trip. First make sure the heater is on a firm, genuinely level surface, because a small lean can still trigger shutdown.
What should I do if the heater turns off intermittently and the surface is level?
If the heater is level but the shutoffs continue, the tilt switch may be sticking or faulty. Inspecting the switch and testing continuity with a multimeter is an option if you are comfortable disassembling the base housing, otherwise contacting support is often the safer next step.
How do I do a leak test after connecting the propane tank?
With the tank connected and the valve open, brush soapy water over each joint (tank valve to regulator, regulator to hose, and hose to the heater inlet fitting). Bubbles indicate a leak. Turn off the tank immediately if you find bubbles, ventilate the area, then tighten and retest.
What if I smell gas while troubleshooting?
Stop immediately. Turn off the tank valve, do not touch electrical switches, move away, and contact your gas supplier or emergency services if needed. Do not attempt to locate the leak by lighting anything or creating a spark.
Can I use an aftermarket regulator or hose assembly with my Charmglow heater?
No. The manual specifies using only the regulator and hose assembly that came with the heater. Using an aftermarket or mismatched regulator can create connection incompatibility or improper fuel flow, which can cause ignition problems or repeated shutdowns.
When does the problem suggest I should stop DIY and call for help?
If you’ve replaced the thermocouple/ODS assembly and it still won’t stay lit, the gas valve may be failing, and that is not generally DIY-friendly. Also stop DIY if the regulator seems damaged, feels “soft” under pressure, continuously hisses, or there is a gas odor even with the tank closed, since a full replacement regulator and hose is usually safer.