Most broken patio heaters fall into three categories: won't ignite at all, lights but won't stay lit, or runs for a few minutes then shuts off. In almost every case, the culprit is one of a small handful of components: a dead piezo igniter, a dirty or misaligned thermocouple, a tripped tilt switch, or a clogged orifice. Before you haul the heater to the curb or pay for a service call, work through this guide. Nine times out of ten you can fix it yourself with basic hand tools in under an hour.
Broken Patio Heater Repair Guide: DIY Troubleshooting Steps

Grant Mercer
28 Apr 2026
Quick diagnosis: figure out exactly what 'broken' means
The first thing to do is get specific about the symptom, because 'it doesn't work' covers a dozen different problems with different fixes. Stand at the heater, try to start it normally, and watch what happens at each step.
| What you observe | Most likely cause | Where to start |
|---|---|---|
| No click and no spark when you push the igniter | Dead piezo igniter or disconnected igniter wire | Ignition section below |
| Click and spark but pilot won't catch | Gas supply issue, clogged orifice, or airflow problem | Gas supply and ignition checks |
| Pilot lights but goes out when you release the knob | Thermocouple not in flame path, or thermocouple failed | Thermocouple section below |
| Pilot lights, main burner lights, then shuts off after a few minutes | ODS/safety sensor triggered, or tilt switch tripping | Safety shutdown section below |
| Heater tips off and won't restart | Tilt switch tripped, needs reset | Tilt switch section below |
| No heat from electric heater, unit is plugged in | Thermal cutout tripped, element failed, or tilt switch off | Electric heater checks below |
Write down exactly what happens. Does it click? Does the pilot catch? How long does it run before shutting off? That detail will cut your diagnosis time in half.
Safety first: before you touch anything
Gas appliance troubleshooting is safe when you follow a short set of rules. Skip any of these and you're taking a real risk.
- Never troubleshoot with gas flowing. If you smell gas before you've done anything, stop immediately. Close the tank valve, move everyone away from the area, and don't use any switches or flames nearby.
- After connecting or reconnecting any gas fitting, do a leak test before lighting the heater. Apply a liquid leak-detection solution (or soapy water) to every threaded connection and the regulator fitting under normal operating pressure. Bubbles mean a leak. Do not proceed until the leak is fixed.
- Work outdoors or in a well-ventilated area. Never bring the heater indoors for testing.
- If the igniter keeps sparking on its own after the gas is off, that's a wiring or control fault. Stop and call a pro.
- If you find a cracked heat shield, warped emitter screen, or visibly damaged gas line, those are not DIY fixes. Call a certified gas technician.
- Repeated unexplained shutdowns after you've checked the thermocouple and tilt switch also warrant a pro inspection. Don't keep resetting and relighting a heater that keeps failing the safety chain.
- For electric patio heaters: unplug before opening any panel or pressing a reset button. Some reset buttons require a non-conductive rod to press. Don't use a metal screwdriver.
Identify your heater type so you're chasing the right problem

Patio heaters split into two main types: gas-fired (propane or natural gas) and electric (infrared element or quartz tube). The failure modes are almost entirely different, so knowing which you have tells you which half of this guide applies to you.
Propane and natural gas heaters
Most freestanding mushroom-style and tabletop patio heaters run on propane from a standard 20-lb tank. Wall-mounted and some built-in models connect to natural gas. Both types use a pilot-and-burner system with a piezo igniter, a thermocouple (or ODS sensor), and a gas valve controlled by the main knob. The fuel path goes: tank/supply line, regulator, shutoff valve, gas valve body, pilot orifice, burner orifice. A blockage or failure anywhere in that path causes ignition problems.
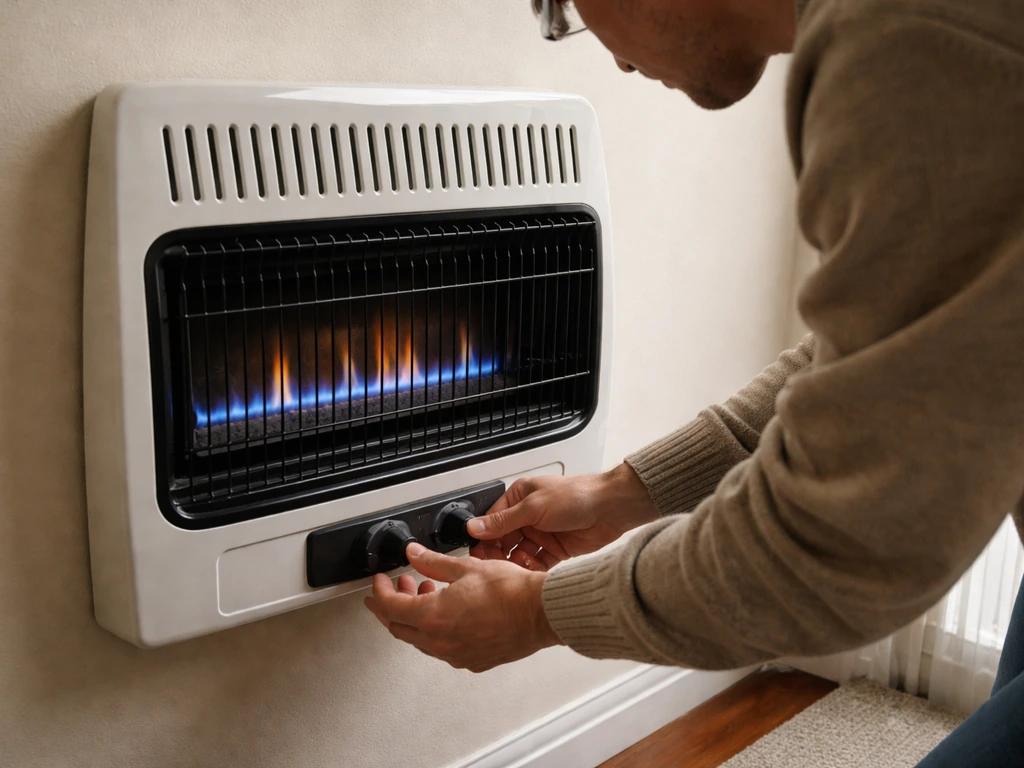
Electric patio heaters
Electric models use a resistance element or infrared emitter powered directly from a standard outlet (typically 120V or 240V). They have no pilot, no thermocouple, and no gas valve. Their main failure modes are a tripped thermal cutout, a tilt switch in the off position, a failed heating element, or a bad power connection. If you have an electric heater and it's producing no heat, start by checking the tilt switch position and the thermal reset button before assuming the element is dead.
Ignition troubleshooting: why it won't spark or won't catch
Check gas supply first
Before blaming the igniter, make sure there's actually gas reaching the heater. Open the tank valve fully, wait 30 seconds, then try again. If the tank is low or the regulator is in a thermal lock (which happens if you open the valve too fast), close the valve, wait 60 seconds, and reopen it slowly. A partially open valve is one of the most common 'broken heater' calls that turns out to be nothing.
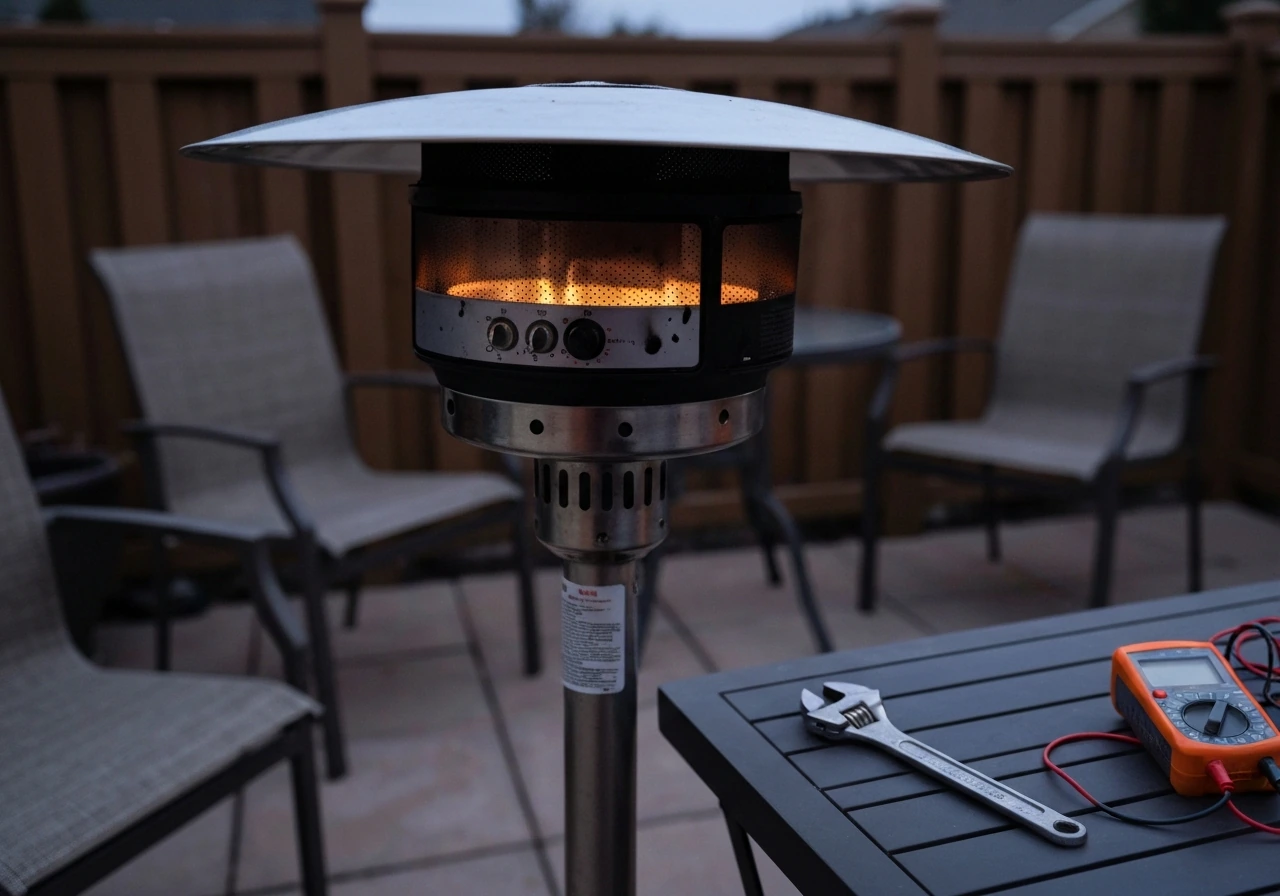
Test the piezo igniter
Look through the burner screen or pilot viewing window while pressing the igniter button firmly and completely until you feel or hear a click. You should see a small blue spark at the electrode tip near the pilot. If there's no spark at all, the piezo module itself may have failed, or the igniter wire has come loose from the electrode. On models like Hiland heaters, the lead wire from the igniter module to the switch can work free from its terminal over time. Push it firmly back on and try again before buying a new igniter.
If you get a spark but the pilot still won't light, the spark is landing in the wrong place. The electrode tip should be positioned very close (1-2mm) to the pilot port. On many heaters the electrode is adjustable. Bend it carefully so the spark gap is tight and aimed directly at the pilot orifice opening.
Clogged pilot or burner orifice
If the pilot lights but the main burner won't come on, the burner orifice is a prime suspect. Spider webs, dust, and debris are notorious for clogging the small hole. The owner’s manual also advises keeping air passageways and ventilation openings clear of dirt and spider webs to prevent safe-operation issues [Spider webs, dust, and debris are notorious for clogging the small hole. ](https://media.
tractorsupply. com/is/content/TractorSupplyCompany/tsc/product/2/40/43/19/2404319_Man1. pdf). With the gas fully off and the tank disconnected, use a can of compressed air to blow out the pilot orifice and burner orifice.
With the gas fully off and the tank disconnected, use a can of compressed air to blow out the pilot orifice and burner orifice.
Do not use a wire or pin to ream out an orifice as that enlarges the hole and changes the fuel-air mixture. If the orifice is visibly corroded or damaged, replace it.
Airflow and wind
Wind is a surprisingly common cause of ignition failure that homeowners don't think of. If you're trying to light the heater in a breeze, the pilot flame blows away before it can heat the thermocouple. Shield the base with your body while lighting, or move the heater to a calmer spot for testing. If the heater lights reliably indoors or in still air but won't stay lit outside, your problem is wind, not parts.
Thermal safety shutdowns: thermocouple, ODS, and sensor diagnosis
If the pilot lights and the main burner fires but the heater shuts off after anywhere from 30 seconds to a few minutes, the safety chain is cutting gas flow. On propane patio heaters, that chain usually involves either a thermocouple or an Oxygen Depletion Sensor (ODS). Understanding how they work makes the diagnosis much faster.
How the thermocouple works (and why it fails)
The thermocouple is a small metal probe that sits in the pilot flame. When it gets hot enough, it generates a tiny electrical voltage that tells the gas valve to stay open. If the thermocouple doesn't get hot enough, or generates insufficient voltage, the valve snaps shut and the gas cuts off. There are three reasons this happens: the thermocouple is positioned outside the flame path, it's coated in dirt or residue blocking heat transfer, or it's genuinely failed and needs to be replaced.
- Look at the pilot flame when the heater is running. The thermocouple tip (the rounded probe end) should be sitting inside the flame, not beside it or above it. If it's out of the flame, loosen the positioning bracket and move the probe so the flame wraps around the tip.
- Check for dirt or carbon buildup on the thermocouple tip. A light scrub with fine steel wool or emery cloth can restore contact. Also check the small hole or air port near the pilot and thermocouple mounting area — if it's blocked, clear it with compressed air.
- Check the thermocouple connection at the gas valve. It threads in by hand and should be snug (finger-tight plus a quarter turn with pliers). A loose connection causes exactly the same symptom as a failed thermocouple.
- If the tip is in the flame, the connection is snug, and the probe is clean — replace the thermocouple. They cost around $10-15 and are available at most hardware stores. Older heaters that won't stay lit almost always have a thermocouple that's simply worn out.
ODS (Oxygen Depletion Sensor) shutdowns
Some heaters, particularly Mr. Heater brand models, use an ODS instead of or in addition to a thermocouple. The ODS monitors oxygen levels in the air around the heater and shuts the unit down if combustion air gets too thin. If your heater runs fine outdoors in open air but keeps shutting off in a screened porch, pergola, or partially enclosed space, the ODS is doing exactly what it's supposed to do. The fix isn't repairing the heater, it's using the heater in a better-ventilated location. If the ODS is triggering in genuinely open air, the sensor itself may be faulty and should be replaced by a technician, since it's a safety-critical component.
Tilt switch and overheating reset checks
The tilt switch
Almost every freestanding patio heater has a tilt switch (sometimes called a tip-over switch) built into the base. If the heater rocks even slightly on an uneven surface, the switch trips and cuts gas flow or power. This is one of the most common causes of a heater that 'suddenly stopped working.' The fix is straightforward: make sure the heater is on a firm, level surface. Adjust the leveling feet if the heater has them. Rock the heater gently back to center, and try relighting. If it lights and stays lit, you've just confirmed the tilt switch was the issue.
If you've leveled the heater and it still trips the tilt switch, the switch itself may have become overly sensitive or its wiring connector has loosened. Check that the wiring harness to the tilt switch is firmly connected. On some models you can check the switch with a multimeter in continuity mode: when upright, the circuit should be closed (continuity); when tipped, open. A switch that shows open even when the heater is perfectly level needs to be replaced. Never bypass or jumper the tilt switch permanently for normal use. Running the heater with the safety disabled is a serious fire hazard.
Thermal overload (overheat protection)
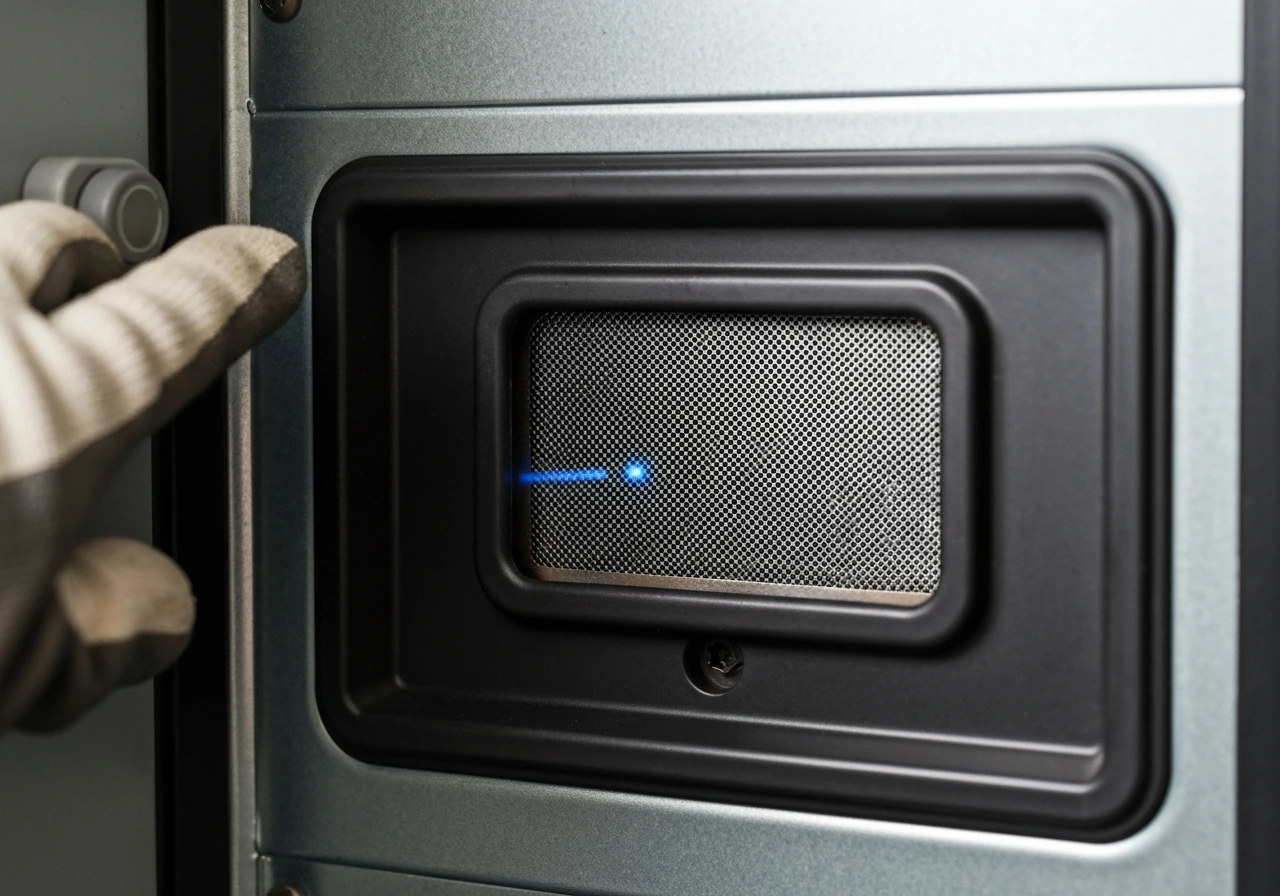
Electric patio heaters have a thermal cutout that trips if the heater overheats, usually because airflow around the element is blocked. If your electric heater runs for a while then shuts off and won't restart, look for a small reset button on the unit (often on the back panel or underneath). Unplug the heater first, wait for it to cool completely (10-15 minutes), then press the reset button with a non-conductive object. Plug it back in and test. If it trips again quickly, check that nothing is blocking the element housing and that the heater isn't running in a position that restricts airflow.
Repair actions and post-fix testing
Replacing the thermocouple
- Close the gas valve and disconnect the tank or supply line.
- Locate the thermocouple: it's the thin metal probe near the pilot, with a small copper or steel tube running down to the gas valve body.
- Unscrew the thermocouple nut from the gas valve (usually 5/16 inch, finger-loose then wrench). Note how it threads in.
- Release the probe end from its mounting bracket near the pilot. It usually slides out or has a small clip.
- Take the old thermocouple to the hardware store to match the length and connector type, or check your model number for the OEM part.
- Install the new thermocouple: route the tube the same way as the old one, seat the probe tip in the pilot flame path, and hand-tighten then snug the valve nut.
- Reconnect the gas supply, do a full leak test on all connections, then attempt ignition.
Replacing a piezo igniter
Piezo igniters are easy to swap. Most unscrew from a housing on the gas valve or control knob assembly. Disconnect the igniter wire, remove the old unit, thread in the replacement, and reconnect the wire. Replacement piezo igniters are cheap (under $10 for universal models). After installation, test for spark before reconnecting the gas, then test with gas.
Cleaning the pilot and burner
With the gas off and the tank disconnected, remove the burner head if your model allows it (usually three screws). Use compressed air to blow out the pilot orifice and main burner ports. A soft brush removes external soot and debris. Don't use water on the internal components. Reassemble, reconnect, and leak-test before testing ignition.
Checking the regulator
Regulators can fail in a locked state (no gas flow) or a fully open state (too much gas). Signs of regulator lock: you open the tank valve, try to light the heater, and there's zero gas smell at the burner even after 30 seconds with the knob on pilot. Reset the regulator by closing the tank valve, turning the heater control knob to off, waiting 30 seconds, then slowly reopening the tank. If the problem keeps returning, replace the regulator. They're typically $15-25 and attach with a standard POL or acme fitting.
Post-repair testing checklist
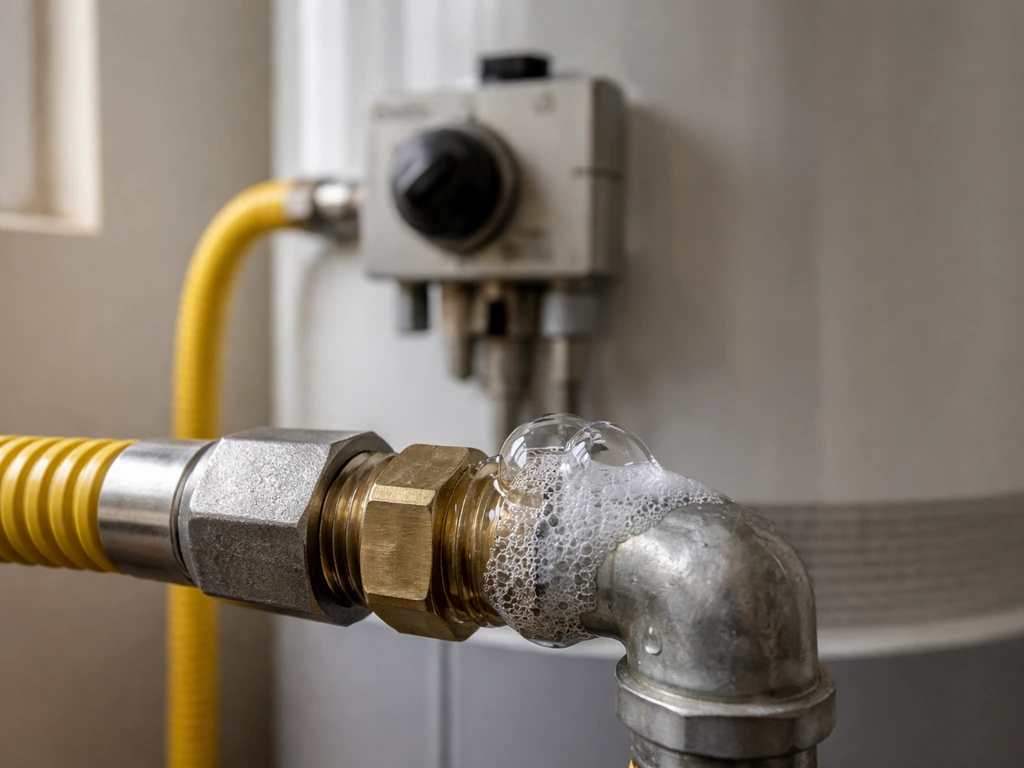
- Do a soap-and-water or leak-detection solution test on every gas connection you touched. No bubbles before proceeding.
- Attempt ignition: hold the knob in the pilot position, press the piezo until spark, keep the knob held down for 30 seconds after the pilot catches.
- Release the knob slowly. The pilot should stay lit. If it goes out, go back to the thermocouple section.
- Turn the knob to a medium heat setting. The main burner should ignite from the pilot within a few seconds.
- Let the heater run for 15 minutes. Watch for unexpected shutoffs. If it runs clean for 15 minutes on a level surface in open air, you've confirmed the repair.
Maintenance and prevention: keep it running season after season
Most broken patio heaters are the result of deferred maintenance. A few simple habits at the start and end of each season will prevent most of the failures covered in this guide.
- At the start of each season, inspect the burner screen and emitter for spider webs, insect nests, and debris before lighting for the first time. Blow out the pilot and burner orifices with compressed air.
- Wipe down the thermocouple tip with a dry cloth or light scrub with fine emery cloth each season. Carbon and oxide buildup on the tip reduces voltage output over time.
- Check all gas connections at the regulator, hose, and valve body. Tighten any that have worked loose. Do a full leak test after any reconnection.
- Inspect the gas hose for cracks, kinks, or stiffness. Propane hoses degrade over 5-8 years. Replace a hose that shows any cracking, even minor.
- At the end of the season, close the tank valve and run the heater until the residual gas is consumed. This clears gas from the line before storage.
- Store the heater upright in a covered location or with a proper heater cover. Moisture inside the burner and orifice is a leading cause of springtime ignition failures.
- If the heater sits outdoors year-round, check the tilt switch wiring harness connector once a year. Moisture and thermal cycling work connectors loose over time.
- Check the leveling feet before each use. Even a slight lean on an uneven patio can be enough to trip the tilt switch mid-session, especially on windy days.
If you've worked through this guide and the heater still won't stay lit reliably, the issue may be deeper in the gas valve itself, a failed solenoid or sticking valve seat. At that point, weigh the cost of a replacement valve (which can approach the price of a new budget heater) against the age and overall condition of the unit.
For persistent ignition faults, stubborn flame-retention problems, or anything involving the main gas valve or supply line, it's time to call a certified gas technician rather than keep chasing the issue yourself. If you suspect patio heater problems that involve poor ignition or repeated shutdowns, use the safety and troubleshooting steps in this guide to pinpoint the component at fault.
If you’re dealing with firestorm patio heater problems like repeated shutdowns or poor flame retention, the fix may be a deeper component issue that needs a technician. If your patio heater is still failing after these checks, you may need a top replacement for your specific patio heater model patio heater top replacement. Knowing when to stop is as much a part of good DIY practice as knowing what to fix.
FAQ
What should I do if my broken patio heater smells like gas but the pilot never lights?
If you smell gas but you never see a pilot spark or pilot flame, treat it as a gas-supply or valve problem and stop troubleshooting. Ventilate the area, turn the control knob to off, shut the tank valve, and wait before re-attempting. The next likely checks are for a regulator lock or a partially opened tank valve, since you can get little to no gas at the burner even with the heater turned on.
I tried to clear a clogged burner orifice on my broken patio heater. How do I know I didn’t damage it?
Do not “clean” an orifice with a wire, pin, or drill bit. Even if it seems to reopen, you can enlarge the hole and change the air-to-gas ratio, which leads to unstable flames or rapid shutdown. For clogged ports, use compressed air with the gas fully off and the tank disconnected, and replace the orifice if it’s corroded or visibly deformed.
My broken patio heater sparks but won’t ignite. What are the most common causes besides a dead igniter?
If you repeatedly get a spark at the electrode but the pilot still won’t catch, re-check the electrode position (gap and aim) and make sure the electrode is clean and not grounded by soot. Also confirm you’re lighting with the knob held fully in the pilot position for long enough that the thermocouple starts generating voltage.
Could my broken patio heater be acting up because the propane tank is low, and how can I tell?
For propane models, low tank pressure often looks like “no ignition” because the pilot cannot establish a stable flame. If the heater fails right after a tank change, also check that the regulator fitting is properly seated and the tank valve was opened fully, then try again after waiting 30 seconds.
My broken patio heater seems level but still trips. What else can cause the tilt switch to trigger?
A tilt switch trip can be caused by more than just an uneven floor, for example a shifted base on soft pavers or a heater set on a mat or wet surface that allows slight rocking. After you level it, let it sit for a minute, then try starting while gently pressing it upright, if the design allows safe handling.
How do I diagnose whether my broken patio heater shuts off because of a thermocouple issue versus wind?
If your thermocouple gets dirty, it may still “kind of work” until the residue builds up. In addition to cleaning debris, confirm the probe sits in the pilot flame path, not off to the side. If it shuts off after lighting in multiple locations with similar wind exposure, plan on thermocouple replacement rather than repeated cleaning.
What’s the fastest way to tell whether my broken patio heater is shutting down due to wind or a safety sensor?
Wind can cause a thermocouple or ODS shutdown, but you can distinguish it by testing in still conditions (indoors only if manufacturer guidance allows it, otherwise sheltered but open-air). If it reliably stays lit in still air but not in breeze, treat the main problem as airflow and reposition the heater rather than replacing safety parts right away.
My electric broken patio heater runs then shuts off. How should I use the reset procedure without making it worse?
If the electric heater shuts off, look first for a blocked airflow path around the element and confirm the tilt switch and thermal reset behavior. After unplugging and cooling, press the reset button once, then test. If it trips immediately again, stop and inspect for obstructions, bent fins, or debris in the heater housing.
After replacing parts on a broken patio heater, what’s the safest way to confirm everything is sealed before testing?
For any part you replace on a gas heater, you should do a leak test before attempting ignition. Use soapy water at the fittings and connections you disturbed, look for bubbles, and only proceed when there are no bubbles. If you find leaks, do not attempt to “dry it out” and relight.
My broken patio heater sometimes has no gas at the burner. How do I decide when it’s the regulator instead of the igniter or thermocouple?
If the regulator repeatedly locks or won’t deliver gas, don’t keep troubleshooting ignition. Close the tank valve, reset the control to off, wait, then reopen slowly as described. If it returns, replacing the regulator is usually the most cost-effective fix, especially when symptoms include no gas smell at the burner even with the control set correctly.
When should I stop DIY repairs on my broken patio heater and replace the whole unit?
If you’re considering replacing the main gas valve on an older heater, compare the price of the valve and labor risk against a whole-unit replacement. A practical cutoff is when multiple safety-related shutdown symptoms persist after you’ve confirmed gas, ignition, and sensor operation, because that often indicates a deeper component problem and more time spent chasing.