If your gas patio heater lights for a second and then shuts off the moment you release the knob, the thermocouple almost certainly isn't getting hot enough to hold the gas valve open. That's the single most common cause, and it's fixable at home in under an hour. But before you replace anything, run through the full checklist below, because a kinked gas hose, a tripped tilt switch, a clogged pilot orifice, or a propane regulator that's stuck in safety lockout can produce the exact same symptom and cost you nothing to fix.
Patio Heater Will Not Stay Lit: DIY Troubleshooting Guide

Grant Mercer
28 Apr 2026
Won't light at all vs. won't stay lit: know which problem you have
These two symptoms look similar but point to different causes, so it helps to pin down which one you're dealing with before you start pulling things apart. When you have a broken patio heater, start by confirming the safety basics and identifying whether it won't light or won't stay lit, since the fixes differ.
| Symptom | What it usually means | Where to start |
|---|---|---|
| Clicks but no flame at all | No gas reaching the pilot, igniter not sparking, or electrode gap is wrong | Gas supply and igniter checks |
| Pilot lights, goes out when you release knob | Thermocouple not generating enough voltage, or pilot flame too small/misaligned | Thermocouple and pilot orifice |
| Burner lights, then shuts off after a few seconds | Tilt-over safety switch tripped, thermostat issue, or overheating cutoff | Safety switch and thermostat reset |
| Nothing happens, no click, no gas smell | Dead battery, gas valve closed, or propane tank empty/OPD lockout | Battery, tank valve, regulator reset |
| Smells like gas but won't light | Gas reaching the heater but igniter failing, or air in the line | Igniter and air-bleed procedure |
Safety first: do these before anything else
Gas troubleshooting is safe when you respect a few hard rules. Ignore them and you're working with real hazards, not just a broken heater.
- If you smell gas at any point and the heater isn't lit, turn the control knob to OFF immediately, close the tank valve, and wait at least 5 minutes for the gas to clear before doing anything else. Do not hit the igniter during this time.
- Work outdoors only. Never troubleshoot a propane patio heater indoors or in an enclosed space.
- Make sure the heater is on a flat, stable, hard surface. These heaters have a tilt-over safety switch that will shut off gas if the unit tips even slightly. An uneven surface can trip it without the heater actually falling over.
- Close the propane tank valve before disconnecting the hose or regulator for any inspection.
- Check that you're at least 3 feet away from any structure, awning, or overhead obstruction. Reflected heat can trigger the thermal cutoff.
- Keep a fire extinguisher within reach any time you're working around propane.
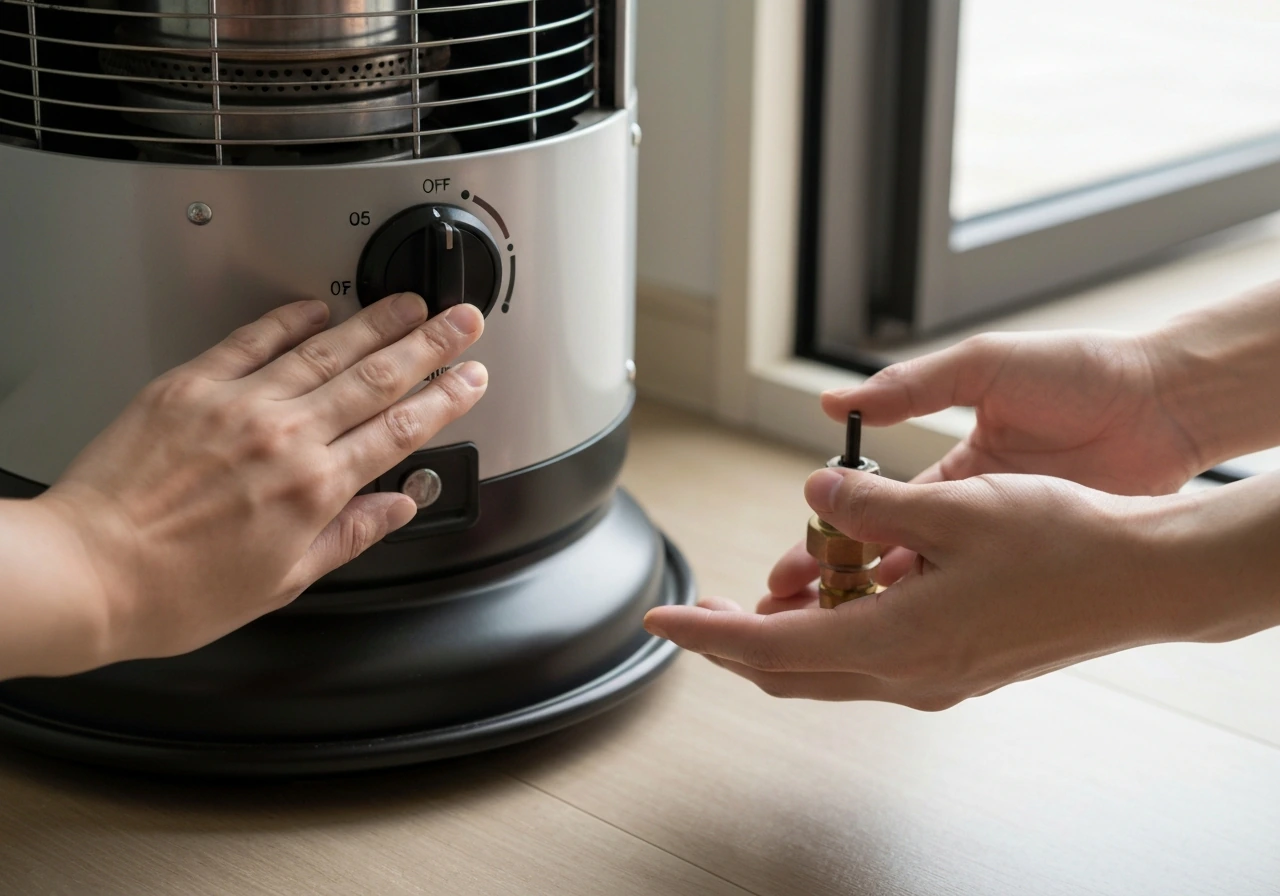
Once you've confirmed the area is safe and you haven't smelled gas, do a basic setup check: Is the tank valve open? Is the regulator hose fully connected and not kinked? Is the heater sitting level? Is the control knob set to Pilot before you try to light? These sound obvious, but they account for a surprising number of service calls.
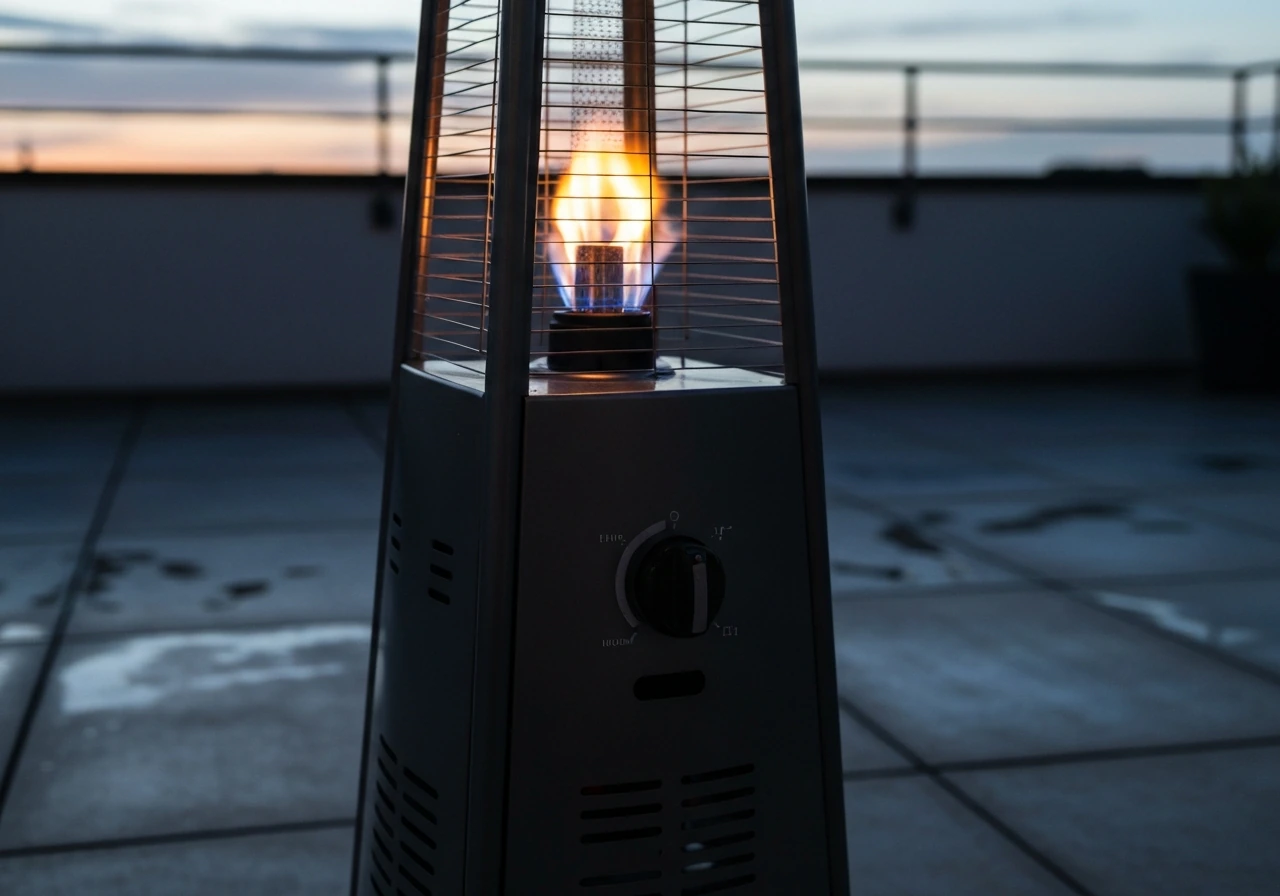
The most likely culprit: pilot lights but won't stay lit (thermocouple and control valve)
When your patio heater's pilot lights and then dies the moment you let go of the knob, you're looking at a thermocouple problem about 80% of the time. Here's how the system works: the thermocouple is a small metal probe that sits in the pilot flame. As it heats up, it generates a small electrical voltage (around 25 to 30 millivolts) that tells the gas valve it's safe to stay open. If the voltage is too low, the valve snaps shut. That's why the flame drops the second you release the knob and remove the manual override.
Step 1: Hold the knob longer than you think you need to
This is the fix that works most often, and it costs nothing. After you light the pilot, hold the control knob fully depressed for a full 30 to 45 seconds. Most people let go after 10 seconds, which isn't long enough for the thermocouple to reach operating temperature and generate sufficient voltage. Some manuals for models like the GWT801B specify a minimum of 30 seconds. If the pilot goes out the moment you release at 10 seconds but stays on when you hold for 45 seconds, the thermocouple is working but just needs more warm-up time.
Step 2: Check thermocouple position in the flame
The tip of the thermocouple needs to sit directly in the pilot flame, not beside it or above it. If the probe has shifted slightly (which happens over time from heat cycling and vibration), the flame won't heat it enough. Look at the pilot assembly with the flame lit. The thermocouple tip should be immersed in the inner blue cone of the flame. If it's off to the side or only catching the outer edge of the flame, carefully bend the probe bracket a few millimeters toward the flame center. This is fiddly work but makes a big difference.
Step 3: Test or replace the thermocouple
If you've held the knob for 45 seconds, the flame looks good, the probe is in the flame, and it still drops out, the thermocouple itself is likely failing. A working thermocouple should produce at least 25 mV when fully heated. You can test this with a multimeter set to millivolts: disconnect the thermocouple lead from the gas valve and measure across the terminals while the pilot is lit and the probe is hot. Below 20 mV means replacement. Thermocouples for patio heaters are inexpensive (typically $10 to $20) and are a straightforward swap on most models, including popular Hiland and Living Accents units. If the thermocouple is failing, you may end up choosing a patio heater top replacement to get heat recovery and reliable flame holding back to normal. If the pilot flame itself is tiny or weak (barely visible), address the gas supply and pilot orifice before replacing the thermocouple, because a weak flame will produce low voltage regardless of thermocouple condition.
Control valve issues
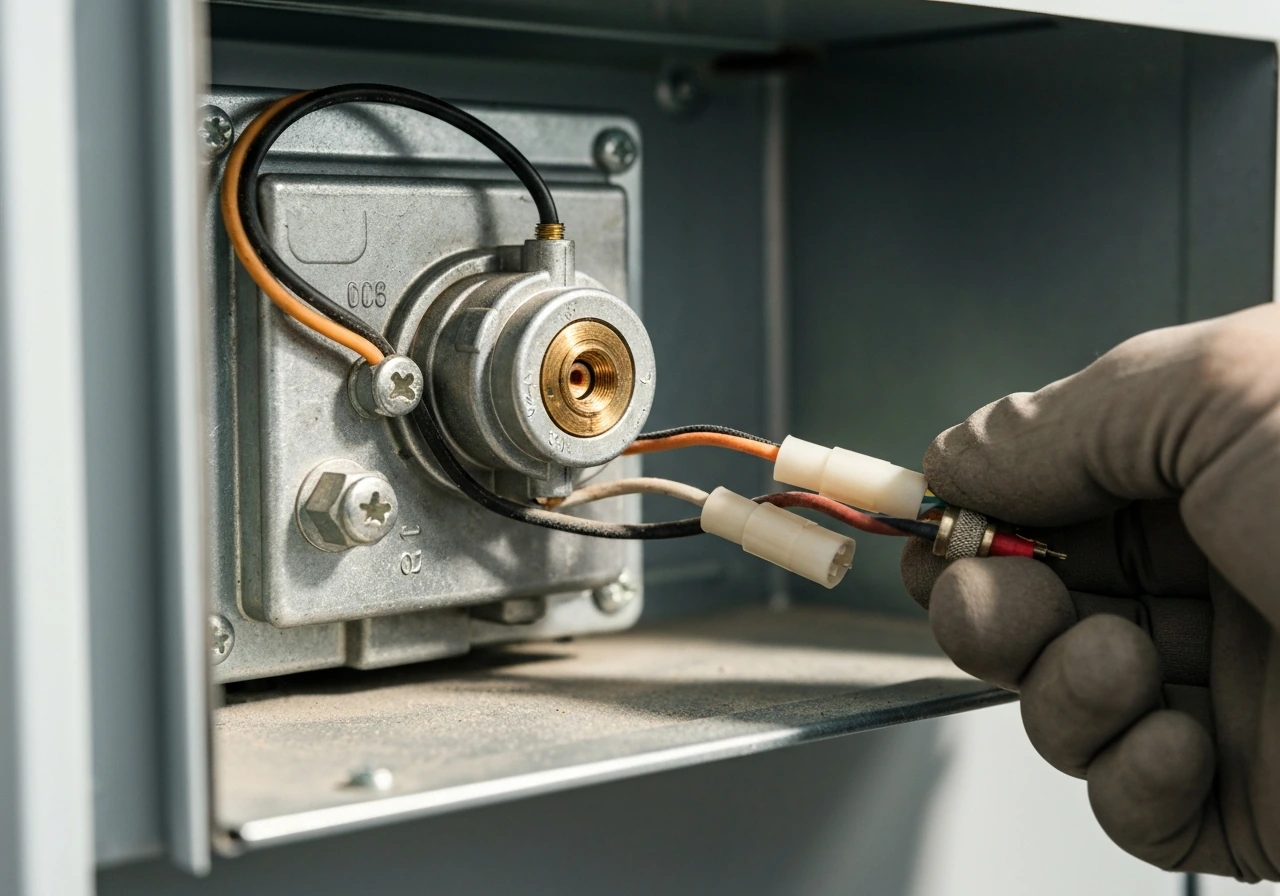
If you've replaced the thermocouple and it still won't hold, the gas control valve itself may have a faulty solenoid that won't stay energized. This is less common but does happen on older heaters. A control valve replacement is more involved and more expensive (often $40 to $80 for the part), but the symptom is identical to a bad thermocouple. Exhaust the thermocouple and cleaning steps first before going here.
Gas supply problems: tank, regulator, and hose
If the heater won't ignite at all, or the flame is weak and sputtering, the gas supply is where to look. These issues are easy to fix once you know what to check.
Propane tank level and temperature
A low tank is an obvious first check, but propane also vaporizes poorly in cold weather. If it's below about 40°F, a partially full tank may not supply enough vapor pressure to keep the pilot lit reliably. Warm the tank slightly by bringing it inside for 30 minutes if you're troubleshooting in cold conditions. Also check that the tank is a standard 20 lb. cylinder; smaller camping-style cylinders sometimes can't sustain the flow rate a full-size patio heater needs.
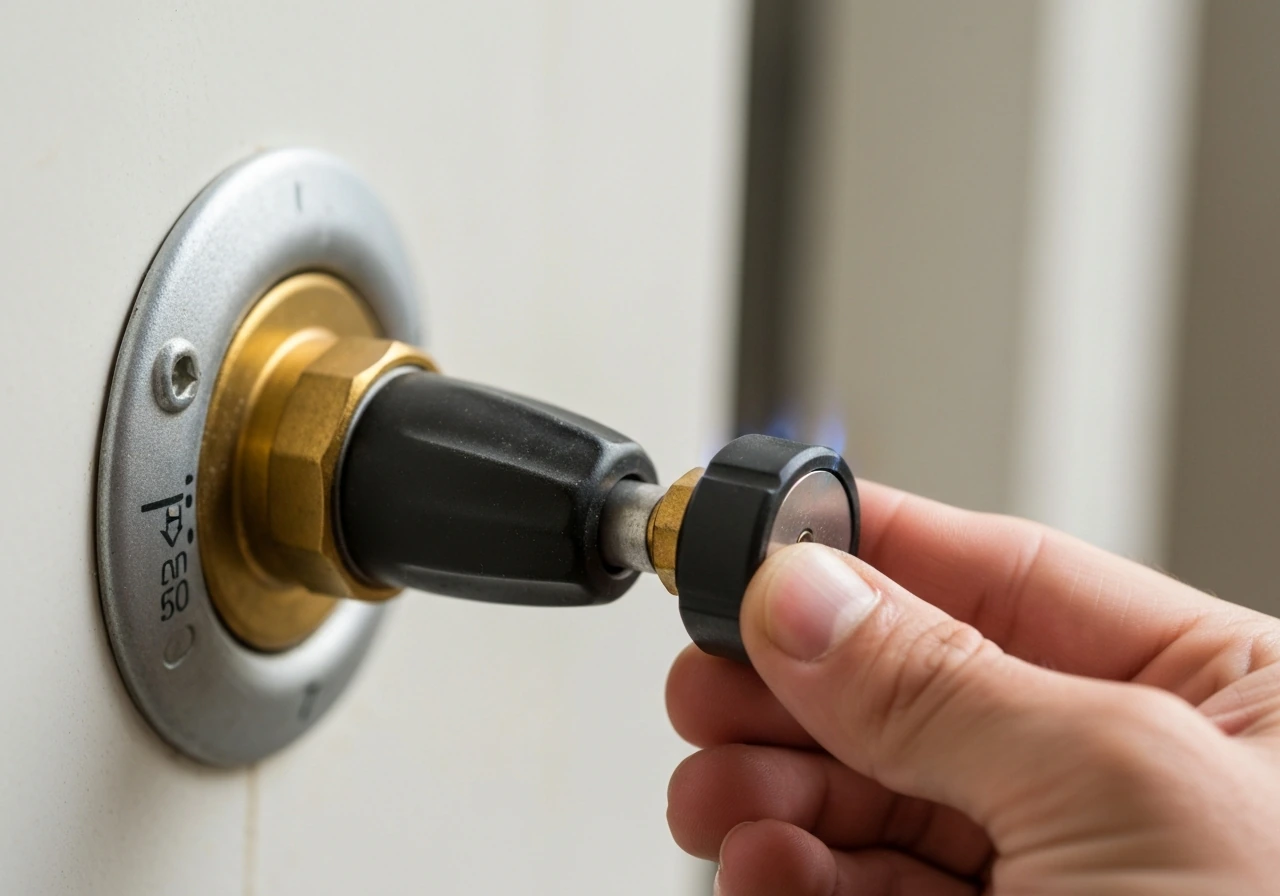
OPD valve and regulator lockout
This one catches a lot of people off guard. Modern propane tanks have an OPD (Overfill Prevention Device) valve with a built-in flow limiter. If you open the tank valve quickly (or if the heater tried to ignite without the valve fully engaged), the OPD can interpret the sudden pressure drop as a leak and restrict flow to a trickle. The symptom is a very weak flame or no flame despite the tank being full. The fix: turn the tank valve all the way off, disconnect the regulator from the tank, wait about 30 seconds, reconnect the regulator, then open the tank valve very slowly, a quarter turn at a time over about 5 seconds. That resets the flow limiter and usually restores full gas flow.
Hose kinks and air in the line
Run your hand along the gas hose from the regulator to the heater base and check for any kinks, bends, or pinch points. A kinked hose restricts flow enough to prevent ignition. If the hose is routed around a table leg or pinned under anything, free it up. If the heater has been in storage or this is the first use of the season, there may be air in the gas line. To bleed it: turn the control knob to the Pilot position, press and hold the knob in for up to 1 to 2 minutes without sparking it. This purges air from the line. You should start to faintly smell gas after 30 to 60 seconds, which tells you the line is cleared and you're ready to try lighting.
Cleaning fixes: pilot clogs, venturi blockages, and airflow
A dirty pilot orifice or clogged venturi tube is the second most common reason a patio heater either won't ignite or produces a flame too small to hold. These heaters sit outside season after season, and spiders, dust, lint, and debris find their way into every opening.
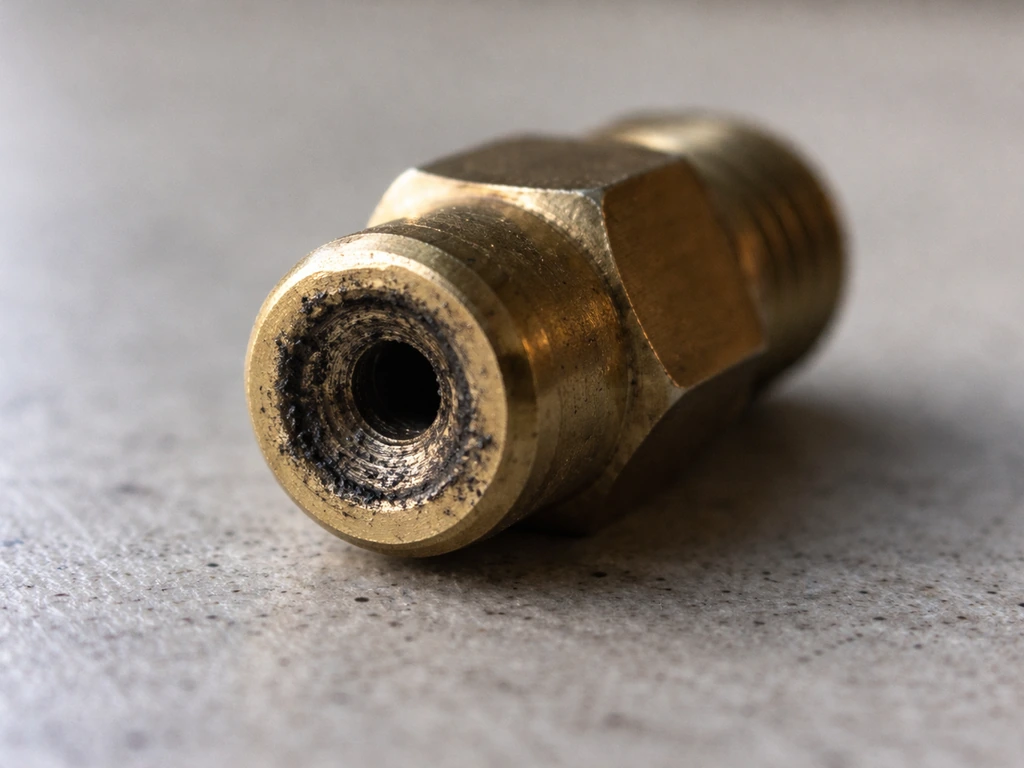
Cleaning the pilot orifice
Close the tank valve and disconnect the gas line before any cleaning. The pilot orifice is a tiny brass fitting with a small hole in the center. It gets clogged with dust, carbon buildup, and spider debris. Use a can of compressed air to blow through the orifice, or a single strand of wire (a strand from a wire brush works) to gently clear the opening. Do not use a drill bit or anything that could enlarge the hole. The orifice is precision-calibrated, and enlarging it will permanently affect the gas/air mixture. Never use a toothpick either, as bits can break off inside.
Clearing the venturi tube

The venturi tube is the air intake passage that mixes oxygen with gas before combustion. Spider webs are the number-one blockage culprit here, and it's a well-documented issue in troubleshooting guides from Fire Sense, Lowe's, and other sources. A blocked venturi means the burner can't get the air it needs, resulting in a weak flame that won't stay lit. To clean it: remove the burner assembly (usually two or three screws at the base), then use a bottle brush or pipe cleaner to sweep through the venturi tube. Follow with compressed air. If you see a screen or spider guard at the air intake, check it for debris and clean or replace it. Reinstall the spider guard after cleaning to prevent future blockages.
Wind and location
Patio heaters are sensitive to wind, and even a steady 5 to 10 mph breeze can blow out the pilot or destabilize the main flame. If you're troubleshooting and the heater is in an exposed location, move it to a sheltered spot temporarily to rule out wind as a factor. If it stays lit when sheltered, you know the hardware is fine and the placement is the issue.
Ignition system checks: spark, electrode, and battery
If the heater isn't sparking when you press the igniter button, or sparking but not catching, work through these checks in order.
- Check the igniter battery. Most push-button igniter modules use a standard AA or AAA battery housed in a compartment near the control knob or at the base of the heater. Pop the cover, replace the battery, and try again. Dead batteries are responsible for more 'won't light' calls than any igniter hardware failure.
- Listen and look for a spark. In a dim environment, press the igniter while looking at the pilot area. You should see a blue spark jump to the pilot. If there's no spark at all even with a fresh battery, the issue is the igniter module or the wire connection to the electrode.
- Check the electrode gap. The electrode is the small metal rod next to the pilot orifice that produces the spark. It should have a gap of roughly 3 to 4 mm between its tip and the pilot hood or grounding point. If it's been knocked out of position or corroded, the spark won't reach. Gently reposition it if bent, and clean the tip with fine steel wool if there's oxidation.
- Check the electrode wire and connection. Follow the wire from the electrode back to the igniter module. A loose connector, cracked wire insulation, or corroded terminal will interrupt the circuit. Reconnect or replace as needed.
- Use a manual lighter as a backup. If you've exhausted the igniter checks and still can't get a spark, use a long-reach BBQ lighter. On most mushroom-style patio heaters there's a small access port (sometimes called a peephole) near the pilot assembly. Hold the knob in, hold the lighter flame at the pilot orifice, and proceed with the 30 to 45 second hold. This confirms whether the gas supply is good and isolates the problem to the igniter system only.
Tilt switch, thermostat, and reset scenarios
If the heater lights, runs for a few seconds or minutes, and then shuts off on its own, you're likely dealing with a safety switch activation rather than an ignition problem.
Tilt-over safety switch
Every propane patio heater has a tilt-over (or anti-tip) switch that cuts the gas if the unit tilts beyond a certain angle, usually around 30 degrees. The switch itself is typically a mercury switch or a ball-bearing switch mounted inside the base. If the heater is on uneven pavement, a deck with a slope, or soft ground, it can trigger without the heater actually falling. Place the heater on a level, hard, stable surface. If the switch was tripped, turn the control to OFF, let it sit for a minute, then retry from the beginning. Some models require you to fully restart the ignition sequence after a tilt-switch trip; just turning it back to Pilot won't reset it.
Thermal cutoff and overheating
If the heater is positioned too close to a wall, fence, umbrella, or overhead structure, radiated heat can build up and trigger a thermal cutoff switch. Give the heater at least 3 feet of clearance in all directions and make sure nothing is directly overhead within about 6 feet. Let the heater cool for 10 to 15 minutes before relighting if you suspect overheating.
The 5-minute reset rule
Whenever the heater fails to light or shuts off unexpectedly, set the control knob to OFF and wait a full 5 minutes before trying again. This is written into most patio heater manuals, including the GWT801B and Patio Comfort NPC05, for a reason: it allows any unburned gas to dissipate and gives the safety valve time to reset. Jumping straight into another lighting attempt after a failed one is a common mistake that leads to frustration and, in the worst case, a gas buildup.
When to call a pro and what's worth replacing
Most patio heater problems are DIY-fixable with basic tools and inexpensive parts. If you keep running into patio heater problems, it helps to work through each likely cause in order, starting with the symptoms you’re seeing won't stay lit. But there are situations where the right call is to stop and get a professional involved, or to decide whether the heater is worth repairing at all.
Stop and call a pro if:
- You smell gas persistently even after shutting off the tank valve and waiting 5 minutes. This indicates a leak in the hose, regulator, or valve body that needs professional inspection.
- The gas hose shows visible cracking, weathering, or damage to the outer sheath. A damaged hose is a fire and explosion risk and must be replaced, not taped.
- The control valve or regulator is visibly damaged, corroded, or physically broken. Don't attempt to repair a gas valve yourself.
- You've replaced the thermocouple and the new one still doesn't hold, and you've ruled out all other causes. A failing gas valve solenoid requires proper diagnosis before any further work.
- The heater is more than 10 years old and has had multiple component failures. At some point the cost of parts and labor exceeds the replacement cost of a new unit.
Parts worth replacing yourself
| Part | Typical cost | DIY difficulty | When to replace |
|---|---|---|---|
| Thermocouple | $10–$20 | Easy | Pilot lights but won't stay lit after 45-second hold |
| Igniter battery | Under $2 | Trivial | No spark when pressing igniter button |
| Electrode/igniter module | $15–$35 | Moderate | No spark with fresh battery, wire and gap checks done |
| Gas regulator | $15–$30 | Easy | Weak flame after OPD reset, hose is undamaged |
| Gas hose | $15–$25 | Easy | Any visible cracking, kinking, or damage |
| Control valve | $40–$80 | Advanced | New thermocouple fitted but pilot still won't hold |
Before ordering parts, look up your specific model number (usually on a label inside the base panel or on the back of the heater frame) and confirm part compatibility. Generic thermocouples often work across brands like Hiland, Living Accents, and Fire Sense, but thread size and probe length vary. If you're dealing with a broader set of problems beyond a won't-stay-lit issue, the troubleshooting path for a broken patio heater or general patio heater problems covers additional failure points that might be relevant.
The good news is that in most cases you'll find the fix before you even need to order a part. Work through the 5-minute reset, the OPD valve reset, the 45-second knob hold, and a basic cleaning of the pilot and venturi before spending a dollar. Most heaters that 'won't stay lit' just need one of those steps. If you still have trouble with a broken patio heater, the guide below can help you pinpoint whether it’s gas supply, ignition, or a safety switch triggering. If your unit is still acting up, compare these checks with common firestorm patio heater problems like weak gas flow, pilot issues, or safety switch trips.
FAQ
How long should I hold the control knob after lighting the pilot for it to stay lit?
Hold the knob all the way down for at least 30 to 45 seconds. If you release at around 10 seconds, many heaters shut off because the thermocouple has not reached operating temperature yet.
What if the pilot looks like it’s burning, but the heater still won’t stay lit?
Confirm the thermocouple tip is immersed in the inner blue flame cone. If the tip is only beside the flame or catching the outer edge, the voltage stays too low and the valve will close when you release the knob.
Can I adjust the thermocouple after it starts working, or will I mess something up?
You can gently reposition it when the pilot is lit, using very small bends toward the flame center. Avoid forcing the probe into a different angle than the bracket is designed for, and stop if it feels like you would bend the metal unevenly.
Is it safe to keep trying to relight immediately after it shuts off?
No. After any failed lighting attempt or an automatic shutoff, set the knob to OFF and wait a full 5 minutes before trying again. This prevents repeated gas release and gives the safety valve time to reset.
My tank is full, but I get a weak pilot or no flame. Could it still be an OPD issue?
Yes. If the tank valve was opened quickly, or the regulator was engaged abruptly, the OPD flow limiter can restrict gas to a trickle. Reset by turning the tank off, disconnecting the regulator, waiting about 30 seconds, reconnecting, then opening the valve very slowly (quarter turns over about 5 seconds).
If the heater won’t stay lit, should I always replace the thermocouple first?
Not always. First verify the knob-hold time, confirm the thermocouple is in the flame, and inspect for a weak pilot. If the pilot is tiny or sputtering, fix gas supply, then clean the pilot orifice and venturi before replacing anything.
What reading should I look for when testing the thermocouple with a multimeter?
A fully heated, working thermocouple should generate at least about 25 mV. If you measure below 20 mV, replacement is typically the correct next step.
Do I need special tools to clean the pilot orifice and venturi?
You usually only need compressed air and a soft cleaning method (like a single wire strand for the tiny orifice, and a bottle brush or pipe cleaner for the venturi). Avoid drills, toothpicks, or anything that could enlarge the orifice or leave fragments behind.
How can I tell if the issue is wind exposure versus a hardware problem?
Move the heater to a sheltered spot and try again. If it stays lit when sheltered, wind is likely blowing out the pilot or destabilizing the flame, so the fix is placement or shielding rather than parts.
What if the heater turns off after lighting, but it feels like it runs fine for a short time?
That often points to a safety switch cutoff rather than ignition. Check that the heater is level on a hard, stable surface, because a tilt/anti-tip switch can trip on uneven ground even if the heater did not actually fall.
Will a tilt switch require me to fully restart lighting, or will switching back to Pilot work?
Often you must fully restart the ignition sequence. Simply turning back to Pilot may not reset certain models after a tilt-switch trip, so follow the complete lighting steps again.
Could overheating or clearance issues cause the heater to go out?
Yes. If it’s too close to a wall, fence, umbrella, or overhead structure, heat can build up and trigger a thermal cutoff. Use at least about 3 feet of clearance in all directions and about 6 feet from overhead obstructions.
The igniter sparks, but the heater doesn’t catch right away. What’s the first check?
Start with gas flow and pilot/air passage blockages. Verify the tank is adequate, warm conditions if it is cold, and then clean the pilot orifice and venturi if the flame is weak or delayed.
Does it matter which model my thermocouple replacement is for?
Yes. Even if parts look similar, confirm compatibility using your heater’s model number, because thread size and probe length vary. When in doubt, match the thermocouple specs to the original part.
When should I stop DIY and call a professional?
If you smell gas that does not clear, if the control valve seems stuck, if repeated resets do not restore stable operation, or if you find damaged gas components (hose/regulator fittings). Also consider replacement when repairs would require major parts beyond the thermocouple or basic cleaning.