Most Costco patio heaters are made by FireSense and run on propane with an electronic push-button igniter. To get yours running: confirm the AA battery is installed in the igniter chamber, open the LP cylinder valve fully, hold the control knob in for 2 minutes to purge air (especially on first use), then push the knob in and press the red igniter button. Hold the knob depressed for 30 seconds after the burner lights before releasing. That sequence covers the vast majority of Costco freestanding propane heaters sold from 2018 onward.
Costco Patio Heater Instructions: Setup, Lighting, and Fixes

Grant Mercer
1 Jul 2026
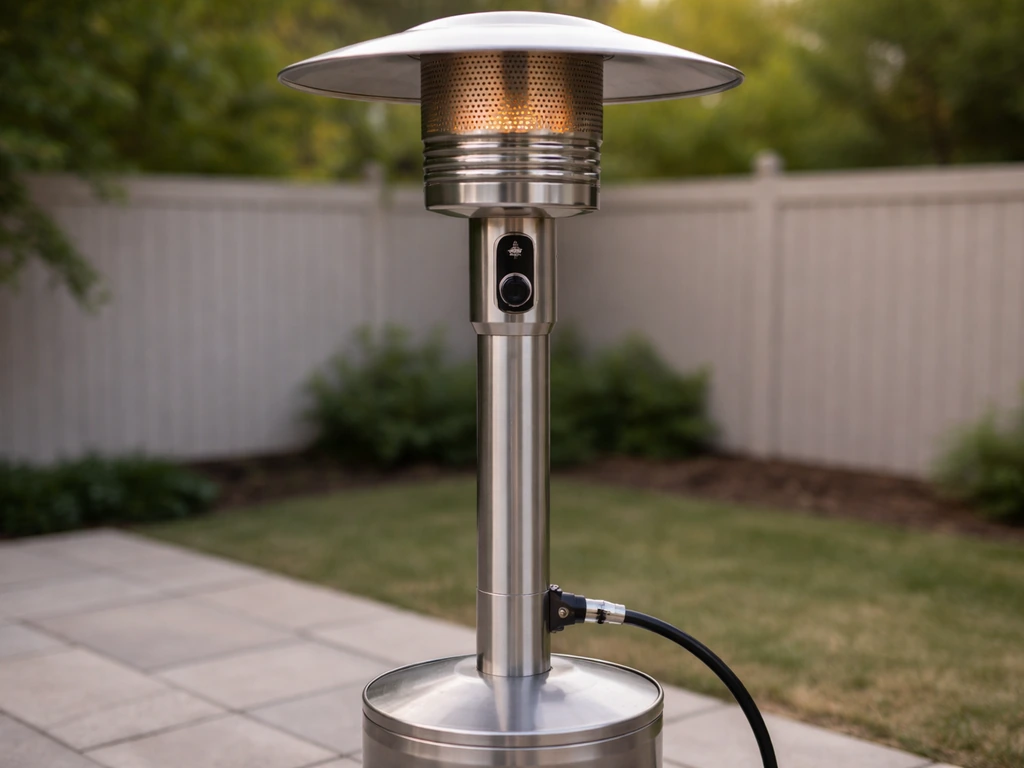
Figure out which Costco patio heater you have first
Before you follow any instruction path, you need to know exactly what you're working with. If you're looking for similar step-by-step guidance for a patio appliance, you can also review patio egg diffuser instructions as a related option. Costco has sold heaters under the FireSense brand across item numbers like 60368, 60485, 60786, 60788, and 61185. They look similar but have minor differences in assembly and ignition. The fastest way to identify yours is to check the sticker or rating plate on the heater itself, usually on the base or control box. It lists the model number, fuel type, and BTU rating. Write that number down and keep it with your receipt, because FireSense manuals have a blank serial number line for exactly this purpose.
Here's a quick breakdown of the main variants you'll encounter from Costco:
| Type | Fuel | Ignition Style | Common Use |
|---|---|---|---|
| Freestanding mushroom-top | LP propane (20 lb tank) | Electronic push-button (AA battery) | Deck, patio, backyard |
| Tabletop | LP propane (1 lb canister) | Electronic or manual | Table, small outdoor spaces |
| Natural gas (NG) | Natural gas (hard-piped) | Electronic or standing pilot | Permanent outdoor install |
| Infrared/electric | 120V or 240V electric | Switch or remote | Covered patios, garages |
The overwhelming majority of Costco patio heater purchases are the freestanding propane mushroom-top style. The instructions in this guide follow that model family. If you need gardenline patio heater instructions, follow the manufacturer’s lighting and safety steps for your exact model before first use. If you have a natural gas model, the clearances and operation checklist are the same, but you won't be connecting a cylinder and there's no air-purge step since NG lines stay pressurized. Electric models are a completely different repair category. Check your rating plate before proceeding.
Unboxing checklist and assembly
Do not skip the parts check. It sounds obvious, but missing a rubber ring or the wrong screw size will halt your assembly halfway through, and Costco hardware is non-standard enough that a hardware store run won't always solve it. Lay every piece out on a flat surface and compare against the parts list in your manual before you touch a screwdriver.
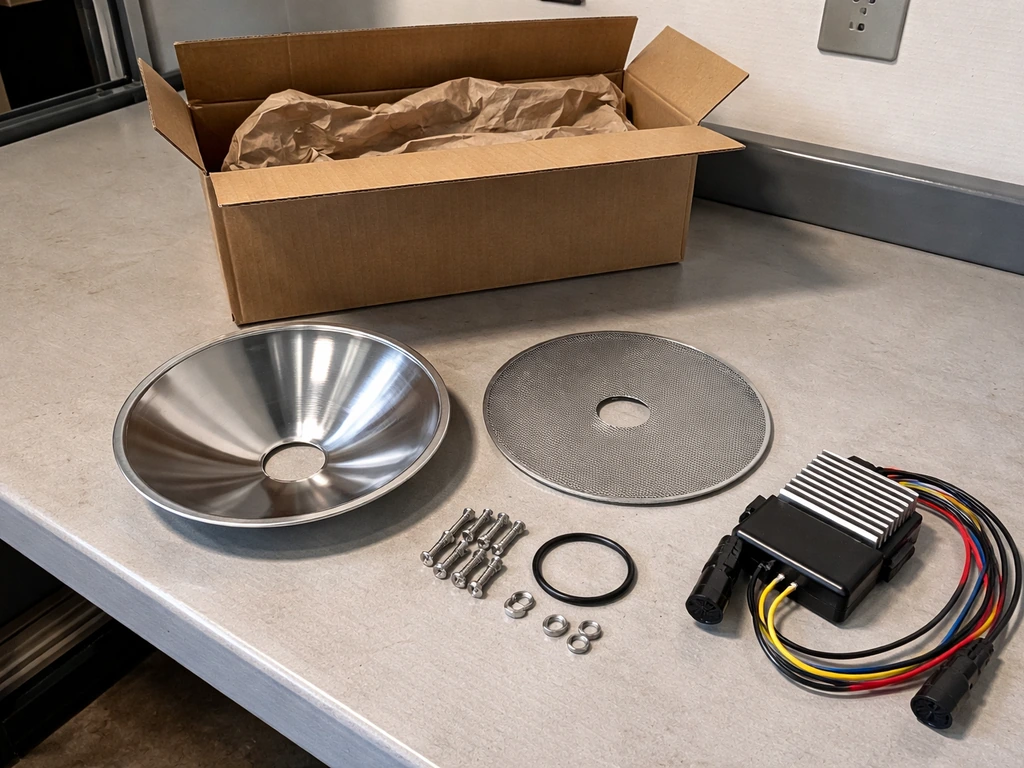
A typical Costco FireSense freestanding heater box contains:
- Reflector and mesh reflector
- Protective guard(s)
- Glass tube(s)
- Stainless steel ring and rubber ring for glass tube connection
- Control box assembly (with burner/pilot components already attached in most models)
- Side and front panels
- Bottom plate
- Hardware bag: M5 and M6 screws, knob, washers, and flange nuts
- Hose and regulator assembly
- Instruction manual
Also check the hose assembly before you assemble anything. Look for cuts, abrasion, kinking, or any signs of wear. If the hose looks damaged, do not proceed. Contact FireSense customer service for a replacement before using the heater.
Assembly order
- Attach the bottom plate and side/front panels to form the base cabinet. Use M5/M6 screws as specified in your manual diagram.
- Insert the control box assembly into the base and secure it per the diagram.
- Stack and connect the aluminum pole sections. Most FireSense models use 2-3 pole segments.
- Attach the damper to the top of the assembled pole.
- Connect the glass tubes using the stainless steel ring. Place the rubber ring in position and confirm the glass tube spring tabs sit on the outer edges before inserting. Do not force them.
- Attach the reflector to the damper, then place the mesh reflector and secure the protective guard.
- Connect the hose from the control box to the regulator. Hand-tighten first, then snug with a wrench (do not overtighten brass fittings).
- Install the AA battery in the ignition chamber on the front of the control box: unscrew the red igniter button, insert the AA battery with the anode (+) side facing OUT, then replace the button.
Once assembled, do not connect the LP cylinder yet. Complete the safety placement and leak check in the next section first.
Placement, clearances, and the leak check you must do before first light

Where to put it
The FireSense manual is very specific about placement and these aren't suggestions. Place the heater on a hard, level surface outdoors only. Never bring it inside, into a garage, a tent, or any enclosed or poorly ventilated space. Carbon monoxide is odorless and accumulates fast in enclosed areas. If you ever feel dizzy, nauseous, or develop a headache while the heater is running, move to fresh air immediately and shut the unit down.
Required clearances from the manual:
- At least 36 inches of clearance above the heater from any combustible material
- At least 24 inches of clearance on all sides from combustible materials
- Wind speed below 10 mph at the operating location
- Hard, level surface only (no grass, uneven pavers, or soft ground that could tip the unit)
How to do the leak test
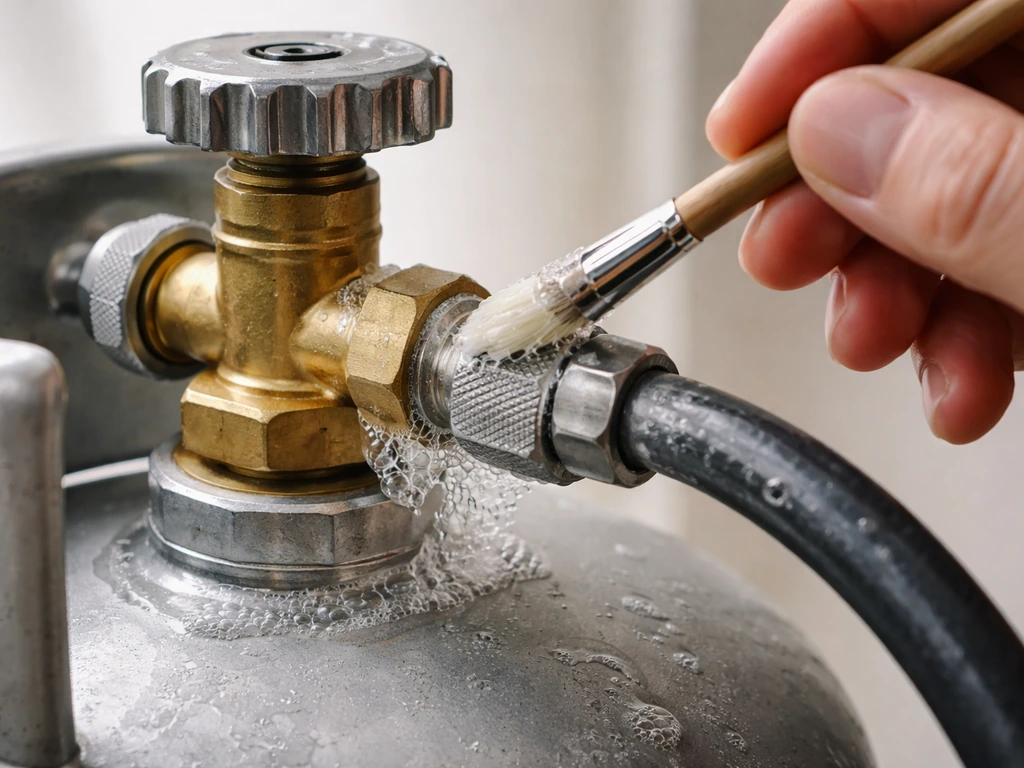
This step is non-negotiable before first use and after every cylinder change. Mix a leak test solution: one part liquid dish soap to three parts water (about 2 to 3 oz total is plenty). Connect the regulator to a full LP cylinder. Apply several drops of the solution to both the hose-to-regulator connection and the regulator-to-cylinder connection. Then slowly open the cylinder valve fully.
Watch both connection points for 30 seconds. Any bubbling at all means you have a leak. Turn the cylinder valve OFF immediately. Tighten the fitting and re-test. If bubbles keep appearing after several re-tightening attempts, remove the cylinder, set it outside away from ignition sources, and call FireSense customer service. Do not try to operate the heater with a confirmed gas leak.
Lighting your Costco patio heater for the first time
If you've assembled everything, placed the heater correctly, and passed the leak test, you're ready to light it. Follow this sequence exactly, especially the air-purge step. Skipping the purge is the number one reason a new heater or a freshly-reconnected cylinder refuses to light.
- Open the LP cylinder valve fully (counterclockwise until it stops).
- Push the control knob in and hold it for 2 full minutes. This purges air from the gas lines. Do not skip this on first use or after any cylinder swap.
- Turn the control knob to OFF and release it.
- Turn the control knob to roughly halfway between the small and large flame symbols.
- Push the control knob fully in and press the red igniter button. You should hear a clicking sound and see ignition within a few clicks.
- Keep the control knob fully depressed for 30 seconds after the burner lights. This allows the thermocouple to heat up and hold the gas valve open.
- After 30 seconds, slowly release the knob. The burner should stay lit.
- Adjust the flame level to your preference using the control knob.
If you're re-lighting a heater that was recently on, wait at least 5 minutes before attempting re-ignition. This lets residual gas dissipate so you're not igniting a built-up pocket of propane.
A properly lit heater should produce a steady, blue-based flame with some orange tips at the burner head. The flame should be consistent across the burner ring without gaps. The reflector will warm up and begin radiating heat within a couple of minutes. If anything looks or smells off, shut it down and troubleshoot before continuing.
When it won't ignite at all
If you've followed the lighting steps and the heater simply won't start, work through these checks in order. They go from simplest/most common to more involved.
- Dead AA battery: this is the most common culprit. Unscrew the red igniter button, swap in a fresh AA battery with the positive (+) end facing out, and try again. The click you hear when pressing the igniter should be noticeably crisper with a good battery.
- Air in the lines: if you just connected or reconnected the cylinder, you may not have purged long enough. Go back to step one and hold the knob in for the full 2 minutes.
- Cylinder is empty or low: connect a known-good full cylinder and try again. Low gas pressure causes weak or absent ignition.
- Igniter clicks but no spark visible: the igniter electrode may be misaligned or corroded. Try using a long-handled stick lighter (BBQ lighter) inserted near the burner orifice while holding the control knob in. If the heater lights with a manual flame source, the igniter is the problem, not the gas system.
- Orifice or burner blocked: spiders and insects love to nest in the burner orifices. Remove the burner assembly, clean the orifice holes with a heavy-duty pipe cleaner, and use short bursts of compressed air to clear smaller debris. Reassemble and retry.
- Loose connection somewhere in the gas line: check every fitting from cylinder to regulator to hose to control valve. Hand-check each one and re-run the soap test.
- Pilot light assembly is bent or out of position: if your model has a pilot assembly, visually confirm it's properly seated and pointing at the thermocouple. A bent pilot tube that's even slightly off-axis won't heat the thermocouple enough to hold the valve open.
- Regulator failure: if none of the above work, the regulator may have failed or gone into lock-out mode (some regulators trip a safety lock if they detect a fast pressure drop, which can happen if the valve was opened too quickly). Disconnect the regulator, wait 30 seconds, reconnect, open the cylinder valve very slowly, and try again.
When it lights then shuts off

This is the thermocouple problem in about 80% of cases, but there are a few other causes worth ruling out first.
Thermocouple and ODS sensor
The thermocouple is a small metal probe that sits in the pilot flame. When it gets hot enough, it generates a tiny voltage that signals the gas valve to stay open. If it doesn't heat up fast enough, or if it's worn out, the valve closes and the burner shuts off even though you lit it successfully. This is almost always why a heater lights and then goes out within a few seconds to a minute.
The fix: hold the control knob depressed for the full 30 seconds after lighting. Many people release it too early because the flame looks stable. If you've been holding it properly and the heater still shuts off within a minute or two, the thermocouple is likely worn and needs replacement. FireSense thermocouples are available from HVAC suppliers and online parts vendors. This is a DIY-friendly repair: disconnect the old thermocouple from the gas valve (it threads off), swap in the new one, position the tip in the pilot flame, and test.
Some Costco models also have an ODS (Oxygen Depletion Sensor) built into the pilot assembly. The ODS shuts the heater down if oxygen levels drop below a safe threshold, which is a safety feature, not a malfunction. If the ODS is triggering, it means you're operating in too enclosed a space. Move the heater to a more open outdoor area.
Gas supply and valve issues
If the thermocouple checks out, look at the gas supply side. A kinked or bent supply hose will restrict gas flow enough to starve the burner after a few seconds. Visually trace the hose from the cylinder to the control box and straighten any bends. Run a soap test after straightening to confirm no damage occurred at the kink point.
A blocked burner injector causes the same symptom: the heater lights, the flame is weak or uneven, and then it shuts off as the thermocouple fails to stay hot enough. Remove and inspect the injector, clean it with a pipe cleaner, and clear the orifice holes.
Tilt safety switch
Freestanding patio heaters have a tilt switch that automatically shuts off the gas if the unit tips beyond a certain angle. If the heater is on uneven pavers or soft ground, or if a gust of wind rocks it, the tilt switch will trigger. Make sure the heater is perfectly level on a hard surface. If it keeps triggering on a surface that looks level, place a small bubble level on the base to confirm. Some tilt switches can be jostled back into position by gently righting the heater fully upright; others require the unit to be powered off and reset before they'll allow re-ignition.
Safe shutdown, regular maintenance, and when to stop DIYing
Shutting down properly every time
Don't just pull the cylinder or flip a switch. The correct shutdown sequence from the FireSense manual is: push the control knob in and turn it clockwise to OFF, then turn the cylinder valve clockwise to closed, then disconnect the regulator. If you have a Thermacell Patio Shield, make sure it is turned off and allowed to cool down before performing any shutdown or maintenance steps how to turn on thermacell patio shield. Doing it in this order ensures no gas is left pressurized in the hose while it's stored or transported.
Maintenance you should actually do
The FireSense manual calls out specific maintenance tasks to perform regularly, and they're worth taking seriously because they prevent most of the ignition and shutdown issues described above.
- Clean the reflector and glass tube with warm soapy water whenever carbon deposits appear. Built-up carbon reduces radiant heat output and can cause hot spots.
- Clean burner holes and orifices with a heavy-duty pipe cleaner at least once per season. Follow up with short bursts of compressed air to clear fine debris. Spiders and insects nest in these orifices during storage and can fully block gas flow.
- Inspect the hose assembly before every use season. Look for cracks, abrasion, or stiffness in the rubber. Replace the hose at any sign of wear, not when it fails.
- Wipe down exterior surfaces to prevent surface corrosion, especially on the control box.
- Run a full soap-bubble leak test at the start of each season and after every cylinder swap.
Annual professional inspection
The manual requires that the heater be inspected by a qualified service person at least once per year. For most homeowners running a heater seasonally, this means having someone who services gas appliances check the regulator, valve, and thermocouple before the first use of the season. It's not expensive and it catches regulator diaphragm failures and valve wear that you won't catch visually.
When to stop and call for help
Some situations are beyond reasonable DIY territory, and it's important to recognize them. Stop troubleshooting and call FireSense customer service or a qualified gas appliance technician if:
- You can smell gas and cannot identify or stop the leak after several re-tightening attempts. Remove the cylinder outdoors away from ignition sources before calling.
- The control valve feels sticky, grinds, or doesn't turn smoothly. A damaged valve can fail to close fully, which is a serious hazard.
- The hose is cracked, blistered, or has visible damage. Don't operate the heater until it's replaced.
- The heater was knocked over and the supply line took a hard impact. Internal damage isn't always visible.
- You're smelling something burning from the control box or base cabinet (not the normal warm-dust smell on first use of the season).
- Any gas component looks corroded, scorched, or physically damaged beyond what cleaning can address.
If you're troubleshooting a different brand entirely, the diagnostic logic for thermocouple failures, ignition issues, and tilt switches is similar across most outdoor gas heaters. The same problem-first approach applies whether you're working through a generic setup or dealing with a specific brand's quirks.
For most Costco FireSense owners, the combination of a fresh AA battery, a proper 2-minute air purge, and a full 30-second thermocouple hold after ignition will solve almost every issue right away. Start there, and only move into parts replacement if those fundamentals don't fix it. If you also have a Thermacell patio shield, check the Thermacell patio shield instructions for proper placement and safe use around people and pets.
FAQ
How can I tell if my Costco patio heater is a propane model or natural gas model before I start?
Check the rating plate or sticker on the base or control box for the fuel type, it will list propane or NG (natural gas). If it says NG, you will not use an LP cylinder or do an air-purge step, and the leak-test procedure should follow the manual’s connection points for your gas line.
What if the red igniter button clicks but the burner does not light?
First confirm the AA battery is installed and seated in the igniter chamber, then repeat the lighting sequence including the full 2-minute purge if it’s the first use or after a cylinder change. If it still will not start, inspect the hose/regulator for any visible wear and perform a soap leak test again before retrying ignition.
Should I hold the control knob down for 2 minutes as well as doing the air purge?
No. The 2-minute hold is for purging air during the initial setup (while holding the knob in). After the burner lights, the hold period is shorter and specific, you must keep holding for 30 seconds to heat the thermocouple, then release.
My heater lights and then goes out after a few seconds. What’s the most common mistake to check first?
Most often the knob is released too early after ignition. Keep the knob fully depressed for the full 30 seconds after it lights, even if the flame looks stable, then reassess. If it still shuts off within a minute or two, the thermocouple is the next likely cause.
Why does my heater sometimes take multiple attempts to light after being off overnight?
Residual gas distribution can make the first attempt weak if the purge was skipped. Use the full air-purge step on first use and after any cylinder change, and for relight after the heater was recently on, wait at least 5 minutes before trying again.
What should the flame look like, and is it normal to see orange tips?
A properly lit unit should show a steady flame with a blue base and some orange tips at the burner head. The key check is consistency across the burner ring, if you see gaps, persistent yellow sooting, or uneven burning, shut down and troubleshoot before re-ignition.
Do I need to do a leak test every time I reconnect the LP cylinder, even if nothing changed?
Yes. The manual requires a leak check after every cylinder change, even if you recently removed and reattached the cylinder. Soap-test the hose-to-regulator and regulator-to-cylinder connections, and if bubbles appear, do not operate until fixed and retested.
Is it safe to move the patio heater once the cylinder is connected?
Avoid moving the heater while it is connected and especially while it is operating. If you must reposition it, shut it down using the specified control-knob then cylinder-valve order, disconnect the regulator, and let it cool before moving to a new hard, level outdoor spot.
What’s the correct shutdown order, and why does it matter?
Shut off at the control knob first (push in and turn clockwise to OFF), then close the cylinder valve clockwise, then disconnect the regulator. This order prevents gas from remaining pressurized in the hose during storage or transport.
My tilt switch keeps shutting the heater off even on a flat patio. What else could trigger it?
Wind gusts and slight rocking on uneven pavers can activate it. Confirm the heater is level using a small bubble level on the base, tighten any loose connections if your manual indicates, and ensure the unit sits on a hard, stable surface rather than soft ground or shifting stones.
Can I clean the burner injector or orifice myself if the flame is weak or uneven?
Yes, within reason. If the heater lights briefly and then shuts off with weak or uneven flame, inspect the injector and clear the orifice holes. Use appropriate cleaning tools (like a pipe cleaner) and reassemble carefully, but stop if you find damage that would affect safe operation.
If my heater has an ODS, does that mean the heater is broken?
Not necessarily. If the ODS shuts it down, it indicates oxygen levels are dropping below a safe threshold, which usually means the heater is in too enclosed or poorly ventilated an area. Move it to a more open outdoor location before troubleshooting parts.
When should I stop DIY troubleshooting and contact FireSense or a technician?
If you suspect a confirmed gas leak that keeps reappearing after tightening and retesting, or if you smell gas when the unit is off, stop immediately. Also stop if you see physical damage to the hose assembly, regulator, valve, or if repeated ignition attempts fail with abnormal behavior that you cannot safely isolate.