For most gas patio heaters, the correct sequence is: identify your exact model from the rating plate, download the manufacturer's PDF manual for that specific model number, assemble the stand and gas connection per those instructions, then light by turning the control knob to PILOT, pressing it in, and holding it depressed for 30 seconds after the pilot catches. If it won't stay lit, the usual suspects are a dirty pilot orifice, a failing thermocouple, or a tripped tilt switch. This guide walks you through every step of that process, with extra detail for AZ Patio Heaters and Enders units since those come up most often.
Patio Heater Instructions: Gas Setup, Ignition Troubleshooting

Grant Mercer
22 May 2026

Step 1: Figure out exactly which heater you have
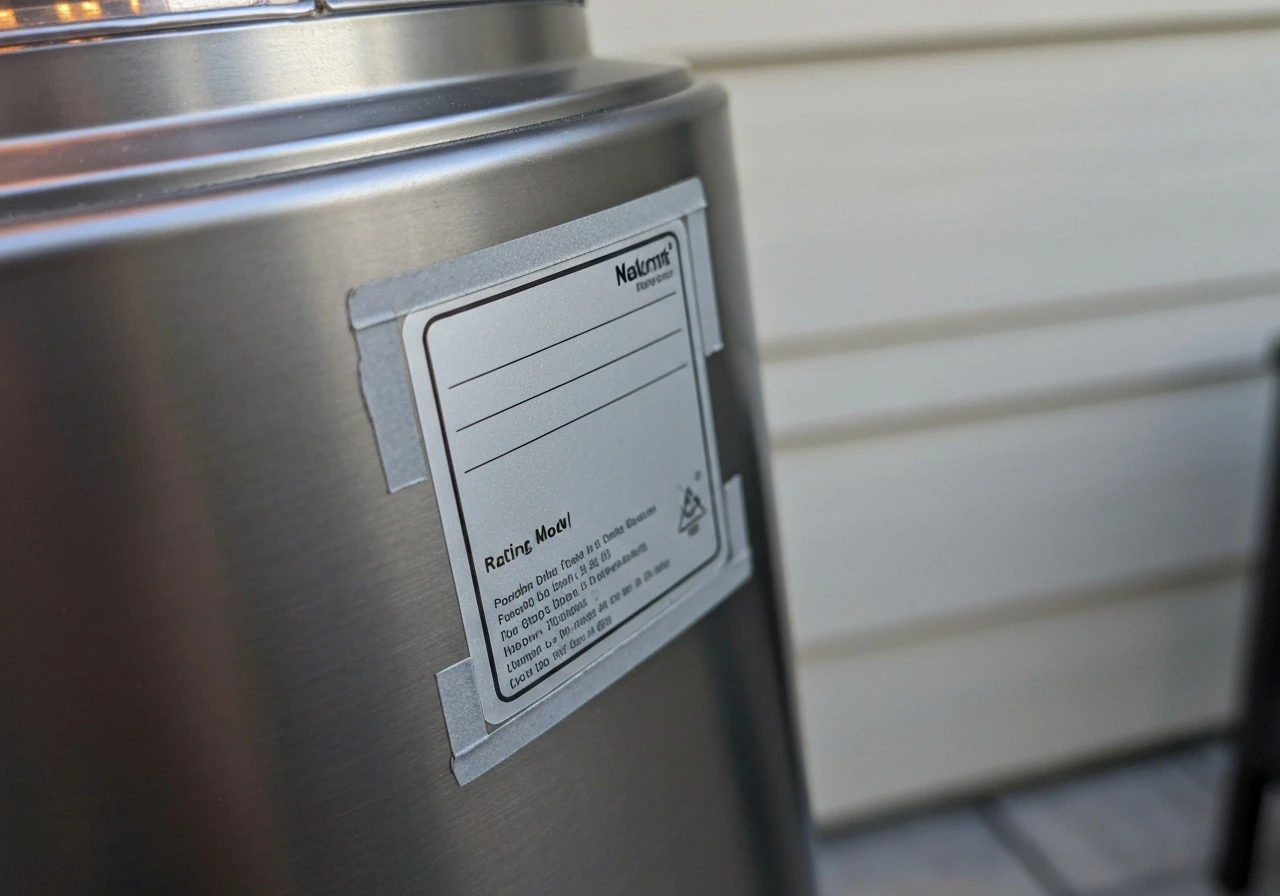
Before you do anything else, find the rating plate on your heater. On most freestanding propane and natural gas models, it's a small metal or adhesive label attached somewhere on the pole, the base, or the burner housing. That plate tells you the model number, the fuel type (LP or NG), the BTU input rating, and the serial number. Write those down. You'll need them to pull the right manual and, later, to order the correct replacement parts.
For AZ Patio Heaters, the model number format looks like NG-GT-BRZ (for natural gas glass tube units) or HS-SS-PC (for stainless pyramid-style units). These are not interchangeable. The NG-GT-BRZ manual, for example, has a dedicated field on its cover page for you to copy in the model number and serial number from your physical unit. The HS-SS-PC manual covers completely different control knob positions and ignition steps. Using the wrong manual is one of the most common reasons people get stuck.
For Enders heaters (a German brand common in Europe and available through importers), Enders explicitly distinguishes between the article number and the serial number on the rating plate. The article number is what you need to find the correct manual and parts. Don't confuse the two. The Enders 5515 is a good example of an LP model with piezo ignition that has its own specific lighting sequence.
If the rating plate is missing or unreadable, check the bottom of the base, the inside of the carry bag if it came with one, or any stickers on the regulator hose. As a last resort, a photo of your control knob layout and burner assembly posted to the manufacturer's support page can usually get you an ID.
Step 2: Get the right manual and verify it matches your heater
Once you have the model number, go directly to the manufacturer's website and download the PDF for that exact model. AZ Patio Heaters hosts individual PDFs for each model series, so the NG-GT-BRZ manual is a separate file from the HS-SS-PC manual. That's intentional. The lighting instructions, troubleshooting tables, and maintenance steps are model-specific. For Enders, manuals are available through the Enders Germany website and through third-party manual repositories like Manualzz, which is where you'll find the Enders 5515 documentation.
When the PDF opens, do a quick sanity check before you read anything else. Confirm the model number on the manual cover matches the number on your rating plate. Then look at the control knob diagram in the manual and compare it to the actual knob on your heater. It should show the same positions: typically OFF, PILOT, LOW, and HIGH. If the positions don't match, you have the wrong manual. Some AZ service manuals also reference a battery compartment for models with electronic ignition switches, so check whether your unit has a push-button igniter or a rotary piezo, and confirm the manual matches.
AZ also publishes a separate User Care and Maintenance Guide alongside the owner's manual. You want both. The care guide covers the annual leak test and hose inspection procedures that aren't always spelled out in full detail in the owner's manual alone.
Step 3: Assembly and initial setup
Most freestanding patio heaters ship in multiple boxes and require you to assemble the stand, pole sections, burner head, and gas connection before first use. Follow the manufacturer's sequence strictly. The AZ service manual, for example, walks through wheel assembly to the bottom plate using specified bolts and nuts first, then the pole sections, then the protective guard and glass tube. Reversing that order is how people end up needing to partially disassemble the unit to install a part they skipped. The AZ Patio Heaters service manual for 102712104 includes the assembly steps and installation details for specific AZ units, so match its wording and procedures to your exact AZ model series blank" rel="noopener noreferrer">AZ service manual walks through wheel assembly to the bottom plate.
- Lay out all parts and hardware and match them to the parts list in your manual before you start. Missing hardware is common and easier to catch before assembly than after.
- Assemble the base and wheel kit first, then build upward through the pole sections. Tighten all bolts firmly but don't overtighten aluminum threads.
- Install the reflector and emitter screen before connecting the gas components.
- Attach the gas hose and regulator to the propane cylinder last. The AZ service manual is explicit: screw the regulator on by hand first to avoid cross-threading, then snug it with a wrench. Use only the regulator and hose supplied with the appliance. Third-party regulators may not deliver the correct supply pressure.
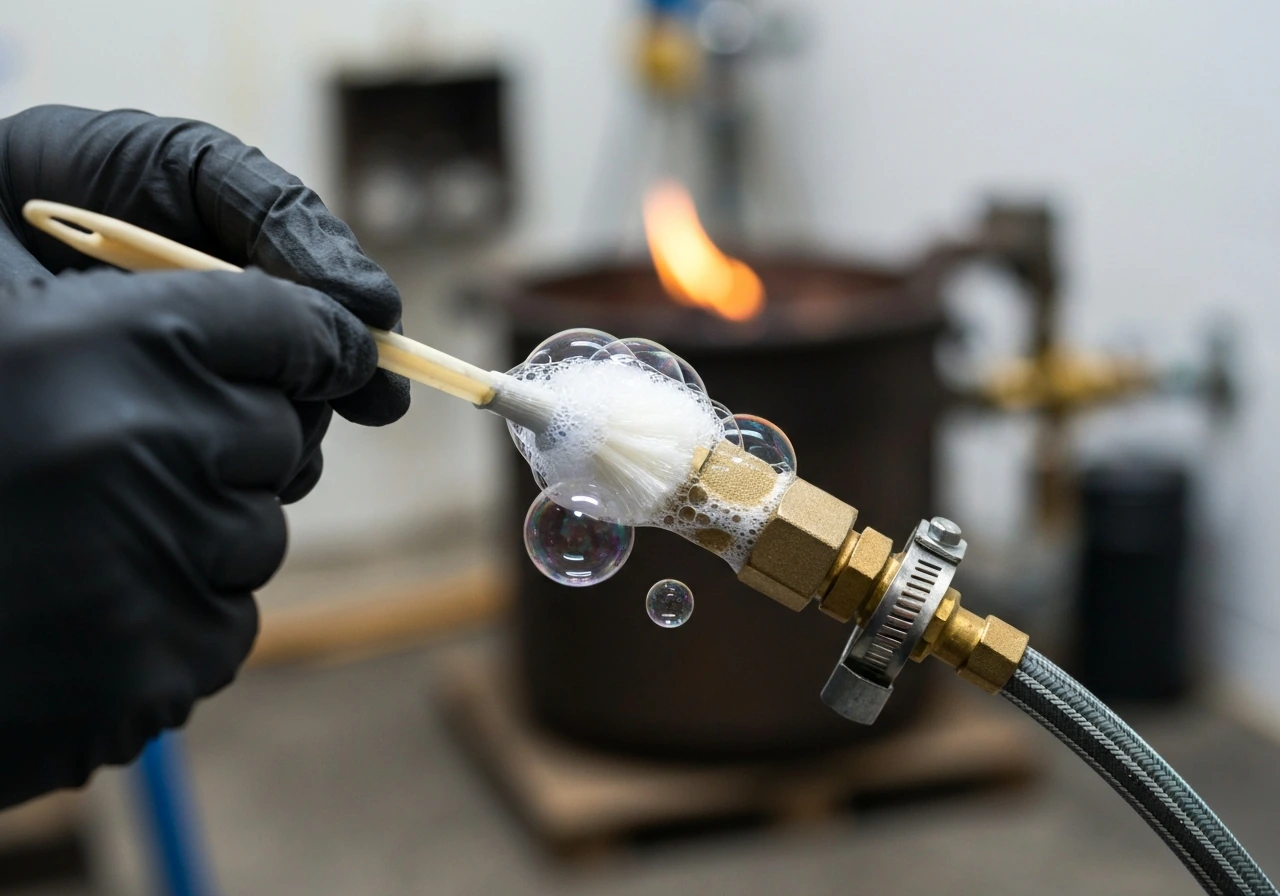
- Before turning on any gas, perform a leak test on every connection you just made.
The leak test is not optional. AZ's documentation is direct about this: do not use the heater until all connections have been leak tested. Mix a 50/50 solution of liquid dish soap and water. Open the propane valve slowly, then brush or spray the solution onto every connection point: the regulator-to-cylinder connection, the hose fittings, the manifold, and the valve body. Watch for bubbles. If you see any, close the gas supply immediately, tighten the leaking connection, and repeat the test. If bubbles appear again at the same spot after tightening, that connection or component needs to be replaced before you go any further.
Step 4: Lighting your patio heater correctly
This is where most first-time problems happen, usually because people rush the pilot hold step. Here's the standard sequence for an AZ-style propane heater with a control knob ignition system. Enders models with piezo ignition are slightly different and are covered below. Thermacell patio shield instructions are similar in that you should follow the manufacturer’s setup and safety steps before using the device outdoors.
AZ Patio Heaters: lighting sequence (HS-SS-PC and similar models)
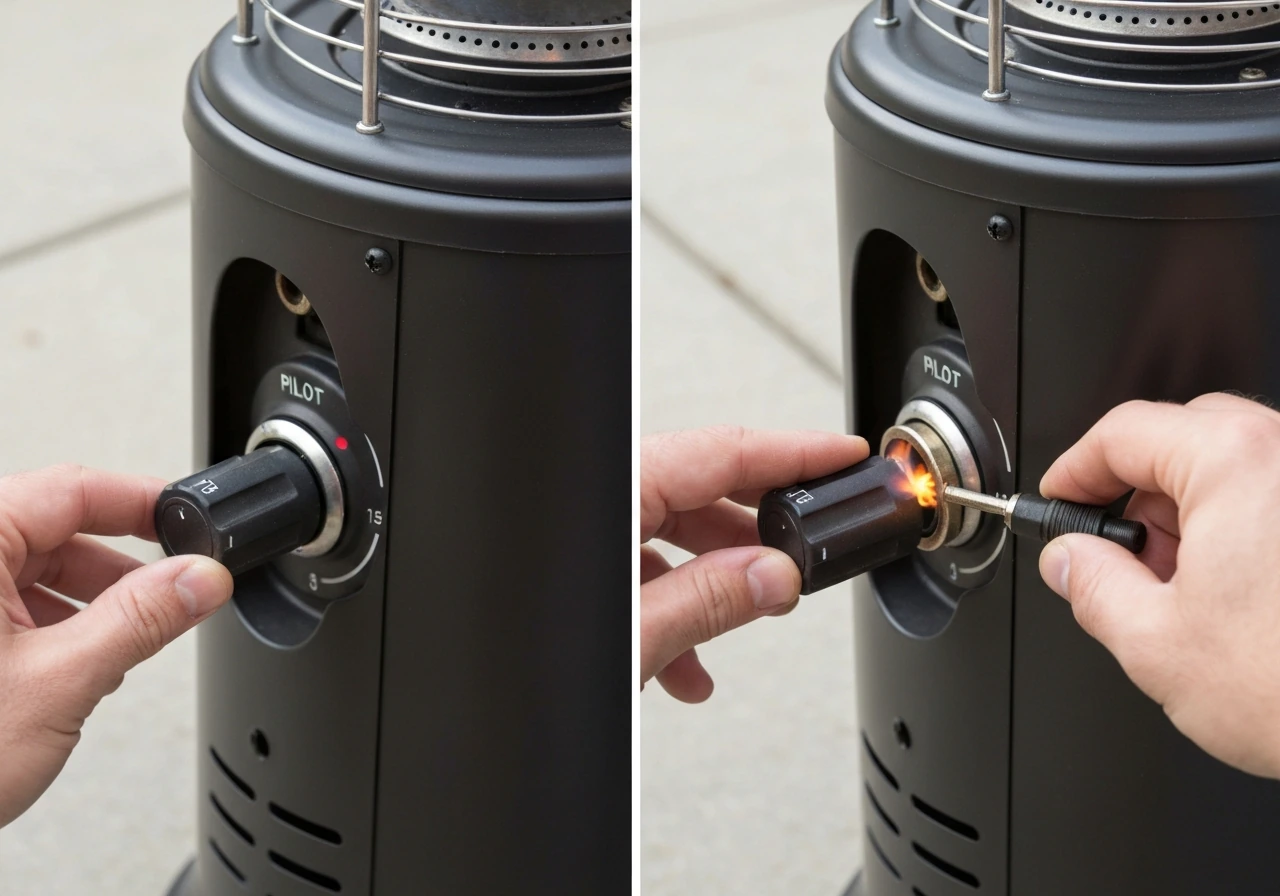
- Open the propane tank valve fully (turn counterclockwise).
- Push the control knob in and turn it counterclockwise to the PILOT position.
- Keep the knob depressed. Press the igniter button repeatedly until you see a pilot flame through the glass tube or viewing window.
- Once the pilot is lit, continue holding the control knob depressed for a full 30 seconds. This is not a suggestion. The thermocouple needs time to heat up and generate the millivolt signal that holds the gas valve open. Releasing too soon is the number-one reason the pilot goes out immediately.
- After 30 seconds, slowly release the knob. If the pilot stays lit, turn the knob counterclockwise to LOW or HIGH.
- If the pilot goes out when you release the knob, close all valves, wait at least 5 minutes for any accumulated gas to clear, then try again from step 1.
If the igniter clicks but no flame appears after several attempts, your AZ manual offers a backup: turn the knob to PILOT, hold it in, and use a long-stem lighter inserted through the glass tube opening to manually light the pilot. If that works, the igniter module itself is the problem, not the gas supply.
Enders models: piezo ignition sequence
On the Enders 5515 and similar models, you press and hold the control knob to the PILOT position with one hand, then press the piezo ignition button with your other hand simultaneously. The Enders manual is specific that both actions happen at the same time, not sequentially. Hold the knob depressed after the pilot catches, just as you would with an AZ unit. The same 30-second thermocouple warm-up principle applies.
Shutting down properly
The AZ HS-SS-PC manual specifies a two-step shutdown: first turn the control knob clockwise to PILOT to kill the main burner while keeping the pilot on, then depress the knob and continue turning clockwise to OFF to extinguish the pilot completely. Close the propane tank valve afterward. Skipping the pilot-off step and just closing the tank valve leaves gas trapped in the line and can cause hard relights next session.
Step 5: Troubleshooting won't-light and won't-stay-lit problems
Most patio heater failures fall into a small set of categories. The table below matches the symptom to the most likely cause and the first thing to check. Detailed diagnostics follow for the two most common failures: thermocouple and tilt switch problems.
| Symptom | Most Likely Cause | First Check |
|---|---|---|
| Igniter clicks but no spark visible | Igniter module failure or wire disconnect | Inspect igniter tip and wire connection; try manual lighting with long-stem lighter |
| Pilot lights but goes out immediately when you release the knob | Thermocouple not heating fully, or released too soon | Hold knob for full 30 seconds; if still fails, test/replace thermocouple |
| Pilot lights and holds, but main burner won't come on | Blocked main orifice or faulty gas valve | Check orifice for debris; inspect valve operation |
| Heater shuts off after a few minutes | Tilt switch tripped or thermocouple failing under heat | Confirm heater is on level ground; inspect tilt switch wiring; test thermocouple |
| No gas flow at all (no smell, no flame) | Empty tank, closed valve, or tripped OPD on regulator | Check tank level; close tank valve completely, wait 30 seconds, reopen slowly to reset OPD |
| Weak or yellow flame | Blocked orifice or air in the gas line | Clean pilot orifice; bleed air from line per manual (open gas line 1-2 minutes or until gas smell is present) |
| Gas smell without flame | Leak at connection or stuck valve | Close all valves immediately; perform soap-solution leak test on all connections |
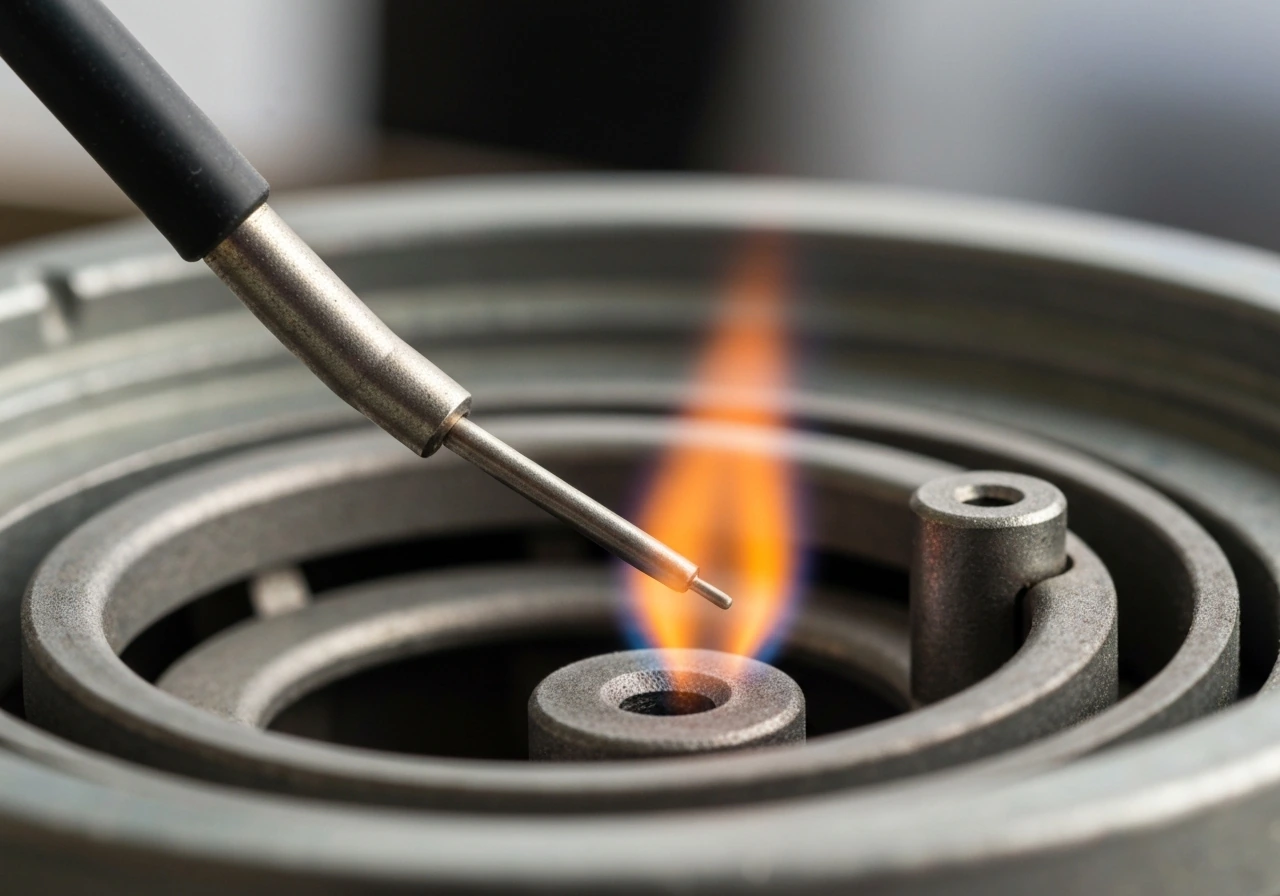
Thermocouple: the most common won't-stay-lit culprit
The thermocouple is a small probe that sits in the pilot flame. When it gets hot enough, it generates a tiny electrical current (in the millivolt range) that keeps the gas valve open. If the thermocouple is dirty, corroded, bent out of position, or simply worn out, it won't generate enough current and the valve closes the moment you release the knob. The AZ HILDS01 troubleshooting table explicitly lists thermocouple failure as a cause of pilot-won't-stay-lit, with the action being replacement.
To diagnose it: if the pilot lights and holds while you're pressing the knob but goes out the instant you release it after a full 30 seconds, the thermocouple is almost certainly the issue. Check that the tip of the thermocouple is actually inside the pilot flame. If it's been bumped and is sitting above or beside the flame rather than in it, bending it gently back into position sometimes solves the problem. If repositioning doesn't help, replace the thermocouple. On most AZ and Enders units this is a straightforward part swap that involves a wrench and about 15 minutes.
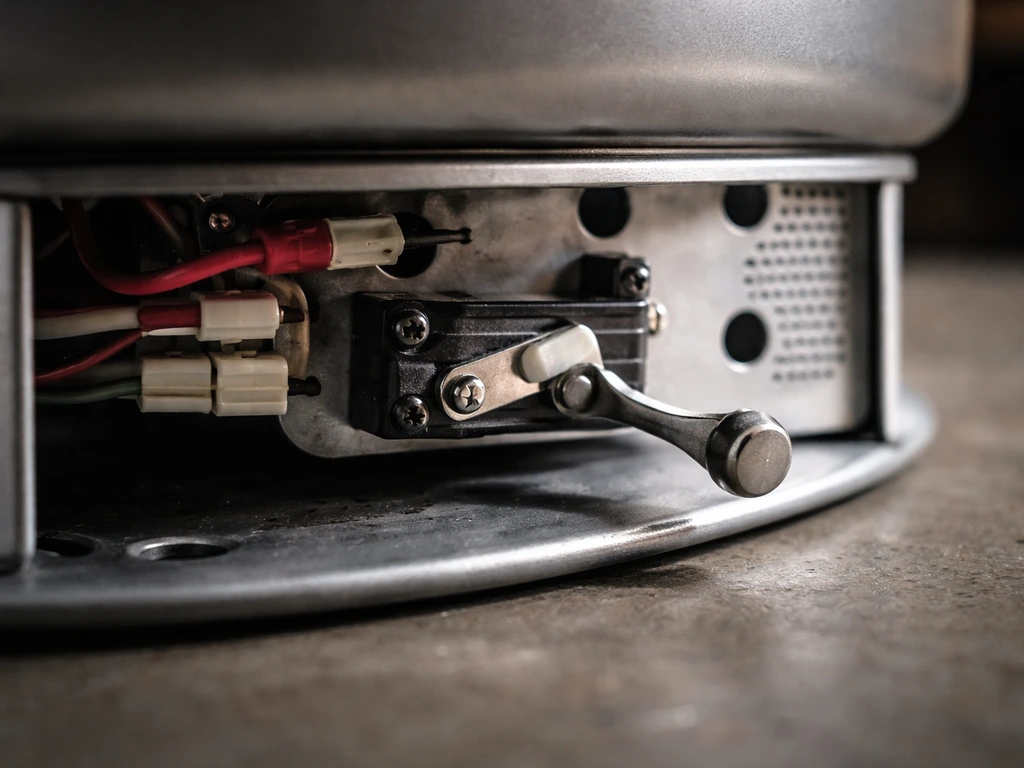
Tilt switch: the safety feature that causes phantom shutoffs
The tilt switch (sometimes called an anti-tilt switch) is a safety device that cuts gas flow if the heater tips past a certain angle, preventing fire hazards. The thermocouple and tilt switch are effectively wired in series on most heater models, so if either one fails, the effect is the same: the heater lights but won't stay on, or shuts off randomly.
If your heater shuts off but the ground is level, check the tilt switch. On most freestanding models it's located near the base. Look for a small cylindrical or ball-bearing mechanism with two wires attached. The AZ HILDS01 troubleshooting table lists two tilt switch problems: a faulty switch itself, and wires that aren't properly connected. Check the wire connections first since that's a five-second fix. If the connections are solid and the heater still shuts off, test continuity across the switch with a multimeter. A good tilt switch should show continuity when the heater is upright. No continuity means replace the switch.
Dirty pilot orifice and blocked lines
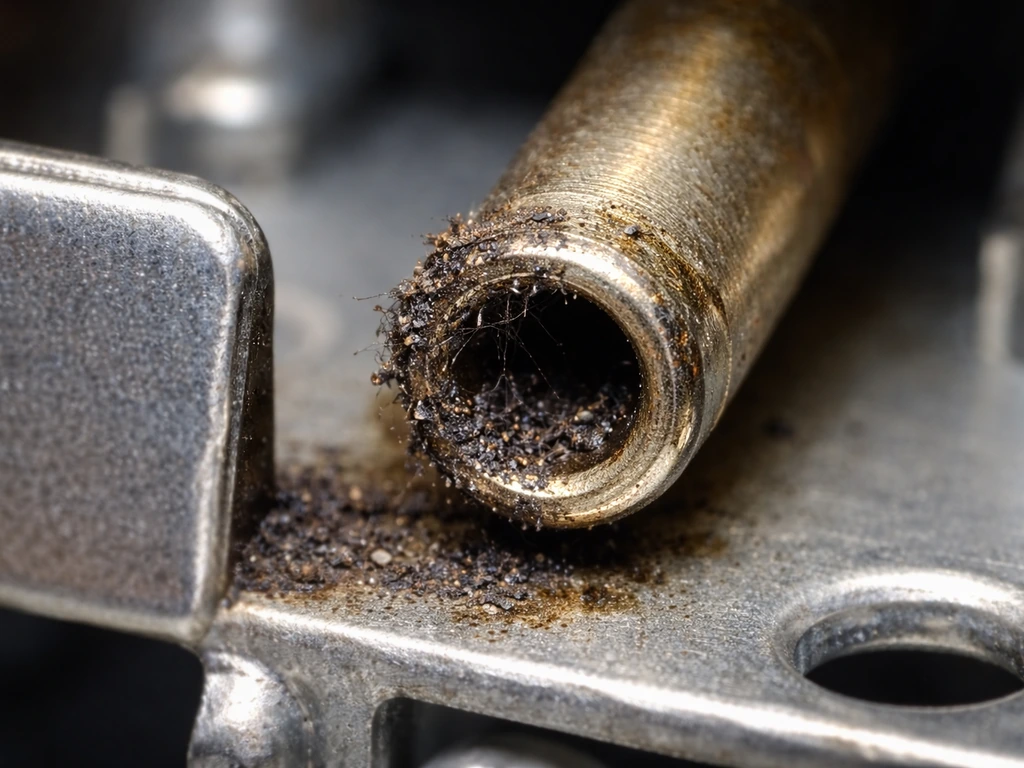
Spiders and insects love to nest in burner orifices and pilot tubes during storage. A partially blocked orifice produces a weak pilot flame that can't heat the thermocouple properly, mimicking a thermocouple failure. Before replacing any parts, inspect the pilot tube and orifice visually. A can of compressed air or a fine wire (not a regular drill bit, which can enlarge the orifice) can clear most blockages. The AZ care guide specifically flags insects and debris as a maintenance concern worth addressing every season.
If you suspect air in the gas line (common after a tank swap or after the heater has sat unused for a long time), the AZ HILDS01 manual recommends opening the gas line and bleeding it for no more than one to two minutes, or until you can smell gas. Do this outdoors with no ignition sources nearby. Once you can smell gas, close the supply, wait a few minutes for it to dissipate, and then attempt a normal light.
OPD regulator lockout
Modern propane tanks have an Overfill Protection Device (OPD) that can trigger a flow restriction if you open the tank valve too quickly. This feels exactly like an empty tank: no gas smell, no flame. To reset it, close the tank valve fully, disconnect the regulator, wait 30 seconds, reconnect, then open the tank valve very slowly (about a quarter turn per second). If you are trying to use a patio egg diffuser with a heater, make sure you follow the manufacturer’s patio egg diffuser instructions for safe operation. This resets the OPD and restores normal flow.
Step 6: Maintenance, part replacement, and when to stop DIYing
Annual maintenance checklist
- Perform a soap-solution leak test on all gas connections at the start of every season and any time you replace a gas-side component. AZ's documentation is explicit: this is required annually, not optional.
- Inspect the regulator hose for cracks, kinks, or brittleness. A hose that shows surface cracking or has been exposed to UV and heat for more than 5 years should be replaced regardless of whether it's leaking.
- Clean the pilot orifice and burner tube with compressed air. Check for spider webs or insect nests especially if the heater has been stored in a shed or garage.
- Check that the thermocouple tip is correctly positioned in the pilot flame path. Gently straighten it if it has shifted.
- Inspect the tilt switch wiring for corrosion, fraying, or loose terminals.
- Wipe down the reflector and emitter screen. Heavy carbon deposits on the emitter can affect heat output and indicate incomplete combustion.
- Test all knob and valve positions to confirm smooth operation with no sticking or grinding.
Parts you can replace yourself
Thermocouples, tilt switches, igniter modules, pilot orifices, regulator hoses, and emitter screens are all standard DIY replacements on most AZ, Enders, and similar brand heaters. Order by model number from the manufacturer or an appliance parts supplier. Fitting a generic thermocouple is possible as long as the thread size and tip length match the original. When in doubt, use the OEM part number from your manual's parts list.
When to stop and call a professional (or retire the heater)
There are situations where DIY is the wrong call. Stop what you're doing and either call a qualified gas appliance technician or take the heater out of service if any of the following are true:
- You smell gas and cannot identify or stop the source after closing all valves. This is an immediate safety issue.
- The gas valve body itself is leaking, cracked, or corroded. Valve internals are not a DIY repair on residential patio heaters.
- The regulator has been physically damaged, dropped, or submerged in water.
- Bubbles persist at the same connection point after tightening and retesting twice. The fitting or component needs replacement, and if you're not confident doing that on a gas appliance, get help.
- The heater has been knocked over and the burner or pole is visibly bent or cracked.
- The unit is more than 10 years old and showing multiple simultaneous failures. At that point, replacement is often safer and cheaper than continued repair.
Natural gas patio heaters (like the AZ NG-GT-BRZ) also require proper line sizing and pressure verification at the gas supply connection. If you're working on a hard-piped natural gas unit rather than a portable propane model, involve a licensed gas fitter for any work beyond the burner-side components covered in your owner's manual.
If you're working with a specific brand, the process is the same but the details vary. Gardenline, HeatMaxx, and Costco-branded heaters all follow similar lighting and troubleshooting logic, but each has its own manual with model-specific component layouts and part numbers. If you have a Costco patio heater, look up the exact model manual first, then follow its lighting and troubleshooting steps carefully Costco patio heater instructions. If you have a HeatMaxx patio heater, use your exact model’s instructions from the manual to ensure the lighting sequence and troubleshooting steps match. Always start with the correct manual for your exact unit, confirm it matches your physical heater, and work through the diagnostic steps before ordering parts. If you're troubleshooting a Thermacell Patio Shield, the safest way to proceed is to consult the device’s own manual and follow its exact lighting and start-up steps how to turn on thermacell patio shield. For Gardenline patio heater instructions, make sure you download and follow the manual that matches your exact model number before lighting or troubleshooting. That approach solves the vast majority of patio heater problems without a service call.
FAQ
How long should I keep the knob held after the pilot lights to prevent it from going out?
Most propane models require about 30 seconds, but only count the time once the pilot flame is stable. If the flame is weak or flickering, keep holding longer will not fix the problem, you should troubleshoot the pilot flame quality (clean pilot orifice, correct thermocouple positioning) first.
What if my knob positions on the heater do not match the manual exactly?
Do not guess. Compare the manual’s knob legend to the physical knob markings and the control knob stem position where it points toward OFF, PILOT, LOW, and HIGH. If the layout is different or the manual references a push-button igniter but your unit has a rotary piezo, you likely have the wrong manual or a different control valve revision.
Can I use the heater if I smell gas but no leaks show up on the first soap test?
Stop use immediately and do another test after you first shut the tank valve and allow the area to clear. Residual odor can linger after disconnects, if the smell is still present after a few minutes or you detect gas when you spray connections again, do not light. Tighten only the connections you are inspecting and repeat the test, if it persists, replace the regulator hose or have it checked.
Why does my pilot light but the heater shuts off after a minute even when I held the knob for 30 seconds?
This often indicates the thermocouple is not getting enough heat, either because the tip is not fully in the pilot flame or debris is partially blocking the pilot orifice. Repositioning the thermocouple tip and inspecting the pilot flame pattern usually solves it, if it still drops, plan on thermocouple replacement.
What is the safest way to clear an insect blockage in the pilot orifice?
Inspect first without enlarging anything, then use compressed air or a fine wire made for delicate jet cleaning. Avoid drill bits, they can increase the orifice size and cause an unstable or unsafe flame.
How do I tell if the issue is air in the line versus a bad igniter or valve?
Air problems after a tank change typically show up as repeated delayed ignition, once you smell or confirm gas is reaching the burner area the pilot should catch normally. Igniter issues usually produce no spark or a weak click with no pilot, while thermocouple problems produce a pilot that lights and then immediately drops when you release the knob.
My tank valve feels hard to open, could it be the OPD and what should I do?
Yes, a sudden restriction can mimic an empty tank, especially on newer propane cylinders with OPD. Close the valve fully, disconnect the regulator, wait about 30 seconds, reconnect, then open the tank valve very slowly (roughly a quarter turn per second). If you still cannot get a proper pilot, stop and check regulator and hose condition.
Does the tilt switch test require tools, and can I bypass it?
Testing continuity typically requires a multimeter, but never bypass the safety switch. If the heater shuts off when level, check the wiring connections first, then test continuity across the tilt switch. Replace the switch if it fails, do not jump wires to keep it running.
Can I replace parts like a thermocouple or tilt switch without disconnecting everything?
No, always shut off the gas supply at the tank and ensure the gas is fully off before removing or loosening any components. After replacement, always run a full soap-and-water leak test on every connection you disturbed before attempting to light again.
What should I do if I have a natural gas model and the pilot still will not stay lit?
For hard-piped natural gas units, do not troubleshoot beyond what your manual allows, especially if you suspect supply pressure or line sizing issues. A licensed gas fitter should verify correct pressure at the supply connection, then you can focus on burner-side items like pilot cleanliness and thermocouple positioning.
How do I shut down correctly if my manual has a two-step OFF procedure?
Follow the manual’s exact shutdown sequence, commonly turning to PILOT to extinguish the main burner while keeping the pilot on, then moving to OFF to extinguish the pilot. After the control valve is OFF, close the tank valve, this prevents trapped gas in the line and reduces hard relights.
If I recently moved or stored the heater, do I need to do anything before first use?
Yes, inspect the pilot area for insect debris and visually check burner orifice cleanliness before lighting. Also confirm the thermocouple tip location is aligned with the pilot flame and perform a leak test even if the heater is unchanged, vibration during transport can loosen fittings.