
If your Hampton Bay patio heater igniter isn't working, the fix is usually one of three things: a dead AA battery, a wet or misaligned spark electrode, or the propane tank valve being closed or nearly empty. If the igniter clicks and sparks fine but the flame dies the moment you release the knob, that's a different problem entirely, and it almost always points to the thermocouple not getting hot enough to hold the gas valve open. Both problems are fixable at home without special tools, and this guide walks you through exactly how to tell them apart and what to do about each one. If you confirm the symptoms but the fix is still unclear, use the steps in this guide to narrow down whether the igniter, thermocouple, or gas flow is at fault patio heater not working.
Hampton Bay Patio Heater Igniter Not Working: DIY Fixes

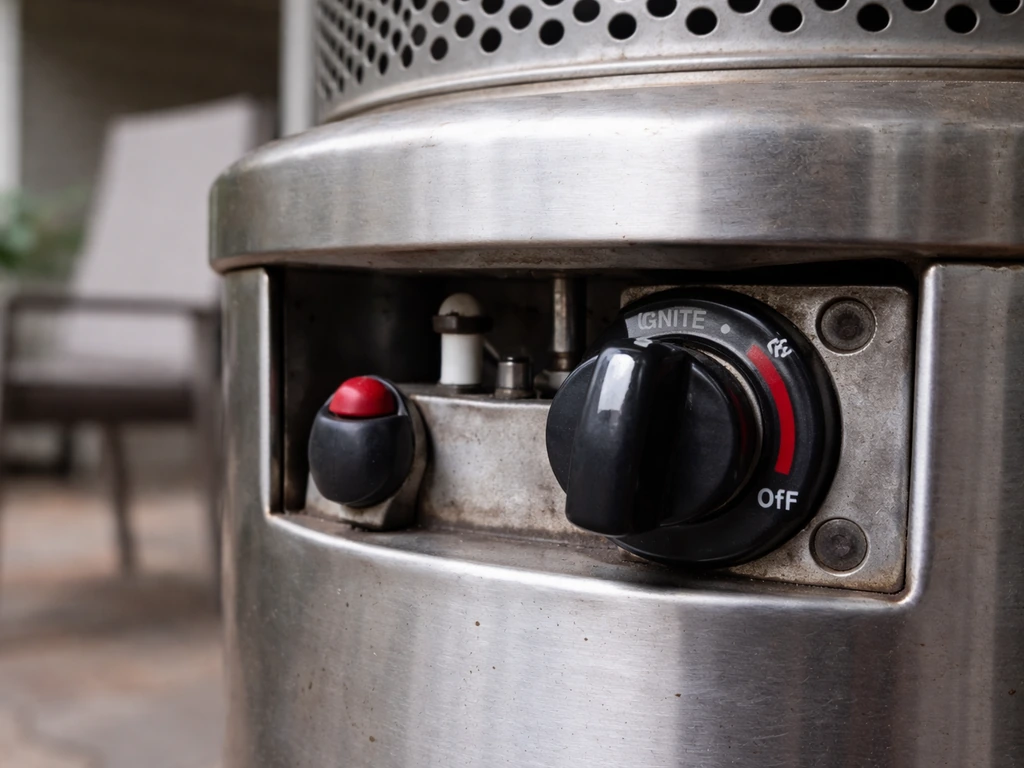
Is the igniter not working, or is the burner not staying lit?
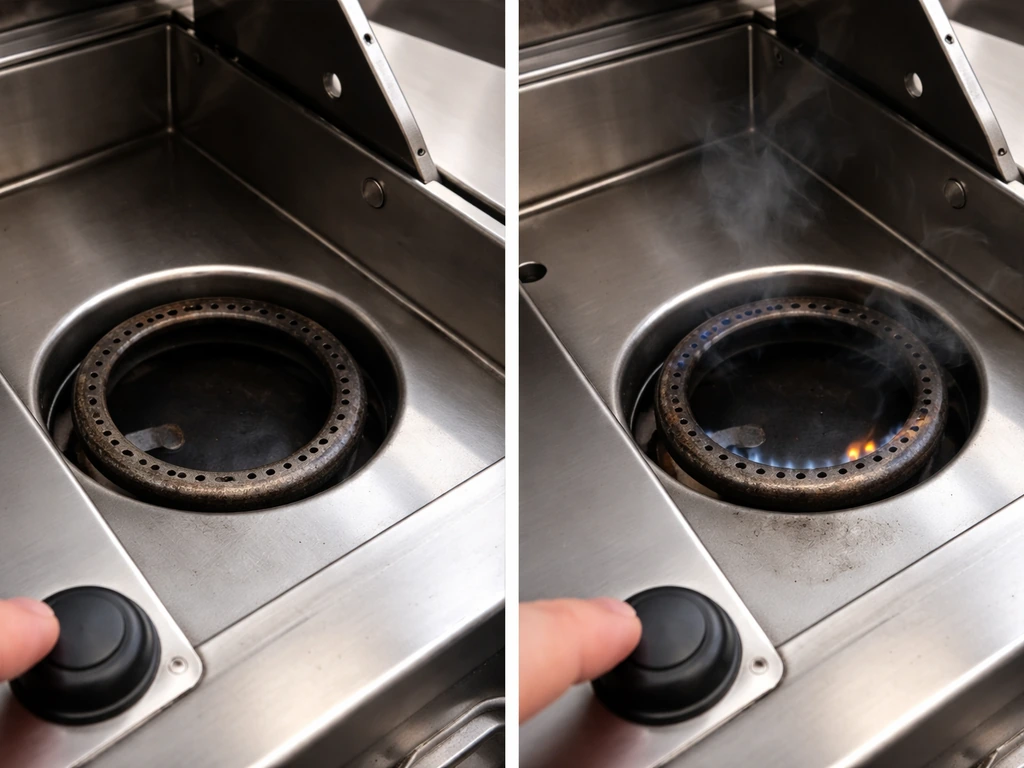
These two symptoms look similar from a distance but have completely different root causes, so diagnosing correctly first saves you a lot of time. Listen and watch carefully when you try to light the heater.
| What you observe | What it means | Where to start |
|---|---|---|
| No click, no spark at all | Igniter/electrical problem: battery, electrode, or wiring | Battery, electrode gap, wiring checks |
| Click and spark present, but no flame | Gas supply problem: closed valve, empty tank, blocked burner/venturi | Gas flow checks |
| Flame lights, then dies when you release the knob | Flame-sensing problem: thermocouple not heating up, or tilt switch tripping | Thermocouple and tilt switch checks |
| Flame lights, burns for a few seconds, then cuts out | Safety shutoff: thermocouple positioning, carbon buildup, or tilt switch | Thermocouple cleaning and positioning |
Keeping this distinction in mind as you work through the steps below will stop you from chasing the wrong part. A lot of people replace the igniter module when the real culprit is a gunked-up thermocouple, and vice versa.
Do these safety checks before you touch anything
Propane troubleshooting has one rule above all others: always work outdoors, away from any ignition source. Hampton Bay manuals are explicit that the heater shall only be used in a well-ventilated space and must never be operated in a building, garage, or any enclosed area. That applies equally when you're troubleshooting.
- Make sure the heater is completely off and the tank valve is closed before inspecting any components.
- If the flame went out accidentally or was blown out by wind, wait at least 5 minutes before attempting to re-light. This is directly from the Hampton Bay manuals (models NCZH-G-LASS01, PH01-SS, PH02-SS) and the reason is simple: propane that has escaped needs time to dissipate, or you risk a flash ignition.
- Smell around the burner and regulator connection before re-lighting. A rotten-egg smell means you have a gas leak and you should not proceed. Move the heater away from any structures and call your propane supplier.
- Whenever you disconnect or loosen any gas connection for inspection, you must perform a soap-and-water leak test before re-lighting. Apply soapy water to all fittings and watch for bubbles with the tank valve slowly opened.
- Check the heater for obvious physical damage, such as bent or cracked components, before troubleshooting. If the emitter screen is glowing abnormally red, flames are extending beyond the burner mesh, or you see thick black smoke, shut the heater off immediately. These are combustion safety signals from Hampton Bay's own manuals, not just general cautions.
- If the propane cylinder looks frosted over, that indicates low pressure due to cold temperatures. Wait for the cylinder to warm up to ambient temperature before troubleshooting further, because the low pressure will mimic other faults.
Common causes behind Hampton Bay igniter failures
Hampton Bay heaters across models (the NCZH-G-LASS01, PH01-SS, PH02-SS, PH01-S-PC, HD22DT, and others) share most of the same ignition architecture, so the failure points are consistent even if the control knob style differs slightly. Here's what actually goes wrong most often:
No spark or weak spark (igniter not clicking)
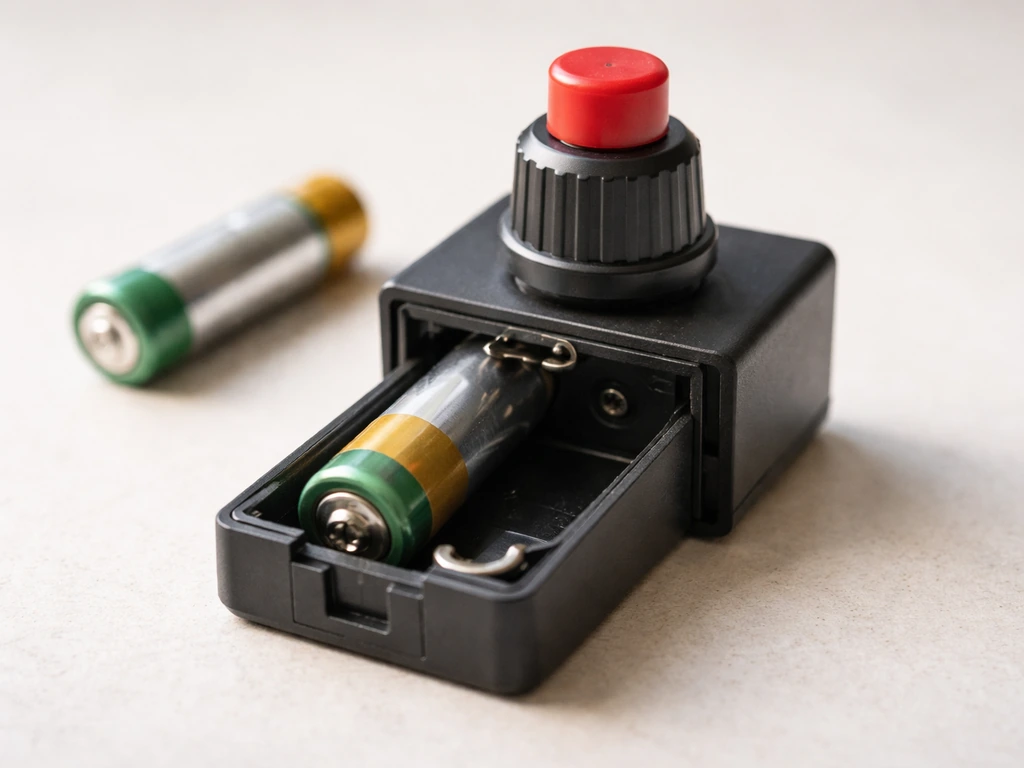
- Dead or weak AA battery: this is the single most common cause of igniter failure. Hampton Bay igniter modules run on one AA battery (some models use AAA), and a weak battery produces either no click or a faint click with no visible spark.
- Wet or corroded spark electrode: rain, dew, or condensation on the electrode tip shorts the spark to ground before it can jump the gap. The electrode looks like a small metal pin or rod positioned near the burner head.
- Incorrect electrode gap: the spark needs a specific gap between the electrode tip and the grounded metal nearby to jump correctly. Too wide and it won't spark; too narrow and it shorts out.
- Loose or disconnected electrode wire: the wire running from the igniter module to the electrode can work loose from vibration or come unclipped.
- Wire shorting between the igniter and electrode: Hampton Bay's own troubleshooting table lists this explicitly. If the wire insulation is damaged and touching metal, the spark never reaches the electrode.
- Broken igniter pin: visible on inspection if the ceramic insulator or pin itself is cracked.
Spark works but no flame (gas supply problems)
- Propane tank valve is closed or only partially open.
- Tank is empty or nearly empty.
- OPD (overfill protection device) on the tank has tripped, which typically happens if the tank was tipped. Stand the tank upright and open the valve slowly.
- Regulator is in bypass/lockout mode, which can happen if the valve was opened too quickly. Close the tank valve, disconnect the regulator, wait 30 seconds, reconnect, then open the tank valve very slowly.
- Blocked burner orifice or venturi tube. Spiders and insects love to nest in patio heater venturi tubes during storage, and even a partial blockage prevents gas from reaching the burner. Hampton Bay manuals specifically reference clearing the burner/venturi tube as a corrective step.
- Air in the gas line after a new tank connection. After attaching a fresh tank, Hampton Bay manuals state to allow at least one minute for air in the gas pipeline to purge before expecting the igniter to work reliably.
Flame lights then dies (thermocouple and safety sensor problems)
- Thermocouple not generating enough voltage: the thermocouple is a heat-sensing probe positioned in the flame. It generates a tiny electrical signal that holds the gas valve open. If it doesn't get hot enough fast enough, the valve closes when you release the knob.
- Carbon or soot buildup on the thermocouple tip: this acts as an insulator, preventing the thermocouple from reaching operating temperature, which means the valve never gets the signal to stay open.
- Thermocouple out of position: if the probe tip isn't sitting directly in the flame path, it won't heat up properly. Even being a few millimeters off is enough to cause repeated flame-out.
- Tilt switch tripped or faulty: Hampton Bay heaters include a tilt/tip-over safety switch. If the heater is on an uneven surface, the switch may be cutting gas. A faulty tilt switch can trigger even on a level surface.
Test steps: confirm gas flow and the ignition sequence
Work through these in order. Each step either confirms that section of the system is working or points you to the fix.
- Check the propane tank. Open the valve and listen for a faint hiss at the burner when you depress the control knob to the pilot position. No hiss at all usually means a closed valve, empty tank, or regulator lockout. A very faint hiss with weak flame suggests low pressure or a partial blockage.
- Check for regulator lockout. Turn the control knob to off, close the tank valve completely, and disconnect the regulator hose from the tank. Wait 30 seconds. Reconnect the hose, then open the tank valve very slowly (less than one full turn per two seconds). Try to light again. This resets a tripped regulator.
- Test the igniter click. With the tank valve open and the control knob pressed in at the pilot/ignition position, press the igniter button. You should hear a distinct, sharp click. If you hear nothing, it's the battery or the igniter module. If you hear a muffled or weak click, it's almost certainly the battery.
- Replace the battery first. Open the igniter module housing (usually a small plastic box on the control panel or pole, secured with one screw or a snap-fit cover) and swap in a fresh AA or AAA depending on your model. Test again.
- Check for spark at the electrode. In a dim environment, press the igniter and look for a visible blue spark at the electrode tip near the burner head. No spark after a fresh battery means the electrode, wire, or module needs attention. A spark that's orange or weak rather than crisp blue suggests a wet electrode or worn module.
- Inspect the electrode. Look at the ceramic-insulated rod near the burner. It should be clean and dry with no cracks in the ceramic. The gap between the tip and the grounded metal target should be about 3 to 5 mm (roughly the thickness of a few coins). Check that the wire from the module to the electrode is clipped securely at both ends.
- Check for blockage in the venturi tube. With the tank off and disconnected, look into the air intake openings at the base of the burner. Use a flashlight. If you see debris, spider webs, or insect nests, clear them with a thin bottle brush or compressed air. Do not use water.
- Attempt the full lighting sequence correctly. Hampton Bay's procedure for most models is: open the tank valve, press and hold the control knob in at the ignition/pilot position, press the igniter button (you may need to press it several times), and once a flame appears, continue holding the knob in for a full 10 seconds before slowly releasing. If this is a new tank connection, allow at least one minute before attempting the light to clear air from the gas line.
Fixing ignition failures: electrodes, gaps, and wiring
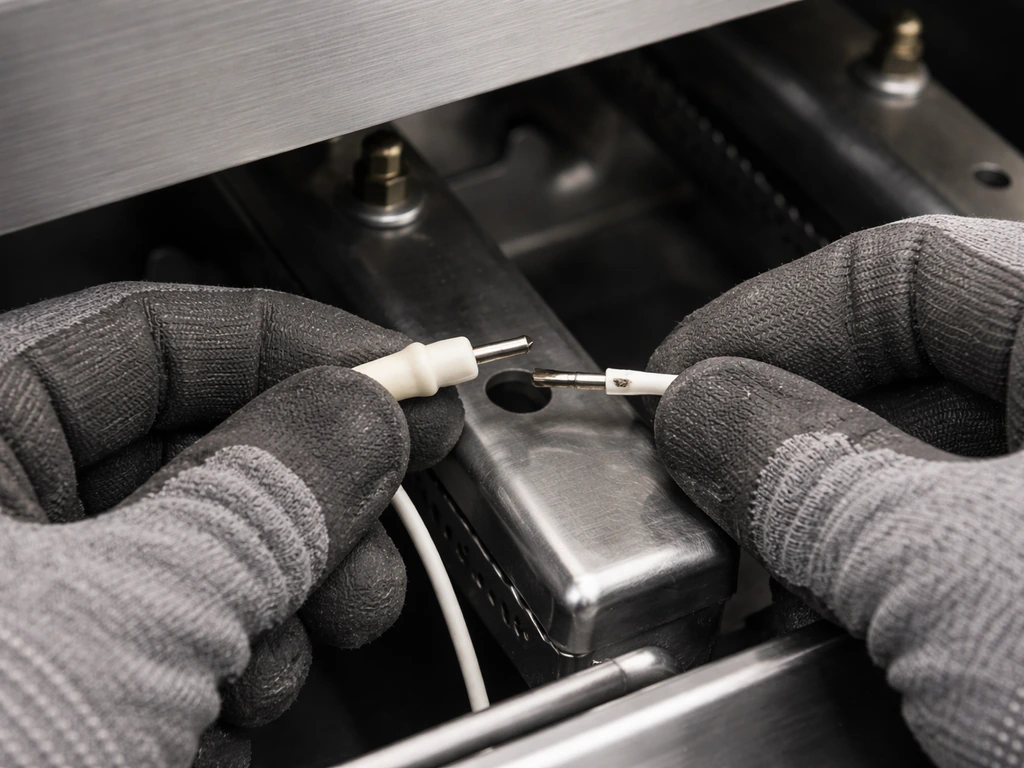
Once you've confirmed whether you have a spark problem or a gas flow problem, these are the hands-on fixes you can do at home without any specialized tools. If your tabletop patio heater isn't working, start by confirming whether you have a spark problem or a gas flow problem before replacing any parts tabletop patio heater not working.
Battery and igniter module
Replace the battery with a brand-name alkaline cell, not a budget or rechargeable battery. Cheap batteries often don't deliver the sharp voltage spike the igniter needs. If a fresh battery produces a strong click but still no spark at the electrode, the module itself may have failed and needs replacement. Hampton Bay igniter modules are available as parts and run about $10 to $20 depending on the model. Match your model number (found on the label on the base or pole) to the correct part before ordering.
Electrode cleaning and gap adjustment
If the electrode is wet, dry it thoroughly with a clean cloth and let the heater sit in the sun for 20 to 30 minutes before retesting. If it's coated in carbon or oxidation, clean the tip gently with fine-grit sandpaper or an emery board until the metal is bright. If your Fire Sense patio heater igniter is not working, cleaning the electrode tip is often the fastest place to start before moving on to wiring or module checks clean the tip gently. To adjust the gap, carefully bend the grounded metal target (not the electrode itself, which is fragile) closer or further from the tip until you're at roughly 3 to 5 mm. Test for spark after each adjustment. If the ceramic insulator on the electrode is cracked, replace the electrode. A cracked insulator means the spark is bleeding to ground through the crack and will never reliably jump the gap.
Wiring checks
Trace the wire from the igniter module to the electrode. Look for any spot where the insulation has worn through and the bare wire is touching metal. Hampton Bay's own troubleshooting documentation flags this as a direct cause of ignition failure. If you find a short, you can temporarily insulate it with high-temperature electrical tape as a test, but the proper fix is to replace the wire or the full electrode assembly. Also check both connector ends of the wire for corrosion. A corroded connector looks dull gray or greenish and will prevent the electrical signal from getting through. Clean it with a small wire brush or replace the connector.
Fixing the 'won't stay lit' problem: thermocouple and tilt switch
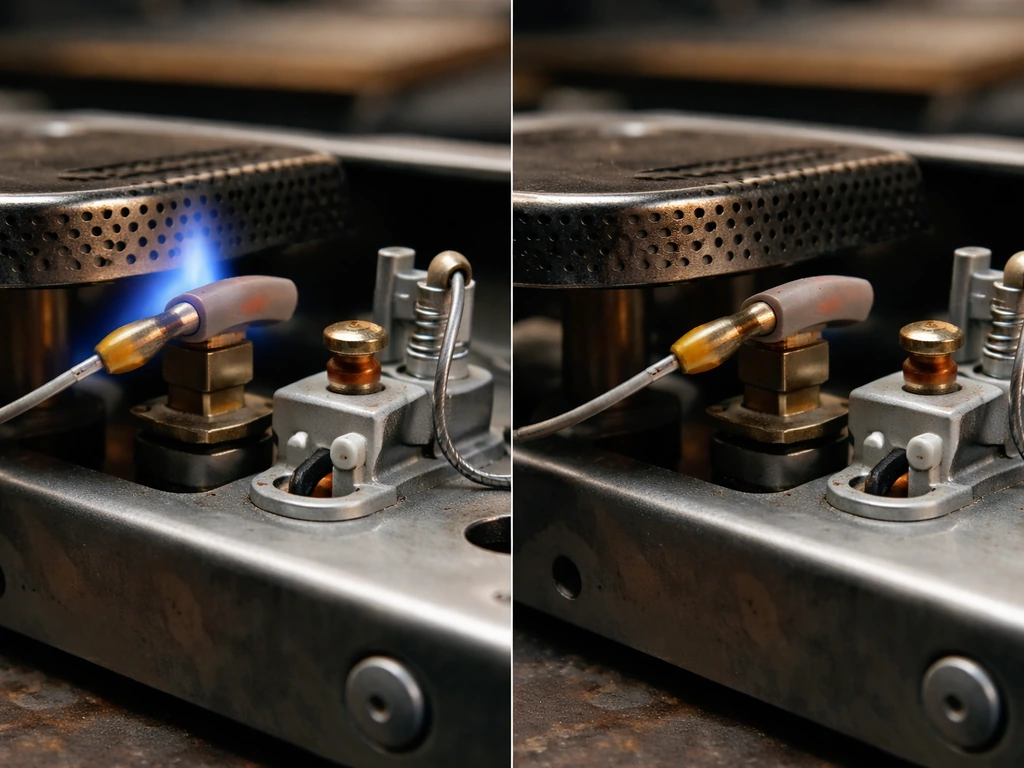
This is the scenario where the heater lights up fine, you can see the flame, but the moment you release the control knob the flame drops out. It happens because the gas valve on these heaters requires a continuous electrical signal from the thermocouple to stay open. If the thermocouple isn't warm enough or isn't positioned correctly in the flame, it can't send that signal, and the valve closes as a safety measure. This is working as designed, it's just the thermocouple that needs attention.
Clean the thermocouple tip
The thermocouple probe is a thin metal rod, usually copper or stainless, positioned so its tip sits in the pilot flame or main burner flame. Over time, carbon and soot build up on the tip and act as an insulator, which is exactly the opposite of what you need. Turn the heater off, let it cool completely, then use fine steel wool or fine-grit sandpaper to gently clean the tip until the metal is shiny. Don't scrub aggressively or you'll damage the probe. After cleaning, try the lighting sequence again, remembering to hold the knob in for the full 10 seconds.
Check thermocouple position
The thermocouple tip needs to sit directly in the flame path, not beside it or below it. If it looks like it's been bumped or bent out of position, gently bend the probe bracket so the tip is inside the flame. Also check that the small hole near the thermocouple (referenced in Hampton Bay documentation) is clear of any debris, because that opening is part of the air/flame pathway that heats the sensor. After repositioning, test again with the proper hold time. If cleaning and repositioning fix the problem, great. If not, the thermocouple itself may be worn out and no longer generating enough voltage to hold the valve.
Replace a failed thermocouple
A thermocouple replacement is one of the more approachable DIY repairs on a patio heater. The part is typically a threaded probe with a lead wire that connects to the gas valve. Shut off the tank, disconnect the gas line, unscrew the old thermocouple from its bracket and from the valve connection, and thread in the new one. Thermocouple replacements for Hampton Bay heaters are widely available and usually cost $10 to $25. Make sure you get a replacement rated for the BTU output of your model and with the same thread size. After installation, do a full soap-and-water leak test on all connections before re-lighting.
Test and reset the tilt switch
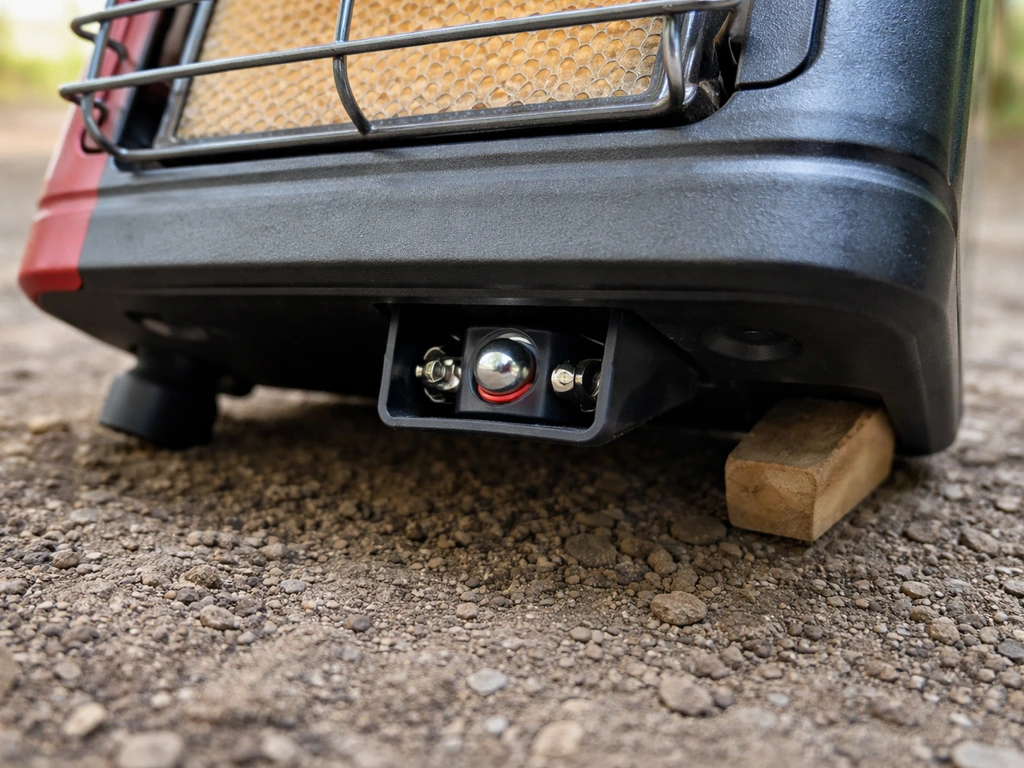
The tilt switch is a small safety sensor, often a mercury or ball-bearing type, that cuts gas if the heater tips over. If your heater is on slightly uneven ground, the tilt switch may be triggering even though the heater looks upright. Move the heater to the flattest surface you have and try again. If you suspect the tilt switch itself is faulty and triggering on a level surface, you can test it by carefully disconnecting the two wires from the switch and temporarily connecting them directly to each other (bypassing the switch). If the heater then stays lit, the tilt switch is the problem and needs to be replaced. Do not leave the switch bypassed permanently. This is a safety component and must be functional during normal use.
Getting your model right matters more than you'd think
Hampton Bay has released a lot of patio heater models over the years: the NCZH-G-LASS01, PH01-SS, PH02-SS, PH01-S-PC, HD22DT, and others. The control knobs, ignition sequences, and hold times aren't identical across models. The PH02-SS and NCZH-G, for example, both call for holding the knob in for 10 seconds after ignition, but the exact button arrangement and pilot positions differ. While the dial is held pressed in at the ignition position, press the spark button to ignite, then hold the dial in for at least 10 seconds to ensure the heater stays lit. If you're following a lighting procedure that doesn't quite match your control panel, find your specific model number on the label at the base of the heater and download the correct manual directly from Home Depot's product page or from a manual repository. Using the wrong procedure is one of the most common reasons owners think their heater is broken when it's actually a sequence issue.
When to stop DIY: signs of a regulator or gas valve problem
There's a clear line between what a homeowner should diagnose and what they shouldn't. Most igniter and thermocouple issues are genuinely DIY-friendly. Regulators and gas valves are a different story, and it's worth knowing the signs that you've crossed into that territory.
Signs the regulator may be the problem
- You can smell gas at the regulator connection even after a proper reconnection and leak test.
- The flame is consistently very low and orange even with a full tank and correct procedure, suggesting the regulator isn't delivering the right pressure.
- The regulator hose feels stiff, cracked, or shows any visible damage. Hoses should be replaced every few years as a matter of maintenance.
- After resetting the regulator (disconnect, wait, reconnect slowly) multiple times and the heater still has low or no gas at the burner, the regulator itself may have failed internally.
- The propane cylinder shows no signs of frosting and the tank is clearly not empty, but you still get no gas flow.
Signs the gas valve may be the problem
- You've cleaned and repositioned the thermocouple, replaced it with a new one, confirmed the tilt switch is fine, and the heater still won't stay lit. At this point the valve itself may not be responding to the thermocouple signal.
- You can hear gas flowing but the control knob feels mechanically wrong, sticky, or difficult to press in and rotate.
- You smell gas inside the heater body when the heater is off, which can indicate an internal valve leak.
If you're seeing any of the signs above, stop troubleshooting and do not attempt to disassemble or repair the regulator or gas valve yourself. These components are under pressure and involve gas-handling precision that goes beyond basic DIY. The correct next step is to contact a licensed propane appliance technician. If your outdoor propane patio heater is still not working after checking common ignition and flame issues, the technician can diagnose the gas valve and regulator safely contact a licensed propane appliance technician. Given that Hampton Bay heaters are sold at price points where a full replacement is sometimes comparable to a repair bill, it's also worth getting a quote on a replacement before committing to a professional repair. If the heater is several years old and the valve or regulator has failed, a new unit may be the more practical answer.
Quick reference: parts to check and what to replace
| Component | Symptom it causes | DIY fix | Difficulty |
|---|---|---|---|
| AA/AAA battery | No click, no spark | Replace with fresh alkaline battery | Very easy |
| Spark electrode | No spark or weak spark after new battery | Clean tip, adjust gap to 3-5mm, or replace if ceramic is cracked | Easy |
| Electrode wire | No spark despite working module | Inspect for shorts/damage, reseat connectors, replace if damaged | Easy |
| Igniter module | Click but no spark after electrode check | Replace module (model-specific part, ~$10-20) | Easy |
| Propane regulator (reset) | No gas flow, no flame | Disconnect, wait 30 sec, reconnect slowly | Easy |
| Venturi/burner orifice | Spark works, no flame | Clear with brush or compressed air | Easy |
| Thermocouple (clean/position) | Lights but won't stay lit on release | Clean tip, reposition in flame path | Easy |
| Thermocouple (replace) | Won't stay lit after cleaning and repositioning | Replace thermocouple (~$10-25) | Moderate |
| Tilt switch | Flame cuts out, heater on level surface | Test by bypassing, replace if faulty | Moderate |
| Regulator (replace) | Persistent low/no gas, visible damage | Replace hose and regulator assembly | Moderate |
| Gas valve | Won't stay lit after all above checks | Stop DIY, contact technician | Not DIY |
Most Hampton Bay patio heater igniter problems resolve at the top of that list. If you still end up with an electric patio heater not working after the quick checks, move on to deeper ignition and wiring testing. A fresh battery and a clean electrode get a large percentage of heaters working again without any further work. If you're working through the thermocouple steps, you're dealing with a more involved but still very solvable problem. The issues requiring professional help are genuinely uncommon, but it's important to recognize them when you get there rather than keep pushing into territory that's not safe for a DIY repair.
FAQ
My Hampton Bay patio heater igniter clicks, but I never see a spark, what should I check first?
Yes. If the igniter clicks but there is no visible spark at the electrode, do not keep cycling the igniter knob for long periods. Stop, confirm the battery is fresh alkaline, then inspect the electrode tip (wetness, carbon, cracked ceramic insulator) and the wire insulation and connectors for shorts or corrosion before testing again. Continuous attempts can heat components and mask the real fault.
If the flame dies when I release the knob, could it be my lighting timing instead of parts failing?
Hold-time matters. For the “flame dies when I release the knob” symptom, you generally need to keep the knob fully depressed for the full specified time (commonly 10 seconds) while the pilot heats the thermocouple. If you release early, the thermocouple never reaches the temperature needed to keep the valve open, even if it is clean and correctly positioned.
Can I bypass the tilt switch to test it on my Hampton Bay patio heater?
Yes, but only in a limited diagnostic way. If you bypass the tilt switch temporarily by connecting its two wires directly and the heater stays lit, that indicates the switch is triggering. However, you should not run the heater like that long-term, the safety circuit must be restored, replace the tilt switch if bypass fixes it, and also verify the heater is on a level surface.
After drying or cleaning the igniter electrode, how soon should I retest and what signs mean I should stop?
After cleaning or any electrode repositioning, wait until the heater is fully dry and then retest once. If you just dried the electrode but it still looks sooty or smells strongly of propane, let it air out outdoors longer and check for any cracked insulator or loose electrode connections before continuing. Repeated retries can delay the discovery of a cracked ceramic insulator or a short in the wiring.
What’s the correct placement of the thermocouple, and how do I know it’s not too far from the flame?
A thermocouple probe that is too far from the flame path is a common “it lights but won’t stay on” cause. Make sure the tip sits in the hottest area of the pilot or main flame, not beside it or below it. Gently bending the probe bracket to correct position is usually safer than trying to force the probe itself, and you should recheck the hold time after adjustment.
What should I do if I smell propane while troubleshooting an igniter problem?
If you smell propane or see flames where they should not be (for example, outside the expected burner area) stop immediately. Do not troubleshoot with the heater operating, close the tank valve, let it cool, and then do a soap-and-water leak test on all connections once you can safely handle it. If leaks are found, fix the leaking connection or stop and contact a licensed technician.
How can I confirm I’m using the correct ignition procedure for my exact Hampton Bay model?
Yes, different models may require slightly different control knob sequences, pilot positions, and hold times. Before ordering parts or repeating troubleshooting steps, verify your exact model number from the label and follow the corresponding lighting procedure, because using an incorrect procedure is a frequent reason owners think the igniter or thermocouple is broken.
Do I need to do a leak test after replacing the thermocouple or reconnecting any gas parts?
Soapy-water testing is for gas leaks, and it should be done after any work on gas connections, including thermocouple replacement. Mix dish soap and water, apply to connections, then watch for growing bubbles when the tank is turned on. If you find bubbles, do not relight until the leak is resolved.
How do I know whether the igniter module itself is dead versus a wiring problem?
If your heater has a removable igniter module, a failed module is more likely when you have a fresh alkaline battery, clean/dry electrode, and intact wiring, yet there is still no spark at the electrode. Confirm there is continuity from the module to the electrode only if you are comfortable testing, otherwise replace the module after verifying the electrode and connectors, because a shorted wire can mimic a “dead module” symptom.
What if my heater has mixed symptoms, like weak spark sometimes and also won’t stay lit?
In most cases, the two symptom patterns are separate: spark failure points to battery/electrode/module/wiring, while “flame out when releasing knob” points to thermocouple heat signal or thermocouple positioning. If you have both issues (sometimes it sparks, sometimes it doesn’t, or it sparks but never holds), re-check the battery first and inspect connectors for intermittent corrosion, then proceed to thermocouple cleaning and placement.