Most propane patio heater problems come down to three things: the thermocouple not getting hot enough to hold the gas valve open, a blocked or misaligned pilot tube, or a weak/dead igniter. You can fix the majority of these issues yourself in under an hour with basic tools, no HVAC training required. But before you touch anything, you need to do a few safety checks, because propane and a gas leak are not a combination you want to discover mid-repair.
How to Fix a Propane Patio Heater Step by Step

Grant Mercer
30 Jun 2026
Quick safety checks before you do anything else
Propane is heavier than air, which means it pools at ground level and can ignite from a spark you didn't even know was there. Before opening any panel or touching any fitting, run through this list.
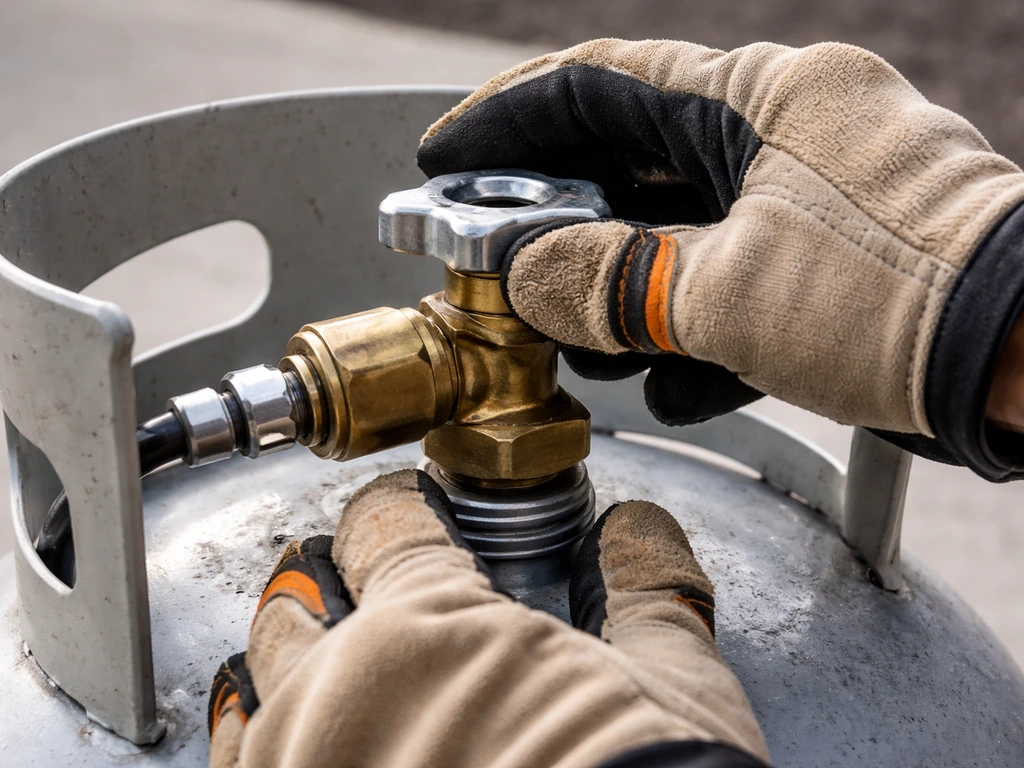
- Shut off the gas at the cylinder valve by turning it fully clockwise. Do not skip this step.
- Disconnect the propane cylinder from the regulator and move the heater to an open outdoor space with good airflow. Never troubleshoot with gas flowing.
- Sniff around the regulator, hose, and all fittings. If you smell gas, stop and wait at least 5 minutes for it to dissipate before continuing.
- Mix a leak-test solution of 2 to 3 oz of dish soap in a small spray bottle of water. You'll use this later to check every connection you touch.
- Before relighting after any repair, spray the soap solution on the regulator, hose connection, and all gas fittings. Watch for bubbles. If you see them, there's a leak, and the heater does not get used until it's resolved.
- If you find a leak you cannot fix by tightening a fitting, turn off the gas cylinder valve and call the manufacturer or a qualified technician. This is not a judgment call, it's a hard stop.
- Never use a flame to check for leaks. Soap and water only.
- Keep the area clear of ignition sources (cigarettes, lighters, power tools) while you work.
One more thing: check that the heater is sitting perfectly level before any test lighting. Propane patio heaters have a tilt safety switch built in that automatically cuts the gas if the unit tips beyond a safe angle. If the heater is even slightly off-level on uneven pavers, that switch can trip and shut everything down, making you think there's a bigger problem when really you just need to shim the base.
Common symptoms and what they usually mean
Before diving into fixes, figure out which category your problem falls into. The symptom tells you a lot about where to look first.
| Symptom | Most Likely Cause | Where to Start |
|---|---|---|
| No spark when you press the igniter | Dead battery, fouled electrode, or broken igniter wire | Check battery first, then electrode gap and condition |
| Spark fires but pilot won't light | Blocked pilot tube, closed gas valve, or empty/low tank | Check tank level, then inspect pilot orifice for debris |
| Pilot lights but goes out the moment you release the knob | Thermocouple not heating up, not held long enough, or bad thermocouple | Hold knob 30 to 45 seconds; if still dies, test thermocouple |
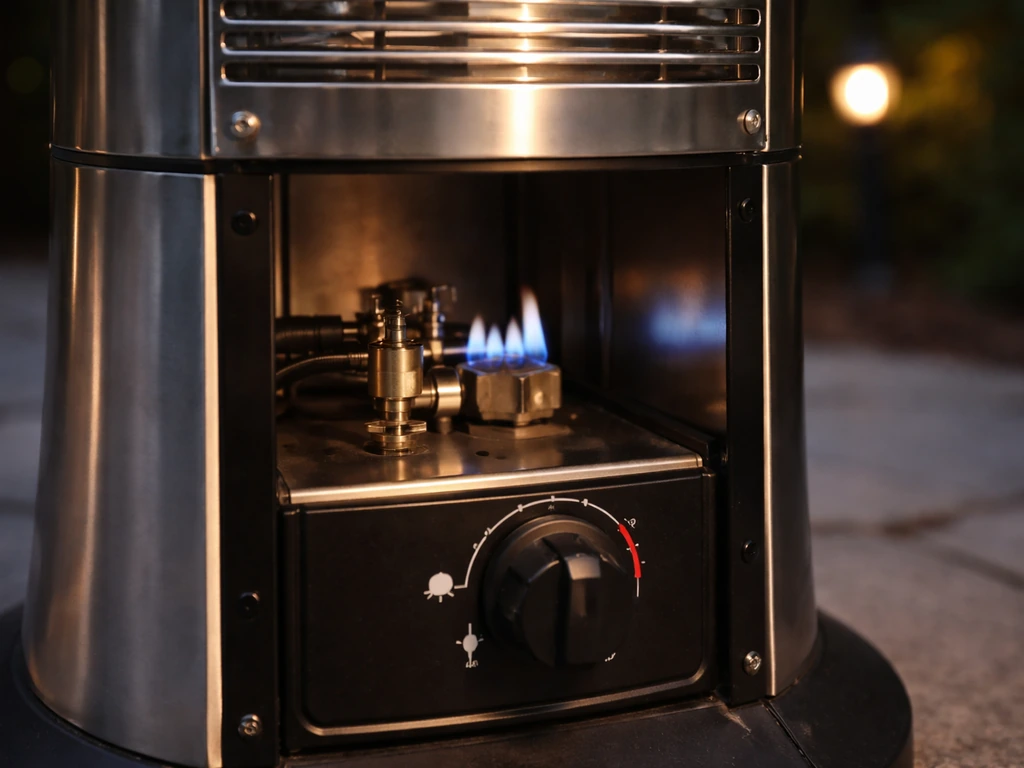
| Pilot stays lit but main burner won't come on | Gas valve fault, blocked burner ports, or insufficient pilot flame | Inspect pilot flame size and burner port cleanliness |
| Heater lights then shuts off after a few minutes | Tilt switch tripping, thermocouple failing under load, or propane cylinder frosting | Level the heater; check cylinder temperature and thermocouple position |
| Weak or uneven flame | Partially blocked burner ports or low gas pressure | Clean burner ports; check regulator and cylinder level |
| Flame too high or unstable | Regulator issue or incorrect gas pressure | Check regulator; replace if needed |
Tools and parts you may need

You don't need a full toolkit for most of these repairs. Here's what to have on hand before you start pulling things apart.
- Flathead and Phillips screwdrivers
- Adjustable wrench and a set of open-end wrenches (5/16" and 7/16" cover most thermocouple nuts)
- Needle-nose pliers
- Fine-grit emery cloth or fine steel wool (for cleaning the thermocouple tip and electrode)
- Canned compressed air or a small wire brush (for clearing pilot orifices and burner ports)
- Dish soap and water in a spray bottle (leak test)
- Replacement thermocouple (universal 24" or 36" units from any hardware store fit most patio heaters; match the thread size)
- Replacement igniter electrode (if yours is cracked or corroded)
- AA or AAA battery, depending on your igniter type
- Replacement regulator hose assembly if yours shows cracks or is more than 5 years old
- Pipe thread sealant tape (PTFE/gas-rated) for re-sealing threaded fittings if you disconnect them
The thermocouple is the single most-replaced part on a propane patio heater. A standard replacement runs $8 to $15 at any hardware store and takes about 15 minutes to swap. If your heater is lighting but won't stay lit, just buy one before you start troubleshooting so you have it ready.
Step-by-step: getting your propane heater to ignite reliably
If the heater isn't igniting at all, work through these steps in order. Each one rules out the next possible cause.
Step 1: Confirm the gas supply
Check that the propane cylinder has fuel. Pick it up and shake it gently. An empty tank is obvious by weight. If it's been cold overnight, check for frost on the outside of the cylinder. A frosted cylinder means you're drawing propane faster than the liquid can vaporize, and pressure drops too low to sustain a flame. Let it warm up to ambient temperature before trying again. Make sure the cylinder valve is open fully (counterclockwise) and that the regulator is hand-tight on the cylinder post.
Step 2: Check and replace the igniter battery
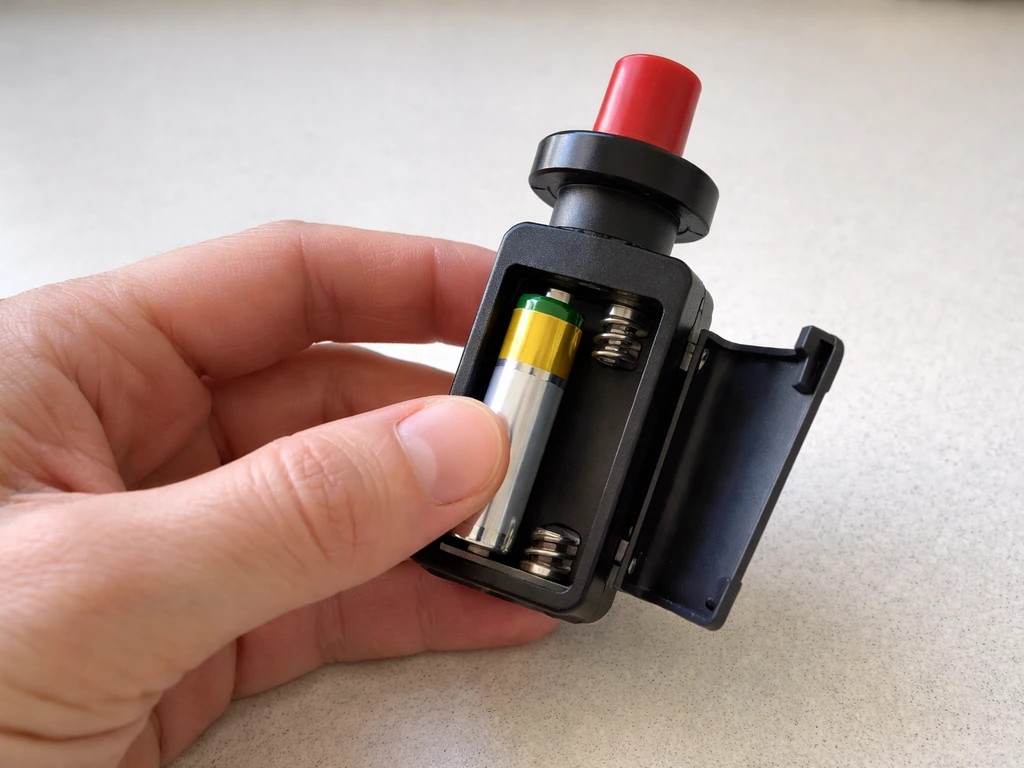
Most piezo push-button igniters are battery-powered, not purely mechanical. If you press the button and hear nothing (or a weak click with no spark visible), swap the battery first. The battery compartment is usually on the back of the control panel housing or under a small cap near the igniter button. Replace it with a fresh alkaline battery even if the old one tests okay on a meter. Battery testers under load are more reliable than voltage-only checks, and this fix costs almost nothing.
Step 3: Inspect the electrode
The electrode is the small ceramic-tipped rod positioned next to the pilot. It needs to be clean, properly gapped (about 1/8 to 3/16 of an inch from the burner or pilot hood), and free from cracks. Carbon buildup, corrosion, and spider webs in the electrode area are extremely common, especially after the heater has been sitting in storage. Use fine emery cloth to gently clean the tip of the electrode, and blow out the surrounding area with canned air. If the ceramic body is cracked, the spark is leaking to ground and you need a new electrode.
Step 4: Check the igniter wire
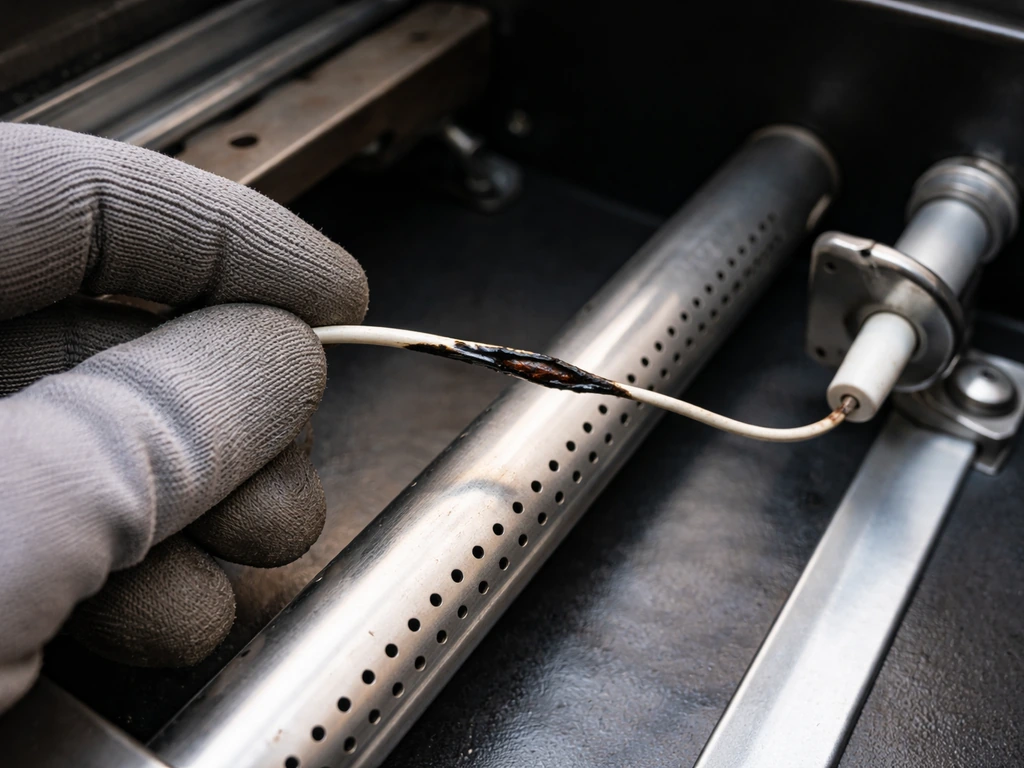
Trace the wire from the igniter button to the electrode. Look for breaks, burn marks, and bare spots where the insulation has worn through. A damaged wire won't carry the spark signal reliably. If you find damage, the wire and electrode often come as one assembly and can be replaced together for around $10 to $20.
Step 5: Clear the pilot orifice
If you have spark but no ignition, the pilot orifice is probably blocked. It's a tiny hole (smaller than a pin) in the brass fitting at the base of the pilot assembly. Dirt, rust, or insect debris can block it completely. Turn off and disconnect the gas, then use canned air to blow through the pilot tube from the control valve end. If you suspect a clogged pilot tube from soot or insect debris, cleaning the pilot tube and pilot orifice is usually the first place to start. Do not use a drill bit or wire to ream the orifice out, as this enlarges the hole and changes the gas-to-air ratio. If the orifice is visibly corroded or damaged, replace the pilot assembly.
Step 6: Try manual ignition as a test
If the electronic igniter isn't firing but you've confirmed gas flow, test whether the pilot will light manually. Turn the control knob to the pilot position, push it in, and hold it while you use a long match or lighter near the pilot orifice. If the pilot lights this way but not with the igniter, your problem is isolated to the ignition system (battery, electrode, or wire), not the fuel supply. This is a useful diagnostic shortcut.
Step-by-step: fixing "won't stay lit" (thermocouple, thermopile, and valves)
This is the most common propane patio heater complaint. The pilot lights, you let go of the knob, and the flame dies within a few seconds. Here's exactly what's happening and how to fix it.
Understand what the thermocouple does
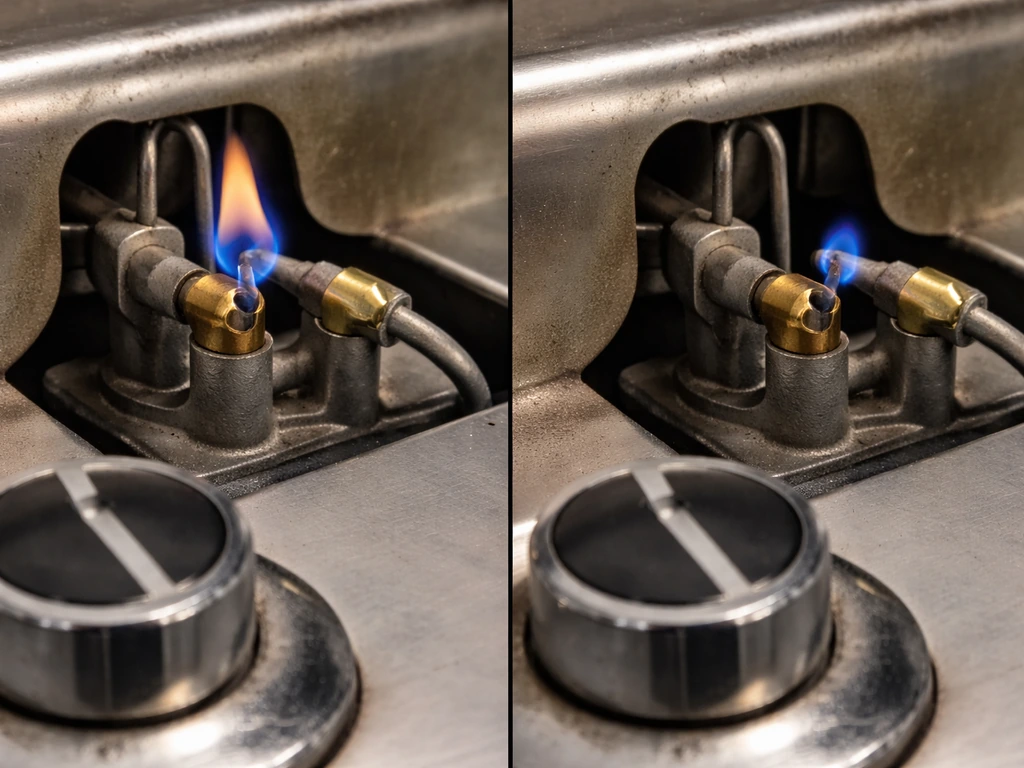
The thermocouple is a small metal probe with its tip positioned in the pilot flame. When heated, it generates a small DC voltage, typically 25 to 35 millivolts, that signals the gas valve to stay open. When you press and hold the control knob, you're manually holding the valve open while the thermocouple heats up. Once it's hot enough to generate that holding voltage, releasing the knob keeps the valve open automatically. If you release the knob too soon, or the thermocouple isn't generating enough voltage, the valve snaps shut and the flame dies.
Step 1: Hold the knob longer
Before assuming the thermocouple is bad, try holding the control knob fully depressed for a full 30 to 45 seconds after the pilot lights. Many people let go after 10 to 15 seconds, which isn't long enough. Press the knob in firmly (not partway), keep it there for a full 30 to 45 count, then release slowly. If the flame holds, you're done. If it still dies, continue to the next step.
Step 2: Check thermocouple position
The tip of the thermocouple needs to be inside the pilot flame, not beside it or below it. If the thermocouple tip is mispositioned, you can usually fix it without replacing anything, which is closely related to how to fix thermocouple on patio heater issues. Even a few millimeters of misalignment dramatically reduces the voltage it generates. Look at where the pilot flame is sitting relative to the thermocouple tip. The flame should be visibly engulfing the tip. If it's off to the side or the tip is sitting above the flame, gently bend the thermocouple bracket (with the gas off) to reposition it. This is a zero-cost fix that solves the problem more often than you'd expect.
Step 3: Clean the thermocouple tip
Over time, the thermocouple tip builds up a layer of carbon and oxidation that insulates it from the flame and reduces its voltage output. If you need a focused guide, follow the steps for cleaning a patio heater thermocouple. With the gas off and the thermocouple cool, lightly sand the tip with fine emery cloth using a circular motion. You want bare, shiny metal exposed. Don't grind it down aggressively, just remove the buildup. This alone sometimes restores enough output to hold the valve.
Step 4: Check the thermocouple connection at the valve
The thermocouple connects to the gas valve with a small threaded nut, usually on the front or side of the valve body. If this connection is even slightly loose, the millivolt signal can't reach the valve reliably. Use a 5/16" or 7/16" open-end wrench (depending on your model) to snug the nut down finger-tight plus about a quarter turn. Don't overtighten it; the threads are soft and the connection just needs to be secure.
Step 5: Replace the thermocouple
If you've repositioned it, cleaned it, tightened the connection, and held the knob for 45 full seconds and it still dies, the thermocouple is done. Replacement is straightforward. Turn off the gas, let everything cool, unscrew the connection nut from the gas valve, and pull the thermocouple bracket out of its clip or mounting point near the pilot. Take the old one to the hardware store to match the length (24" and 36" are most common). Thread the new one in by hand, then snug the nut. Make sure the tip is positioned correctly in the pilot flame before testing.
Step 6: Check the tilt switch
If the heater lights and then shuts off after a few minutes of use, especially if the ground is uneven or someone bumped the heater, check the tilt switch. It's a small safety device (usually a ball-bearing switch or mercury switch) located in the base or on the gas valve assembly. It cuts gas automatically if the heater tips past a set angle. Make sure the heater is sitting perfectly level. If it still trips, the tilt switch itself may have failed in a closed or overly sensitive position and needs replacement.
Step 7: Check for a frosted or low cylinder
A propane cylinder that's nearly empty or very cold can frost over on the outside. This is a sign that propane liquid is vaporizing too fast or that pressure is too low to keep the heater running. If you see frost on the cylinder during operation, that's your culprit. Let the cylinder warm up or replace it with a full one. Don't wrap cylinders in anything to warm them faster; just let ambient temperature do it.
Step-by-step: fixing ignition system issues (spark, electrode, and fuel path)
If the problem is specifically that you get no spark or the spark isn't igniting the gas, these steps focus specifically on the ignition hardware and fuel delivery path.
Testing the igniter module
In a dark space or at dusk, press the igniter button while watching the electrode tip. You should see a sharp blue-white spark jumping to the ground point. A weak orange spark or no spark at all points to a dead battery, a bad igniter module, or a cracked electrode. Replace the battery first, then inspect the electrode and wire. If you're getting a strong spark but the pilot still won't catch, the problem is fuel delivery, not the ignition system.
Checking the fuel path from cylinder to burner
Work from the cylinder inward. First, verify the cylinder valve is open. Then check the regulator connection at the cylinder: the fitting should be snug and the regulator itself should feel firm and not rattle. If the regulator connection is cracked, loose, or damaged, you may need to replace the regulator on your patio heater. Inspect the hose between the regulator and the heater for cracks, kinks, or spots that have been pinched. A hose that's kinked flat won't pass enough gas to light. If the hose is over 5 years old or shows any cracking, replace the regulator/hose assembly before doing anything else.
Clearing the burner ports
If the pilot lights and the main burner tries to come on but produces a weak, patchy, or uneven flame, the burner ring ports are clogged. With the heater off and cool, use a wire brush or a straightened paper clip to clear each port around the burner ring. Spider webs and insect nests are the most common culprit after storage. Follow up with compressed air to blow the debris out. The flame should be uniform around the entire burner ring when things are clear.
What to do after repairs: the re-check routine
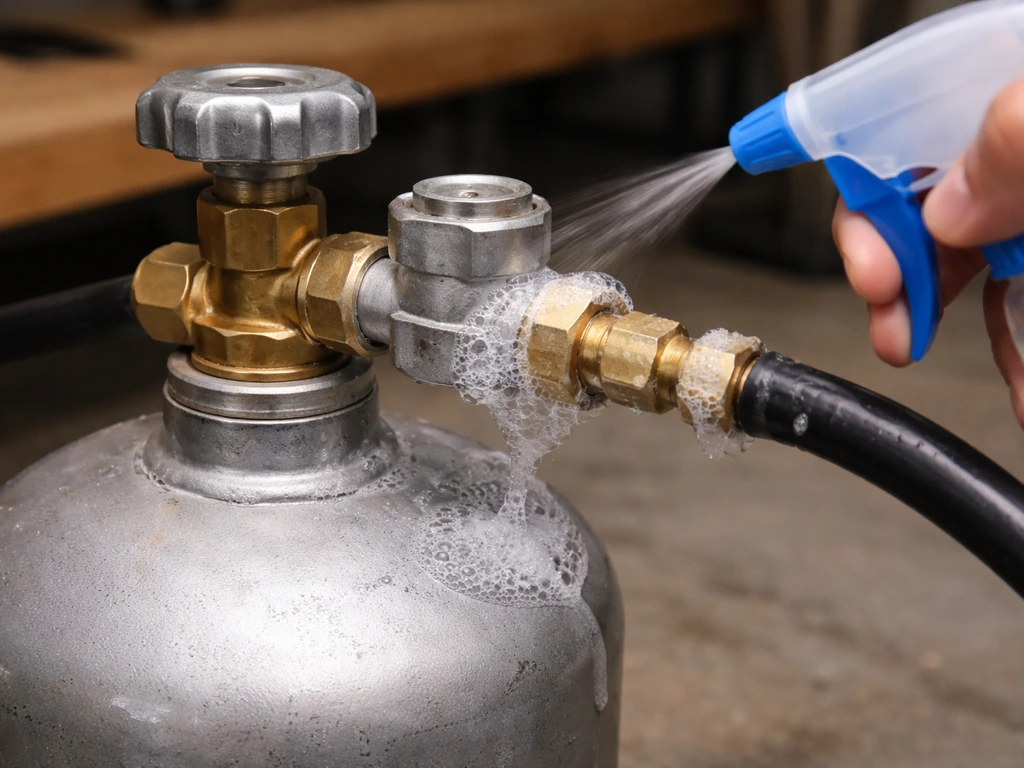
After any repair that involved disconnecting a fitting or replacing a component, do a full leak test before operating. The Lowes manual also cautions you should blank" rel="noopener noreferrer">not use the patio heater until all connections have been leak tested. Reconnect the cylinder, open the valve slowly, and spray soap solution on every connection you touched. Use a leak-check solution made with dishwashing detergent and water at the stated 2, 3 oz guidance, and apply it to regulator/cylinder connections and other joints to look for bubbles blank" rel="noopener noreferrer">2–3 oz leak-check solution using dishwashing detergent and water. Watch for 30 seconds. No bubbles means you're good. Then run through the full ignition sequence, confirm the pilot holds after 30 to 45 seconds, and let the heater run for 5 minutes to verify the flame is steady and the burner pattern is even. Check that the flame color is mostly blue with some orange tips. Mostly yellow or flickering orange flame indicates incomplete combustion, which usually means a blocked or dirty burner or an air shutter that needs adjusting.
When to replace a part vs. when to call a pro
Most propane patio heater repairs are genuinely DIY-friendly. But a few situations call for professional help, and it's worth being honest about that line.
| Situation | DIY or Pro? | Notes |
|---|---|---|
| Dead battery in igniter | DIY | 2-minute fix |
| Fouled or cracked electrode | DIY | Inexpensive part, easy swap |
| Thermocouple replacement | DIY | Most common repair; $8–$15 part |
| Blocked pilot orifice or burner ports | DIY | Compressed air and a brush handle it |
| Tilt switch replacement | DIY (with caution) | Disconnect gas completely; verify correct replacement part |
| Regulator/hose replacement | DIY | Match the BTU rating and thread size of the original |
| Gas valve replacement | Pro recommended | Improper valve installation can cause dangerous leaks |
| Leak you can't stop by tightening fittings | Pro | Shut off cylinder and don't operate until resolved |
| Smell of gas with no obvious source | Pro immediately | Don't troubleshoot further; evacuate and call your gas supplier |
| Heater runs but trips safety controls repeatedly | Pro | Could indicate a regulator, valve, or ODS sensor fault |
The gas valve is the one component I'd steer most DIYers away from replacing themselves. It's not that the repair is impossibly complex, it's that a misthreaded or improperly seated gas valve can leak in a way that's not immediately obvious and can cause a serious incident later. If the thermocouple, regulator, electrode, and pilot are all fine and the heater still doesn't work, the gas valve is probably the issue, and at that point a service call makes more sense than a DIY gamble.
Keeping your propane heater working season after season
The best way to avoid repeat repairs is a 10-minute checkup at the start and end of each season. Before your first use in spring, inspect the hose and regulator for cracks, clean the burner ports and pilot assembly with compressed air, check the electrode gap and condition, and do a fresh leak test when you reconnect the cylinder. Before storage, turn off the cylinder valve and let the heater run until the remaining gas in the line burns off, then disconnect and store the cylinder separately. Cover the heater to keep insects out of the pilot and burner area. Spiders and wasps love to nest in the pilot tube over winter, and that's the number one cause of "won't ignite" calls every spring.
If your heater has deeper issues like a consistently unreliable regulator, a faulty ODS sensor, or thermocouple problems that keep coming back, those topics get their own detailed treatment elsewhere on this site. Thermocouple cleaning, pilot tube cleaning, regulator replacement, and battery replacement each have step-by-step guides that go deeper than what's covered here. The troubleshooting logic is the same: start with the simplest, cheapest fix, test it, and work your way up the parts list from there.
FAQ
Can I warm a cold propane patio heater cylinder to get it working again?
Yes, but only if the cylinder and all connections are confirmed leak-free first. Do not use an open flame to “help” propane warm up, and never enclose the cylinder in heat blankets or anything that traps heat. If you notice frost on the cylinder, let it warm to room temperature naturally, then try again after the heater has been stable on level ground for a few minutes.
After I replace or adjust a part, do I really need to leak test before using the heater?
Always do an actual leak test after you touch any part in the gas path, including loosening and reattaching the regulator, hose, thermocouple connection, or pilot assembly. Use soap solution on every connection you disturbed and watch for bubbles for about 30 seconds before lighting. If you see bubbles, shut everything down and do not attempt ignition.
My heater has no spark, what should I troubleshoot first?
If the heater has no spark, focus on ignition power and hardware, in this order: battery (under load), electrode condition, electrode gap, then the igniter wiring. Many “weak spark” problems are actually poor grounding or carbon tracking on the ceramic tip, so cleaning the electrode tip and surrounding area can restore reliable sparking.
What if I have a strong spark but the pilot still will not catch?
If you see a strong spark but the pilot will not light, treat it as a fuel delivery issue, not the ignition system. Common causes are a blocked pilot orifice or pilot tube, or insufficient gas reaching the pilot due to regulator or hose problems. A quick manual pilot-light test (using a match or long lighter while holding the knob) helps confirm that gas is available at the pilot.
How can I tell whether my electrode gap or my igniter module is the problem?
Start by verifying that the electrode is actually producing a spark to the grounded point. If the spark looks weak, orange, or intermittent, clean the electrode tip and ceramic body, check for cracks, and confirm the gap is about 1/8 to 3/16 inch. If the gap is correct and cleaning does not help, the igniter module or battery supply is more likely than the pilot.
The burner flame is weak and uneven, what should I check besides the thermocouple?
A patchy or uneven burner flame after lighting usually means debris in the burner ports or incorrect airflow. Clear the burner ring ports and remove insect nests or soot, then blow out the area with compressed air. If the burner still burns unevenly after cleaning, check for an air shutter or assembly position issue specific to your model before assuming you need new parts.
What are the most common reasons a propane heater won’t stay lit after releasing the knob?
If the heater keeps shutting off after you release the knob, do not immediately replace the thermocouple. First, hold the control knob fully depressed for 30 to 45 seconds after the pilot lights, confirm the thermocouple tip is directly in the pilot flame (not beside it), then check the tightness of the connection at the gas valve. These three fixes solve most “lights then dies” cases.
Why does my heater shut down after ignition when the patio is uneven?
Yes, and it is a common mistake on uneven surfaces. Even with the tilt safety switch present, an off-level heater may trip the cut-off repeatedly, which can look like a thermocouple failure. Shim the base until the heater sits perfectly level, then test the ignition sequence again without bumping the unit.
What tools should I avoid when cleaning a clogged pilot orifice?
Do not ream the pilot orifice with drills or metal wire. Enlarging the hole changes the gas-to-air mix and can create incorrect combustion. Instead, blow through the pilot tube with compressed air and clean debris carefully. If the brass orifice is visibly corroded or damaged, replace the pilot assembly rather than trying to “unclog” it by force.
How do I know whether I should replace the regulator or hose instead of troubleshooting the pilot?
If you find a kinked or cracked hose, or the regulator connection is loose or damaged, replace the regulator/hose assembly rather than trying to patch it. Also, if the hose is older and shows cracking, replace it as a safety precaution even if the heater lights briefly. A hose that is pinched flat can restrict flow and cause hard-to-diagnose ignition problems.
If I replaced the thermocouple and it still fails, what should I check next?
If it keeps failing the same way after replacement, treat that as a clue the root cause is still present. Recheck thermocouple positioning and connection tightness, confirm the pilot flame is engulfing the tip, and verify you are holding the knob long enough for heat-up. Also inspect the electrode and pilot area for insect nests, since recurring clogs can make new parts seem “bad.”
How long should I test the heater after repairs to be sure it is really fixed?
Yes, but timing matters. After reconnecting the cylinder, open the valve slowly, do the soap-bubble leak test, then run the ignition sequence. Let it run about 5 minutes to confirm the flame pattern stays even and the combustion looks normal, not mostly yellow or flickering orange, which can indicate a dirty burner or airflow issue.