To get the right Char-Broil Patio Bistro 240 manual, start by confirming your exact model number from the label on the back of the unit, then go directly to Char-Broil's support site or ManualsLib and pull the PDF that matches. Once you have it, the manual gives you the parts diagram, ignition troubleshooting table, and burner cleaning steps you need to fix a won't-light or won't-stay-lit problem yourself in about an hour.
Char Broil Patio Bistro 240 Manual Guide for Troubleshooting

Grant Mercer
21 Jun 2026
First, confirm you have the right model
"Patio Bistro 240" covers more than one grill, and downloading the wrong manual wastes time and can send you chasing the wrong parts. There are gas versions, an electric version (model 12601688-A1), and a TRU-Infrared compact gas version (model 14601900), plus recalled units with model numbers 11601558, 11601558-A1, 12601558, and 12601558-A2 in the US, and 11601579 and 12601579 in Canada. Each has its own documentation.
Flip to the back of your grill and find the rating/identification label on the bottom support. It carries both the model number and serial number. The model number is what you need. On some units the label is inside the grill body, on the base plate, or behind a door panel, so check those spots if the back comes up empty. Char-Broil UK support notes that the model number location varies by model and is often inside the grill, on the base plate, behind doors, or on the back on a large silver-grey label check those spots if the back comes up empty. Write down both the model number and serial number before you do anything else. If you ever need to call Char-Broil support, they will ask for both.
Once you have your model number, cross-check it against this short list so you know what you're working with before you download anything.
| Model Number | Variant | Fuel Type | Notes |
|---|---|---|---|
| 11601558 / 11601558-A1 / 12601558 / 12601558-A2 | Patio Bistro 240 (US gas) | LP propane | Subject to CPSC ignition recall |
| 11601579 / 12601579 | Patio Bistro 240 (Canadian gas) | LP propane | Subject to CPSC ignition recall |
| 12601688-A1 | Patio Bistro 240 Electric Black | Electric | Separate electric grill manual |
| 14601900 | Patio Bistro 240 TRU-Infrared Compact Gas | LP propane | Product manual on ManualsLib and Manualzz |
| 15601902 | Patio Bistro 240 Portable BBQ (AU variant) | LP propane | PDF available via Char-Broil AU |
If your model number matches the recalled units (11601558, 11601558-A1, 12601558, 12601558-A2 in the US), stop and check the recall section below before you do any ignition work. The ignition module on those units has a known hazard that Char-Broil addressed with a specific repair kit.
Where to find the manual (PDF and print sources)
Char-Broil's own support site is the best starting point. Go to the Char-Broil parts lookup tool, type in your exact model number, and look for the "Warranty and Manuals" link on the results page. That link takes you straight to the official PDF for your specific variant. These steps are also summarized in the patio caddie gas grill manual for your specific model variant. The same page also has a "Parts and Diagram" link, which is worth bookmarking because you'll use it alongside the manual when ordering replacement components.
If the official PDF isn't loading or your model returns no results, these are the most reliable fallback sources:
- ManualsLib: Search "Char-Broil Patio Bistro 240" and you'll find at least two hosted manuals, including the Operating Instructions Manual and the 14601900 Product Manual with a full troubleshooting section.
- Manualzz: Hosts the Char-Broil Patio Bistro 240 14601900 Product Manual with extracted troubleshooting tables including electronic ignition problems.
- Char-Broil AU (charbroil.com.au): Hosts the PDF "15601902 Patio Bistro 240 Portable BBQ Instructions Web.pdf" with safety, assembly, parts list, parts diagram, and troubleshooting all in one document.
- Char-Broil Recall Page: If your unit is a recalled gas model, this page links directly to the "Gas Patio Bistro Grill 240 Repair (US)" instructions and the ignition kit installation supplement, which are the official repair docs for those models.
- Char-Broil Ignition Kit Supplement PDF: Char-Broil also hosts a standalone "BISTRO-240-IGNITION-KIT" PDF. This is important because lighting instructions for some variants were published in a supplement rather than the main product guide, so if your main manual seems incomplete on ignition steps, this is the document you're missing.
One quick tip: if you're searching Google for your specific variant, use the full model number in quotes plus the word "manual" or "PDF". Something like "14601900 manual PDF" will surface the right document faster than a generic search. Avoid downloading from random document-sharing sites because those are often incomplete scans of the wrong model.
Getting to know your grill using the parts list and diagram
Once you have the correct manual open, flip to the Parts List and Parts Diagram sections. These are the most practically useful pages in the whole document. The diagram uses letter codes (A, B, C and so on) that match the parts list, so you can identify exactly what you're looking at on the physical grill. Here are the key components called out in the gas Patio Bistro 240 parts list and what each one does:
| Part Code | Component Name | Why It Matters for Troubleshooting |
|---|---|---|
| B | Lower Body | Houses the burner assembly; check for grease buildup and damage |
| C | Heat Tent | Sits over the burner; remove first to access the burner |
| D | Burner | Main combustion component; inspect ports for blockage or cracks |
| F | Igniter Switch Module | The button you press to ignite; first thing to check if no spark |
| CC | Ignition Module | Electronic spark generator; replaced under recall on affected units |
| DD | Electrode Wire | Carries spark signal from module to electrode; check for damage |
| EE | Ignitor Electrode | Creates the actual spark at the burner; gets fouled by grease |
| S | Hose/Valve/Regulator Assembly | Connects LP cylinder to burner; check for kinks, leaks, or tripped excess flow valve |
| Q | Grease Tray | Remove before burner access; keep clean to prevent flare-ups |
The manual's Assembly Steps diagrams (labeled Figures A through F in most versions) also show how these parts fit together around the burner and valve interface. If you ever disassemble for cleaning or a repair, reference those figures during reassembly to make sure the burner brackets seat correctly and the regulator reconnects properly.
On the electric Patio Bistro 240 (model 12601688-A1), the parts and diagnostic approach are completely different. There's no burner, regulator, or electrode. If you have the electric variant, the relevant troubleshooting framework centers on the controller indicator light and heating element rather than gas flow and ignition. The assembly and troubleshooting guides for the electric model are separate documents, so make sure you're not using a gas manual for an electric unit or vice versa.
Step-by-step troubleshooting for ignition and flame problems
Most Patio Bistro 240 problems fall into three buckets: the grill won't ignite at all, it sparks but won't light, or it lights but won't stay lit. Work through these in order. Don't skip ahead because the steps build on each other.
Starting up: the correct light-up sequence
The manual is specific about start-up order, and skipping steps causes the excess flow valve to trip, which kills gas flow and is the most common reason people think their grill is broken when it isn't. If your Char-Broil Patio Bistro is not working, start by confirming the exact model and then follow the ignition and flame troubleshooting flow in the manual start-up order. Follow this sequence every time:
- Open the grill lid fully before turning on any gas.
- Turn the LP cylinder valve slowly to fully open (counterclockwise). Do not crank it fast.
- Wait 5 seconds before touching the control knob.
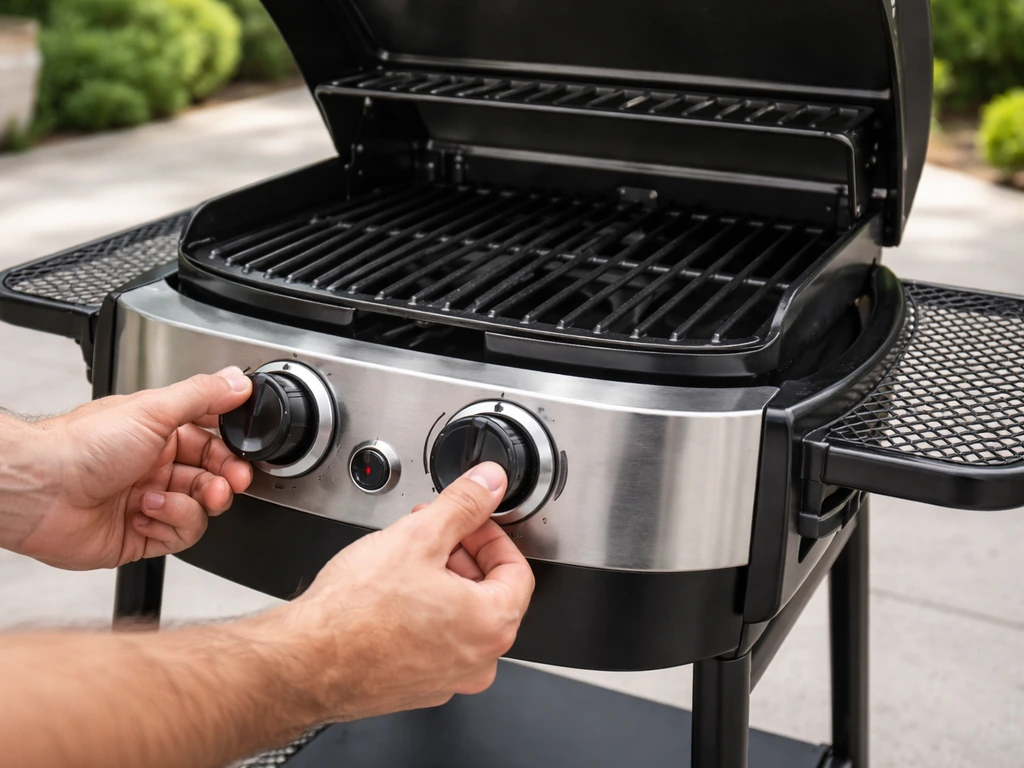
- Turn the control knob to the High/Ignite position.
- Press the igniter button once per second. Most units light within 3 to 4 presses.
- If it doesn't light in 5 attempts, turn the control knob back to Off, wait 5 minutes for gas to clear, then try again.
Grill won't ignite: no spark at all
If you press the igniter button and hear nothing, no clicking, no spark visible at the electrode, work through these checks:
- Check the igniter button (part F, Igniter Switch Module). Press it with the lid open in a dim area and look for a spark at the electrode. If there's no visible spark, the ignition module (part CC) or the electrode wire (part DD) is the likely failure point.
- Inspect the electrode wire for cracks, pinches, or burn marks. A damaged wire won't carry the spark signal.
- Look at the electrode tip (part EE). Grease buildup on the ceramic insulator or the tip will prevent sparking. Clean it gently with a dry cloth or soft brush, never water.
- If the module clicks but no spark appears at the burner, the electrode gap may be off. The manual specifies correct gap distance; check the diagram and compare to your unit.
- On recalled models: if the ignition module was never replaced under the recall, this is the moment to do that before anything else. The replacement kit disables the existing ignition switch and installs a new module with a corrected design.
Grill sparks but won't light
This is a gas delivery problem, not an ignition problem. You have a working spark but no fuel reaching the burner, or not enough of it.
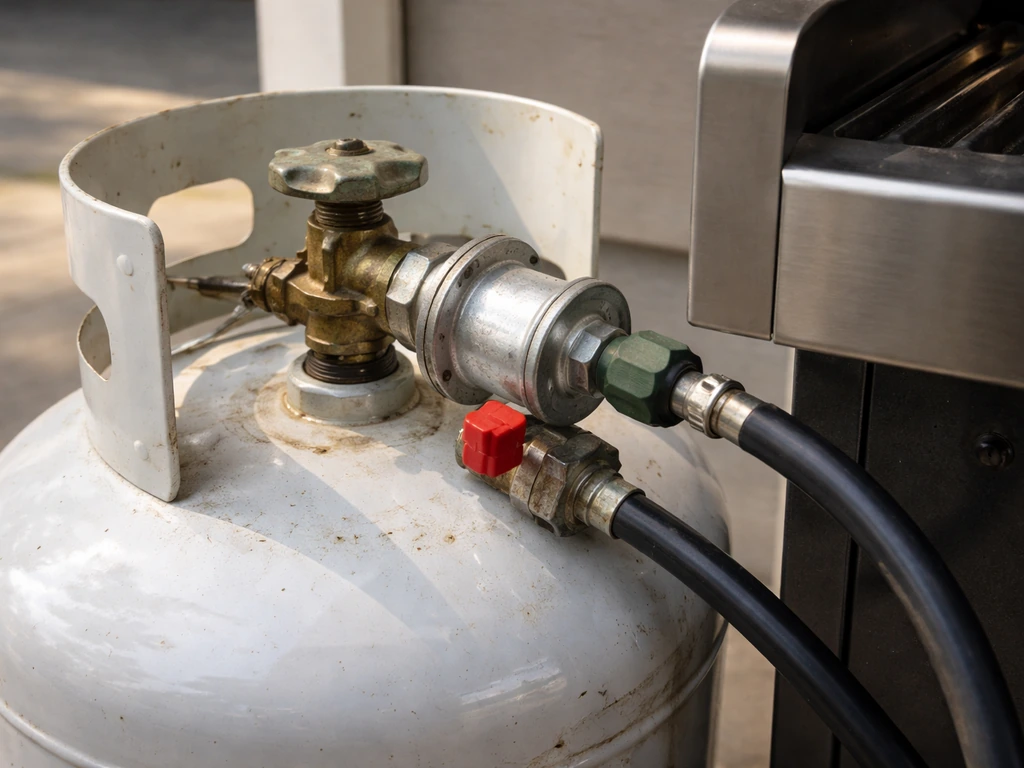
- Check the LP cylinder. It sounds obvious but a nearly empty cylinder produces the same symptom as a tripped excess flow valve.
- Check for a tripped excess flow valve. This happens when you open the tank valve too quickly or there's a sudden pressure drop. The fix: turn everything off (knobs first, then tank valve), disconnect the regulator, wait 30 full seconds, reconnect the regulator slowly, open the tank valve slowly, and try again.
- Inspect the hose and regulator assembly (part S) for kinks, cracks, or visible damage. A kinked hose restricts flow enough to prevent ignition.
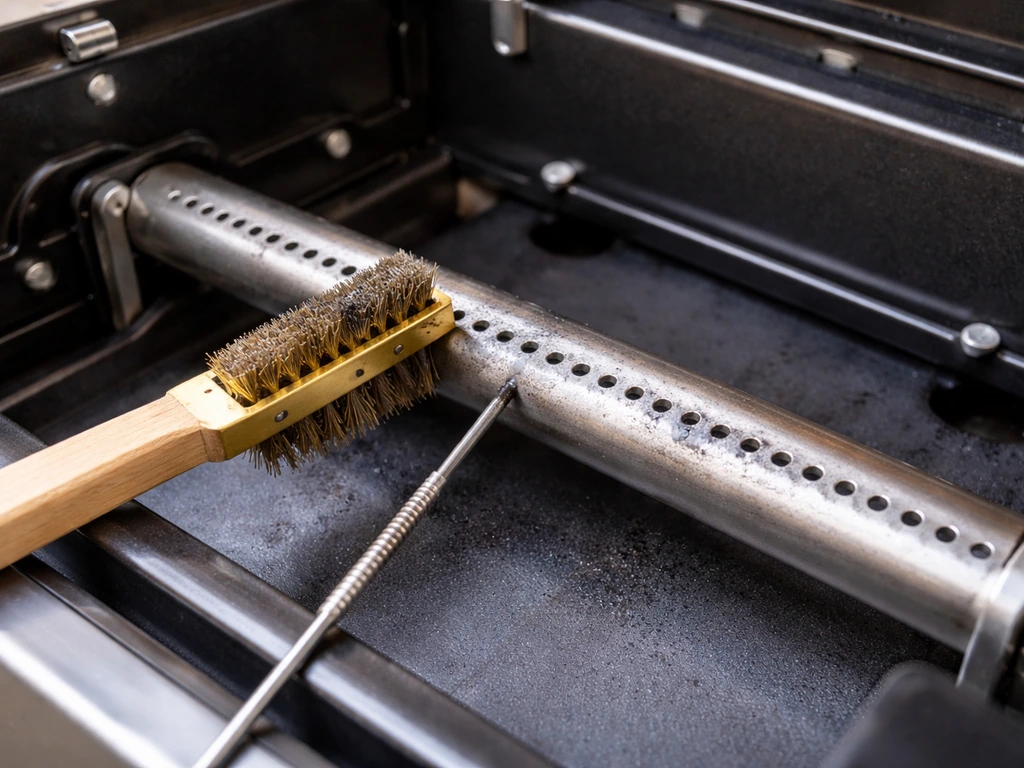
- Check the burner ports (part D). Blocked ports mean gas can't exit the burner properly. Remove the heat tent and look at the ports along the burner tube. Spiders and insects are a documented cause of blocked ports and flashback problems on this model. Clean blocked ports with a thin wire or pipe cleaner.
- Check venturi tubes for obstructions. The same spider/insect warning in the manual applies here. A partial venturi blockage causes weak or uneven flame that won't sustain ignition.
Grill lights but won't stay lit
This is the trickiest symptom because it has several possible causes that feel identical from the user side.
- Sudden drop in flame or flame going out: this is almost always the excess flow valve tripping mid-cook. Turn everything off, wait 30 seconds, and restart using the slow-open sequence above.
- Flame that starts strong then fades: check LP cylinder level first. A nearly empty cylinder produces exactly this symptom as liquid propane can't vaporize fast enough in cold weather.
- Low or uneven flame: clean the burner ports. A partially blocked burner produces low flame that gets worse as the grill heats up and causes any remaining blockage to expand.
- Flame goes out in wind: the Patio Bistro 240 has a windshield and inner reflector in the parts list. Check that both are installed and correctly positioned per the assembly diagram. A missing or incorrectly seated windshield makes the flame very vulnerable to outdoor breeze.
- Check flame height before each use. The manual's Burner Flame Check procedure describes what normal flame height looks like. If it's consistently low or unstable even after cleaning, the regulator assembly may need replacement.
DIY repair workflows you can handle at home
Cleaning the burner assembly
This is the most effective repair for low flame, won't-light, and uneven heating problems. The manual's burner cleaning procedure walks through this step by step, and it's a straightforward job if you follow the sequence carefully.
- Turn the control knob to Off and close the LP cylinder valve completely.
- Disconnect the regulator from the LP cylinder by turning the coupling counterclockwise.
- Remove the grease tray (part Q) from beneath the burner.
- Open the lid and lift out the cooking grates and warming rack.
- Remove the heat tent (part C) from over the burner.
- Locate the nuts securing the burner to the lower body and remove them.
- Lift the burner (part D) straight up and out of the grill body.
- Inspect every port along the burner tube. Blocked ports look like dark spots or have visible debris. Use a thin wire or pipe cleaner to clear each one. Do not use water inside the burner.
- Check the burner for cracks, holes, or rust damage. If you find any, the burner needs replacement, not just cleaning.
- Reinstall the burner by reversing these steps, making sure the burner brackets seat correctly into the lower body before reattaching the nuts.
- Reattach the heat tent, grates, and grease tray in the order shown in the assembly diagram.
- Reconnect the regulator, open the tank valve slowly, and do a full leak check with soapy water on all connections before lighting.
Replacing the electrode wire or igniter module
If cleaning the electrode tip didn't restore sparking, the electrode wire (part DD) or the ignition module (part CC) needs replacement. Order the correct part using your model number from Char-Broil's parts and diagram page. The parts list in your manual shows you where each component connects, and the assembly diagram shows routing for the electrode wire. This is a straightforward swap: disconnect the old wire at both ends, route the new one the same way, reconnect, and test before closing up the grill.
Replacing the hose and regulator assembly
If you've reset the excess flow valve multiple times and the grill still loses flame mid-cook, or if you find any visible damage on the hose during inspection, replace the full hose/valve/regulator assembly (part S) as a unit. Don't try to repair a damaged gas hose. Order the replacement part by model number, follow the assembly diagram for routing, and torque the connections hand-tight plus a quarter turn with a wrench. Always leak-test with soapy water before the first use.
Recall kit installation (for affected gas models)
If your model is one of the recalled units (11601558, 11601558-A1, 12601558, or 12601558-A2 in the US, or 11601579 and 12601579 in Canada), Char-Broil provides a free repair kit and dedicated installation instructions. The kit replaces the ignition module and disables the existing ignition switch to eliminate the hazard where the burner could re-ignite unexpectedly when the control knob passes through the ignition position. The recall page has the ordering link and the repair document. This is a well-documented DIY repair with clear instructions, and it's the right fix to do before any other ignition work on those models.
Maintenance, safety checks, and when to stop DIYing
Routine maintenance that prevents most problems
- Do the Burner Flame Check before every use. The manual describes what normal flame looks like. Catching a change early prevents bigger problems.
- Clean the burner ports and inspect the venturi tubes at least once per season, and more often if you grill near vegetation where insects can nest in the tubes during storage.
- Empty and clean the grease tray regularly. Grease accumulation is a fire hazard and contributes to flashback problems.
- Inspect the hose and regulator assembly for cracks, brittleness, or abrasion every season. Propane hoses degrade over time, especially with UV exposure.
- Store the grill with the LP cylinder valve closed and, if possible, disconnect the regulator when the grill is not in use for extended periods.
- Check all burner brackets and mounting hardware annually. Vibration and thermal cycling loosens fasteners over time.
Safety checks you should never skip
The manual includes an Emergencies section for good reason. Before every use, especially after the grill has been stored, do a soapy water leak test on every gas connection: regulator-to-hose, hose-to-valve, and valve-to-body. Bubbles mean a leak. If you smell gas and can't identify the source, do not light the grill. Turn off the LP cylinder valve, move away from the area, and let it air out for several minutes before investigating. If a gas leak cannot be stopped or a fire starts due to gas leakage, get away from the grill and call the fire department. That is not a situation to troubleshoot.
The manual also specifies this grill is designed for LP (propane) gas only with the supplied regulator and valve assembly. Never connect it to natural gas or a different regulator type, and never modify the gas train.
When to stop and call a pro (or retire the grill)
There are a few situations where the right move is to stop the DIY work:
- You find a cracked or holed burner. A damaged burner is a replace-only situation, not a clean-and-reinstall situation. Order the correct replacement part before using the grill again.
- The hose or regulator has visible damage, kinks, or brittleness and you're unsure the replacement part you have is an exact match for your model. Using a mismatched regulator on an LP grill is dangerous.
- You've installed the recall kit on a recalled unit following the official instructions but the grill still has ignition problems. At that point contact Char-Broil support directly with your model number and serial number.
- You smell gas during or after a repair and can't identify or stop the source. Don't light the grill, don't use it, and get a qualified gas technician involved.
- The grill is old enough that multiple components need replacement at once and replacement parts are no longer available by model number. At that point, repair cost and safety risk often outweigh the value of the unit.
If you're working with the electric Patio Bistro 240 (model 12601688-A1) rather than a gas unit, the troubleshooting path is entirely different and involves the heating element and controller rather than burners and gas valves. If you need the char broil electric patio bistro 240 assembly instructions, look up the correct manual for model 12601688-A1 so you follow the right steps for your electric unit. The assembly instructions and troubleshooting steps for the gas and electric variants are separate documents, so confirm your variant before investing time in the wrong diagnostic path.
FAQ
Where exactly should I look on the grill for the model number and serial number if the back label is missing or unreadable?
Check the rating/identification label on the bottom support, and also look inside the grill body, on the base plate, and behind any door panel. If the label is damaged, record any partially readable model digits and the full serial format, then re-check the same spots using a flashlight so you can match the correct variant before downloading a manual.
Do I need to use the manual for my exact fuel type (LP only), and what happens if I accidentally follow LP steps on a different setup?
Yes. This grill is designed for LP with the supplied regulator and valve assembly. If you have a different fuel connection or regulator type, the troubleshooting logic and safety assumptions in the manual do not apply, and you should stop and correct the gas train setup before attempting any ignition or flame troubleshooting.
If the grill sparks but never lights, what common mistake should I double-check first?
Verify the start-up order and make sure the excess flow valve has not tripped. Many people skip the manual sequence and end up with the valve preventing gas flow, which looks like an ignition failure even though the spark is working.
How can I tell whether my problem is gas delivery versus ignition when symptoms are ambiguous?
Use what the manual implies by symptom order: if you see sparking at the electrode but there is no flame or no response from gas, treat it as a fuel delivery issue. If there is no visible spark or no electrode action at all, treat it as an ignition circuit issue rather than continuing to clean burners.
What’s the safest way to check for leaks before troubleshooting igniter issues?
Do a soapy water leak test on every gas connection after the grill has been stored: regulator-to-hose, hose-to-valve, and valve-to-body. If bubbles appear, fix the leak before further testing. If you smell gas and cannot locate or stop the leak, do not attempt to light it, and shut off the LP cylinder valve first.
If my grill shuts down mid-cook, is resetting the excess flow valve always the correct fix?
Not always. If you have to reset multiple times, or you see any visible damage on the hose, the manual indicates replacing the full hose, valve, and regulator assembly as a unit. Repeated resets can hide an underlying fault instead of addressing the cause.
When replacing parts like the electrode wire or ignition module, do I need special tools and how should I route the wire?
You typically only need basic hand tools for the swap, but routing matters. Follow the assembly diagram letter-coded placement, disconnect the old wire at both ends, route the new wire the same path as the diagram, and test the ignition before closing the grill to avoid reassembly mistakes.
What torque or connection tightening method should I use when installing the replacement hose/valve/regulator assembly?
Make the connections hand-tight and then apply an additional quarter turn with a wrench, then leak-test with soapy water before first use. Over-tightening can damage fittings, and skipping the leak test defeats the safety check the manual emphasizes.
My model number matches a recalled unit, should I still troubleshoot ignition problems first?
No. If your model is in the recall list, address the recall repair first using the free repair kit and the dedicated installation instructions. The kit replaces the ignition module and disables the ignition switch to prevent hazardous re-ignition behavior, so it should come before any other ignition diagnostics.
How do I avoid mixing up the gas and electric Patio Bistro 240 documentation?
Start by matching the model number to the correct variant. The electric model (12601688-A1) uses a controller and heating element with no gas burner, regulator, or electrode, so the gas manual troubleshooting tables and burner-related parts will not apply.