To disassemble a patio heater safely, you need to shut off the gas supply and let the unit cool completely, then work from the outside in: remove the reflector hood and emitter screen first, then unscrew the burner housing to reach the ignition electrode, thermocouple, and control valve. Keep track of every screw, disconnect wiring carefully before pulling any panel, and never force a fitting that won't budge. That sequence covers about 95% of standard mushroom-style propane patio heaters, and the same logic applies to wall-mounted and natural gas units with small variations.
How to Disassemble a Patio Heater Safely Step by Step

Grant Mercer
23 May 2026
Identify your patio heater type and parts layout
Before you touch a single screw, figure out exactly what you're working with. The disassembly path is different depending on whether you have a freestanding propane mushroom heater, a natural gas plumbed-in unit, a wall-mounted infrared heater, or an electric element heater. Most DIYers land on the freestanding propane type (the classic tall post with a dome reflector), and that's the primary focus here, but I'll flag the key differences for other types along the way.
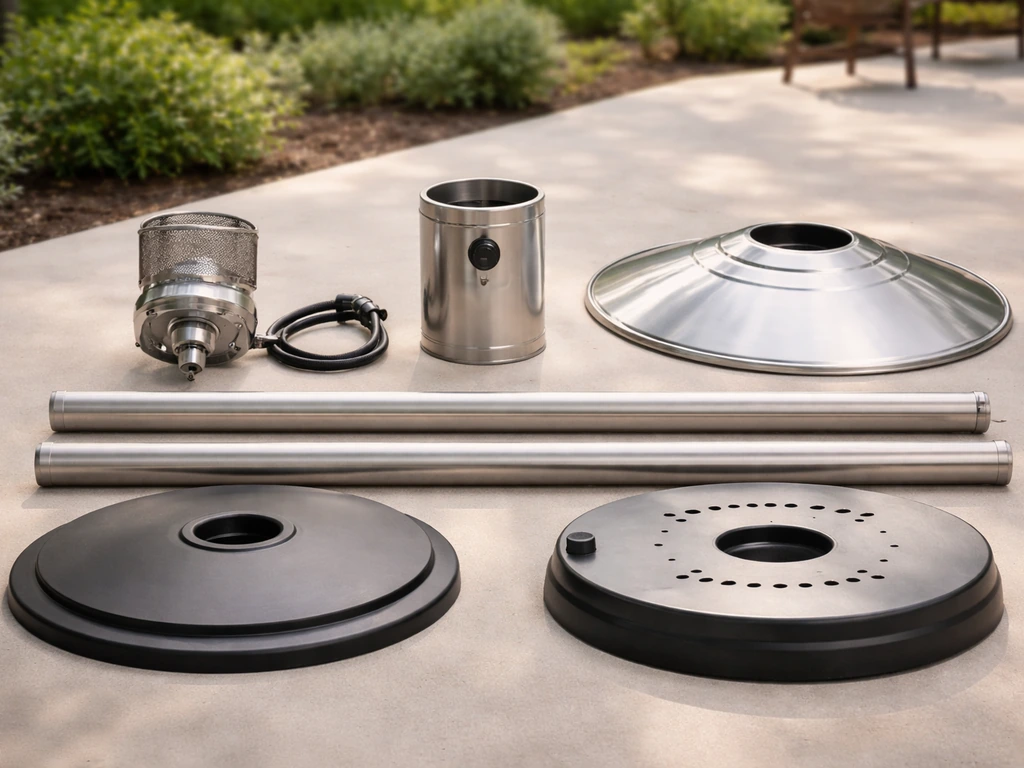
For a standard freestanding propane heater, the major components you'll encounter from top to bottom are: the reflector hood (dome), the emitter screen, the burner head, the ignition electrode and spark gap, the thermocouple (flame sensor), the gas control valve, the tilt switch, and the regulator at the base. Natural gas units skip the regulator and propane tank but add a fixed gas line connection that must be isolated before any work. Electric patio heaters have a heating element and thermostat instead of a burner, and disassembly is generally simpler since there's no gas to worry about, but you still treat the electrical side with the same respect.
Pull out your owner's manual if you have it, or look up your model number (usually on a label near the base or on the pole) and download the manual online. The parts diagram in the manual is worth its weight in gold during disassembly because it shows you how panels layer together and where hidden fasteners live. If you're working on a brand-specific unit, assembly instruction guides for models like Fire Sense, Mainstays, Living Accents, or Amazon Basics often include detailed exploded-view diagrams that work just as well in reverse for disassembly. If you’re working with an Amazon Basics unit, use the amazon basics patio heater assembly instructions as your reverse-check when reinstalling parts.
Safety prep before you start
This step is not optional, and I'm going to be direct about it: skipping proper shutdown before disassembling a gas patio heater is genuinely dangerous. Gas patio heater manufacturers including Calcana and Dayton explicitly require disconnecting the electrical supply and shutting off the gas supply before opening any service panels. Here's the full prep sequence:
- Turn the control knob to the OFF position and let the heater run until the flame extinguishes naturally. Do not force-stop it by disconnecting anything while it's hot.
- Close the propane tank valve (for portable units) or close the individual manual shutoff valve on the gas supply line (for natural gas or hard-plumbed units). Dayton's service documentation specifically calls out isolating the heater from the supply piping using this valve before any servicing or pressure testing.
- Disconnect power if your unit has an electronic ignition module plugged into an outlet. For battery-powered igniters, remove the batteries.
- Let the heater cool completely. A burner head that was running at full tilt can stay hot enough to burn you for 20 to 30 minutes. Don't rush this.
- Move the heater to a well-ventilated outdoor area or a space with good airflow. Never disassemble a gas heater in an enclosed garage.
- Gather your tools: a Phillips and flathead screwdriver set, an adjustable wrench, needle-nose pliers, a small container or magnetic tray for screws, and a can of soapy solution for leak testing later (more on that below). A 5mm feeler gauge is useful if you're replacing the ignition electrode.
One more thing: some manufacturers, including Patio-Pal's PH-series infrared heaters, state that installation and servicing should be performed by trained gas service personnel. If your heater is a high-BTU commercial infrared unit or you're uncomfortable at any point in this process, that warning is there for a reason. Know your limits before you start.
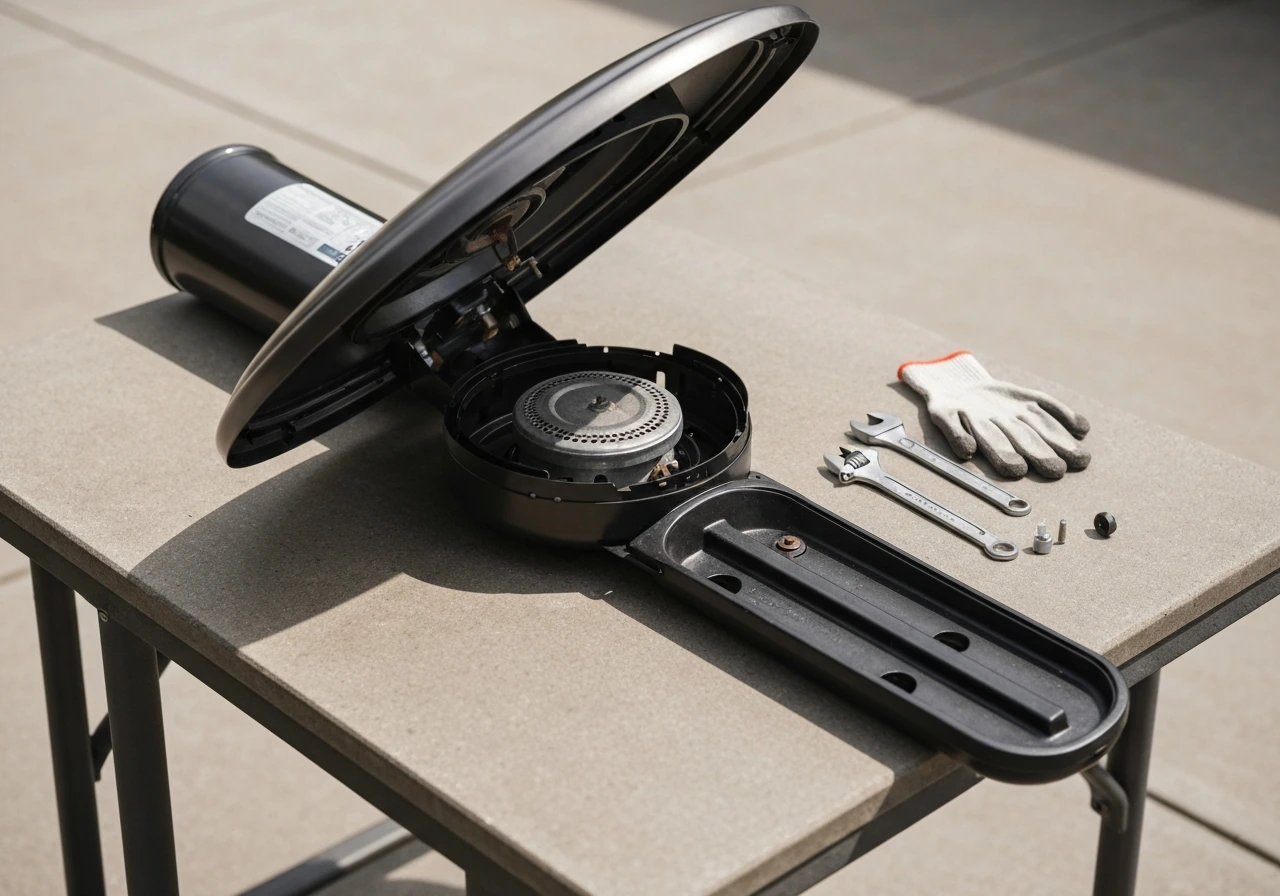
Remove the outer shell, guards, and reflector hood
Start at the top and work down. On a standard mushroom-style propane heater, the reflector dome is either screwed to the burner housing with three or four Phillips screws around the perimeter, or it clips onto a collar that you can rotate and lift off. Look for screws on the underside of the hood where it meets the emitter ring. Once those are out, the dome lifts straight up and off.
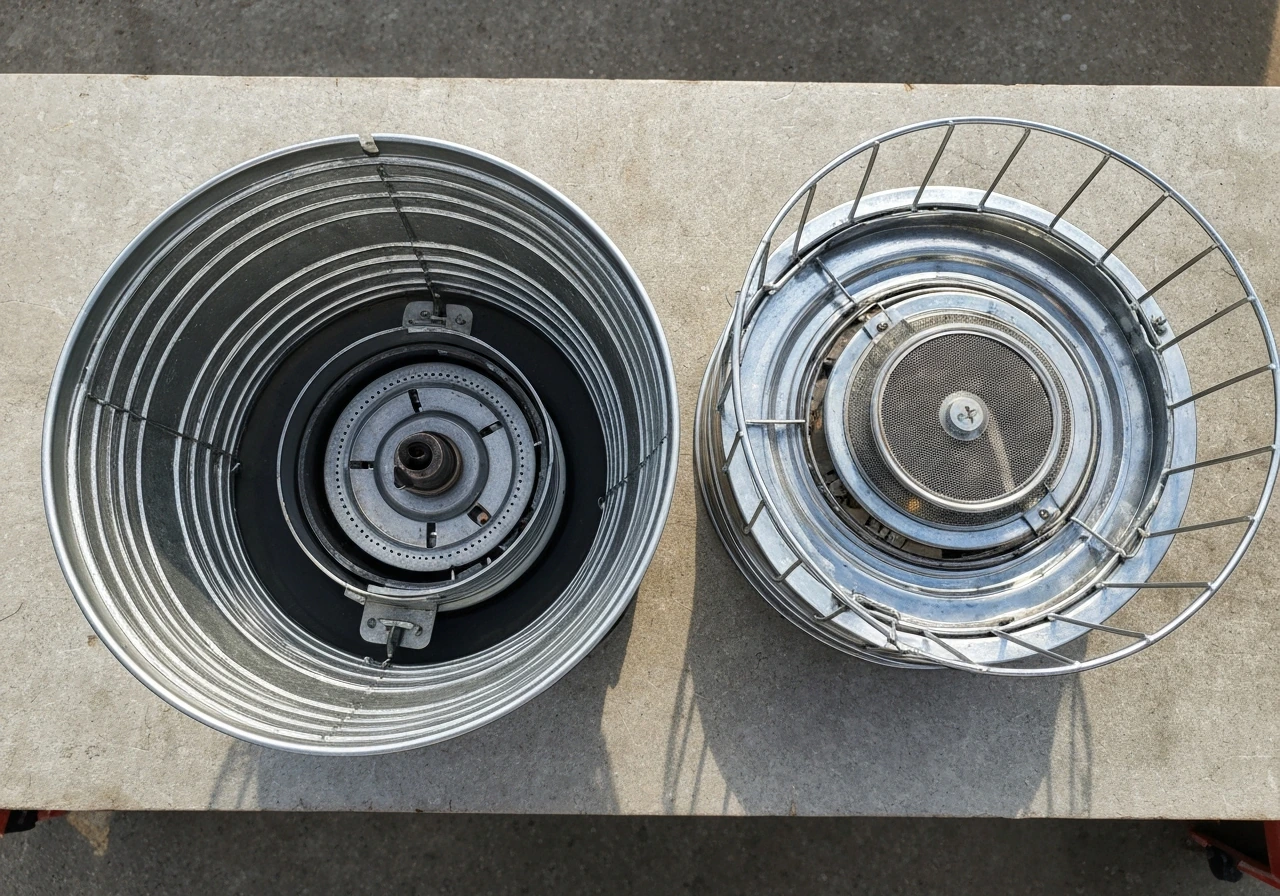
With the dome removed, you'll see the emitter screen (a mesh or perforated metal ring that surrounds the burner head). This is usually held in place by two or three screws or by tabs that fold down. Remove the screen and set it aside. This is often the component you're cleaning or replacing if the heater is running with a weak or uneven flame.
Next comes the burner housing itself, which is the cylindrical or tapered metal section just below the emitter. This is held to the pole/post with screws or a locking collar. Before you pull it off, look carefully for any wires running from inside the housing down through the pole. On most units, the ignition wire and thermocouple lead run down through the center of the pole to the control valve at the base. You don't want to yank the housing off and rip a wire. Let the housing hang loosely or support it while you trace the wires.
For wall-mounted or natural gas infrared units, the outer access panel is typically held by screws along the sides or back. The same principle applies: remove screws, check for wires before pulling the panel, and set hardware aside in a labeled container so you know exactly where each fastener goes during reassembly.
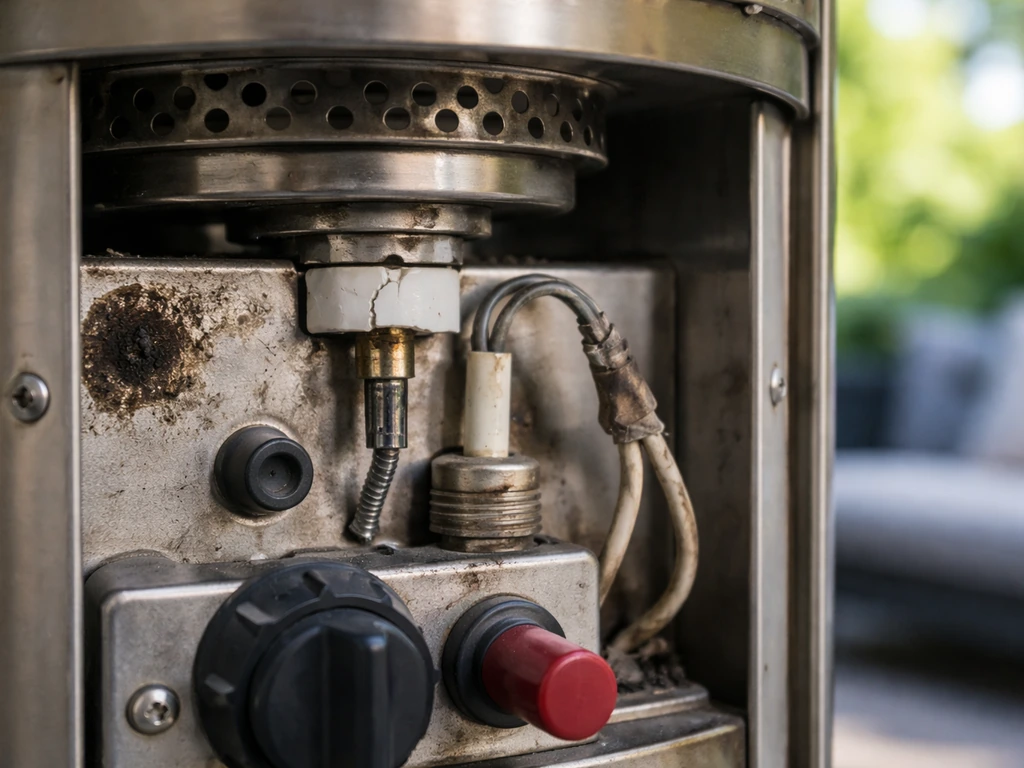
Disconnect ignition, burner, and control parts safely
Once you have access to the burner head and the interior of the housing, you'll see the ignition electrode, the thermocouple, and their associated wiring. This is the most detail-oriented part of the disassembly, so take a photo with your phone before you disconnect anything. Seriously, do it. You'll thank yourself during reassembly.
Ignition electrode
The ignition electrode is a small ceramic-tipped probe positioned near the burner head with a specific gap between the electrode tip and the burner. That gap matters: Sierra's service instructions call out a spark gap of 5mm plus or minus 0.5mm (about 3/16 inch). If you're replacing the electrode, you'll need to set this gap correctly on the new one before reinstalling. The electrode is usually held in place by one or two screws and has a single wire connector (or a push-on spade terminal) that pulls straight off. Don't yank the wire by the wire itself; grip the connector body and pull.
Thermocouple and flame sensor
The thermocouple is a thin probe (usually copper or stainless steel) positioned so its tip sits in the flame. It generates a small voltage that tells the control valve the burner is lit. If this fails, the heater lights briefly and then goes out. The thermocouple lead connects to the gas valve with a threaded nut, usually hand-tight plus a small turn with pliers.
Unscrew this connection gently. On units with a flame sensor wired to a spark module (like the Sierra SGL-series), you'll also disconnect the ignition cable and flame-sensor wire from the electrode/sensor assembly. The Sierra SGL instructions have you remove the screws holding the electrode/sensor assembly and slide it away from the heater, which is a clean, non-destructive way to do it.
Control valve panel and ignition wiring
On units where the control valve and ignition module are housed in a panel (common on DCS and similar brands), removing the valve panel requires extra care. DCS's PHFS-DW manual specifically warns: avoid tugging the ignition wire attached to the backside of the valve panel at the igniter. Slide the panel out slowly, keep slack in the wire, and disconnect the igniter connector before fully removing the panel. This is a common spot where people accidentally rip a wire and then wonder why their ignition doesn't work after reassembly.
Handle the tilt switch and gas control/regulator areas
The tilt switch is a small safety device, usually located on the pole or inside the base housing, that cuts gas flow if the heater tips over. It's wired in series with the thermocouple circuit, which means if either the tilt switch or the thermocouple fails, the heater won't stay lit. This is a very common "won't stay lit" symptom and one of the main reasons people end up disassembling their heater.
Sierra's service instructions explicitly include disconnecting the tilt switch leads as part of the servicing procedure. The tilt switch leads are usually two small wires with push-on connectors that clip onto the switch terminals. Label them with tape before you remove them, because while they're often interchangeable (the switch is not polarity-sensitive), it's good practice. The switch itself is typically held by a single screw or a bracket clip. Handle it gently: it contains a small ball bearing or mercury-free mechanism inside, and dropping it or jarring it hard can damage it.
At the base of most portable propane heaters, you'll find the regulator and the gas control valve. The regulator screws onto the propane tank and has a rubber hose or copper line running to the valve. Do not attempt to disassemble the regulator itself. If you suspect the regulator is faulty (low pressure, hissing, visible damage), replace it as a unit. The gas control valve connects to the burner tube with a threaded brass fitting. If you need to remove it, use two wrenches: one to hold the valve body and one to turn the fitting, so you don't stress the valve body itself. Apply thread sealant rated for gas connections when you reinstall it.
What to inspect once you're inside
Disassembly gives you access to the parts most likely to cause common patio heater problems. Here's what to look for while you have everything open:
| Symptom | Component to Inspect | What to Look For |
|---|---|---|
| Heater won't ignite | Ignition electrode | Cracked ceramic, carbon buildup, incorrect spark gap (should be 5mm ±0.5mm) |
| Lights then goes out | Thermocouple | Tip not in flame path, lead wire damaged, loose connection at valve |
| Lights then goes out | Tilt switch | Damaged switch body, corroded terminals, leads disconnected |
| Weak or uneven flame | Emitter screen / burner head | Clogged ports, spider webs, corrosion, debris in burner orifice |
| No gas flow | Regulator / control valve | Tripped OPD valve on tank, kinked hose, failed regulator |
| Hissing or smell of gas | All threaded connections | Apply soapy solution to find the leak source |
Reassembly, leak-checking, and functional testing
Reassembly is essentially disassembly in reverse, but there are a few things that trip people up. Work from the inside out: reinstall the control valve connections and tilt switch first, then the electrode and thermocouple, then the burner housing, then the emitter screen, then the reflector hood. Don't fully tighten anything until the layer above it is in place and you've confirmed alignment.
If your unit has a wiring diagram (Mr. Heater's MH60QFAV and MH85QFAV manuals include dedicated wiring diagrams), check every connector against it before closing up. The ignition circuit is a series loop: if you accidentally skip reconnecting the tilt switch leads or leave a thermocouple connector loose, the heater simply won't work and you'll have to open it back up. Five minutes checking connections now saves 30 minutes of disassembly later.
Leak testing the gas connections
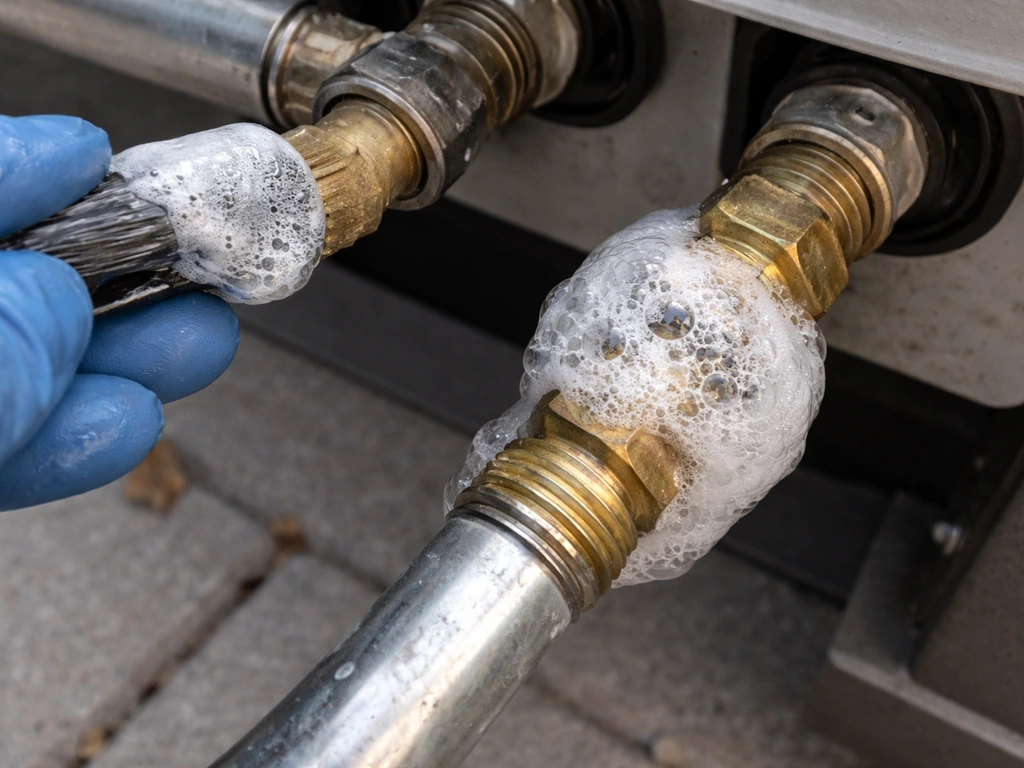
Before you fire the heater up, you must leak-test every gas connection you touched. This is non-negotiable. Make a solution of 70% water and 30% foaming dish soap (the Patio Comfort manual specifies this exact ratio, and it works well). Sure Heat T35PHLP instructions specify a leakage test using a solution of equal parts mild detergent or liquid soap and water [solution of equal parts mild detergent/liquid soap and water](https://www.
manualsdir. com/manuals/712522/sure-heat-t35phlp-patio-heater. html? page=10).
Paint or spray the solution generously onto every fitting: the regulator-to-tank connection, the hose connections, the valve-to-burner fitting, and any union you loosened. Open the gas valve slowly and watch for bubbles. Bubbles mean a leak; tighten the fitting a quarter turn and retest. If bubbles keep forming after tightening, shut the gas off and replace the fitting or the hose.
Never check for gas leaks with a match or lighter. The Patio Comfort manual states this directly, and I'll repeat it: a flame leak test can ignite a gas accumulation instantly. Soapy water only.
Functional testing
Once you've confirmed no leaks, test the ignition. Open the gas valve, press and hold the control knob in the pilot or ignite position, and trigger the igniter. The pilot should light within two or three clicks. Hold the knob for 30 seconds to let the thermocouple heat up and hold the valve open, then release slowly. If the flame stays lit, turn up to your desired heat setting and let it run for five minutes. Check that the tilt switch is working by gently tilting the heater a few degrees: the flame should extinguish within a second or two. If it doesn't cut out, the tilt switch leads may be disconnected or the switch itself may have failed.
Common mistakes and when to stop and call a pro
Here are the mistakes I see most often when people disassemble a patio heater themselves:
- Pulling the burner housing off without first tracing the wires running through the pole, which tears the ignition wire or thermocouple lead.
- Forgetting to reconnect the tilt switch leads, then assuming the heater is broken when it simply has an open safety circuit.
- Over-tightening the thermocouple nut at the valve, which can damage the valve seat. Finger-tight plus a half turn with pliers is enough.
- Setting the electrode spark gap wrong after replacing it. Use a feeler gauge and confirm 5mm ±0.5mm before closing up.
- Skipping the leak test because the heater "seems fine" after reassembly.
- Reassembling the reflector hood before confirming the emitter screen is seated correctly, which causes uneven heat distribution.
There are also situations where you should close everything up and call a licensed gas technician instead of continuing. Stop if you smell gas during disassembly and can't identify the source after shutting off the supply. Stop if the gas control valve body is cracked, corroded through, or visibly damaged. Stop if the hose or regulator has visible rubber cracking, scoring, or rodent damage. Stop if you're working on a high-BTU commercial infrared heater (like Patio-Pal PH-series units) that the manufacturer explicitly designates for trained service personnel only. And stop if any fitting refuses to move after reasonable force: forcing a brass fitting on a gas line risks cracking it, and a cracked gas fitting is a serious hazard.
Patio heaters are repairable appliances, and most electrode, thermocouple, tilt switch, and emitter screen replacements are well within DIY reach if you follow the sequence above. The key is working methodically, photographing before you disconnect, and never skipping the leak test. If you're also starting from scratch and need to go the other direction, the same methodical approach applies when following assembly instructions for your specific model. For reassembly and correct sequencing on your exact model, use the living accents patio heater assembly instructions alongside your wiring diagram. Once everything is back in place, follow the patio heater assembly instructions for your exact model to ensure the components are layered correctly and the wiring connections are fully restored.
FAQ
How long should I wait after turning off a gas patio heater before disassembling it?
Not for the average DIYer. If your patio heater is propane or natural gas, you should wait until the unit is completely cool and the gas supply is shut off, then leak-test any connection you opened. For parts inside the burner housing, residual heat can burn you and residual gas can ignite if something wasn’t fully isolated.
If my heater won’t light after reassembly, what should I check first?
If your heater uses a thermocouple style flame sensor, the most common post-disassembly cause is a loose or incorrect thermocouple connection (threaded joint at the gas valve) or a disconnected tilt switch lead. Another frequent issue is the electrode spark gap getting out of spec after reinstalling, so verify the gap and connector seating before leak-testing again.
What’s the best way to keep track of wiring and fasteners during disassembly?
Labeling helps, but photos help more. Take close-up pictures of (1) wire routing through the pole, (2) connector orientations at the electrode and thermocouple, and (3) where screws and clamps land on the housing. During reassembly, keep the ignition and sensor wiring slack, so you do not tension the wires when panels are tightened.
Can I disassemble just the electrode or thermocouple without fully taking the heater apart?
Yes, but only if you keep it controlled. Disconnect power before touching wiring, and do not open sealed gas components like regulators. For common service parts inside the burner housing, you can remove the electrode or thermocouple assembly, but stop if you find damaged insulation, frayed leads, or cracked gas fittings.
What should I do if a gas fitting or screw won’t budge?
No. Do not try to loosen a fitting by forcing a tool or applying extra leverage when it refuses to move. If a brass gas fitting feels stuck, stop and reassess, because cracking the fitting can create a leak you may not notice until you pressurize and test with soapy water.
What should I do if I smell gas while disassembling or after reassembly?
If you smell gas at any point, shut off the gas immediately and do not continue disassembly. Then ventilate the area and identify the leak using soapy water on the connections you touched, not a flame. If you cannot pinpoint the source quickly or the valve or hose shows damage, switch to repair or a licensed technician.
How do I know whether a leak test result is serious enough to stop and replace parts?
Soapy water is the right method for gas leak checks, and it should be applied to every connection you loosened. If bubbles appear, tighten slightly and retest. If bubbles persist after re-tightening, shut the gas off and replace the fitting or hose, because continued bubbling usually indicates a damaged or mismatched part or a compromised hose end.
My heater lights briefly and then shuts off, what does that usually mean?
Don’t use the heater while diagnosing an ignition issue. If it lights and then goes out, the usual suspects are thermocouple not heating properly (loose/incorrect connection or positioning) or tilt switch circuit interruption. After any adjustment, repeat the full leak test before trying again.
Could reconnecting the wrong wire or leaving a connector loose affect the safety shutoff?
For any connector you removed, confirm it is fully seated and not pinched under a panel. The tilt switch is in series with the safety circuit, so leaving it unplugged or misrouted can prevent ignition or cause shutoff. Also confirm the electrode wire connection is secure (pulling by the wire can damage it), then test ignition after leak testing.
How can I test whether the tilt switch is actually working?
The reliable way is to test after the leak test passes and gas is confirmed sealed. With the heater lit, gently tilt a little and watch for shutdown within a second or two. If it does not cut out, stop using the heater and inspect the tilt switch connections and switch condition before further testing.
When replacing the ignition electrode, is the spark gap the only thing I need to adjust?
Use the manufacturer’s guidance when available, but in general replacements should include the correct part type and correct spark gap setup for the electrode. If you replace an ignition electrode, you must set the spark gap to specification before reassembly, because a too-large or misaligned gap commonly results in weak or no spark.
If I find visible wear like a cracked hose or corroded valve, can I keep going and just reassemble?
Yes for gas-line leaks you find, but not as a repair strategy for damaged components. If you see cracked regulator parts, corroded-through valve areas, or hose damage (cracking, scoring, or animal damage), the safe path is to replace the affected component rather than continuing with disassembly and reassembly.