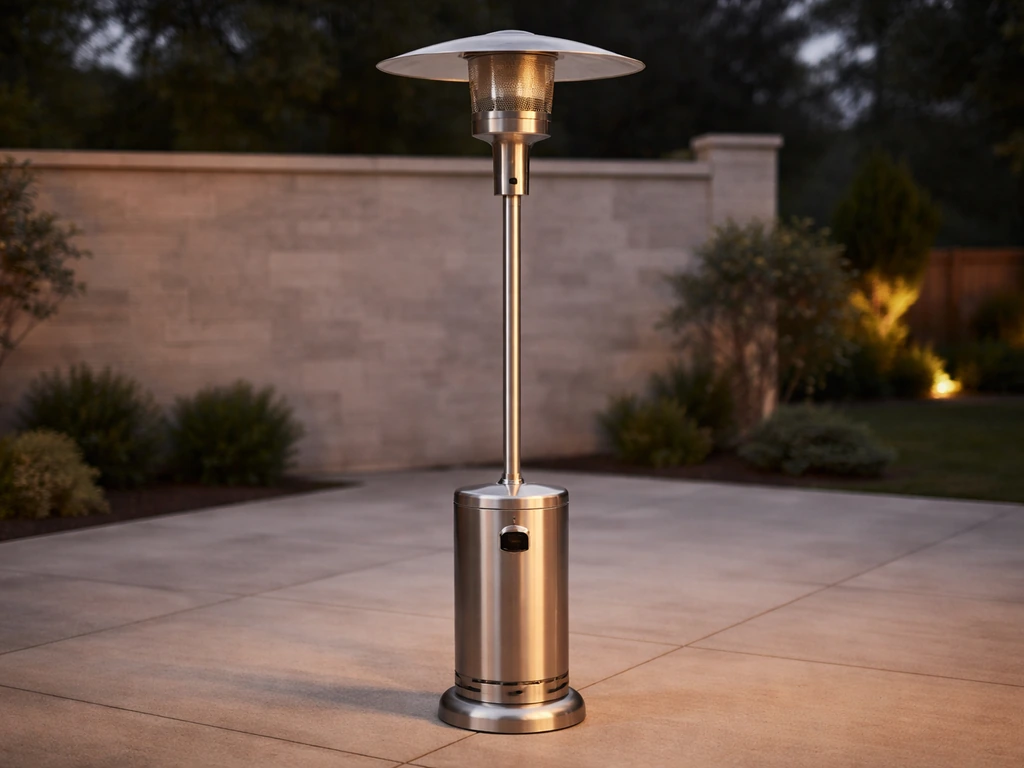
Most Living Accents patio heaters sold at Home Depot are the 46,000 BTU freestanding propane model (item 4026216), and you can get one fully assembled and ready for a first light in about 60 minutes with a Phillips screwdriver and a bottle of soapy water. The assembly sequence goes base brackets first, then pole sections, then the cylinder housing, then the burner head, and finally the reflector panels. If you still need step-by-step patio heater assembly instructions, follow the order from base brackets through gas hookup and then perform a full leak check before your first light. Gas connection is last, before you do anything else with the igniter. Get that order right and you avoid 90% of the problems people run into.
Living Accents Patio Heater Assembly Instructions

Grant Mercer
26 Jun 2026
Find your exact Living Accents model before you start
Living Accents is a private-label brand sold primarily through Ace Hardware and Home Depot, so the same SKU number (4026216 for the 46,000 BTU bronze freestanding unit) can show up under slightly different product names depending on the season or retailer. Before you open a single bag of hardware, locate the model number on the rating label, which is typically a silver sticker on the lower pole section or the base. Cross-reference that number with the parts diagram in your included manual. If your manual is missing, search for "Living Accents 46000 BTU Freestanding Patio Heater B0F1Z3H7N9 instruction manual" to find the correct PDF.
Why does the model matter? Assembly hardware, hose routing, and even the reflector attachment method can differ between model years. The bolt patterns, screw sizes (M6 x 30 on the pole-to-base connection, for example), and the number of reflector spacers are all specific to your version. If you're working from a generic guide, you risk forcing parts that don't quite fit, which almost always causes trouble with alignment or gas connections later.
Once you've confirmed the model, lay out every part and compare it against the package contents list in the manual. Before assembly, compare the parts you have with the package or hardware contents list in the manual’s “Preparation” section, and do not assemble if parts are missing or damaged Preparation section tells users to compare parts and not assemble if anything is missing or damaged. Do this before assembly, not halfway through. If anything is missing or damaged, stop and contact the retailer. The manual specifically says not to assemble with missing or damaged parts, and that's genuinely good advice: a cracked burner orifice housing or a bent regulator fitting isn't something you want to discover after you've built the whole thing.
Safety prep and tools you actually need
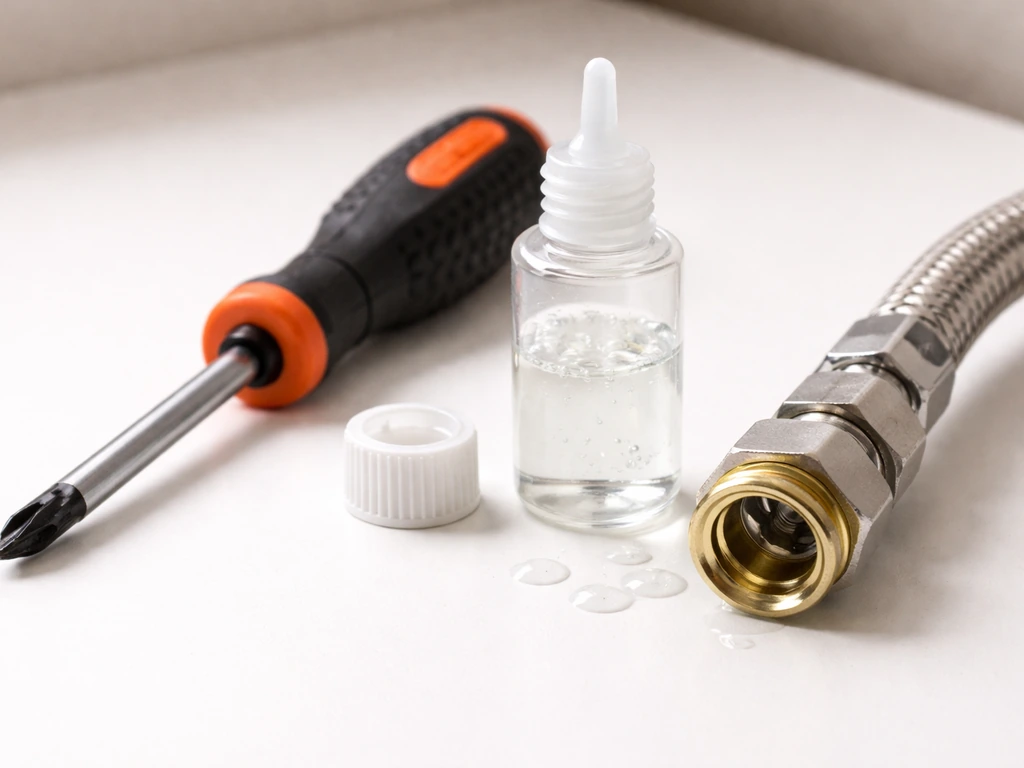
The Living Accents manual lists two required tools: a Phillips screwdriver with a medium blade and leak detection solution. That's it for tools, but I'd add a few things to that list from experience.
- Phillips screwdriver (medium blade, the kind you'd use for appliance assembly)
- Adjustable wrench or open-end wrench for the regulator connection
- Dish soap mixed with water in a spray bottle (your leak detection solution)
- A second person to hold parts steady during pole assembly and reflector fitting
- A flat, stable surface outdoors to work on
On safety: propane is heavier than air. Any leak during assembly or your first start will cause gas to pool at ground level, not rise and dissipate. Assemble and test outdoors only, away from any open flame, pilot light, or ignition source. If you want a model-specific walk-through, follow the mainstays patio heater assembly instructions as your related step-by-step reference before your first start assemble and test outdoors only. Never use a flame to check for leaks. Keep the propane cylinder disconnected until the entire mechanical assembly is complete. If you smell gas at any point during setup, stop, move away from the area, and let it clear before investigating. These aren't just boilerplate warnings: they directly apply to what can go wrong when connecting a regulator for the first time.
Also confirm your clearances before you pick a permanent spot. The manual requires a minimum of 36 inches (91 cm) of clearance from the sides and rear of the heater, and 24 inches (61 cm) of clearance from the top. That rules out placement under low pergola roofs, string lights, or overhead shade structures that are less than about 7 to 8 feet up. Pick your spot first, then assemble there if you can, because moving a fully assembled tower heater is awkward.
Step-by-step assembly: from base to burner
Step 1: Build the base
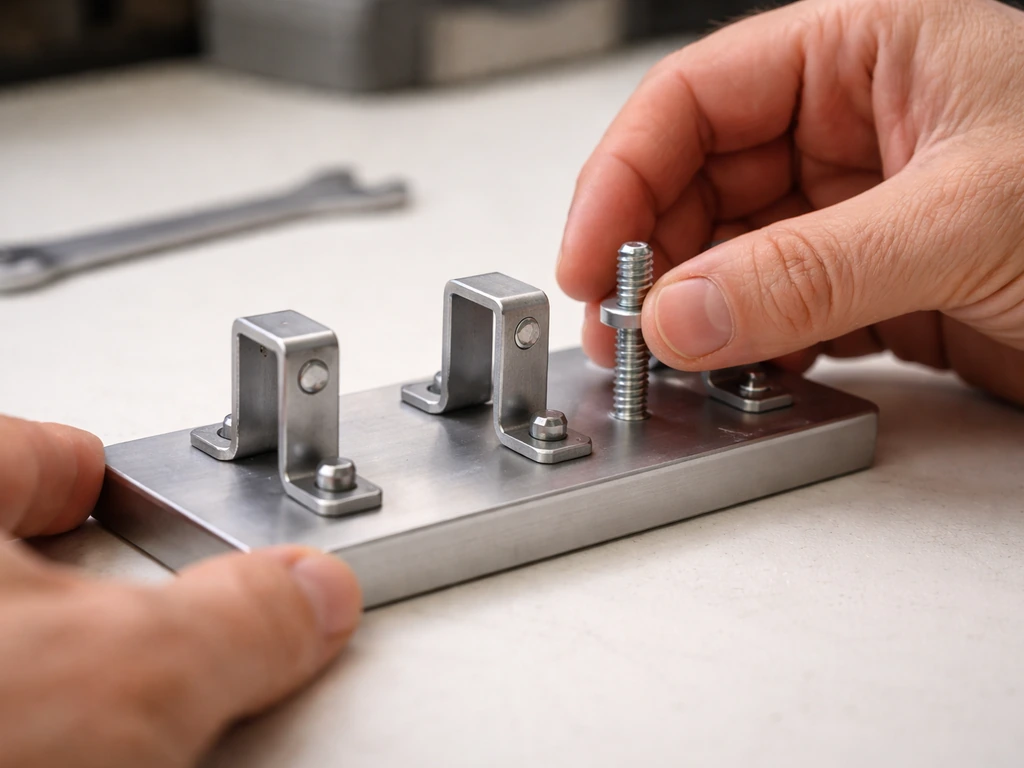
Start by attaching the three support brackets (labeled part I in the manual's diagram) to the base. Thread the bolts (part AA) in loosely at first so you can make minor adjustments. You want all three brackets seated flat and evenly before you snug anything down. Tighten them fully once they're aligned. This base is the foundation, and if it's even slightly uneven, the pole assembly will lean.
Step 2: Assemble the pole sections
Fit the upper pole section onto the lower pole section and secure them with screws (part KK). There's an orientation requirement here: the warning label on the lower pole has a flat plate, and the upper pole has a specific position relative to it. Check your manual diagram. Getting this wrong means your control knob ends up facing the wrong direction, which makes operating the heater awkward and can make the alignment decal useless.
Next, mount the assembled pole onto the three support brackets using six M6 x 30 bolts and six flange nuts (part BB). The manual is explicit: tighten all six screws fully. Don't leave them hand-tight. The pole needs to be completely rigid at this stage or the head assembly won't sit level.
Step 3: Slide on the cylinder housing
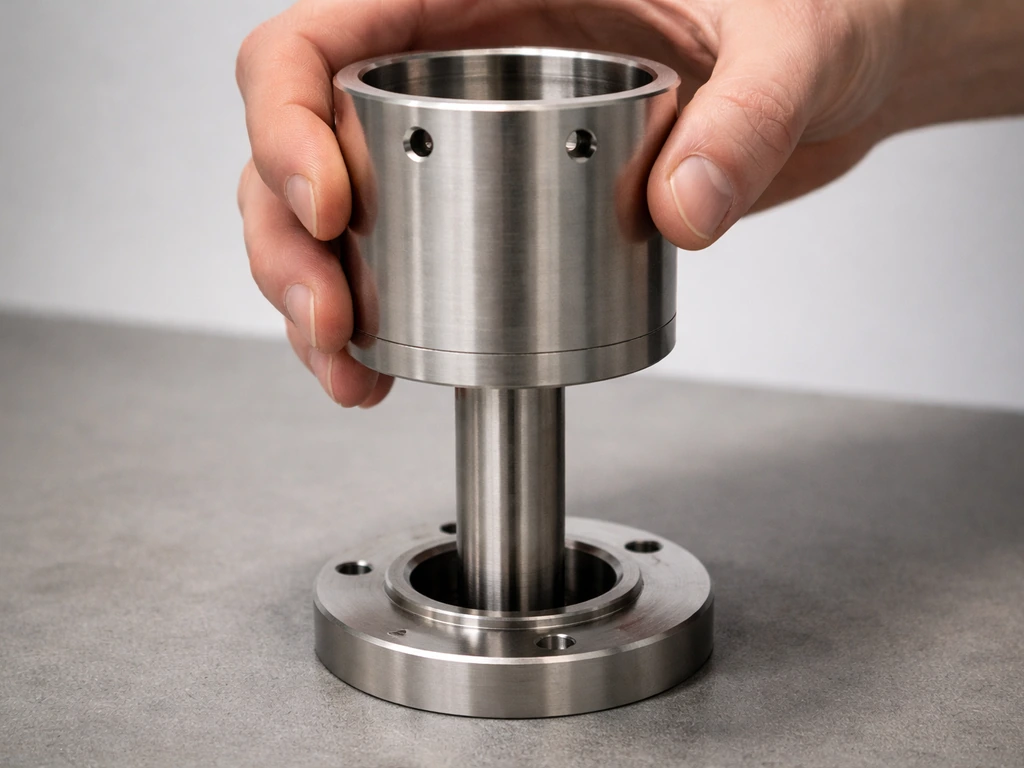
Load the cylinder housing (part D) over the top of the pole and slide it down until it seats over the base. This part just needs to drop into place; it typically doesn't require fasteners at this stage. It's there to enclose the propane cylinder once you load it later. Make sure it sits flush and doesn't rock.
Step 4: Prep and mount the head assembly
Before attaching the head assembly (part C) to the pole, attach the three reflector spacers (part EE) and their washers (part FF) to the top of the head assembly. Tighten the spacers down now, before the head goes onto the pole, because access is much easier at bench level.
Now insert the gas hose from the head assembly into the top of the pole, feeding it down through the pole interior. This is the step most people rush, and it's where kinks happen. Feed it slowly and make sure there are no tight bends. Once the hose is routed, secure the head assembly to the top of the pole using the stainless steel bolts provided. The alignment check here: the control knob on the head assembly should sit directly above the decal on the pole. If it doesn't line up, loosen and reposition before final tightening.
Step 5: Install the reflector
Remove the protective cover from the reflector before assembly. Assemble the reflector panels by sliding them together, then fasten with the screws and cap nuts. If you need a deeper walkthrough of how to assemble a fire sense patio heater reflector hood, use the reflector-hood assembly guide as a related comparison for panel fit and fastening order reflector panels. If the panels don't align cleanly, loosen the reflector alignment bolts, adjust, and retighten. Don't force it: a warped reflector affects heat distribution and looks bad.
Place washers over the threaded ends of the spacers you installed in Step 4, then locate the reflector assembly onto those spacers and secure with wing nuts. Tighten by hand until snug, then a quarter turn more. The manual specifically says not to overtighten the wing nuts; you can crack the reflector mounting if you crank down hard.
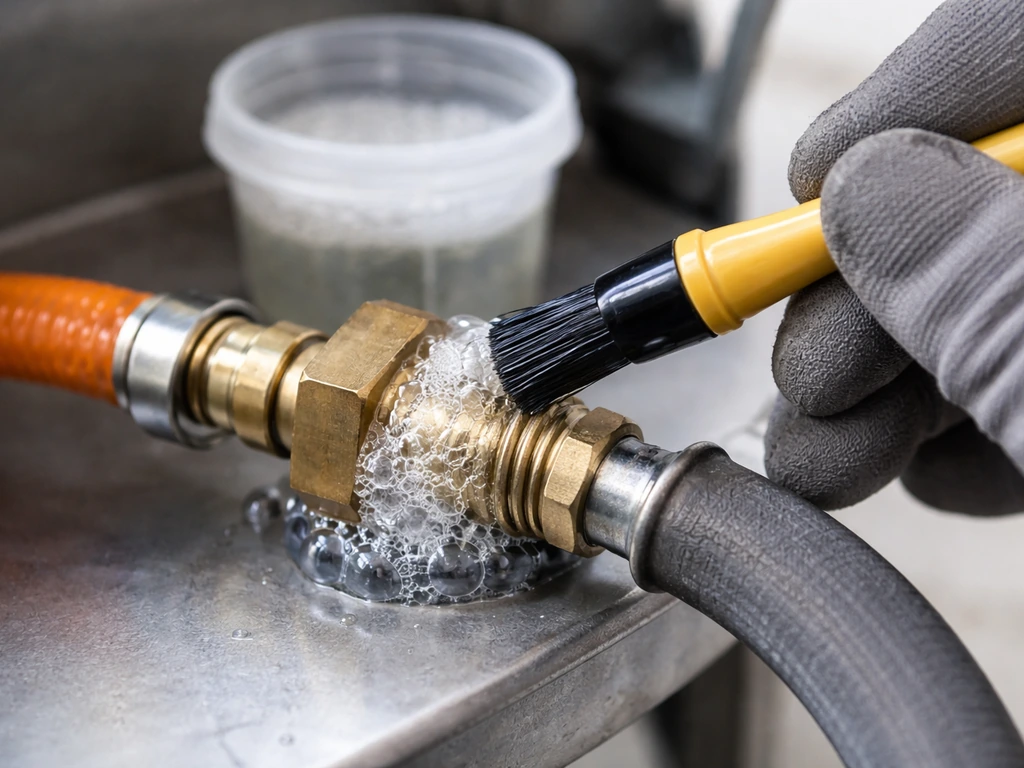
Step 6: Connect the gas supply
Use only the pressure regulator and hose assembly that came with the heater. Do not substitute a third-party regulator and do not connect an unregulated cylinder directly to the heater. The manual is clear on both points. Load a standard 20 lb propane cylinder (sold separately) into the cylinder housing, then connect the hose and regulator to the cylinder valve. Hand-tighten the regulator connection, then snug it with a wrench. Propane fittings typically have left-hand (reverse) threads, so you turn the fitting counterclockwise to tighten.
Before opening the cylinder valve, perform a leak check: spray or brush your soapy water solution onto every connection, including the regulator-to-cylinder joint and any fittings at the burner end of the hose. Then open the cylinder valve slowly. Watch for bubbles. If you see any, close the valve immediately, tighten the fitting, and recheck. If bubbles persist after tightening, the fitting or hose may be defective. Do not proceed until the leak check passes completely.
First start and ignition troubleshooting
Once you've passed the leak check, you're ready for a first light. Turn the control knob to the pilot/ignite position (usually marked on the knob), press it in to open the gas flow, and press the igniter button. You may need to hold the knob in and press the igniter several times on the first attempt while the hose purges air. This is normal. If the heater lights, hold the knob in for about 30 seconds to allow the thermocouple to heat up, then release. If it stays lit, you're done. Turn the knob to your desired heat setting.
If you press the igniter and hear nothing, not even a faint clicking, the igniter mechanism may not be making contact or a wire connection at the igniter module is loose. Check that the igniter wire is fully seated at both ends. If you hear clicking but get no flame, the most common causes after a new assembly are air in the hose (keep pressing), a regulator that hasn't fully opened (make sure the cylinder valve is fully open), or a burner orifice that has debris from manufacturing. You can clear the orifice carefully with a can of compressed air, not a metal probe.
If the heater lights but won't stay lit after you release the knob, the thermocouple is the likely issue. On a brand new heater, this is usually because the thermocouple tip isn't positioned close enough to the pilot flame. The thermocouple needs direct flame contact for about 30 seconds to generate enough millivoltage to hold the gas valve open. If it's even a few millimeters off, the valve will drop out. Check the burner head alignment and compare the thermocouple tip position to your manual's diagram.
Common assembly mistakes that cause problems
These are the mistakes I see most often on patio heater assemblies, and most of them are entirely avoidable if you slow down at the right moments.
| Mistake | What goes wrong | How to fix it |
|---|---|---|
| Kinked or pinched hose inside the pole | Restricted gas flow, heater won't ignite or runs weakly | Disassemble head, re-route hose slowly without tight bends |
| Control knob not aligned above pole decal | Awkward operation, possible misalignment of gas valve position | Loosen head assembly bolts, rotate to correct position, retighten |
| Regulator connection hand-tightened only | Gas leak at cylinder connection | Use a wrench to snug the fitting after hand-tightening |
| Reflector panels forced into alignment | Cracked reflector or warped mounting | Loosen alignment bolts, reposition panels gently, then retighten |
| Wing nuts overtightened on reflector | Cracked reflector mounting points | Tighten by hand to snug plus a quarter turn only |
| Skipping the leak check before first light | Dangerous gas accumulation risk | Always soapy-water test every fitting before opening the cylinder valve |
| Upper/lower pole orientation wrong | Warning label and control knob face wrong direction | Check manual diagram before securing pole screws |
| Thermocouple tip not in pilot flame path | Heater won't stay lit after releasing knob | Recheck burner head diagram and adjust thermocouple position |
Gas line mistakes are the ones that matter most for safety. A loose regulator fitting or a kinked hose isn't just an inconvenience: it's a fire and explosion hazard. If you're not confident about the gas connection after your first leak check, it's worth having a licensed plumber or gas technician verify it before you use the heater. That's a short service call, not a full repair, and it's entirely reasonable if propane connections feel unfamiliar.
Keeping your Living Accents heater working all season
A quick maintenance routine after assembly and before each season will add years to this heater's life. If you need to service or fully disassemble a patio heater later, work in the reverse order of assembly and keep all hardware organized for reassembly after assembly and before each season. It doesn't take long.
After assembly and at the start of each season
- Repeat the soapy water leak check on all gas connections every time you reconnect the cylinder, not just at first assembly.
- Inspect the hose for cracks, kinks, or scorch marks. Replace it if you see any damage. Hoses have a service life and should be replaced every few years regardless of appearance.
- Check that all bolts and screws on the base and pole are still tight. Outdoor temperature swings loosen fasteners over time.
- Clean the reflector panels with a damp cloth and mild detergent. Grease buildup on the reflector reduces heat output and can become a fire hazard.
- Clear any debris (dead insects, spiderwebs, dirt) from the burner orifice area with compressed air. Do this with the cylinder disconnected.
- Test the igniter by pressing it and listening for a clear, consistent click. A weak or irregular click means the battery (if replaceable) is low or the electrode gap needs adjustment.
End of season and winter storage
- Turn off the heater, let it cool completely, then close the cylinder valve and disconnect the regulator.
- Store the propane cylinder outdoors in a well-ventilated area away from the living space. Never store it in a garage, basement, or enclosed shed.
- Cover the heater with a breathable, weather-rated cover. Moisture trapped under a non-breathable cover causes rust on the pole and base.
- If you're storing the heater in a garage or shed, remove the propane cylinder entirely first. Never store the cylinder with the heater indoors.
- Before your first use next season, repeat the full leak check and inspect the burner and igniter before lighting.
Living Accents heaters are reasonably well-built for their price point, but they're not invincible. The regulator hose and the igniter module are the first things to go after a few seasons of use. Keeping spares on hand (a compatible replacement regulator and hose, and a new igniter button if yours is a push-type) means you can fix a common problem in ten minutes rather than waiting on a part order mid-summer. If you're comparing assembly experiences across brands, the process here is very similar to other mushroom-style tower heaters, though the specific hardware and alignment steps do vary by manufacturer.
FAQ
Can I use an assembly guide from a different model year or a different retailer name?
Yes, but only if it matches your exact model year. The manual’s warning label orientation, reflector spacer count, and bolt sizes can differ, so a different Living Accents “46000 BTU” listing may still assemble incorrectly. Use the model number on the rating sticker and confirm against the parts diagram before following any living accents patio heater assembly instructions.
What happens if I overtighten the reflector wing nuts?
If you overtighten the wing nuts, you can crack or warp the reflector mounting, which then changes heat output and fit. Tighten wing nuts to hand-tight, then add only about a quarter turn, and stop if you feel the hardware binding or the reflector starts to shift out of alignment.
After a successful leak check, should I recheck later before lighting?
Do a bubble-free check at every connection, then wait 2 to 3 minutes after closing the cylinder valve and watch again. If bubbles appear later, it often indicates a seating issue at the fitting or a hose that is not fully intact, and you should not attempt a first light until the check stays clean.
Is it okay to use plumber’s tape or sealant on the propane fittings if I’m worried about leaks?
No. Never use tape, thread sealant, or any paste unless your manual specifically tells you to. Propane fittings rely on their designed sealing surfaces, and adding sealants can create leaks or contaminate the regulator connection.
My heater lights briefly, then turns off. What should I check first?
If your heater lights but shuts off after releasing the knob, look first at thermocouple positioning (direct flame contact for roughly 30 seconds) and then at whether the control knob is fully depressed during ignition. If the thermocouple tip is adjusted correctly and the problem persists, the thermocouple may be faulty and usually needs replacement rather than more bending.
I press the igniter and hear nothing. What are the first things to check?
Most “no clicking” situations come down to the igniter wire not being seated at one end, or the module not making contact internally. Before troubleshooting anything else, verify the igniter wire connection at both ends and make sure it is not pinched where the head assembly meets the pole.
How many ignition attempts are reasonable if the hose is still purging air?
You can have normal air purging, but you should still stop if you smell strong propane. Keep pressing according to the manual’s ignition sequence, then pause if odor increases, move away, let it clear, and redo the connection and leak check before trying again.
The heater won’t ignite, can I clean the burner orifice myself?
If you use compressed air, do it briefly and from a safe distance, and never insert a metal probe into the burner orifice. A damaged or enlarged orifice can worsen combustion and flame stability.
Could a partially opened cylinder valve cause ignition but prevent the heater from staying on?
The cylinder valve should be fully opened before testing for proper ignition and burner behavior. If it is only partially open, you can get weak flame, trouble staying lit, or repeated failed starts even when the leak check passed.
Can I assemble most of the heater indoors and only do the leak check outside?
Yes, but plan the leak check workflow. Assemble the metal stand and route the hose as you normally would, then perform the soapy-water bubble test with the cylinder connected but valve still closed until you are ready to open slowly and observe.
My patio has overhead structures, how do I confirm clearance before assembling and using the heater?
Placement matters, at minimum 36 inches from the sides and rear and 24 inches from the top (per the manual). If you put it under a low pergola, string lights, or near overhead structures, airflow and ignition clearance can be compromised, increasing nuisance shutdowns and creating a safety risk.
What maintenance checks should I do before the next season?
After each season, do not rush straight to disassembly. Start by inspecting the regulator hose for cracks, soft spots, or abrasion points where it could rub the pole interior, then clean burner area openings carefully. If you see damage, replace the regulator and hose as a set rather than trying to patch the hose.
Which replacement parts are worth keeping on hand, and how do I make sure they will fit?
Keep spares that match your heater’s setup, specifically the regulator and hose assembly that came with the unit and a compatible igniter button type (the manual notes it can vary by push-type). Using the wrong igniter style can lead to clicking without gas ignition.