Assembling an outdoor patio heater is a straightforward job you can finish in 30 to 60 minutes if you identify your heater type first, lay out all the parts, and follow the right sequence for your specific model. The process splits cleanly into two tracks: electric patio heaters (plug-in or hardwired, either freestanding or wall-mounted) and gas patio heaters like the Fire Sense propane-powered tower models. Both have their own quirks, and getting the order wrong, skipping the leak check on a gas unit, or mounting an electric heater at the wrong angle are the mistakes that cause problems later. This guide walks you through both tracks step by step. For the exact mainstays patio heater assembly instructions, use the manual that matches your specific model and follow the sequence shown for your type of unit.
How to Assemble Outdoor Patio Heaters Step by Step

Before you start: identify your heater type and check the parts
Before you touch a bolt, take five minutes to figure out exactly what you have. Patio heaters fall into a few categories: freestanding propane tower heaters (the mushroom-cap style that runs on a 20 lb. LP tank), wall-mounted or ceiling-mounted electric infrared heaters, tabletop electric heaters, and tabletop gas heaters. The assembly process is completely different for each, and using the wrong instruction set can mean mismatched hardware, wrong orientation, or a missed safety step.
- Find the model number. It is usually on a sticker on the base, the burner housing, or the power cord tag. Write it down before you open any bags.
- Download or locate the manual for that exact model. Brands like Fire Sense, Mainstays, Amazon Basics, and Living Accents all publish model-specific manuals with their own parts lists and diagrams. A generic instruction sheet is not a substitute.
- Lay all parts flat on a clean surface and match them against the parts list in the manual. Count bolts, nuts, and screws now. Missing hardware is far easier to resolve before assembly than after.
- Separate hardware bags by size. Fire Sense propane tower models, for example, include M6x18mm bolts and M6 nuts specifically for the wheel and base assembly. Mixing them up with shorter screws used elsewhere is a common frustration.
- Check that no components are cracked or bent from shipping, especially glass tubes on propane tower models and reflector hoods on electric units.
If your manual is missing or the model sticker is unreadable, search the brand website or a manual database using any visible product code. Assembling from memory or from a similar model's instructions is how people end up with loose connections or improperly oriented heat shields.
Step-by-step assembly for electric patio heaters
Electric patio heaters come in two main configurations: freestanding pole-style units that you assemble like a floor lamp, and wall-mounted or ceiling-mounted infrared panels. The assembly process is low-risk compared to gas units, but mounting orientation and clearance distances matter a lot for both performance and safety.
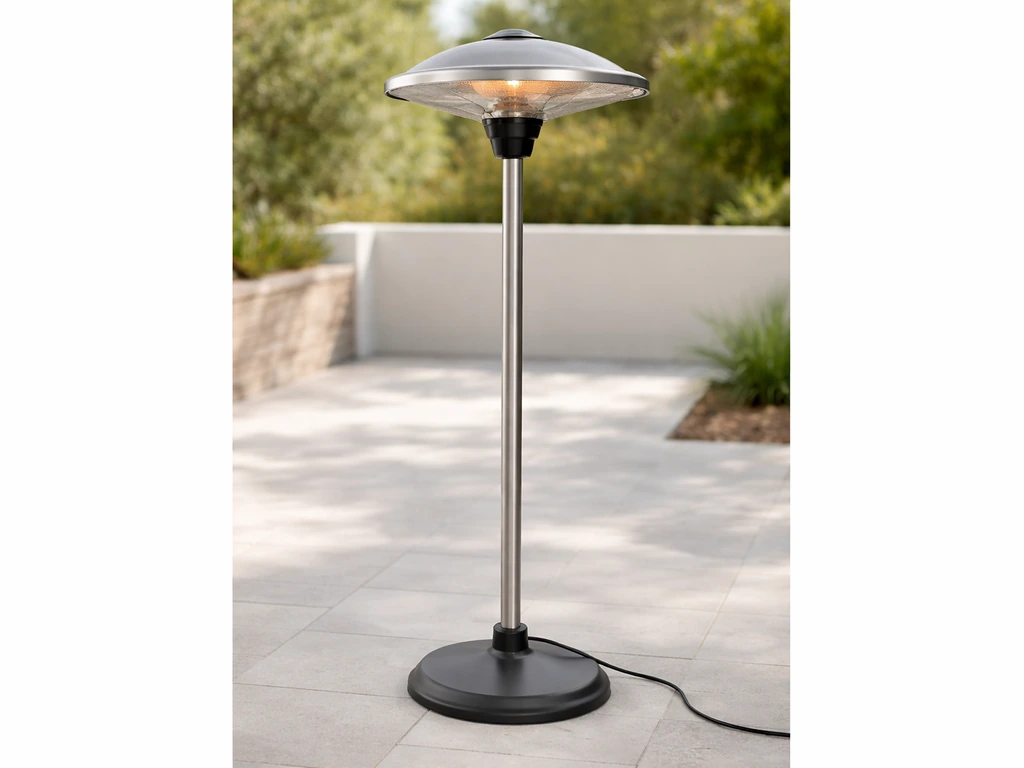
Freestanding electric patio heaters
- Assemble the base first. Most freestanding electric heaters use a weighted base with bolt-on legs or a wheel kit. Attach the base legs or wheels using the hardware specified in your manual, and tighten fully before standing anything upright.
- Thread the pole sections together. Freestanding electric heaters typically have two or three pole sections that screw or slide together. Route the power cord through the pole sections as you connect them, following the cord-routing diagram in the manual. Do not skip this step or you will have to disassemble to fix it.
- Attach the heater head assembly to the top of the pole. Most use a locking collar or set screws. Make sure it is oriented correctly before tightening. The heating element should face outward, not toward the pole.
- Install the reflector hood or guard. On electric models this is usually a clip-on or screw-on shield that sits above and around the heating element. Confirm it is seated securely. A loose reflector can shift and make contact with the element.
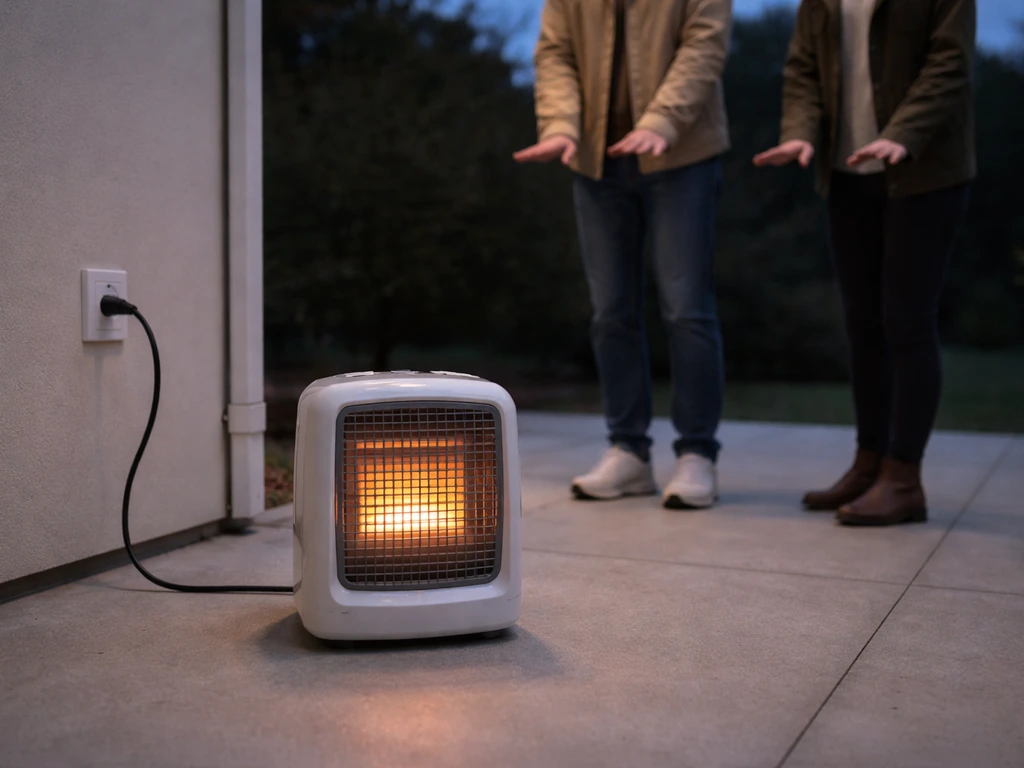
- Connect the power cord at the base or to the included plug. Do not plug in yet.
- Double-check every connection point from top to bottom before the first power-on.
Wall-mounted electric infrared heaters (including Fire Sense electric models)
Wall-mounted electric infrared heaters like the Fire Sense Item 02110 / 60460 require more attention during installation because the mounting angle and clearance distances directly affect how the heat spreads and whether the unit is safe to operate. The Fire Sense wall-mount manual specifies a required mounting angle (in the 45 to 55 degree range depending on model) and provides diagrams showing correct versus incorrect angles. Mount it too flat and the heat misses the target area. Mount it too steep and you lose efficiency and may create a fire risk.
- Choose the mounting location. Confirm you have adequate clearance to adjacent walls and the ceiling. Electric infrared heaters require specific minimum clearances from combustible surfaces. Check your model's manual for the exact figures since they vary by wattage and UL listing.
- Mark and drill mounting holes using the bracket template supplied with the unit. Use a stud finder and anchor into studs or masonry where possible. This heater will be mounted overhead and must not fall.
- Attach the mounting bracket to the wall at the correct angle per the manual's diagram. Use the included hardware and verify the angle with a protractor or angle finder before final tightening.
- Hang the heater body onto the bracket. Most Fire Sense wall-mounted models hook onto the bracket and then lock with a securing screw.
- Route the power cord to the nearest appropriate outlet or to the hardwire junction box if your model is hardwired. Do not energize yet.
- Verify mounting is solid by applying gentle downward and outward pressure before the first use.
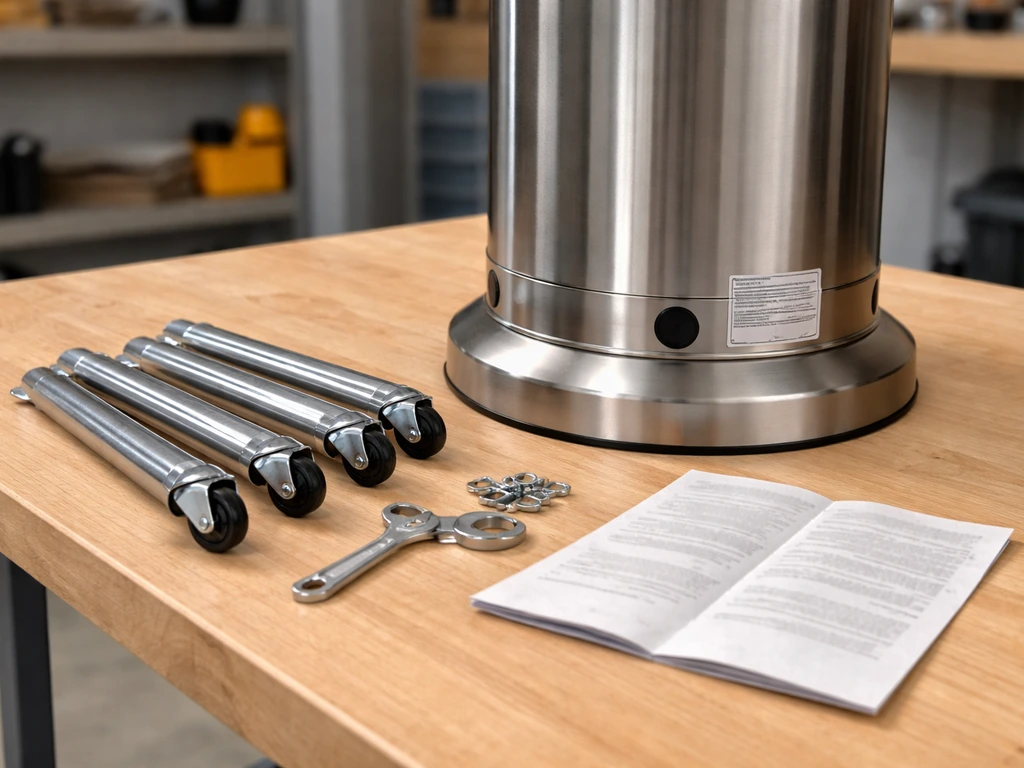
Step-by-step assembly for Fire Sense propane tower patio heaters
The Fire Sense PH08-SB and PH08-SSB (and the related PH08-SA and PH08-SSA variants) are among the most common propane tower heaters people assemble at home. If you are assembling a Fire Sense propane tower model, use the living accents patio heater assembly instructions that match your exact unit type and sequence Fire Sense propane tower patio heater assembly instructions. The sequence matters here. Skipping steps or assembling out of order can mean you have to take the whole thing apart again. If you ever need to service or store it later, review how to disassemble a patio heater for the safest reversal steps after you finish assembly. Here is the correct order from the manual.
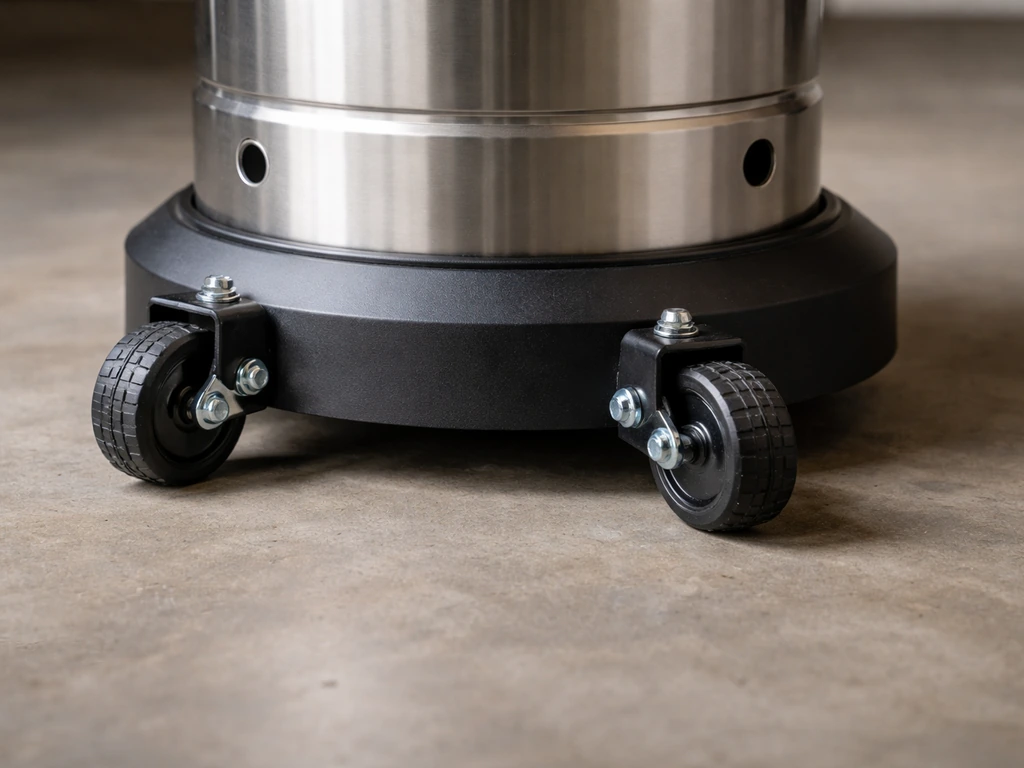
- Attach the wheels to the base assembly. Use 8 pcs M6x18mm bolts and 8 pcs M6 nuts as specified in the parts list. Hand tighten first to align everything, then snug down with a wrench. Do not overtighten or you will strip the aluminum threads.
- Connect the lower support connectors to the base pole section. These are the shorter vertical struts that provide rigidity to the lower frame.
- Attach the upper support connectors, working upward from the lower supports. Follow the diagram in the manual for orientation. Each support has a specific top and bottom.
- Install the glass tube fixed parts (the metal retaining brackets that hold the glass). Slide these onto the pole in the correct orientation before threading the glass tubes, because you cannot add them after the glass is in place.
- Carefully insert the glass tubes. These are fragile and account for most shipping damage claims. Set them gently into the lower retaining bracket before seating the upper bracket. Do not force them.
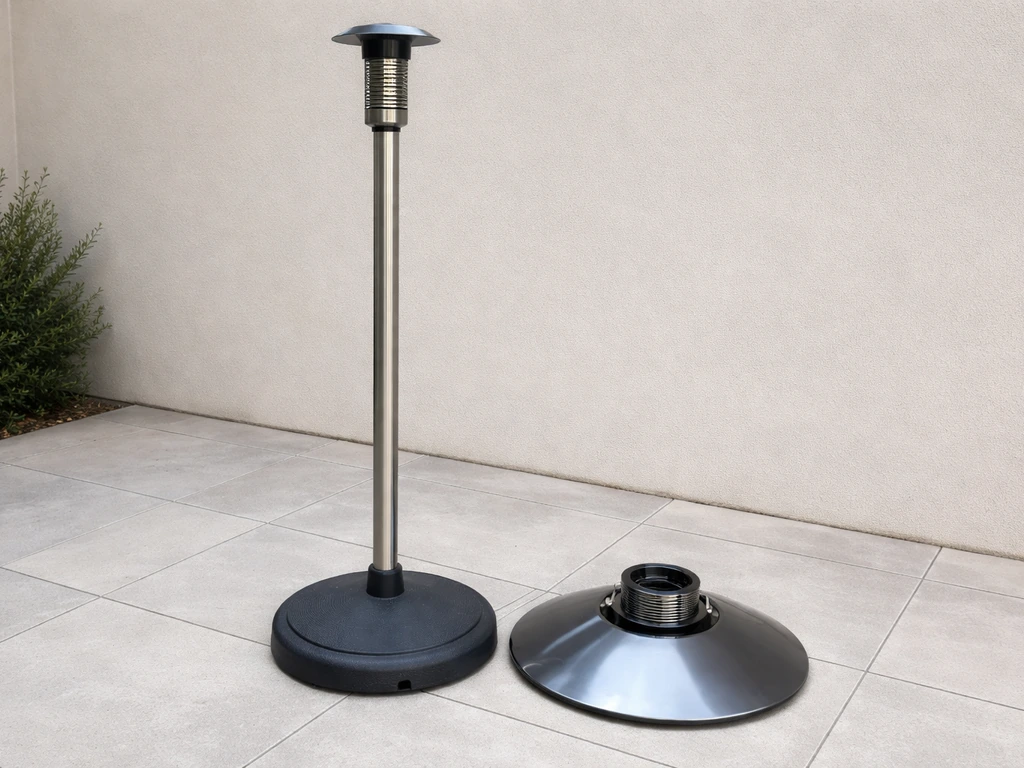
- Attach the upper plate and the mesh guards around the glass tube assembly. The mesh guards protect the glass and are a required safety component. Do not omit them.
- Install the top reflector hood. This is usually a two-piece assembly that clips together over the burner head. Confirm both halves are fully seated and the screws are tight. A loose reflector is a burn hazard.
- Note: the regulator comes pre-assembled with the burner head assembly from the factory. Do not disassemble it. Your job is to connect the regulator to the LP cylinder.
- Connect the regulator to the LP cylinder by threading the connection fitting onto the cylinder valve and hand tightening. The connection should feel snug with no wobble. Do not use a wrench on the final connection to the cylinder, hand tight is correct for this fitting.
- Perform a leak check before any ignition attempt. Mix 1 part dish soap with 3 parts water and apply the solution generously to both the hose-to-regulator connection and the regulator-to-cylinder connection. Slowly open the cylinder valve. If you see bubbles forming at either connection, close the valve immediately, tighten the connection, and retest. Do not proceed until both connections are bubble-free.
Once the leak check passes, you are ready for the first ignition test. Follow the lighting instructions in your manual exactly. If the flame goes out accidentally or gets blown out by wind, turn the heater off completely and wait at least 5 minutes before attempting to relight. This is not a suggestion. Gas can accumulate in the burner housing and igniting too soon risks a small explosion. The Fire Sense manual states this warning explicitly.
How to put the heater together safely: tools, mounting, and clearances
You do not need a toolbox full of gear to assemble a patio heater, but having the right tools handy saves frustration and reduces the chance of stripping hardware.
| Tool | Used For | Notes |
|---|---|---|
| Phillips head screwdriver | Pole connections, guard attachment, hood screws | Most Fire Sense models call this out specifically |
| Adjustable wrench or pliers | Base bolts, wheel nuts, LP regulator fitting | Use only for base hardware, not LP cylinder connection |
| Bubble level | Wall-mount bracket alignment | Critical for electric wall-mount units |
| Angle finder or protractor | Setting correct mounting angle on wall-mount heaters | Fire Sense wall-mount specifies 45-55 degree range |
| Soapy water solution | Leak test on gas connections | 1 part dish soap, 3 parts water |
| Stud finder | Wall-mount installation | Anchor into studs whenever possible |
For clearances, always check your specific model's manual rather than relying on general rules. Minimum clearances from combustibles vary by wattage and fuel type. For electric infrared wall-mount heaters, expect to see requirements specifying minimum distances from adjacent walls and the ceiling, and those numbers change based on UL listing. Infratech's CD-Series wall-mount instructions also specify minimum clearance distances from nearby combustibles such as adjacent walls and the ceiling (varies by UL listing) minimum distances from adjacent walls and the ceiling. For propane tower heaters, place the unit on a flat, stable, non-combustible surface at least 3 feet away from any combustible material and away from overhead obstructions. Never use a propane patio heater indoors or in an enclosed space.
Common mistakes, troubleshooting after assembly, and when to stop
Assembly mistakes to avoid
- Installing the reflector hood upside down or backward. Check the orientation diagram in the manual. An inverted reflector hood directs heat incorrectly and can cause the hood to overheat.
- Forgetting to route the power cord through the pole sections before assembly on electric models. You will have to disassemble.
- Skipping the gas leak check. This is not optional. It takes two minutes and prevents a serious hazard.
- Using a wrench to overtighten the LP cylinder connection. Hand tight is correct. Overtightening can damage the valve seat and cause a leak.
- Placing the base on an uneven or soft surface. Propane tower heaters are top-heavy and will tip on grass, gravel, or uneven decking.
- Leaving glass tubes unprotected during assembly. Set them down on a soft surface or towel, not directly on concrete.
- Using hardware from the wrong bag. M6x18mm bolts for the wheel assembly are not interchangeable with shorter screws used elsewhere in the frame.
Troubleshooting: electric heater won't power on
- Check that the power cord is fully seated at both the heater and the outlet.
- Test the outlet with another device. A tripped GFCI outlet is a very common cause.
- Verify the thermostat or control dial is set above ambient temperature.
- Check for a thermal cutout or reset button on the heater body. Many electric patio heaters have an overheat protection switch that requires a manual reset.
- Inspect the power cord for any kinks or damage that may have occurred during pole routing.
Troubleshooting: Fire Sense propane heater pilot won't light or won't stay lit
| Symptom | Likely Cause | Fix |
|---|---|---|
| Pilot won't light at all | Cylinder valve is closed | Open the cylinder valve fully |
| Pilot won't light at all | Empty or nearly empty cylinder | Weigh or replace the cylinder |
| Pilot lights but won't stay lit | Dirt or debris around the pilot | Clean dirt from around the pilot with a soft brush |
| Pilot lights but won't stay lit | Thermocouple not seated in the flame | Reposition so the thermocouple tip sits directly in the pilot flame |
| Flame is weak or yellow | Low gas pressure or regulator issue | Confirm cylinder is not low, check regulator connection |
| Reduced performance in cold weather | LP gas efficiency drops below 40°F (5°C) | Warm the cylinder slightly or use a full cylinder |
| Any smell of gas | Leak at connection | Close cylinder valve immediately, retest all connections with soapy water |
When to stop and call for service
Stop immediately and do not attempt further DIY work if you smell gas and cannot identify or eliminate the source after two leak tests, if the gas valve or regulator is physically damaged, if an electric heater produces sparks or a burning smell from the wiring (not normal startup odor from new heating elements), or if the mounting structure for a wall-mount heater feels unstable after installation. These are not fixable with a screwdriver. A damaged regulator or compromised LP valve needs replacement from a qualified source, and unstable wall mounts need a professional reassessment before anyone stands under that heater.
Maintenance tips after assembly: keeping it running well
Assembly day is a good time to establish habits that will save you troubleshooting headaches later in the season. The Fire Sense 60262 owner’s manual includes a dedicated Care and Maintenance section, along with Troubleshooting guidance.
Check all connections before each season
On gas models, repeat the soapy water leak test at the start of each season or any time you swap the LP cylinder. Fittings can loosen over winter storage. On electric models, inspect the power cord for cracking or damage, check that all guard and reflector fasteners are still tight, and verify the pole connections have not loosened from vibration or movement.
Keep the pilot and burner area clean
Spiderwebs and insect nests inside the burner housing are one of the most common causes of ignition failure on propane patio heaters. At the start of the season, remove the reflector hood and use a soft brush to clear any debris around the pilot and burner orifice. On electric heaters, clean the reflector surface with a damp cloth (unplugged, fully cool) to maintain heat output efficiency. Dust and oxidation on the reflector reduce radiant output noticeably over a season.
Do a careful test run after assembly
For electric heaters, plug in and run on the lowest setting for five minutes outdoors. Check for any unusual smell (a faint burning smell on brand-new elements is normal and clears within a few minutes), confirm the reflector stays cool to the touch, and verify no connections are getting warm other than the heating element itself.
For propane heaters, after passing the leak test, open the cylinder valve fully, press and hold the control knob to the pilot position, and use the igniter while maintaining pressure on the knob for up to 30 seconds to allow the thermocouple to heat up. Once the pilot stays lit, slowly rotate to the desired heat setting. Let the heater run for 10 minutes and then do a final visual check of all assembly points, especially the reflector hood and glass tube retaining brackets, which can shift slightly as the unit heats up and expands for the first time.
If you are working through a brand-specific setup, the assembly steps for models from Fire Sense, Mainstays, Amazon Basics, and Living Accents all follow this same general logic but have model-specific hardware counts and sequences. Always use the manual for your exact model as the final authority. The steps above will get you oriented and safe, but a 2-page parts diagram is worth more than memory when you are holding an unidentified bolt at step 7.
FAQ
What should I do if I have the right heater type, but the parts look slightly different from the manual?
Stop and cross-check the part numbers stamped on brackets, regulator components, and burner housing pieces. Even within the same family, variants can use different hardware counts or heat shield orientations, and forcing the manual sequence can create loose connections or an incorrect mounting angle.
Can I assemble an outdoor patio heater indoors to save time?
You can assemble it indoors only if you fully avoid gas leak risks from a cylinder and you keep electrical components dry and unpowered. However, never test a gas unit inside, and always perform the first ignition and any leak testing outdoors in a well-ventilated area.
How do I know my propane heater is fully leak-free, not just “looks fine” after a single bubble check?
Do the soapy water leak test on every connection again after you fully tighten fittings, and repeat after you open and close the cylinder valve once. If bubbles appear, tighten the specific joint, re-test, and do not proceed to ignition until the bubbles stop at that joint.
What if my gas heater ignites, but the flame does not stay lit when I release the knob?
That usually indicates the thermocouple is not heating long enough. Keep the knob at the pilot position and hold it through the manual’s specified warm-up time (often up to 30 seconds), then re-try lighting. If it still won’t stay lit, shut it down and have the regulator or control system checked rather than repeating ignition indefinitely.
Is it safe to use a propane patio heater if the burner area looks dusty or slightly clogged after storage?
Small debris is a common problem, but you should still clear the burner and pilot area before the first ignition. If you find insect nests, wipe away debris and inspect the burner orifice area carefully, because a partially blocked path can lead to weak ignition or uneven flame.
How strict are clearance distances for electric infrared wall-mounted patio heaters?
They are strict. Clearance requirements vary by wattage and the unit’s UL listing, so using general “rule of thumb” distances can leave combustible materials too close or aim the heat incorrectly. If your model’s manual states different clearances for sides, ceiling, and front, follow those exact values.
What angle should I use for a wall-mounted electric heater if my manual is missing?
Do not guess. Use the brand’s website or a manual database to find your exact model and angle range, because the safe range is model-specific (often a narrow band). If you cannot identify the model, have installation reviewed by a qualified electrician or installer.
What tools are most helpful, and can I substitute if I do not have the exact sizes?
A properly sized wrench and the correct screwdriver type matter because over-tightening or using the wrong head can strip threads or distort brackets. If your kit includes a dedicated hex key or tool, use it, and avoid forcing fasteners that do not spin on by hand.
When should I stop troubleshooting and call a professional for an electric patio heater?
Call a professional if you see exposed wiring, repeated sparking, persistent burning smell from the wiring, or any sign the mounting structure is not stable. Also stop if the reflector or guards cannot be secured firmly, because loose reflector parts can reduce output and create a hazard.
How can I tell the difference between normal startup odor and a problem on electric heaters?
A faint burning smell on brand-new elements that clears within a few minutes is typically normal. If the odor is strong, lasts longer, or is accompanied by smoke or warming at connections other than the heating element, shut off the heater and inspect connections before reuse.
Do I need to disassemble a propane tower heater for storage every time?
You do not always have to fully disassemble. What matters is preventing damage to the burner and reflector components, keeping the cylinder disconnected and stored safely, and protecting the unit from insects and moisture. If your manual recommends disassembly for winter storage, follow that, otherwise cover the heater per model guidance and keep the inside protected.
Can I use an extension cord for an electric patio heater during assembly testing?
Prefer not to, and never use an extension cord unless your manual explicitly allows it and specifies gauge and outdoor rating. If the manual does not cover extension cords, run the test directly from an outdoor-rated receptacle to reduce overheating risk.