Assembling a Mainstays patio heater takes about 30 to 45 minutes with basic hand tools, and the process is largely the same across their popular 48,000 BTU propane models. You build the base, stack the pole sections, attach the burner head and emitter screen, connect the regulator hose to your propane tank, leak-test every connection before you touch the igniter, and then do a controlled first-light check. The steps below walk you through all of that in order, plus what to do when the heater won't ignite or won't stay lit after assembly. These patio heater assembly instructions also help you troubleshoot common ignition and “won't stay lit” issues after the build.
Mainstays Patio Heater Assembly Instructions for Gas Models

Grant Mercer
20 Jun 2026
Find your Mainstays model and get the right manual
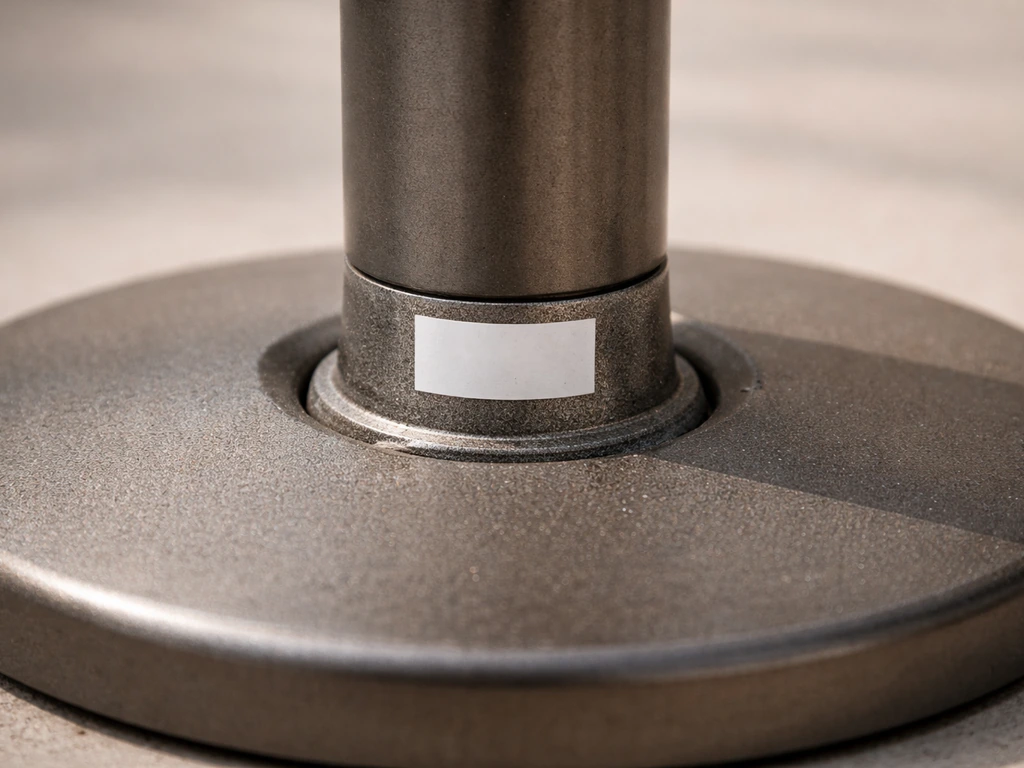
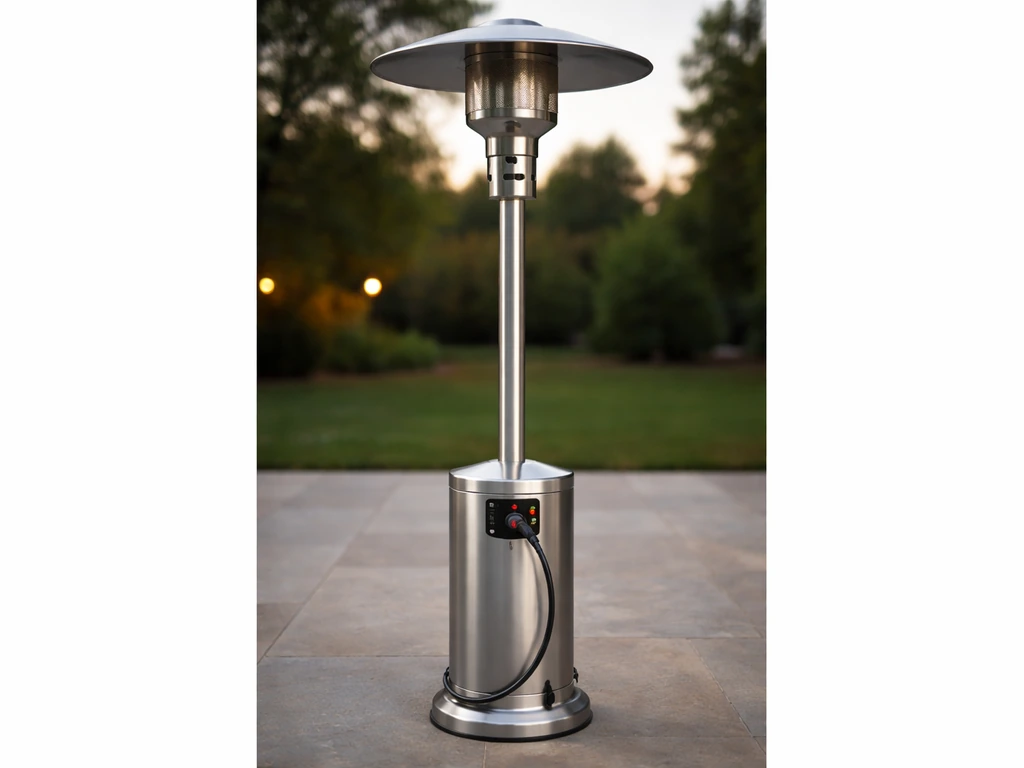
Before you open a single bag of hardware, find your model number. It's printed on a metal plate or sticker, usually on the lower pole section or on the base frame. The two most common Mainstays freestanding propane heater models you'll find at Walmart right now are MSA236241249001 (black powder coat, 48,000 BTU) and MSF328059664030 (stainless steel, 48,000 BTU, 86.6 inches tall). An older model that still circulates in PDF form online is listed as model 92000. Write that number down before you do anything else.
With the model number in hand, search for it directly on Walmart's support page, ManualsLib, or a site like Manuals. co. Mainstays heaters are Walmart house-brand products, so the manual sometimes appears under slightly different model references (like MS44-305-004-01 or MS4430500401) but the assembly sequence is nearly identical across the lineup.
If you can't find yours by exact model, the manual for a similarly sized Mainstays LP heater will cover 95 percent of what you need, just confirm your hardware bag matches the parts diagram before you start. If you're assembling a different brand, the general assembly process covered in a broader patio heater assembly guide will also apply to most of the same steps.
If you need help before you start, follow these amazon basics patio heater assembly instructions for a smooth, step-by-step setup.
One thing every Mainstays manual agrees on: these heaters run on LP (liquid propane) only. There is no conversion kit for natural gas, and attempting one is dangerous and voids any warranty. If someone tells you otherwise, ignore them.
What to gather before you start assembly
Tools you'll need
- Adjustable wrench or open-end wrenches (typically 7/8 inch and 1 inch for the regulator fitting)
- Phillips head screwdriver
- Flat head screwdriver
- Small container or spray bottle for leak-test solution
- Liquid dish soap and water (for leak testing)
Parts that should be in the box
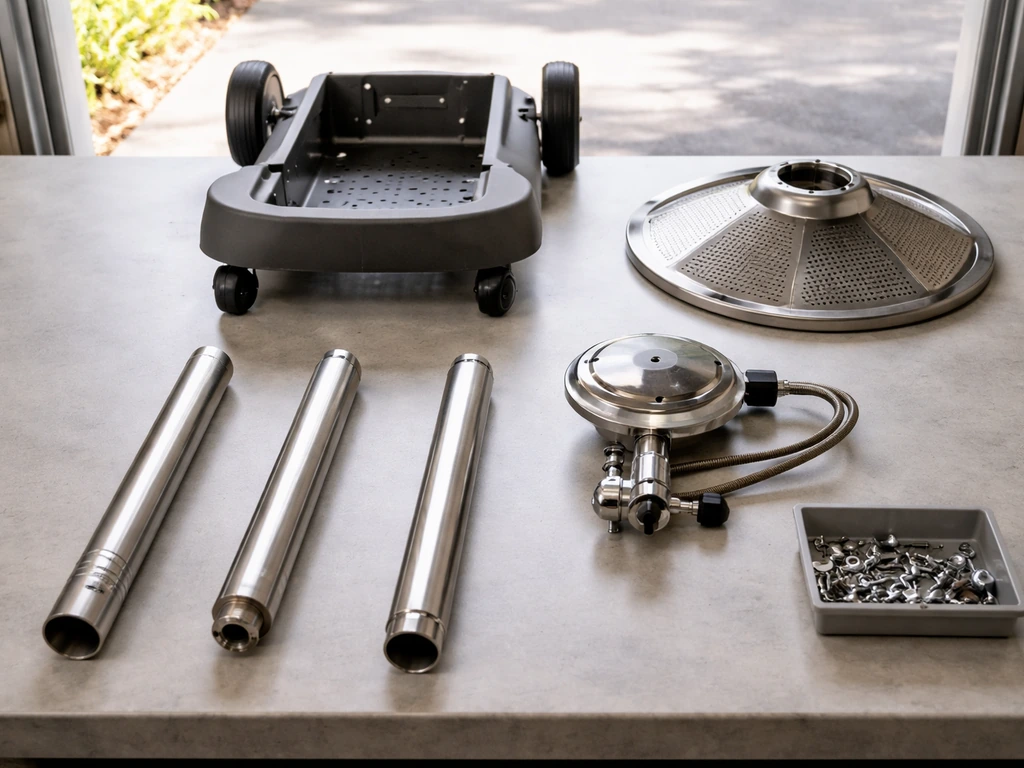
- Base with wheels (usually pre-assembled or two-piece)
- Lower, middle, and upper pole sections
- Burner head assembly with control valve and igniter
- Emitter screen and reflector hood
- Regulator with attached hose (this connects to your propane tank)
- Hardware bags with bolts, nuts, and retaining clips
- Owner's manual with parts diagram
Count your hardware against the parts diagram before you start. Missing a bolt now is far less frustrating than discovering it when you're three steps from done. Your LP tank is not included in the box; you'll need a standard 20 lb propane cylinder fitted with an overfill prevention device (OPD), which is the standard valve on any cylinder bought or refilled since 2002. If you’re looking for living accents patio heater assembly instructions, follow the same basic assembly and safety checks before attempting ignition.
Safety prep
Assemble the heater outdoors or in a very well-ventilated space. Do not connect the propane tank until every mechanical connection on the heater is fully tightened. Then, before you connect the propane tank, make sure you have fully assembled the outdoor patio heater and tightened every mechanical connection outdoor patio heater assembly. Keep any open flame, cigarettes, and ignition sources away from your work area. Have a phone nearby in case something goes wrong during the gas connection phase.
Step-by-step Mainstays patio heater assembly instructions
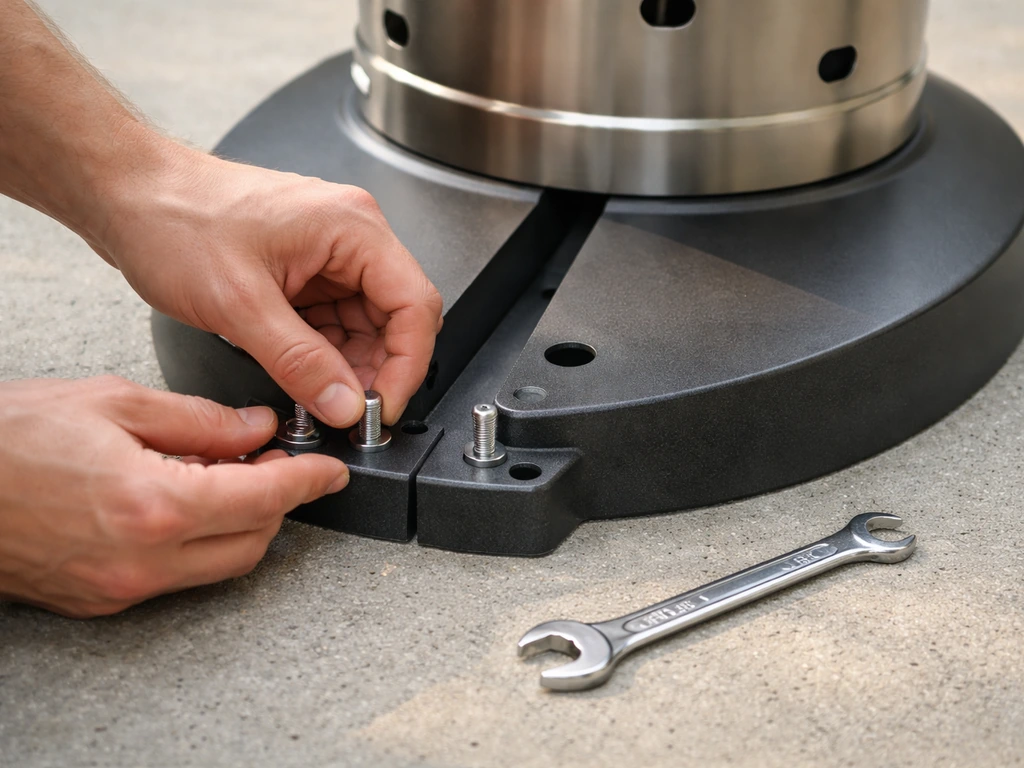
- Attach the base: Set the base on a flat surface. If it ships in two pieces, bolt them together using the supplied bolts and lock nuts. Hand-tighten first, then snug with a wrench. Attach the caster wheels if they're not pre-installed by pressing the axle pins into the base frame holes until they click.
- Stand the lower pole: Insert the lower pole section into the base center tube. Most Mainstays models use a retaining bolt through the side of the base. Thread and tighten that bolt so the pole doesn't wobble.
- Add the middle pole: Slide the middle pole section over the lower pole (or thread it in, depending on the model). Align the bolt holes and insert the provided bolt or retaining pin. Tighten firmly.
- Mount the upper pole and burner head: The upper section carries the control valve, gas line, and igniter assembly. Slide it down over the middle section, align the holes, and secure with the bolt. The gas tubing runs internally through the pole; do not kink or pinch it during this step. Some models have a set screw here as well.
- Attach the emitter screen: The cylindrical wire mesh emitter screen threads or clips onto the burner head just below where the flame will appear. Make sure it seats evenly all the way around.
- Mount the reflector hood: The dome-shaped reflector sits on top of the burner head and is usually secured by three bolts around its rim. Tighten these evenly so the hood sits level. An unlevel hood affects heat distribution and looks sloppy.
- Connect the regulator hose to the burner assembly: The hose end that connects to the heater's control valve typically has a flare fitting. Thread it on clockwise and tighten with a wrench. Do not use thread tape on flare fittings; they seal metal-to-metal.
- Double-check every pole bolt and fitting before moving on: Give the assembled heater a gentle shake. Nothing should rattle or feel loose. This is also a good time to confirm the tilt safety switch (usually a ball-and-tube mechanism on the upper pole) moves freely and isn't jammed by a pinched wire.
Gas connection, regulator setup, and leak testing
This is the most important part of the whole process. Take it seriously and don't rush.
Connecting the regulator to the tank
The regulator end of the hose has a left-hand thread fitting (reverse thread) that connects to your propane cylinder's service valve. Turn it counterclockwise to tighten, which is the opposite of what feels natural. Hand-tighten first, then snug it with a wrench. You should feel clear resistance when it's seated. Do not overtighten to the point of distorting the fitting.
Leak testing: do this every single time you connect the tank
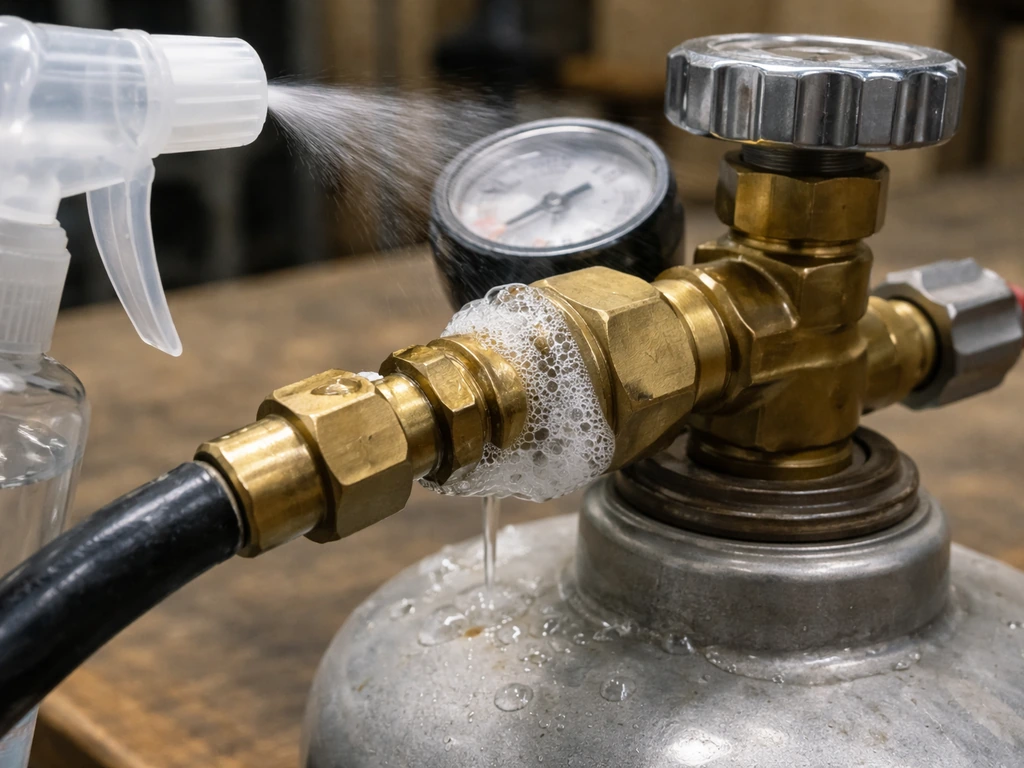
Mix a leak-test solution: roughly 2 to 3 ounces total, made from one part liquid dish soap to three parts water. Pour it into a small spray bottle or apply it with a brush or cloth. Make sure all control valves on the heater are in the OFF position. Then open the propane cylinder valve slowly, about one full turn.
Apply the solution generously to these two spots: the connection between the hose and the regulator body, and the connection between the regulator and the cylinder valve. Watch for 30 seconds. If you see bubbles forming and growing, you have a leak. Close the cylinder valve immediately. Try tightening the fitting and repeating the test. In a Reddit discussion about a patio heater gas leak, commenters described using soapy water to locate the leak area, with leak symptoms showing up around collar and regulator-related connections even after tightening Try tightening the fitting and repeating the test.. If bubbles persist after re-tightening, do not attempt to light the heater. Disconnect the hose or regulator and replace the leaking component before proceeding.
If no bubbles appear at either connection, you're clear to move on. This test takes about two minutes and is not optional. The Mainstays manual is explicit on this: perform a leak test before lighting, and every time you reconnect the tank. Shipping alone can loosen fittings, which is exactly why this step exists even on a brand-new unit.
First ignition and startup checks
Before you light anything, confirm the heater is standing upright and stable. It needs to be on a level, non-combustible surface. Check your clearances: at least 36 inches of clearance above the top of the reflector hood, and at least 24 inches of clearance on all sides from any combustible materials like fences, umbrellas, or overhead structures. Properly maintaining reflector hood clearance helps the heater burn efficiently and reduces fire risk during operation. That's not a suggestion, it's a fire safety requirement.
- Open the cylinder valve fully (counterclockwise until it stops).
- Turn the control knob on the heater to the PILOT or HIGH position as your manual specifies. Most Mainstays models require you to push the knob in while turning to bypass the safety valve.
- Press and hold the knob in (this opens the gas to the pilot or main burner) while pressing the igniter button repeatedly, about once per second. You should hear clicks.
- When the flame lights, continue holding the knob in for 15 to 30 seconds to heat the thermocouple. Then slowly release the knob. If the flame stays lit, you're good. If it goes out, wait 5 minutes before trying again to let any gas dissipate.
- Once the main flame is established and stable, adjust to your desired heat setting.
A healthy flame on a Mainstays propane heater should be predominantly blue with small orange tips at the burner openings. A large, flickering orange or yellow flame usually indicates incomplete combustion, which can mean debris in the burner, a misaligned emitter, or a partially blocked orifice. If you see that, shut it down and inspect before continuing.
Common problems after assembly and how to fix them
Heater won't ignite at all
Start simple. Is the cylinder valve open? Is there propane in the tank? If the tank is full and the valve is open, the igniter itself may not be sparking. Press the igniter button in a dark area and look for a visible spark at the tip of the igniter electrode near the burner. No spark means either the igniter battery is dead (on battery-assisted models), the electrode is dirty or cracked, or the igniter wire is loose. Clean the electrode tip with fine sandpaper, check the connection at the back of the igniter, and try again. You can also light the pilot manually with a long lighter while holding the control knob in, which bypasses the electronic igniter entirely.
Heater lights but won't stay lit
This is almost always a thermocouple problem. The thermocouple is a small metal probe positioned in the flame path right next to the pilot or burner. It generates a tiny voltage when it's hot, which tells the safety valve to stay open. If the thermocouple isn't getting enough heat, is positioned wrong, or is faulty, the valve closes and the flame drops out within 30 to 60 seconds of releasing the control knob.
First, make sure you held the knob in long enough (a full 30 seconds minimum). If that's not the issue, the thermocouple tip may have drifted out of the flame, or the thermocouple itself has failed. Repositioning the thermocouple closer to the pilot flame is a simple fix you can do yourself. Replacing a thermocouple is a $10 to $15 part and a straightforward DIY repair.
Tilt switch shutting off the heater
Mainstays heaters include a tip-over safety switch, typically a mercury or ball-type tilt switch mounted on the upper pole assembly. If the heater is on uneven ground or the switch is stuck or wired incorrectly, it will cut gas flow and the heater won't light or will shut off unexpectedly. First, make sure the heater is perfectly level.
If the heater is level and still shutting off, locate the tilt switch housing (it looks like a small cylinder with wires) and gently shake it. The internal ball should move freely. If it's stuck, the switch needs to be replaced. Do not bypass or disconnect the tilt switch; it exists to shut off gas if the heater falls over, which is a real fire hazard.
Regulator lockout (heater barely produces flame)
If you opened the cylinder valve too quickly, the regulator's internal safety mechanism may have gone into lockout mode, restricting gas flow severely. You'll notice a very weak, low flame or almost no gas at all. To reset it: turn all heater controls off, close the cylinder valve completely, disconnect the regulator from the tank, wait 30 seconds, reconnect, and this time open the cylinder valve very slowly, about a quarter turn at a time. This usually clears the lockout.
| Symptom | Most likely cause | Fix |
|---|---|---|
| No ignition, no spark | Dead igniter or loose electrode wire | Replace battery, clean electrode, check wire connection |
| No ignition, sparks but no flame | Closed valve or empty tank | Open cylinder valve fully, check tank level |
| Lights then goes out within 60 seconds | Thermocouple not heating or failed | Hold knob longer, reposition or replace thermocouple |
| Shuts off when not touched | Tilt switch triggered or stuck | Level the heater, inspect and replace tilt switch if faulty |
| Very weak flame, low heat | Regulator lockout | Close tank valve, disconnect regulator, reconnect slowly |
| Visible bubbles during leak test | Loose fitting at regulator or tank connection | Tighten fitting, retest; replace hose/regulator if bubbles persist |
Keeping it running: maintenance and safe-use habits
Once your Mainstays heater is assembled and working, a little ongoing attention keeps it reliable for years. The biggest thing people skip is hose inspection. At least once a year, take a few minutes to disassemble the reflector and burner head and inspect the full length of the regulator hose.
Store the heater upright in a sheltered area, wait until it is cool before covering it, and never leave the LP cylinder exposed to direct sunlight or excessive heat inspect the full length of the regulator hose.
If you need to take it apart for cleaning or troubleshooting, follow the disassembly steps specific to your patio heater model disassemble the reflector and burner head. Look for cuts, abrasion, cracking, or any spots where the hose rubs against the pole. If you find damage, replace the hose before using the heater again. Any suspect section should be soap-tested before ignition.
- Leak-test every time you reconnect the propane tank, not just the first time.
- Store the heater upright in a sheltered area when not in use. Storing it on its side stresses the hose connections.
- Wait until the heater is completely cool before covering it with a heater cover. Trapping heat under a cover can damage finish and components.
- Never store or use the heater with the LP cylinder exposed to direct sunlight or temperatures above 120°F (such as a hot garage or enclosed space).
- Keep the burner screen clear of spider webs and debris, especially at the start of each season. Spiders love to nest in the burner area during winter storage, and a blocked burner orifice is a common cause of ignition failure in spring.
- After cleaning the burner or emitter screen, soap-test the gas connections before relighting.
- Maintain the 36-inch top clearance and 24-inch side clearance every time you use the heater, even if you've moved it since last use.
If you ever smell gas while the heater is running or after shutting it off, don't try to diagnose it on the spot. Turn the cylinder valve off, move away from the heater, and don't use any ignition source until you've identified the source of the smell. If you can't find a fixable cause with a soap test, disconnect the LP supply entirely and contact a gas appliance technician or your local LP supplier before using the heater again. That's not overcautious, it's just how propane appliances should be treated.
Most Mainstays heater problems after assembly come down to three things: a connection that wasn't quite tight enough, a thermocouple that needs repositioning, or a regulator that locked out during first use. All three are fixable in under 15 minutes with the steps above. Get those right, and the heater will give you a lot of comfortable evenings outdoors.
FAQ
Can I assemble the Mainstays patio heater indoors and only do the leak test outside?
You can assemble indoors if the space is very well ventilated and you keep flames and ignition sources away, but you should do the gas connection and the leak test outdoors (or at least in an open-air area). Avoid performing the final tank connection in a closed room, since a leak can accumulate even if it seems small.
What should I do if the hose connection feels like it does not seat after tightening?
Stop and re-check that you have the correct fitting orientation and thread type, then disconnect and inspect the regulator fitting tip for damage or debris. Reconnecting while forcing the threads can damage the flare or seat, which can make leaks more likely even if it passes a first soap test.
How long should I wait after opening the cylinder valve before I decide there is no leak?
Let the soap solution sit for a full 30 seconds while the cylinder valve remains open. If bubbles form later than that, close the cylinder valve and re-tighten, then repeat the test. Bubble timing can help distinguish an initial seep from a connection that loosens under pressure.
Is it safe to relight immediately after a “won’t stay lit” problem?
Wait and troubleshoot first. If the flame drops out within 30 to 60 seconds, shut the heater down, confirm the thermocouple is in the flame path, and only then try again. Repeated quick attempts can prolong propane release and can foul ignition components if combustion is incomplete.
My flame looks mostly blue, but the burner still won’t heat properly. What else can I check?
Confirm the emitter screen is installed correctly and not bent or blocked, then check for debris in the burner ports. Also verify the heater is on a level, non-combustible surface with correct clearance, since airflow restrictions can reduce performance even when ignition appears normal.
What if the igniter sparks but the pilot still does not catch?
First verify the cylinder valve is fully open and there is adequate propane. If sparking is visible at the electrode, the next checks are pilot fuel delivery and cleanliness, then alignment of the electrode and pilot area. If you try manual lighting with a long lighter, keep the control knob held in for the full time recommended for your model.
How do I know the left-hand regulator connection is tight enough without overtightening?
Hand-tighten first until you feel clear resistance when the fitting seats. Then snug it with a wrench just enough to stop movement, without forcing past resistance or deforming the fitting. If you overtighten, you can crack seals and cause leaks that soap testing may not reliably prevent on subsequent connections.
Should I replace the regulator hose if I find any tiny surface abrasion?
Yes, if you find cuts, cracking, or abrasion where the hose could eventually expose material. Even small wear points can widen with use, heat, and movement. After any hose-related repair or replacement, perform a complete soap leak test at both connections before lighting.
What does “thermocouple positioned wrong” look like in practice?
The tip should be positioned so it sits in the pilot flame path, not just near it. If the thermocouple tip is angled away from the flame or shifted out of the hottest area, the safety valve closes after you release the knob, usually within 30 to 60 seconds.
Can the tilt safety switch be tested by shaking it while the heater is connected to propane?
Do not test or troubleshoot the tilt switch while propane is connected and gas could be released. With the cylinder valve closed and the unit cooled, you can locate the switch housing and check that the internal ball moves freely. If you suspect wiring issues, replacement should be done per the manual and local safety expectations.
If the regulator locks out after opening the cylinder quickly, do I need to replace the regulator?
Usually no. The lockout can often be cleared by fully turning controls off, closing the cylinder valve, disconnecting the regulator, waiting about 30 seconds, and then reopening the valve slowly in small increments. Only consider replacement if the regulator fails repeated reset attempts or if soap testing shows a persistent leak.