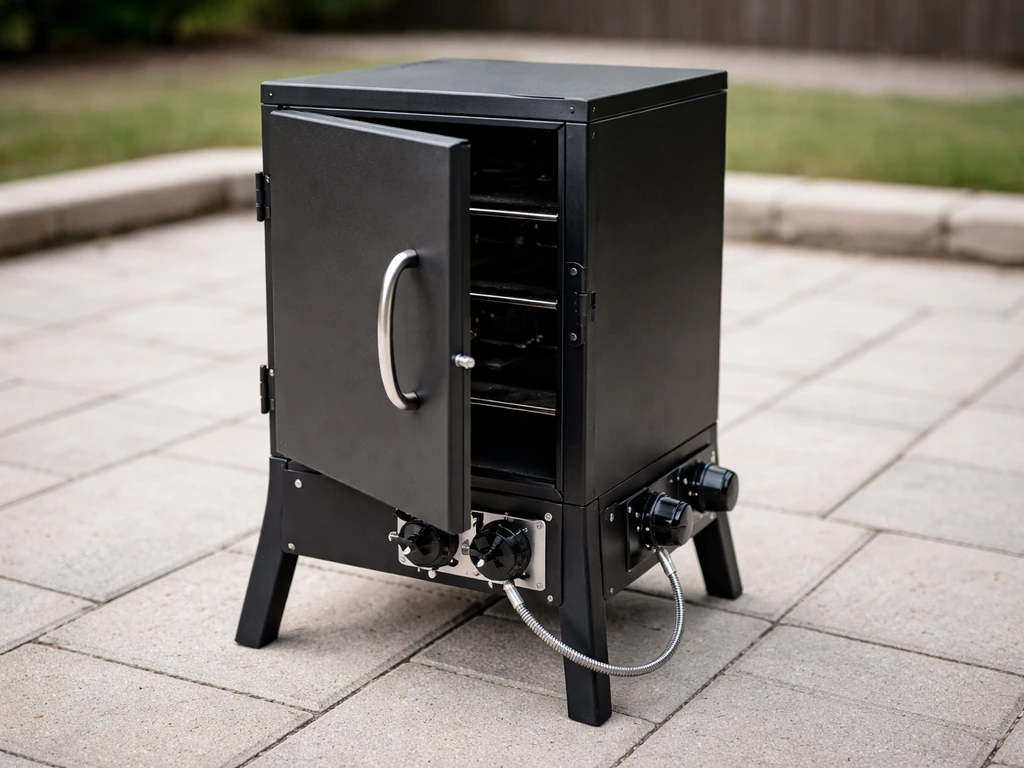
The correct manual for the Masterbuilt MPS 20B Patio 2-Portable Propane Smoker is the official owner's manual titled 'MASTERBUILT MB20050116, Owner's Manual, MPS 20B, MPS 25B PATIO-2-PORTABLE PROPANE SMOKER,' with manual code 9805170020 170912-GSB. ManualsLib also lists a matching “PATIO-2-PORTABLE PROPANE SMOKER” entry for the Masterbuilt MPS 20B, which aligns with the model and product naming in the manual distribution listings Masterbuilt MPS 20B Manuals. It covers model numbers MB20050116, MB20050516, and MB25050416. If you've been searching for 'patio 2 portable propane smoker manual' or 'patio-2-portable propane smoker manual,' this is your exact document, the MPS 20B name and that hyphenated 'Patio-2-Portable' wording both appear on the manual cover. You'll also find it hosted as '283468-1.pdf' on some document platforms, and it's listed on ManualsLib under the Masterbuilt MPS 20B product page. Worth noting: this is a propane smoker, not a patio heater, but the troubleshooting principles around gas flow, igniters, and safety cutoffs overlap heavily with propane-fueled appliances in this category.
Masterbuilt MPS 20B Patio 2 Propane Smoker Manual Guide

Confirm you have the right model before doing anything else
Before you dive into troubleshooting or assembly, confirm the model number on your unit. Look for a label on the back or bottom of the smoker body. You're looking for MB20050116, MB20050516, or MB25050416. All three are covered by the same manual. Use the official owner’s manual titled “MASTERBUILT MB20050116 , Owner’s Manual , MPS 20B, MPS 25B PATIO-2-PORTABLE PROPANE SMOKER” for models MB20050116, MB20050516, and MB25050416 all three are covered by the same manual. The MPS 20B is the smaller version in this line; the MPS 25B is the larger sibling, but the operating procedures, ignition sequence, and safety checks are identical between them in this manual. If your label shows a completely different prefix (like MB2000 or MB4000 series), you're dealing with a different Masterbuilt product and you'll need a different manual.
Safety checks and prep before you even touch the knobs
The manual is unusually specific about pre-use checks, and for good reason: propane gas errors move fast. Work through every item below before connecting a cylinder or attempting to light the smoker.
Placement and clearance
This unit is for outdoor household use only. The manual is explicit: never use it inside enclosed areas including patios, garages, buildings, or tents, and never use it inside or on recreational vehicles or boats. Even a covered patio counts as an enclosed area if the airflow is restricted. Set it up in open air with a minimum 10 feet (3 meters) of clearance from overhead structures, walls, and railings, and the same 10-foot minimum from combustible materials like dry grass, wood, or paper. Then check wind direction and position the propane cylinder downwind of the smoker so the vapor withdrawal system works correctly.
Hose and burner inspection
- Inspect the gas hose before every single use. Look for abrasion, cuts, worn spots, or any signs of a prior leak. If you find any of these, stop. Do not use the smoker until the hose is replaced.
- Inspect the burner and burner tube for insects and insect nests. This is a real and common problem, especially if the smoker has been sitting in storage. A blocked burner tube can redirect flame beneath the appliance.
- Confirm the regulator control knob is in the LOCK OFF position before connecting anything to the gas cylinder.
Soapy water leak test
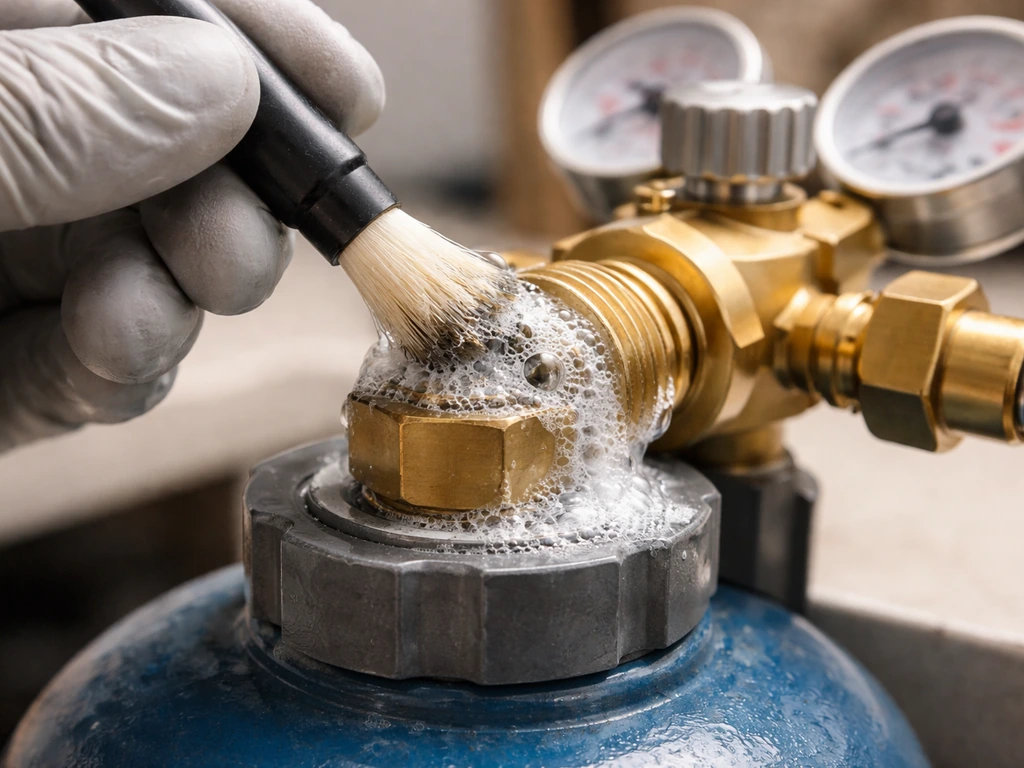
The manual includes a full soapy water test procedure and it should be done every time you connect a cylinder, not just the first time. Mix dish soap and water, apply it to three spots: underneath the regulator orifice connection, at the regulator orifice location itself, and at the junction between the gas cylinder and the regulator. Open the cylinder valve slowly and watch for bubbles. If you see bubbles at the hose or regulator connection, close the cylinder valve immediately and do not use the smoker. That connection needs to be replaced or corrected. If no bubbles appear, close the cylinder valve, wait a minimum of 5 minutes for any gas fumes to disperse, and then proceed to lighting.
Lighting and ignition: exactly what the manual says to do
The MPS 20B uses a push-button ignitor. Here is the step-by-step sequence from the manual's ignition instructions.
- Make sure the regulator control knob is in the OFF/LOCK OFF position.
- Connect the regulator to the cylinder: insert the regulator nipple into the cylinder valve outlet and turn the coupling nut clockwise by hand until it stops. Do not use a wrench and do not over-tighten.
- Slowly open the cylinder valve, then open it further by turning it one full additional turn.
- Set the regulator control knob to LOW or HIGH depending on your setup (the manual specifies based on tank size configuration).
- Press the ignitor button to light the burner.
- If the burner does not ignite within five seconds, turn the knob to LOW and then to OFF (knob will pop up). Open the smoker door and wait five full minutes before retrying.
- If the ignitor still does not light the burner after a second attempt, move to the match-light instructions in the manual.
Match-light backup procedure and flame check
For match lighting, the manual walks you through the same knob sequence but with a lit match held at the burner before turning on gas flow. Once the burner is lit, visually check the flame. A correct flame is blue with a small amount of yellow at the tip. An incorrect flame is excessively yellow and irregular, which points to a combustion problem, usually a blocked burner or an air-to-gas mixture issue. If you see an incorrect flame, shut off the gas, wait five minutes, and inspect the burner tube before retrying.
If the flame goes out mid-cook
Turn the regulator control knob to LOW, then to OFF (let the knob pop up). Open the smoker door and wait five minutes. Then repeat the full ignition sequence from step one. Do not try to relight immediately. That five-minute wait is there to clear any accumulated gas from the cooking chamber.
Won't light or won't stay lit: direct troubleshooting from the manual
The manual's troubleshooting table is well-organized. Here are the most common symptoms and what to do about each one.
Vapor lock at the cylinder connection (most common cause of 'won't light')
If you opened the cylinder valve quickly or the excess flow valve tripped, gas flow will be restricted and the burner won't light. The fix is a disconnect-and-reconnect sequence: turn the burner control knob to OFF, turn the cylinder valve to OFF, then disconnect the regulator completely to release the vapor lock. Reconnect the regulator by hand until tight. Then slowly open the cylinder valve and open it one full turn further. Turn the burner control knob to HIGH and try the ignitor again. This sequence resets the excess flow valve and clears the vapor lock.
Low flame or flame blows out
The manual lists three main causes: out of fuel entirely, low on LP gas, or the valve not being centered in the burner tube. Check your cylinder weight first. If gas is running low, refill or replace the cylinder. If the cylinder is full and the flame is still weak, shut everything down and check that the valve orifice is properly centered in the burner tube. A misaligned valve is a known assembly issue on this unit that causes slow cooking times and inconsistent temperatures.
Troubleshooting quick reference
| Symptom | Likely Cause | Manual's Fix |
|---|---|---|
| Ignitor clicks but won't light | Vapor lock or excess flow valve tripped | Disconnect regulator, reconnect slowly, reopen cylinder valve one full turn |
| Flame blows out during cook | Low LP gas or vapor lock | Refill cylinder; reset vapor lock via disconnect/reconnect sequence |
| Weak or yellow flame | Blocked burner tube or misaligned valve orifice | Inspect and clean burner tube; check valve centering in tube |
| Fire in burner tube (flashback) | Blockage in burner or burner tube | Shut off all knobs and cylinder valve; clean burner and tube before reuse |
| Grease fire / continuous flame | Grease buildup around burner | Shut off burner knob and cylinder valve; let flames die; clean grease from burner area |
Temperature control, cooking performance, and setup mistakes to avoid
The MPS 20B controls temperature through a combination of the regulator control knob and the air dampers on the unit. The manual is clear that you need all three tools working together: smoker settings, regulator control knob, and air dampers to hit a consistent cooking temperature. Before loading any food, preheat the smoker for 30 to 45 minutes at max temperature. Skipping this step is one of the most common reasons people get inconsistent results on their first cook.
Air damper settings
Close all air dampers when you want to retain moisture and heat (most low-and-slow cooking falls here). Open the dampers when cooking fish or jerky to release moisture and firm up the texture. The air dampers get very hot during operation and stay hot during cooldown, so wear heat-resistant gloves any time you adjust them.
Getting wood chips to smoke on a low setting
If your wood chips or chunks won't start smoking at the low temperature you want to cook at, the manual has a specific fix: increase the temperature to 275 degrees first. Wait 8 to 10 minutes, or until the chips begin to smolder. Then reduce back to your target low temperature. This is the correct sequence, not a workaround.
Setup mistakes that wreck cooking performance
- Overloading the racks traps heat, extends cooking time, and causes uneven results. Leave space between food and the smoker walls for proper air circulation.
- Placing food off-center on the racks causes drippings to miss the water bowl and land on the burner area, leading to flare-ups and grease buildup.
- Covering racks with aluminum foil is explicitly forbidden in the manual. It traps heat and can physically damage the unit.
- Not rotating racks between top and bottom positions during a long cook leads to uneven doneness. The manual specifically recommends swapping rack positions.
Parts-level issues: gas flow, regulator, hoses, igniter, and valves
Once you've ruled out user-side issues like vapor lock and low fuel, it's time to look at the individual components. Here's how the manual addresses each one.
Regulator and hose
Gas leaking between the LP cylinder and the regulator connection usually comes down to one of three things: the connection wasn't tight enough, there's thread damage, or the rubber seal inside the coupling is damaged or missing. Shut off the cylinder valve, disconnect the regulator, and visually inspect the rubber seal for cracks or deformation. If the seal looks fine, reconnect and hand-tighten fully. If the seal is damaged, you need a replacement regulator assembly before using the smoker again. For a cracked or cut hose, the answer is straightforward: replace the hose. The manual has no 'repair and continue' option for a compromised hose.
Igniter
If the ignitor clicks but produces no spark, first check that the electrode tip is positioned correctly relative to the burner. A gap that's too wide or a tip covered in grease or carbon buildup will prevent a reliable spark. Clean the electrode tip with a dry cloth. If clicking produces no spark at all, the ignitor module itself may have failed. In that case, match lighting is your operational workaround while you source a replacement part from Masterbuilt.
Valve alignment and burner tube blockage
The MPS 20B's manual flags valve alignment as a real failure point. If the valve orifice is not centered in the burner tube after assembly or reassembly, you'll get low flame output and slow cooking times that don't match the temperature setting. Shut everything down, disconnect the gas, and physically check that the valve is centered in the burner tube opening. On the blockage side, a burner tube clogged with insect nests or debris causes flashback, where the flame travels back into the tube rather than burning at the burner head. Clean the tube with a soft brush or compressed air before reuse.
No thermocouple on this unit
Unlike many propane patio heaters that use a thermocouple as a safety shutoff (a component that keeps the gas valve open only while it senses heat), the MPS 20B manual does not reference a thermocouple-based safety device as part of the ignition or stay-lit circuit. The safety logic here is primarily handled by the regulator's excess flow valve and the user-operated shutoff sequence. If you're used to troubleshooting thermocouple failures on propane patio heaters, that diagnostic branch doesn't apply here the same way.
Cleaning, maintenance, and storage
The manual states 'CLEAN AFTER EVERY USE' in capital letters, and it means it. Neglecting cleaning on a propane smoker leads to grease fires, mold, blocked burner tubes, and corrosion that shortens the unit's life significantly.
After each cook
- Rack supports, racks, water bowl, and drip pan: wash with mild dish detergent, rinse thoroughly, and dry completely before storing.
- Wood chip tray: clean frequently to remove ash, residue, and dust buildup. Accumulated ash restricts airflow and affects smoking performance.
- Interior, exterior, and door seal: wipe down with a damp cloth only. No cleaning agents on these surfaces. Dry thoroughly to prevent rust.
- Grease tray: check it often during cooking and empty it before it gets full. On long cooks, you may need to empty it more than once mid-session.
Ash disposal
Wait until ashes are completely cold. Wrap them in aluminum foil, soak with water, and discard in a non-combustible container. Never store the smoker with hot ashes still inside.
Rust prevention and long-term upkeep
The manual recommends curing the smoker periodically to prevent excessive rust, not just on first use. If the smoker has been sitting for a season or went into storage without a proper post-season clean, run a cure cycle before your first cook back. This seasons the interior surfaces and burns off any moisture or contamination that built up during storage. Store the unit in a dry location with the propane cylinder disconnected and removed.
Assembly walkthrough and when to stop DIY
Regulator-to-cylinder connection (the step most people rush)
Before connecting to any cylinder, confirm the regulator control knob is locked in the LOCK OFF position. If you also need Char-Broil patio bistro 240 assembly instructions, follow the steps for your exact model and keep hardware organized as you go assembly walkthrough. Insert the regulator nipple into the cylinder valve outlet. Turn the coupling nut clockwise by hand until it stops. The manual explicitly says not to use a wrench and not to over-tighten. After connecting, run the soapy water test described earlier before doing anything else. This connection step is where vapor lock and excess flow valve trips most often originate, and it's almost always because the cylinder valve was opened too fast after a rushed connection.
Valve-to-burner tube alignment check
If you've disassembled and reassembled any part of the burner assembly, verify that the valve orifice is centered in the burner tube before reconnecting gas. This is a step the manual calls out specifically as a cause of low flame output and uneven cooking. It takes thirty seconds to check and saves hours of frustrating troubleshooting later.
When to stop and get service or parts
There are clear stopping points in the manual where DIY ends and you need to either replace a part or contact Masterbuilt directly. Here's when to stop:
- The soapy water test shows bubbles and you cannot stop the leak by reseating the regulator and inspecting the rubber seal. Do not use the smoker. Call Masterbuilt for parts or service.
- The gas hose shows any abrasion, cuts, or signs of wear. Replace the hose before using the unit. This is a non-negotiable stop point.
- A gas leak cannot be stopped after shutting off the cylinder valve. Leave the area, do not attempt to relight, and contact the fire department if gas continues to release.
- The regulator rubber seal is visibly damaged and you don't have a replacement. Order the correct part from Masterbuilt before operating.
- Repeated ignition failure after completing the full vapor lock reset sequence and match-light attempt still produces no flame. At that point, the issue is likely a hardware component (ignitor module, orifice, or valve) that needs replacement.
- You suspect internal valve damage or a bent/damaged regulator body. These are not DIY-repairable components on this unit.
For parts, contact Masterbuilt directly using your model number (MB20050116, MB20050516, or MB25050416) as the reference. For warranty questions, have your purchase date and proof of purchase ready. The manual's emergency table also directs you to return or replace the LP cylinder itself if the leak source turns out to be a faulty cylinder rather than the smoker's components, that's a cylinder retailer or propane supplier conversation, not a Masterbuilt one.
If you're also working through similar propane or electric appliance documentation for other outdoor cooking equipment, the same model-verification approach applies across brands. If you are trying to figure out how to use Char-Broil Patio Bistro, use the same basic approach of confirming your exact model and following its manufacturer instructions before troubleshooting or operating it. If you are dealing with a Char-Broil electric patio caddie manual, make sure you verify the exact model number before following any troubleshooting or setup steps propane or electric appliance documentation. Confirming the exact model number before pulling a manual is always the first step, whether you're looking at a Masterbuilt propane smoker or a Char-Broil electric patio appliance. If you're using a Char-Broil patio bistro electric grill instead, make sure you follow the specific Char-Broil electric grill manual for your exact model Char-Broil electric patio bistro grill manual.
FAQ
What should I do if the soapy water test shows bubbles anywhere on the regulator or hose?
If the soapy bubble test shows bubbles at any connection, do not attempt to light the smoker. Close the cylinder valve, disconnect the regulator, and identify the exact leak point (regulator-to-hose, regulator orifice area, or cylinder coupling seal). The manual’s guidance is to replace compromised parts, for example a damaged rubber seal or a cracked hose, because “repair and continue” is not supported for hose failures.
Do I need to run the soapy water leak test every time I reconnect the propane cylinder, or only the first time?
Yes. The manual’s key safety steps (disconnect, reconnect carefully, and use the slow cylinder valve opening) still apply even if you are reusing the same cylinder. If you skip the full soapy water check on a later refuel or reconnection, you can miss a damaged seal or thread damage that may have occurred after transport or previous disconnecting.
My ignitor clicks but won’t light. What checks should I do before assuming the ignitor module is broken?
If the ignitor clicks but you get no spark, first confirm the electrode tip position relative to the burner and remove grease or carbon buildup from the tip. If there is still no spark after cleaning and confirming placement, the ignitor module may have failed, and the manual recommends match lighting as the temporary way to operate until you replace the ignitor part.
After I see an incorrect flame, how long should I wait before trying to relight, and what should I inspect?
Do not relight immediately. The manual instructs waiting at least five minutes after shutting off gas, because unburned propane can accumulate in the cooking chamber. Then you should inspect the burner tube for issues such as blockage, and only after that repeat the full ignition sequence.
How can I troubleshoot uneven cooking temperatures on the MPS 20B?
Start with air damper and regulator setup for temperature control, then use the preheat guidance. If temperatures are inconsistent, confirm all three elements are aligned: the smoker set temperature, the regulator knob position, and the air damper position. Also confirm the smoker is preheated for 30 to 45 minutes at max before the first food load, since skipping preheat commonly causes early swings.
What is the correct process if my wood chips or chunks won’t start smoking at my low cooking temperature?
If wood chips are not smoking at a low setting, the manual’s sequence is to raise temperature to about 275 degrees first, wait 8 to 10 minutes until chips begin to smolder, then reduce back to your target low temperature. Avoid the common mistake of trying to force smoke at the low temp from the start, which often fails to generate smoldering smoke.
When do I need to re-check valve-orifice centering on the burner tube?
Treat valve alignment as an assembly check anytime the burner assembly or gas components are disturbed. After disassembly or reassembly, physically confirm the valve orifice is centered in the burner tube opening before reconnecting gas, because misalignment causes low flame output and slower-than-expected cooking even when the temperature knob is set correctly.
My flame looks weak and cooking is slow, but the cylinder isn’t empty. What are the most likely causes besides low fuel?
If low flame output or slow cooking happens and you have enough fuel, the manual points to valve alignment and burner tube blockages as common culprits. Also look for a blocked burner tube caused by debris or insect nests, and clean the tube with a soft brush or compressed air before reuse to prevent flashback.
I’m used to propane patio heaters with thermocouples. Does the MPS 20B use the same kind of safety shutoff mechanism?
Don’t rely on “thermocouple style” troubleshooting. The MPS 20B manual does not use a thermocouple-based safety shutoff in the ignition or stay-lit circuit the way some propane patio heaters do, so if you’re troubleshooting like a heater, that branch will usually lead you astray. Focus instead on regulator excess flow behavior, burner ignition sequence, and leak testing.
What should I do if I accidentally opened the cylinder quickly and the burner won’t get gas?
If excess flow trips after quickly opening the cylinder valve, the fix is to reset the gas flow path: set burner control to OFF, set cylinder valve to OFF, disconnect the regulator completely to release vapor lock, reconnect by hand until tight, then slowly open the cylinder valve one full turn further before attempting ignition again.
Are the air dampers safe to adjust during or right after cooking?
Use heat-resistant gloves because the air dampers become extremely hot during operation and remain hot while cooling. If you adjust dampers, do it cautiously, avoid touching hot metal surfaces, and only change damper positions when the unit is safe to handle.
Can I use the MPS 20B under a covered patio or in an enclosed outdoor space?
Yes. The manual specifies outdoor household use only, and a covered patio can still count as an enclosed area if airflow is restricted. If you cannot set up in open air with proper clearance, do not operate the smoker there, because restricted airflow increases risk.
What is the safest way to dispose of ashes and store the smoker afterward?
After cooking, let ashes cool fully, then wrap them in aluminum foil, soak with water, and discard in a non-combustible container. Never store the smoker with hot ashes inside, and avoid removing or dumping ashes while they are still hot to prevent accidental ignition or damage to surfaces.