Most gas patio heater problems come down to three culprits: the regulator isn't delivering the right pressure, the valve is stuck or malfunctioning, or something upstream (the tank, hose, or connections) is starving the whole system of fuel. You can diagnose and often fix all three today with basic tools, a soap solution, and this guide.
Patio Heater Problems: Fix Valve and Regulator Issues

Grant Mercer
5 May 2026
Stop here first: quick safety steps before you touch anything
Before you start pulling connectors or turning knobs, do these things in order. Close the propane tank valve by turning it fully clockwise. Wait at least five minutes for any gas that escaped to disperse. Do this outdoors or in a well-ventilated space only. Never troubleshoot a patio heater indoors or in an enclosed garage.
If you smell gas at any point during your inspection, stop immediately. Do not attempt to light the heater. Extinguish any open flames nearby. Open the tank valve only enough to do a soap-solution leak test later, and do not relight the unit until you've found and fixed the source. These aren't optional steps. Propane is heavier than air and pools at floor level, which makes enclosed or semi-enclosed spaces genuinely dangerous.
Know when to call a professional. If you find a cracked hose, a connector that keeps leaking even after tightening, a valve that hisses with the knob in the OFF position, or any damage to the regulator body, stop the repair and call a licensed technician. The part costs on regulators and valves are low enough that replacement is usually the right call anyway, but installation on a compromised fitting is not a DIY job.
Figure out what your heater is actually doing
Before you can fix the problem, you need to match your symptom to the likely component. The behavior of the heater tells you a lot about where to look. Here's how to read the clues:
| Symptom | Most Likely Cause | Where to Start |
|---|---|---|
| Heater won't light at all, no gas smell | Excess-flow valve triggered, regulator not set, tank empty | Tank valve and regulator check |
| Heater lights but goes out within seconds | Thermocouple not heated, safety control valve, or low pressure | Thermocouple and valve check |
| Weak or lazy orange flame | Low gas pressure, wrong regulator, partially blocked orifice | Regulator pressure and orifice check |
| Flame pops on and off, inconsistent heat | Kinked hose, regulator icing, intermittent valve issue | Hose, regulator, and valve check |
| Flame normal but heater won't stay lit in wind | Thermocouple positioning, wind direction | Thermocouple and placement check |
| Hissing sound with valve off | Leaking valve seat or cracked connector | Stop and leak-test everything now |
The key distinction you're trying to make is this: is the problem upstream of the valve (tank, hose, regulator supplying wrong or zero pressure) or is it the valve itself (not opening, not holding, or damaged internally)? A heater that gets no gas at all points upstream. A heater that gets gas but can't maintain flame or has erratic flow often points to the valve or thermocouple. A heater with a weak, undersized flame usually points to the regulator.
Check the tank, hose, and connections before anything else
The most common reason a patio heater suddenly stops working isn't a broken part at all. It's something simple upstream. Work through this checklist first before touching the regulator or valve.
Is there actually propane in the tank?
It sounds obvious, but a partially empty tank can produce exactly the same symptoms as a broken regulator. Pour warm (not hot) water down the side of the tank and feel for a temperature change with your hand. The line where it goes cold is roughly the fuel level. If the tank feels uniformly warm all the way down, it's empty or near empty. Refill or swap it before continuing.
How you opened the tank valve matters
This one trips up a lot of people. If you opened the propane tank valve quickly or fully in one fast turn, you may have activated the excess-flow safety device built into the tank. This is a safety feature that detects a sudden pressure spike (like a wide-open valve being opened fast) and reduces or cuts off flow entirely. The fix is simple: close the tank valve completely, disconnect the regulator from the tank, wait 30 seconds, reconnect, then open the tank valve slowly and fully. Take about five seconds to open it completely. Once it's all the way open, the excess-flow valve should reset and flow should resume normally.
Inspect the hose and all connections
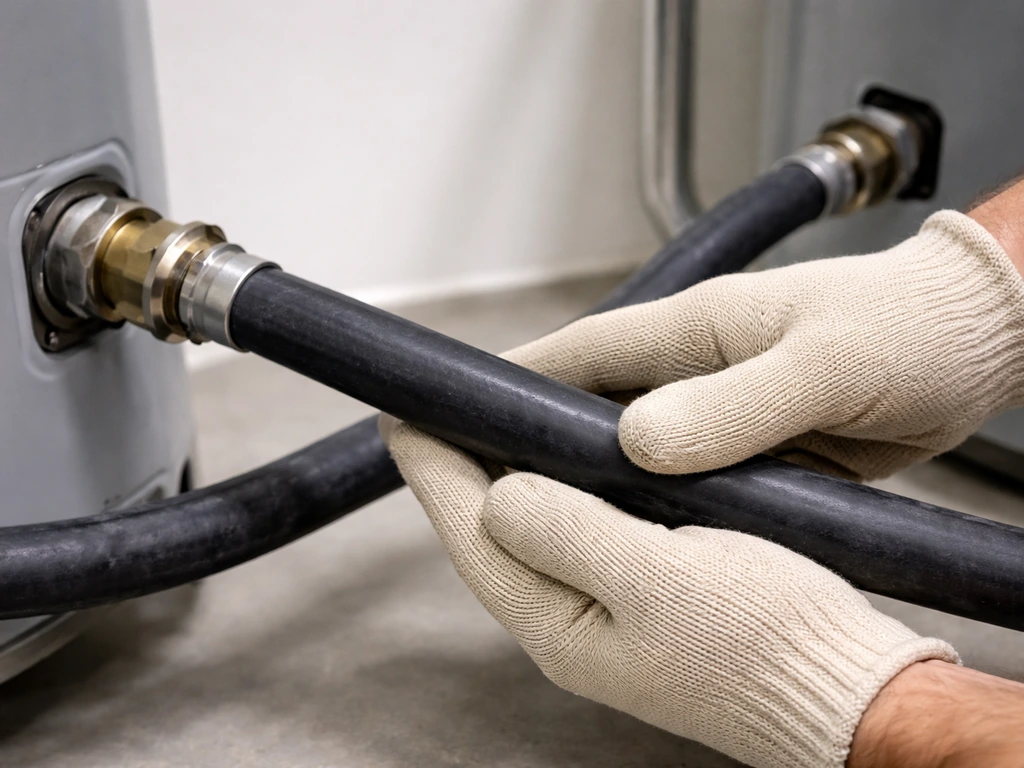
Run your hand along the entire length of the supply hose from the tank connection to where it enters the heater body. Feel for any kinks, sharp bends, or sections that are pinched against a leg or base. A kinked hose can restrict flow enough to cause a weak flame or prevent lighting altogether. Straighten any bends and try again.
While you're at it, check the hose surface carefully for cracks, brittleness, or scorch marks. Rubber hoses degrade over time, especially with UV exposure and heat cycling. If the hose feels stiff, cracked, or shows any visible damage, replace it before continuing. It's a cheap part and not worth the risk.
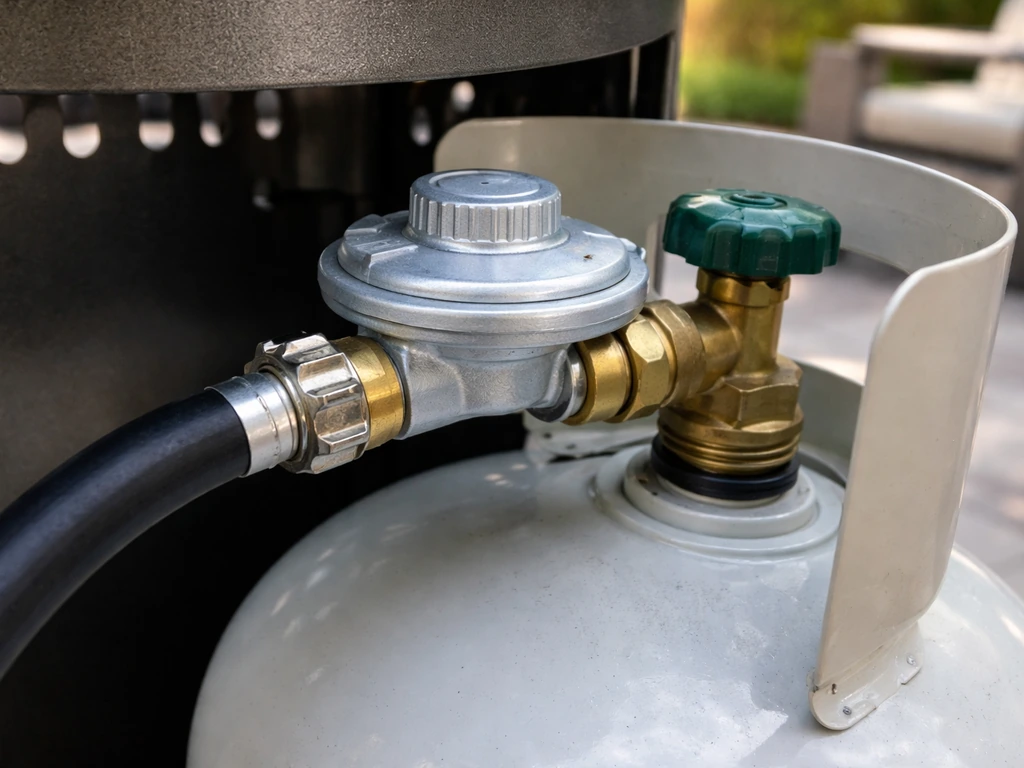
Check how the regulator connects to the tank
There are two main fitting types you'll encounter. The modern Type 1 (also called QCC1) fitting has a large handwheel and right-hand threads, meaning you tighten it clockwise by hand. The older POL fitting has internal left-hand threads and requires a wrench to tighten, turning counter-clockwise to attach. Using the wrong fitting type or cross-threading either one is a common source of leaks and restricted flow. Make sure the fitting is snug and correctly matched to your tank's outlet.
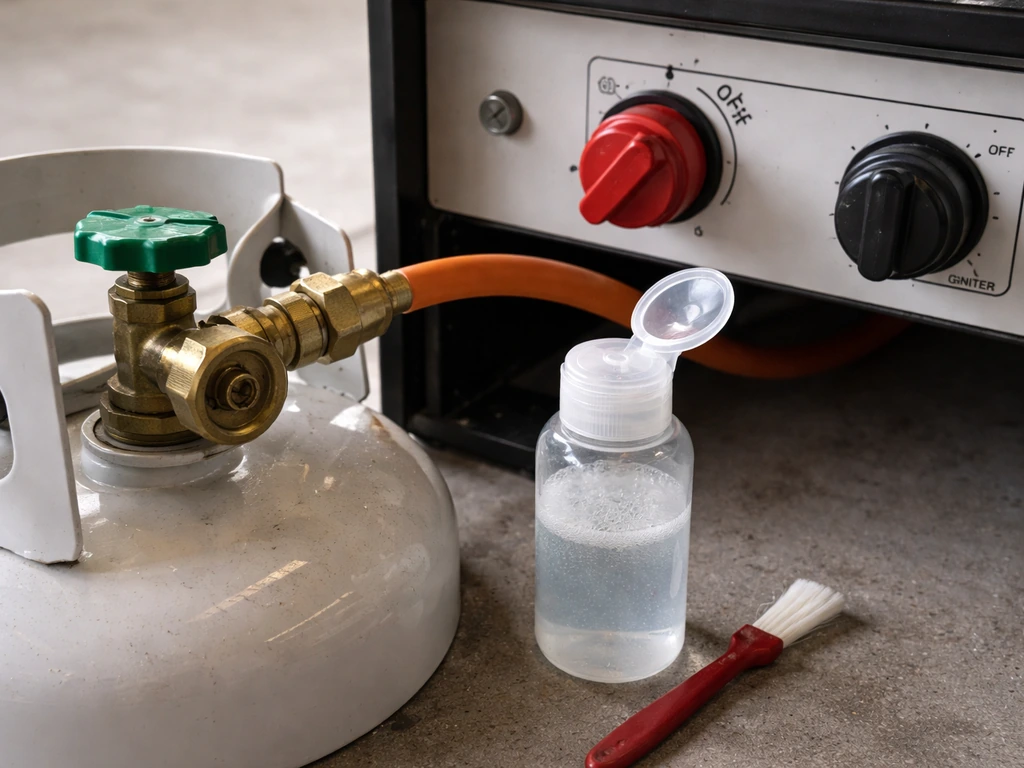
Once the regulator is connected and the tank valve is open, do a soap leak test on every connection point. Mix one part dish soap with one part water, apply it generously to each fitting with a brush or rag, and watch for bubbles. Bubbles mean gas is escaping. Tighten the connection and retest. If bubbles persist after tightening, that fitting or connector needs to be replaced, not just tightened harder.
Troubleshoot the regulator: pressure, icing, and wrong type
The regulator's job is to take the high-pressure propane from the tank (which can range from 25 to over 200 PSI depending on temperature and fill level) and reduce it to a safe, consistent low pressure that the heater's burner can use. Most propane patio heaters are designed to operate on low-pressure propane at 11 to 14 inches of water column (in. WC). That's a fraction of a PSI. If the regulator is delivering anything outside that range, the heater will behave badly.
Wrong regulator type
If you've replaced the regulator recently, or if someone swapped one in from a different appliance (a grill, a camping stove, a different heater model), there's a real chance the outlet pressure doesn't match what your heater needs. A regulator that outputs too low a pressure will give you a weak, orange, flickering flame. A regulator that outputs too high a pressure can cause a roaring, lifted flame or even damage the valve seat over time. Always verify the replacement regulator is rated for low-pressure propane at 11 in. WC output and is approved for your specific heater model. When in doubt, use the part number from your owner's manual or the label on the original regulator.
Regulator icing and vent obstruction
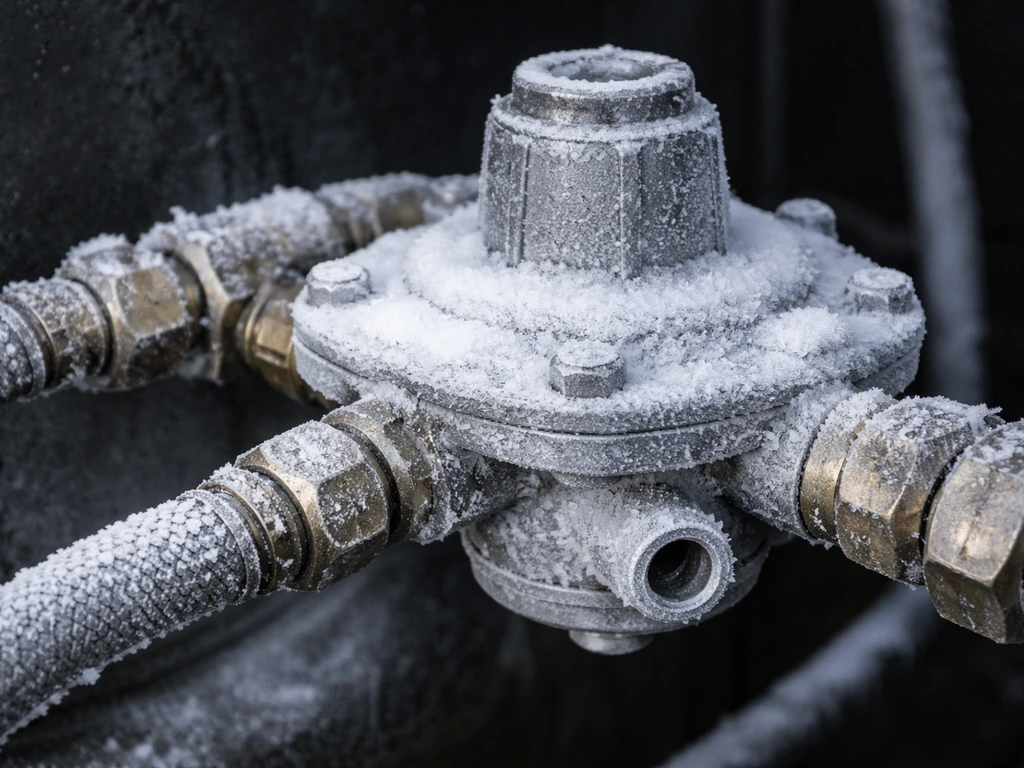
In cold weather or during heavy use, regulators can ice up. The pressure drop inside the regulator causes rapid cooling, and if ambient humidity is high enough, moisture in the gas or on the regulator body can freeze. You'll notice this as a sudden drop in flame height, sometimes going completely out, after the heater has been running for a while. The regulator body may feel unusually cold or show visible frost. The fix is simple: close the tank valve, let the regulator warm up to ambient temperature, and reopen slowly. Wrapping the regulator loosely in an insulating cover can help prevent this in consistently cold conditions.
Also check that the regulator's vent hole (a small opening on the side or underside of the regulator housing) is not blocked by dirt, spider webs, or debris. A blocked vent prevents the regulator from balancing atmospheric pressure against gas pressure, which causes it to under-deliver gas to the appliance. Use a toothpick or thin wire to clear the vent if it looks clogged, but do this with the tank valve fully closed.
Defective or worn-out regulator
Regulators don't last forever. The internal diaphragm can crack or lose flexibility, the spring can fatigue, and the valve seat can wear. Signs of a failing regulator include: gas flow that fluctuates even with a full tank and no changes to the knob setting, a regulator body that gets unusually warm during use, or a heater that worked fine last season and now produces a consistently weak flame with no other obvious cause.
If you suspect a patio heater fix is needed, failing regulator symptoms like fluctuating gas flow can point you to the root cause failed regulator include. If you've checked everything else and the symptoms still point to low or inconsistent pressure, replace the regulator. They're generally inexpensive, and at this point that's the right diagnostic move. Mr.
Heater's own troubleshooting logic says the same thing: if the tank valve is open, the regulator is set correctly, you're holding the safety shutoff open, and you still don't smell or hear gas, replace the regulator.
Troubleshoot the valve: flow control, stuck knob, and solenoid behavior
Once you're confident the regulator and supply line are delivering gas correctly, the valve is the next thing to examine. The valve controls gas flow to the burner, and in most patio heaters it's combined with or adjacent to a safety control valve that works with the thermocouple to keep the pilot lit. Problems here show up differently than regulator problems.
Valve stuck closed or restricted
If gas reaches the regulator outlet but nothing comes through to the burner, the valve may be stuck closed from corrosion, mineral buildup, or prolonged storage. Try turning the control knob through its full range: push in, turn to pilot, hold, then try igniting. If you get no gas smell and no response from the flame, and the regulator tests fine, the valve body itself may be seized. In some cases, working the knob through its range several times loosens minor corrosion. If it stays stuck or feels gritty and mechanical, the valve needs replacement, not further forcing.
Valve won't hold the pilot lit
This is one of the most common patio heater complaints. You hold the knob down, the pilot lights, you release it after 30 to 45 seconds, and the pilot immediately goes out. This is almost always the thermocouple-to-safety-valve circuit, not the valve itself. If your patio heater will not stay lit, the cause is often the thermocouple-to-safety-valve circuit that keeps shutting off after the pilot warms up.
The thermocouple needs to be hot enough from the pilot flame to generate a small electrical signal (around 20 to 30 millivolts) that tells the safety control valve to stay open. Wikipedia notes that in millivolt control systems, the thermocouple heated by the pilot flame generates signal power that helps keep the gas safety valve open [thermocouple needs to be hot enough from the pilot flame to generate a small electrical signal (around 20 to 30 millivolts)](https://en.
wikipedia. org/wiki/Thermocouple). If the thermocouple connection to the valve is loose, corroded, or the thermocouple itself is failing, the valve sees no signal and snaps shut. Tighten the thermocouple nut at the valve body (hand-tight plus a quarter turn with pliers), retest.
If it still won't hold, replace the thermocouple first before replacing the valve, since it's the cheaper part and the more common failure point.
Control knob damage or solenoid issues
Some higher-end patio heaters use an electric solenoid valve that opens and closes based on a switch or thermostat signal. If the solenoid is faulty, gas won't flow even if everything else is working. Check for continuity across the solenoid terminals with a multimeter if you're comfortable using one. No continuity means the solenoid coil is open and needs replacement. On simpler knob-operated valves, physical damage to the knob or a snapped internal stem can prevent the valve from opening. If the knob spins without resistance or feels loose in a way it didn't before, the stem is likely broken inside the valve body. The valve assembly needs to be replaced.
Check the orifice while you're here
The orifice is a small brass fitting with a tiny drilled hole that meters gas flow from the valve to the burner. Spider webs and insect nests are the number one cause of blocked orifices on patio heaters that have been stored for a season. Remove the orifice (it usually unscrews from the valve outlet or burner tube) and hold it up to light. You should see a clean, round hole.
If it's blocked, use compressed air from the outlet end to clear it. Never use a wire or drill bit to ream out the hole as this changes the gas flow rate. If it's damaged or corroded, replace it. If you determine the top heater assembly is the failed part, follow the same replacement logic and choose the correct patio heater top replacement for your model.
Decide: clean it, replace the part, or replace the heater
Once you've worked through the diagnostics above, you should have a pretty clear picture of which component is the problem. Here's how to decide what to do next.
| Problem Found | Clean or Adjust | Replace the Part | Replace the Heater |
|---|---|---|---|
| Kinked or cracked hose | Straighten if kinked, no cracks | Yes, if any cracks or brittleness | No |
| Excess-flow valve triggered | Reset by closing/reopening slowly | No | No |
| Blocked orifice | Yes, compressed air or replacement | If corroded or damaged | No |
| Regulator icing | Warm up, insulate, clear vent | If recurring or diaphragm failed | No |
| Wrong regulator type/pressure | No | Yes, match to heater spec | No |
| Thermocouple not holding valve open | Tighten connection first | Yes, thermocouple or valve | No |
| Valve stuck or knob broken | Try cycling knob a few times | Yes, valve assembly | If unavailable or heater is old |
| Solenoid coil open | No | Yes, solenoid or valve assembly | If parts are discontinued |
| Multiple failed components on old unit | No | Maybe not worth it | Yes, consider replacement |
As a general rule: if the heater is less than five years old and you've identified a single failed component with a part available under $40, repair it. If the heater is older, parts are hard to find, or multiple components are failing at once, replacement is often the smarter call. A patio heater that keeps having gas-control issues is trying to tell you something. Issues like these are also explored in more detail in guides covering why a patio heater will not stay lit and how to approach a broken patio heater holistically.
Reassembly, leak checks, and making sure it doesn't happen again
Once you've replaced or cleaned the faulty component, don't just fire the heater back up. Reassemble carefully and do a full leak test before igniting anything.
- Reconnect the regulator to the tank, making sure the fitting type matches (Type 1/QCC1 hand-tightened clockwise, or POL wrench-tightened counter-clockwise). Don't overtighten either one.
- Reconnect the hose to the heater body and hand-tighten the fitting, then snug it with a wrench. Do not use PTFE tape on flare fittings as it can interfere with the metal-to-metal seal.
- If you replaced the thermocouple, reconnect the thermocouple nut to the safety valve body, hand-tight plus a quarter turn with pliers.
- Slowly open the tank valve fully over about five seconds.
- Apply soap solution (one part dish soap, one part water) to every connection: tank fitting, both ends of the hose, the valve body inlet, and the orifice fitting. Watch for 30 seconds.
- If you see bubbles anywhere, close the tank valve, tighten the leaking connection, and retest. If bubbles continue after tightening, replace that fitting or connector.
- If no bubbles, proceed to light the heater per the manufacturer's procedure.
Test the flame
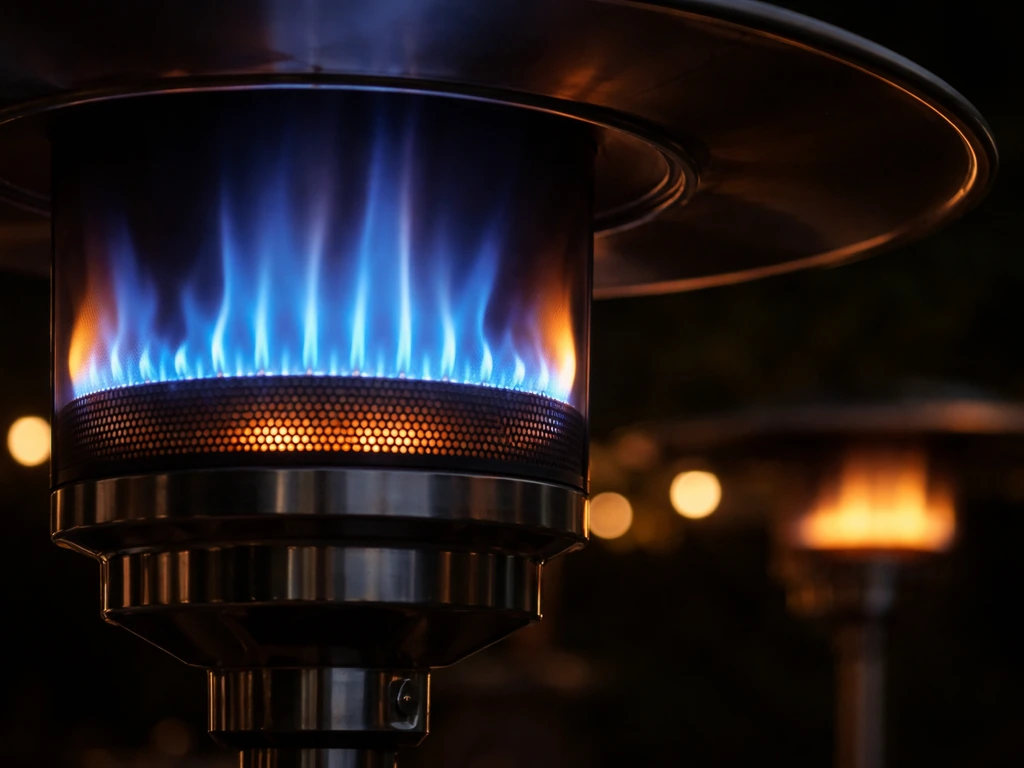
A healthy propane flame on a patio heater should be predominantly blue with yellow tips at the outer edges. A mostly yellow or orange flame means incomplete combustion, which usually signals low gas pressure, a blocked orifice, or a regulator that's not delivering enough flow. A flame that lifts off the burner and seems to float or roar suggests pressure is too high. If the flame looks wrong after your repair, recheck the regulator type and pressure rating before using the heater.
Prevent this from happening next season
Most patio heater valve and regulator problems are caused by storage: moisture, insects, and UV degradation during the off-season. At the end of each season, close the tank valve and let the heater run until the residual gas burns off. Disconnect the hose and regulator from the tank, and store the heater covered or indoors. Before storing, spray the burner, orifice area, and pilot assembly with a short burst of compressed air to clear any debris.
At the start of each season, inspect the hose visually, do a soap leak test before the first use, and open the tank valve slowly. These five minutes at the start and end of each season will prevent the majority of the problems covered in this guide.
If your heater has a specific brand-related quirk or a recurring issue that comes back even after these repairs, it may be worth looking at brand-specific guides. If you’re specifically seeing firestorm patio heater problems, use the same regulator, valve, and leak-check steps, then match the symptoms to the Firestorm model’s known issues. Certain models have known failure patterns that go beyond the standard valve-and-regulator checks, and addressing those directly saves a lot of repeat troubleshooting.
FAQ
My patio heater lights the pilot but won’t stay lit, what should I check first?
A weak pilot can be caused by low output pressure, a dirty orifice, or a thermocouple issue. If the pilot lights but won’t stay lit, focus on the thermocouple-to-safety-valve connection first (tighten and check condition) rather than replacing the valve, since the thermocouple is typically cheaper and fails more often.
What if I still smell propane after turning the heater off?
Yes, even if the heater “seems” off, treat any lingering gas as a risk. If you smell propane after turning the knob to OFF, close the tank valve immediately and do not attempt relighting until you complete a fresh soap leak test on every connection and replace any part that keeps bubbling after tightening.
Can I clean a clogged patio heater orifice with a wire or drill bit?
Don’t use any cleaning tool to ream the orifice. If webs or insects are the cause, clearing from the outlet end with compressed air is the safe move. If the orifice hole is corroded, widened, or you cannot confirm it is a clean round opening, replacement is safer than repeated “clearing.”
I did a soap test and bubbles persist even after tightening, what does that mean?
If you see bubbles at the hose-to-regulator or regulator-to-tank joints, tightening often fails if the connector is worn or the seal is damaged. Persistent bubbles after tightening means the specific connector or fitting needs replacement. Also check that the correct tank fitting type matches your regulator (Type 1/QCC1 vs POL) to avoid cross-threading that causes intermittent leaks.
My heater won’t start after I opened the tank valve quickly, how do I reset it?
To reset the excess-flow safety device, close the tank valve completely, disconnect the regulator, wait about 30 seconds, reconnect, then open the tank valve slowly, fully, over about five seconds. If the heater still won’t feed gas, the issue is likely upstream of flow (kinked hose, blocked vent on the regulator, or an empty/near-empty tank).
Why does my flame drop after the heater runs for a while in cold weather?
Freezing or icing is common during cold snaps and high humidity. If the flame drops after running for a while and the regulator feels very cold or shows frost, close the tank valve, let the regulator return to ambient temperature, then reopen slowly. Wrapping the regulator loosely for insulation can help, but do not block its vent hole.
Could a blocked regulator vent cause patio heater problems, and can I clear it myself?
Yes. If the regulator vent is blocked, it cannot balance pressure correctly and can cause consistently low delivery and poor flame characteristics. Clear the vent only with the tank fully closed, and avoid using anything that could damage the regulator housing or vent geometry.
How do I know the right replacement regulator for my patio heater?
Use the heater’s required low-pressure specification, typically expressed as inches of water column (in. WC). A regulator rated incorrectly, or one swapped from another appliance, can cause either weak orange flames or overly strong roaring/lifting flames. Verify the replacement regulator’s output rating matches your heater model or the original regulator label/part number.
If I replaced the regulator, can the problem come back, and what should I re-check?
Sometimes. If multiple parts were exposed to insects or moisture during storage, you can get repeated gas-control issues that feel like “one problem.” If you already replaced one component and the symptoms return quickly, re-run the upstream checklist, then consider that the underlying failing part might be elsewhere (for example, thermocouple connection corrosion or a partially damaged hose).
My heater has no gas at the burner, how can I tell if it is the valve or something upstream?
If you have no gas flow to the burner but the regulator seems fine, the valve may be stuck closed due to corrosion or mineral buildup, or the knob mechanism may be damaged. A quick test is to carefully work the knob through its full range and see if you get any change. If the knob spins loosely or feels gritty and there is no gas response, the valve assembly likely needs replacement.
How should the flame look after a repair, and what flame colors point to what causes?
The flame color is a useful clue, but the decision point is what else you observed during diagnostics. Mostly yellow/orange plus weak performance usually points to low pressure or a blocked orifice, while roaring/lifting suggests too much pressure. If the flame looks wrong after a repair, stop and re-check regulator type/rating and confirm the orifice is clean before continuing use.
When should I stop troubleshooting and call a professional?
If the valve hisses with the knob in the OFF position, or you find cracked hoses, damaged regulator bodies, or connectors that keep leaking after tightening, stop DIY troubleshooting and call a licensed technician. Those symptoms indicate a compromised safety system or fuel pathway where replacement and installation quality matter.