If your patio heater won't stay lit, shuts off right after you release the knob, or won't ignite at all, the problem almost always comes down to one of three safety devices: the tilt switch, the thermocouple, or an overheat sensor. These aren't all the same thing, and replacing the wrong one wastes money and leaves you with the same dead heater. This guide walks you through figuring out which one is actually causing the problem, testing it properly, and fixing it yourself in most cases.
Patio Heater Safety Switch Troubleshooting and Testing Guide

Grant Mercer
21 May 2026
What a patio heater safety switch actually does
Your heater has at least two, and sometimes three, independent safety devices that can cut the gas and kill the flame. Understanding what each one does makes diagnosis a lot faster.
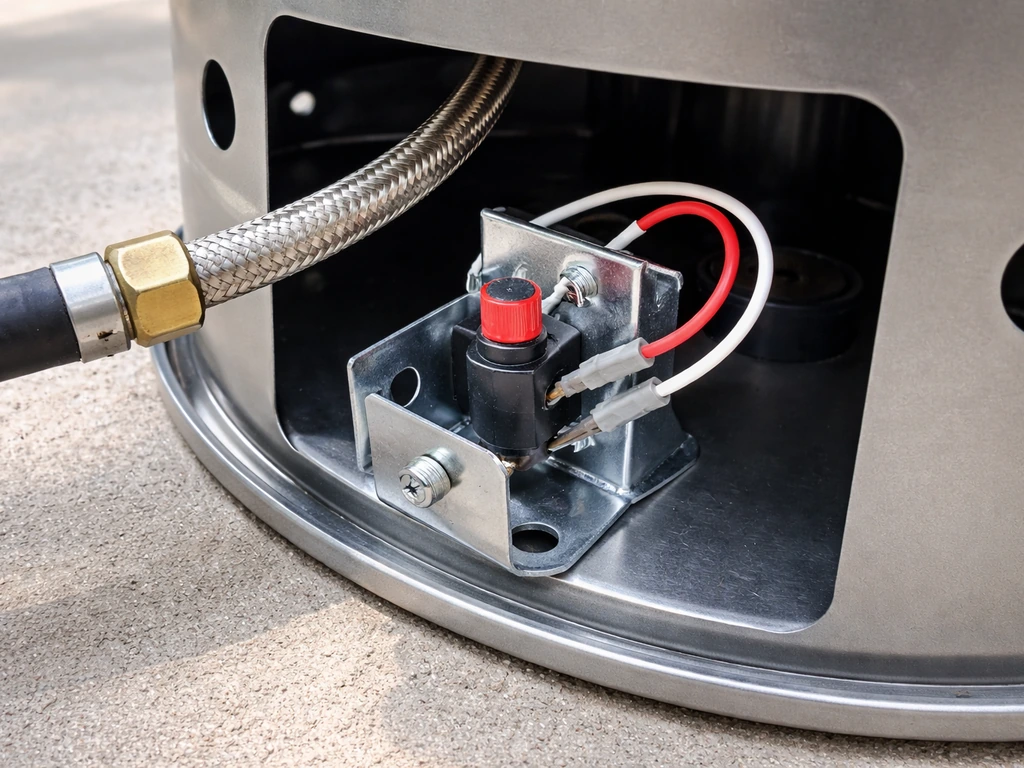
The tilt switch (also called a rollover switch) is a small mechanical or mercury-type sensor mounted inside the heater's base or housing. Its only job is to detect whether the heater is standing upright. If the heater tips past a set angle, the switch opens the circuit and shuts the gas valve. It's a fire-prevention device, pure and simple. The problem is that these switches can be sensitive enough to trip on a slightly uneven patio surface, even when the heater looks perfectly fine from the outside.
The thermocouple is a thin metal probe that sits in or near the pilot flame. When the pilot is burning, the heat generates a small electrical voltage, typically around 25 to 30 millivolts, that holds the safety gas valve open. If the pilot goes out, that voltage drops, the valve closes, and gas stops flowing. This is why you have to [hold the control knob in for 20 to 30 seconds](https://naturalgasfurnace.
us/how-does-a-patio-heater-thermocouple-work/) when lighting: you're giving the thermocouple time to heat up and generate enough signal to take over from your finger. If your patio heater turns off when the knob is released, the thermocouple is often the part that needs checking first. If the thermocouple is worn, mispositioned, or dirty, it won't produce enough millivolts, the valve closes the moment you release the knob, and the heater dies.
The overheat sensor (sometimes called a high-limit switch or thermal cutoff) is found on some heater models, especially enclosed or infrared types. It's a bimetallic or electronic sensor that trips when the internal temperature exceeds a safe threshold. Unlike the tilt switch, it usually resets automatically once the heater cools, but a heater in a tight corner, with blocked venting, or with restricted airflow can trip it repeatedly. If you have an overheat sensor or tilt switch shutdown, you may need to reset it after cooling before it will light again resets automatically once the heater cools. Some models have this sensor tucked inside the heat shield or reflector assembly where it's easy to miss during troubleshooting.
Common signs the safety switch or related sensor is failing
The symptom pattern matters because it tells you which component to check first. Here's what to look for:
- Heater lights, you hold the knob, then it shuts off the moment you release: this is almost always a thermocouple problem, either it's not generating enough millivolts, or it's not sitting in the pilot flame correctly.
- Heater won't light at all and clicking igniter produces no flame: could be a gas supply issue, a failed igniter, or a tilt switch that's open even when the heater is upright.
- Heater lights fine and then shuts off after a few minutes on its own: suspect the overheat sensor tripping, a thermocouple gradually losing output as it ages, or an inconsistent gas supply.
- Heater works indoors or on a flat surface but trips outside: classic symptom of a sensitive tilt switch reacting to a slightly uneven deck or patio.
- Heater suddenly stopped working after being bumped or moved: tilt switch is the first thing to check.
- Burning smell or smell of gas when trying to light: stop immediately. This is not a safety switch issue. Shut off the tank and don't attempt ignition.
How to diagnose a safety-switch shutdown, step by step
Work through these steps in order. Each one rules out a cause before you move to the next, so you don't end up replacing parts that aren't the problem.
Step 1: Check the basics first
Make sure the propane tank has gas in it and the valve is fully open. Check that the regulator hose isn't kinked or cracked. If the tank was stored in cold weather, let it warm to ambient temperature before testing. These aren't glamorous checks, but they eliminate a surprising number of 'safety switch' calls.
Step 2: Level the heater and isolate the tilt switch
Place the heater on a known-flat surface, like a concrete garage floor. Use a small bubble level on the base. Even a 2 to 3 degree lean can trip a sensitive tilt switch. Try igniting on a perfectly level surface before doing anything else. If the heater lights and stays lit on a flat surface but not on your patio, the surface is the problem, not a failed switch. Wano Co also notes that subtle rocking from an uneven patio or deck can trip a sensitive tilt switch, causing the gas to shut off even when the heater appears fine uneven patio surface can trip a sensitive tilt switch. Adjust the feet, add a leveling pad, or relocate the heater.
Step 3: Follow the correct ignition sequence
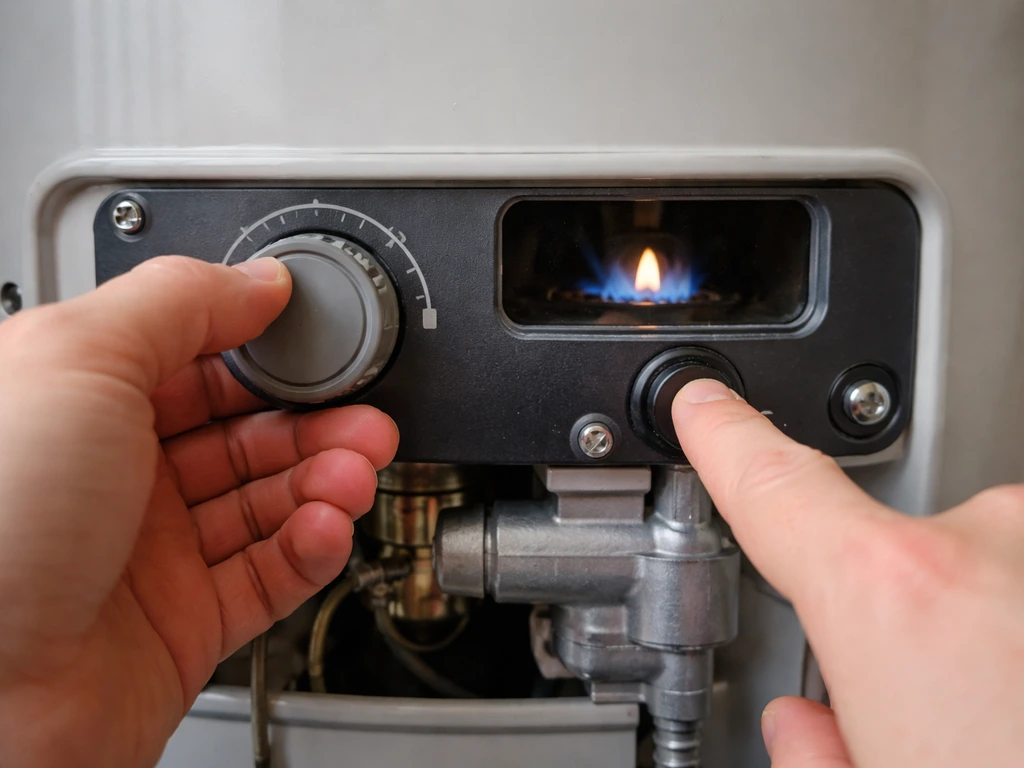
This sounds obvious, but a lot of 'safety switch failures' are actually ignition-sequence errors. Push the control knob in fully, turn it to the pilot position, press the igniter, and once the pilot catches, keep holding the knob in for a full 30 seconds. If your patio heater control knob sticks or won’t stay in position, follow the same thermocouple timing and inspection steps to ensure the safety circuit can hold the gas valve open. Count it out.
Releasing too early is the number one reason a thermocouple-equipped heater shuts off immediately. Many Desa/Desatech models specify exactly this 30-second hold in their manuals. If you've been releasing at 5 or 10 seconds, try the full 30 before diagnosing anything further.
Step 4: Observe the pilot flame
With the pilot lit and the knob held in, look at where the pilot flame is actually burning. It needs to be touching the thermocouple tip directly. A pilot flame that's blowing sideways, burning too low, or missing the thermocouple tip entirely won't heat the probe enough to generate sufficient millivolts. If the flame looks healthy and is squarely on the thermocouple tip, and the heater still shuts off after 30 seconds, the thermocouple itself is likely worn out. If the flame is off to the side or very weak, you may just need to reposition or clean the thermocouple and pilot assembly.
Step 5: Do a quick tilt-switch cross-wire test
If leveling doesn't fix the problem, you can temporarily bypass the tilt switch to confirm whether it's the culprit. Turn off the gas at the tank. Locate the two wires going to the tilt switch and disconnect them from the switch terminals. Use a short piece of wire or a paperclip to bridge those two terminals together (connecting the two wires directly, bypassing the switch).
Then turn the gas back on and try to light the heater. If it now lights and stays lit, the tilt switch is faulty and needs to be replaced. Important: this test is diagnostic only. Do not operate the heater with the tilt switch permanently bypassed.
A heater without a working tilt switch is a real fire hazard if it tips over.
Where the safety switch and sensors are located on different heater types
Location varies a lot depending on the heater design. Here's where to look on the most common types:
| Heater Type | Tilt Switch Location | Thermocouple Location | Overheat Sensor Location |
|---|---|---|---|
| Freestanding mushroom (propane) | Inside the base housing, near the gas valve or on the base plate | At the pilot burner assembly, midway up the pole or in the head unit | In the reflector/head assembly (if fitted) |
| Tabletop propane heater | In the base, sometimes under a removable bottom cover | At the pilot burner, inside the burner housing | Inside the burner housing or heat shield |
| Pyramid/tower heater | In the lower base unit | Inside the burner/flame column at the base of the flame tube | Rare, but sometimes in the control housing |
| Wall-mounted or infrared electric heater | Not applicable (no gas) | Not applicable | Inside the element housing, usually on the element bracket |
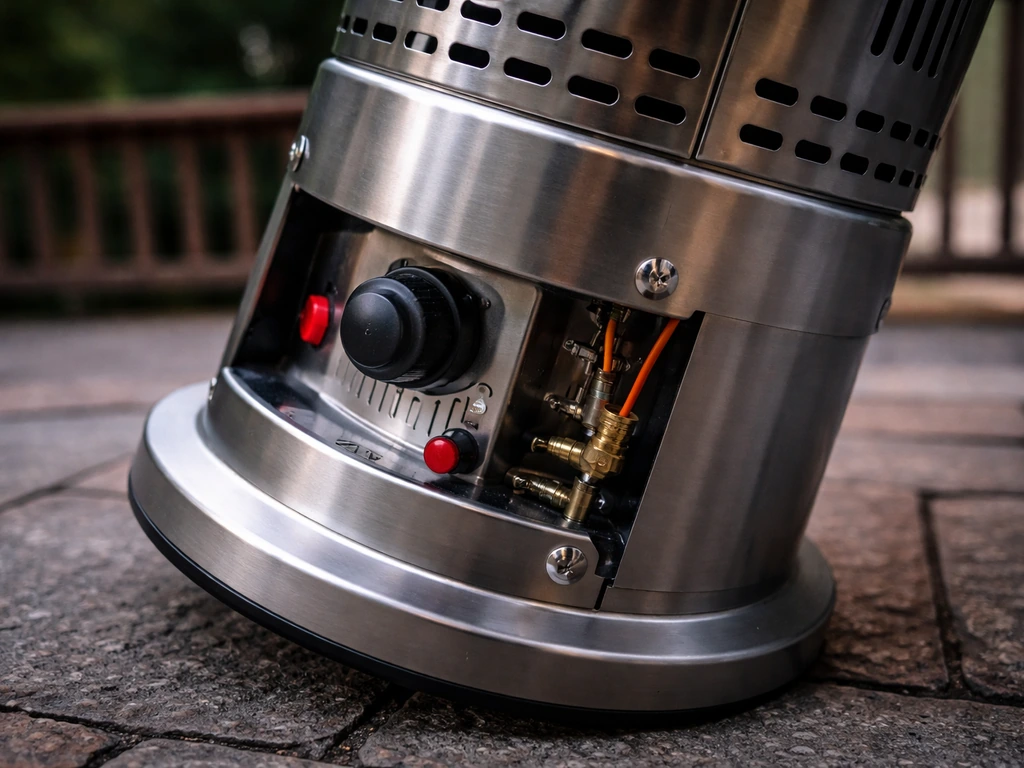
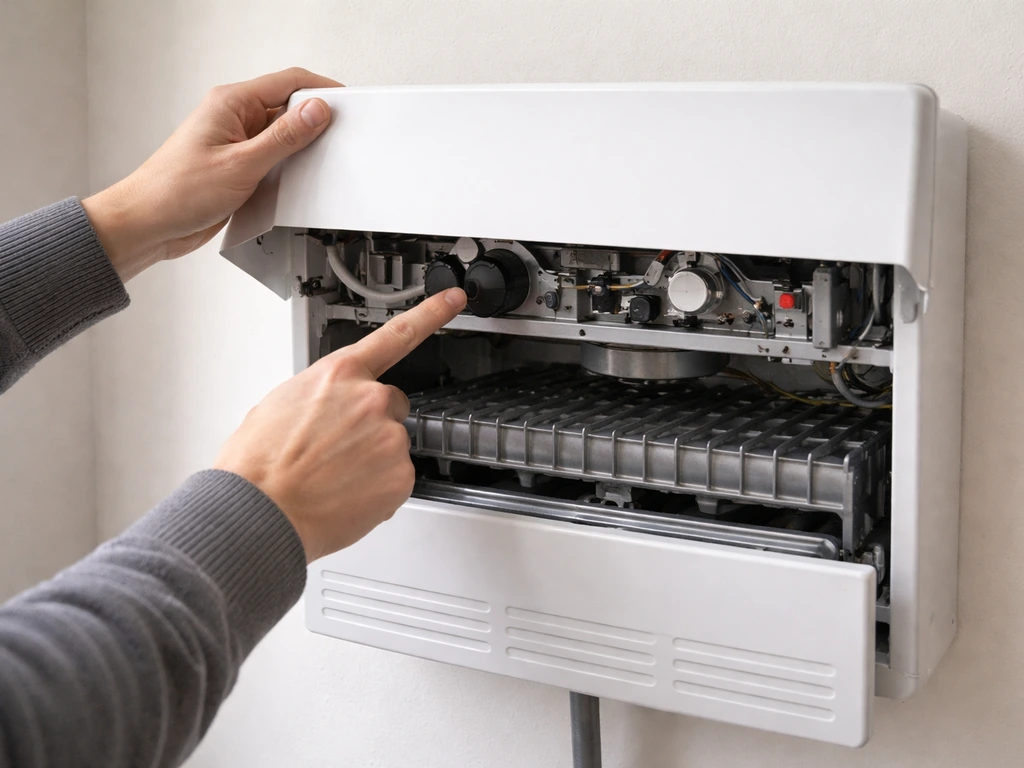
On most mushroom-style heaters, you access the tilt switch by removing 2 to 4 screws on the base cover. The switch itself is a small cylindrical or rectangular component with two wire leads. On tabletop models, the same switch is often mounted directly to the inner base frame and can be accessed from the underside. The thermocouple sits right next to the pilot burner orifice and looks like a thin metal rod with a copper or stainless tube body running to the gas valve.
Testing the switch and related parts
Testing the tilt switch with a multimeter
Turn off the gas and disconnect the propane tank before doing any electrical testing. Set your multimeter to continuity mode (the beep/diode setting). Disconnect the two wires from the tilt switch. Touch one probe to each terminal on the switch while the heater is sitting upright and level.
A working tilt switch in the upright position should show continuity (the multimeter beeps or shows near-zero resistance). Now tilt the heater to about 45 degrees and test again. It should open the circuit (no beep, 'OL' on the display). If it shows no continuity when level, the switch is stuck open and needs replacement.
If it shows continuity in both positions, it's stuck closed and while the heater will run, the safety function is gone.
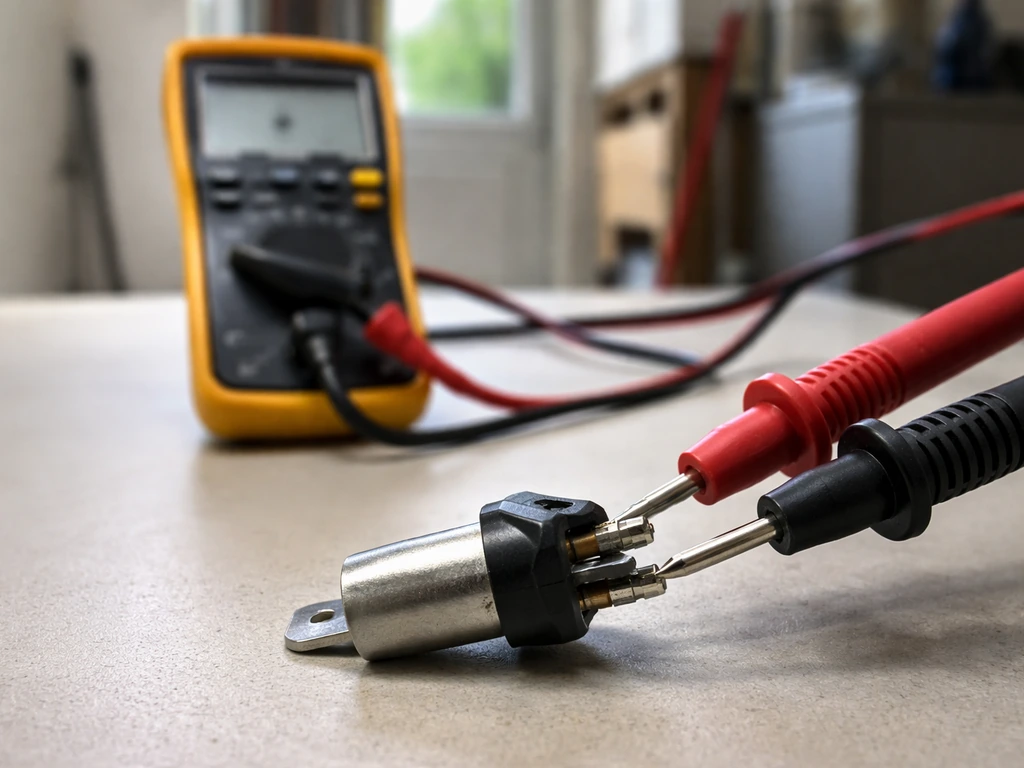
Testing the thermocouple
There are two ways to test a thermocouple: continuity and live voltage output. For the continuity test, disconnect the thermocouple lead from the gas valve. Set your multimeter to continuity mode and touch the probes to each end of the thermocouple. If you get 'OL' (open loop), the thermocouple has an internal break and is dead. Replace it.
For the voltage test (which tells you if the thermocouple is actually producing enough signal when hot), set your multimeter to the millivolt DC range. Light the pilot and hold it for 30 seconds, then place one probe at the tip and one at the connector end of the thermocouple body. A healthy thermocouple should produce at least 25 to 30 millivolts with the pilot flame fully on it. Less than that, and the gas valve won't stay open. If you're reading under 20 millivolts, the thermocouple needs to be replaced. If you're reading zero, check that the pilot flame is actually touching the probe tip before concluding the thermocouple is bad.
Checking wiring and connections
Before replacing anything, visually inspect all the wiring between the tilt switch, thermocouple, and gas valve. Look for cracked insulation, corrosion at the connectors, or wires that have been pinched or burned. A bad connection can cause exactly the same symptoms as a failed component. Clean any corroded contacts with a small wire brush or fine sandpaper, reseat any push-on connectors, and retest. On some models, especially ones that have lived outdoors for several years, a corroded connector is the actual problem and cleaning it takes five minutes instead of buying a new part.
Checking the overheat sensor
If you suspect the overheat sensor is tripping, the first test is simple: let the heater cool completely (at least 30 minutes) and try relighting. If it starts fine when cold but shuts off after several minutes of use, especially if the heater is in a confined space or the reflector is dirty or damaged, the overheat sensor is doing its job.
Clear any obstructions around the heater, clean the reflector, and make sure there's at least 3 feet of clearance above and around it. If the sensor trips even with proper clearance and a clean reflector, test it with a multimeter on continuity mode when cold. It should show continuity. If it doesn't, the sensor has failed in the open position and needs replacement.
Fixes and replacement guidance
Cleaning and repositioning (try this first)
Before spending money on parts, try these no-cost fixes. If the thermocouple looks like it's aimed to the side of the pilot flame rather than into it, gently bend the bracket holding it so the tip sits directly in the hottest part of the flame. Use needle-nose pliers carefully since the tubing is thin and can kink. Clean the thermocouple tip with fine steel wool or emery cloth to remove oxidation buildup. On the pilot assembly, use a can of compressed air to clear any debris from the pilot orifice. A partially clogged pilot orifice produces a weak, angled flame that can't heat the thermocouple properly.
Replacing the tilt switch
Tilt switches are inexpensive (usually $8 to $20) and easy to replace. Turn off and disconnect the gas. Remove the base cover. Note how the wires connect before disconnecting them (a phone photo takes two seconds and saves frustration). Unscrew the old switch, mount the new one in the same orientation, reconnect the wires, and test on a level surface before putting the cover back. Make sure you buy a replacement rated for the same voltage and amperage as the original, which is usually printed on the switch body or listed in your model's parts list.
Replacing the thermocouple
Thermocouples are also inexpensive, typically $10 to $25, and are a common part at hardware stores and online. Turn off the gas and let the heater cool completely. Disconnect the thermocouple's threaded fitting from the gas valve (it usually unscrews with a 5/16-inch or similar open-end wrench, finger-tight plus a quarter turn). Unclip or unscrew the mounting bracket at the pilot end and slide the old thermocouple out. Install the new one in exactly the same position, making sure the tip is in the pilot flame path. Reconnect the valve fitting snugly but don't overtighten it. Relight and test.
When to stop and call a professional
There are clear lines where DIY should stop. If you smell gas at any point during this process, stop immediately, move away from the heater, don't create any sparks, and don't try to fix it yourself. Call a gas technician. If you've replaced both the tilt switch and thermocouple and the heater still won't stay lit, the problem is likely inside the gas valve itself, which is not a DIY repair.
If any of the gas-carrying fittings or the regulator look damaged, corroded, or if the hose has cracks, replace the whole regulator and hose assembly and have a technician check for leaks before relighting. Repeated shutoffs after correct repairs are also a signal to get a professional involved since something in the gas supply or valve is behaving unexpectedly.
Prevention: keeping the heater reliable without constant service calls
Most safety-switch trips are preventable with a few simple habits. Start with where you put the heater. A dedicated patio heater pad or a flat paver stone gives you a stable, level surface that won't shift with the seasons or settle over time. Check with a bubble level at the start of each season. Uneven or soft ground is the single most common cause of repeat tilt-switch trips.
At the start of each heating season, spend five minutes on basic maintenance. Clean the pilot orifice with compressed air. Visually inspect the thermocouple tip for heavy oxidation or damage. Check all the wiring connections at the tilt switch and gas valve for corrosion. Inspect the gas hose and regulator for cracks or hardening. Catching a marginal thermocouple in spring is much easier than diagnosing a shutdown on a cold evening in October.
Always use the correct ignition sequence from your manual. The 30-second knob hold isn't optional, it's how the thermocouple safety system is designed to work. Rushing it is the fastest way to convince yourself the thermocouple is bad when it's actually fine. Store the heater covered and upright during off-seasons to protect the tilt switch mechanism and prevent moisture from corroding the thermocouple connections.
Finally, know your heater's limits. Keep at least 3 feet of clearance from walls, fences, and overhead obstructions to prevent the overheat sensor from tripping. Don't use the heater in enclosed spaces. And if a specific shutdown problem keeps recurring after you've fixed the obvious cause, there's usually a second issue waiting underneath. Address it methodically rather than jumping straight to bypass solutions, since a safety switch that gets bypassed rather than fixed is the one that lets a tipped-over heater burn down your deck.
FAQ
How do I tell if the patio heater safety switch issue is tilt-related or thermocouple-related when it shuts off fast?
If it goes out immediately when you release the knob (even after holding long enough to try), that points to the thermocouple or pilot flame alignment. If it lights but cuts out after you move it, sit it on slightly uneven ground, or after a period of use with proper knob-hold, tilt sensitivity or the overheat sensor is more likely.
Do I need to hold the knob in longer if it has been off for a long time?
Sometimes, yes. If the thermocouple is cold and the pilot is weak or slightly misaligned, re-try the full 30 second hold (count it out) after confirming the pilot flame actually contacts the thermocouple tip. Don’t shorten the hold to “see if it works,” since that can mask a marginal thermocouple.
Can a dirty pilot flame look normal but still fail the thermocouple heating?
Yes. The flame can appear lit while still being too weak, burning too low, or angled so it barely touches the thermocouple tip. Clean the pilot orifice with compressed air and verify the flame is squarely on the probe tip before concluding the thermocouple is bad.
What’s the safest way to confirm a tilt switch fault without leaving it bypassed?
Use the bypass only as a quick diagnostic, and never operate it long-term. After the test confirms the heater stays lit on an even surface with the switch bypassed, turn the gas back off, restore the original wiring, and replace the tilt switch to restore the safety function.
My multimeter shows continuity on the tilt switch in both positions. What does that mean for safety?
It usually means the switch is stuck closed, which defeats the safety feature. Even if the heater runs, replace the tilt switch, because a heater that tips could keep feeding gas.
What readings should I expect when testing a thermocouple with a multimeter?
For voltage output, a healthy thermocouple typically produces at least 25 to 30 millivolts with the pilot fully heating it for the test window. If you read under about 20 millivolts, the thermocouple is likely weak. If you read zero, first confirm the pilot flame actually touches the tip before replacing anything.
Can corrosion at the connectors mimic a bad patio heater safety switch component?
Yes. Corroded push-on connectors or cracked insulation can cause the same symptoms as a failed switch, including immediate shutoff after knob release or intermittent behavior. Clean and reseat every connector in the safety circuit before ordering parts, especially on heaters stored outdoors.
How long should I cool the heater before testing an overheat sensor reset?
Let it cool completely, at least 30 minutes, before relighting. Testing too soon can make the overheat sensor appear to be stuck even when it is just still hot.
If the overheat sensor trips, what environmental checks should I do before replacing it?
Confirm clearances around the heater (including above and around the reflector), remove nearby obstructions that restrict airflow, and inspect the reflector for dirt or damage. A blocked vent path or poor airflow is a common reason for repeated trips, even with the sensor working correctly.
Is it okay to use the heater if I have an aftermarket or mismatched tilt switch?
No. Use a replacement rated for the same voltage and amperage as the original and verify it matches your heater model. A mismatched switch can fail early or behave unpredictably under load.
What are the most common DIY mistakes that lead people to replace the wrong patio heater safety switch part?
The biggest errors are (1) not using a truly level surface for the test, (2) releasing the knob too early instead of holding it the full 30 seconds, and (3) skipping the wiring and connector inspection. These make it look like the safety device is bad when the actual cause is misalignment or a connection issue.
When should I stop troubleshooting and call a technician?
Stop immediately if you smell gas at any point, if fittings or the regulator show damage or severe corrosion, or if you replaced both the tilt switch and thermocouple and the heater still won’t stay lit. At that stage the fault is often in the gas valve or supply side, which is not a reliable DIY repair.
How can I prevent repeat safety trips season after season?
Use a dedicated level patio heater pad or stable paver so the base doesn’t shift over time, check level with a bubble level at the start of each season, and do a quick pilot and connection inspection. Keeping the heater covered and stored upright helps prevent moisture from corroding the safety circuit connections.