
Yes, you can leave many electric patio heaters outside, but only if your specific unit carries the right weather rating, is connected to a GFCI-protected circuit through outdoor-rated wiring, and is either mounted under cover or built to handle direct exposure. For a quick answer and practical guidelines, see can you leave patio heater outside in the rain for what different IP ratings and installation practices mean in wet weather. Leave the wrong heater out in the rain and you are looking at a fried heating element, a tripped breaker, or worse. The answer depends entirely on three things: what your heater's IP rating actually is, how it is wired, and where exactly you are placing it.
Can You Leave Electric Patio Heaters Outside? Safe Guide

Grant Mercer
27 Jul 2026
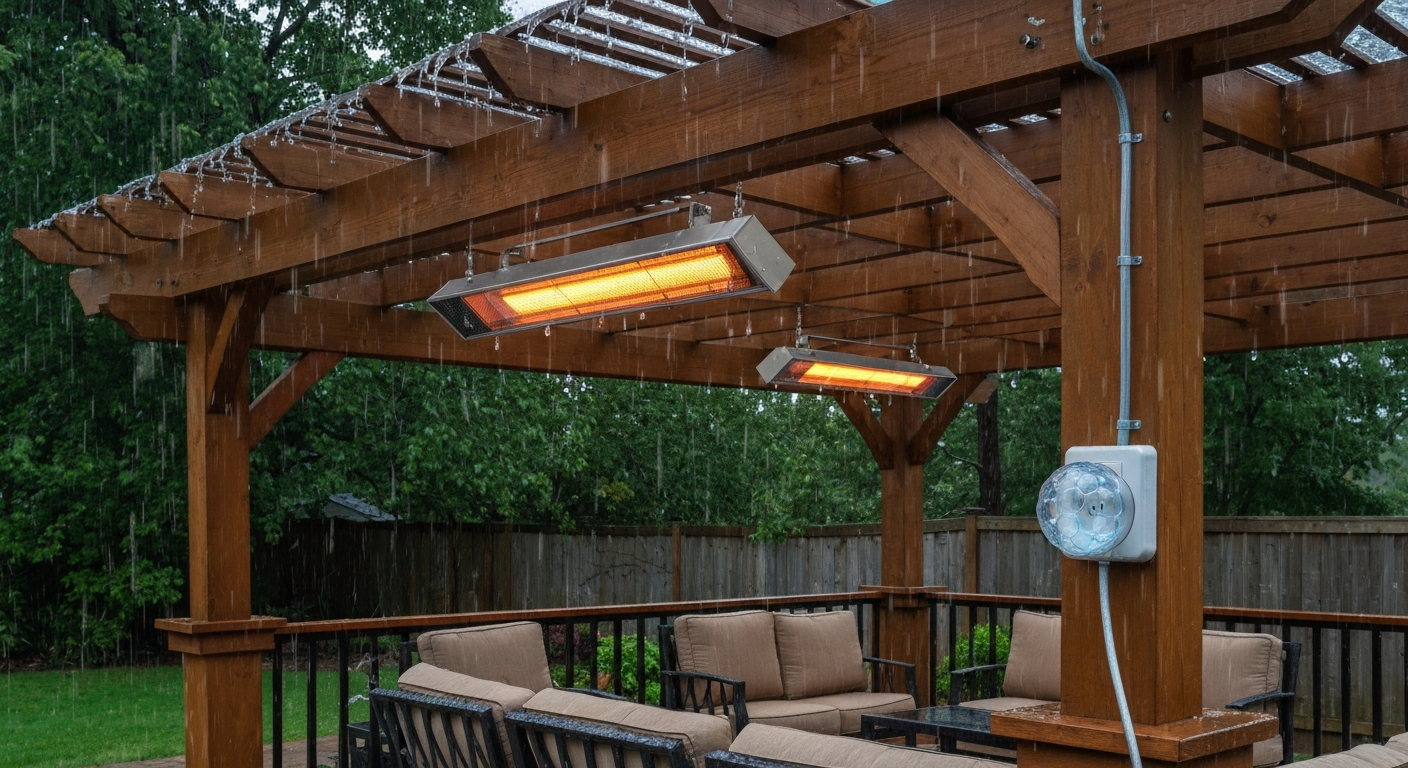
Is your heater actually rated for outdoor use?
Before you leave anything outside, check the label on the heater body or pull up your model's installation manual. There are two things to look for: a certification mark (UL, ETL, or cUL/cETL for Canadian use) and an IP (Ingress Protection) rating. The IP rating is the one that tells you how well the unit handles water and dust. It follows the format IP followed by two digits, or IPX followed by one digit when only water protection is tested.
IPX4 is the practical minimum for a sheltered outdoor location, meaning the heater can handle water splashing at it from any direction. This is what most overhead infrared heaters from brands like Heatstrip and Eurofase carry, and it is appropriate when the heater is mounted under a pergola, canopy, or roof overhang. IPX5 means the unit can tolerate a direct water jet, which is what Dr. Infrared's DR-368 is rated to, giving it a wider margin in more exposed spots. Anything below IPX4 belongs indoors.
| IP Rating | What It Survives | Suitable Placement |
|---|---|---|
| IPX2 / IP22 | Dripping water, slight tilt | Fully sheltered indoor/covered only |
| IPX4 / IP44 | Splashing from any direction | Sheltered outdoor (under cover, overhang) |
| IPX5 / IP55 | Direct water jets | Semi-exposed outdoor, light rain exposure |
| IPX6 / IP65 | Powerful water jets | Exposed outdoor locations |
| IPX7 / IP67 | Temporary immersion | Rarely relevant for heaters |
Beyond the IP code, look at the materials. Die-cast aluminum housings with powder-coat finishes hold up far better than painted steel over years of outdoor exposure. Stainless-steel fasteners matter too because standard zinc-coated screws will rust through quickly in humid climates, especially near coastal areas. Some product lines, including several Infratech SL-series models, are designed explicitly as outdoor units but still specify a minimum IPX4 for all wiring components and connections, not just the heater body itself. That detail in the manual is easy to miss and important to follow.
One more distinction worth knowing: some manufacturers sell the same heater in an 'outdoor' version and an 'indoor/outdoor protected' version. The protected version is only rated for use under a roof or overhead cover, not for open-sky exposure. Check your model number against the manufacturer's spec sheet, not just the box, because the box marketing language can be vague.
Electrical basics every outdoor electric heater needs
This is where a lot of DIY installs go wrong, and getting it wrong with an outdoor electrical circuit is genuinely dangerous. Here is what the National Electrical Code (NEC) requires and what you need to verify before leaving or permanently installing any electric heater outside.
GFCI protection is not optional
NEC Section 210.8 requires GFCI protection for outdoor receptacles at dwelling units, and that requirement has expanded in the 2020, 2023, and 2026 code cycles. Your local Authority Having Jurisdiction (AHJ) may be on a different edition than the current one, so call your local building department and ask which NEC edition is adopted in your area. Regardless of edition, the practical rule is simple: any outdoor outlet powering a patio heater must have GFCI protection, whether that comes from a GFCI breaker, a GFCI receptacle, or a portable GFCI adapter. NEC Article 590 requires GFCI protection for many temporary receptacles and portable distribution devices used by personnel; see Temporary power & NEC 590 GFCI requirements, ExpertCE overview for guidance on listed portable GFCI PDUs and receptacles for temporary outdoor events and construction sites Temporary power & NEC 590 GFCI requirements — ExpertCE overview. No exceptions.
Receptacle and cover requirements
NEC 406.9 requires that outdoor receptacles in wet locations use an 'extra-duty' weatherproof while-in-use cover, the kind with a hinged bubble hood that stays closed around a plugged-in cord. Standard flip-lid covers are not enough once a cord is inserted. These are sold at any hardware store and are inexpensive. If your outdoor outlet currently has only a flat flip cover, replace it before you plug in any heater.
Hardwired heaters and circuit sizing
Most overhead infrared heaters above 2000 W are hardwired, not plug-in. Under NEC Article 424, fixed electric space-heating equipment is treated as a continuous load, meaning your branch-circuit conductors and overcurrent protection device must be sized at 125% of the heater's load, not 100%. The math works like this: a 1500 W / 120 V portable heater draws about 12.5 A and typically runs on a 15 A circuit; a 3000 W / 240 V overhead unit draws about 12.5 A and fits a 15 A or 20 A circuit; a 6000 W / 240 V hardwired unit draws about 25 A, which requires a 30 A dedicated circuit after the 125% multiplier is applied. Do not share a circuit with other loads.
For hardwired outdoor runs, use THWN-2 or dual-rated THHN/THWN-2 conductors inside listed conduit. Never run NM (Romex) cable in exposed outdoor or wet locations. The NEC treats outdoor conduit interiors as wet locations, which is why the conductor insulation rating matters. Keep voltage drop under 3% on the branch circuit by sizing up wire gauge for runs longer than 50 feet. On a 240 V / 30 A circuit over 75 feet, you will typically need to move from 10 AWG to 8 AWG to stay within that threshold.
Junction boxes and enclosures
Any junction box, disconnect, or control enclosure used outdoors must be rated for the exposure. NEMA 3R is the practical minimum for a sheltered location (rainproof). If the enclosure could be hit by a hose stream or is in a more exposed spot, use NEMA 4 or 4X (4X adds corrosion resistance). NEMA ratings and IP codes are tested differently and there is no exact conversion between them, but NEMA 4X roughly corresponds to IP66 in practice. Match the enclosure rating to the actual exposure, not just the cheapest option at the hardware store. Infratech's SL-series manuals, for example, specifically call out IPX4 as the minimum for all installed outdoor wiring components.
If you are not comfortable sizing a dedicated 240 V circuit, running conduit through an exterior wall, or installing a breaker, stop and hire a licensed electrician. This is genuinely one of those tasks where a mistake causes a fire or electrocution, not just a tripped breaker. The heater installation itself is DIY-friendly; the electrical rough-in sometimes is not.
Placement rules and clearances by location
Where you put the heater matters as much as how it is wired. Every manufacturer specifies minimum clearances, and ignoring them creates fire risk and also voids your warranty. The numbers below come from real installation manuals, but always cross-check your specific model's documentation because clearances vary.
Decks and open patios
On an open deck, the main concerns are mounting height, horizontal clearance to combustibles, and anchoring so the unit cannot tip or blow over. Infratech SL-series manuals specify a minimum of 18 inches to sides and ends, 36 inches in front of the heater element, and 6 inches behind. Minimum floor-to-heater height is typically 6 to 8 feet depending on the model and UL listing. Bromic's Tungsten electric requires the heater surface to be at least 96 inches (8 feet) above the floor. These are not conservative suggestions; they are the tested safe-operating distances. Using a heater on a deck also connects to questions about safe surface clearances, which overlap with general guidance on placement over wood decking. If you need more specific guidance on whether a particular unit is appropriate for decking and how to install it safely, see our detailed discussion on whether a patio heater can be used on a deck can a patio heater be used on a deck.
Under canopies and awnings
Covered outdoor spaces are actually the ideal location for most overhead electric heaters. Most IPX4-rated models are designed specifically for this use. The ceiling or roof provides weather protection, and the enclosed space retains more heat. That said, you still need enough overhead clearance above the heater for heat to dissipate without scorching the canopy material, and the canopy itself needs to be non-combustible or at sufficient distance. Fabric awnings are a particular concern: most heater manuals flag fabric overhead coverings as incompatible unless the specified clearance to combustibles is maintained. If you are using a heater under an awning or canopy, verify clearances against the manufacturer's table for your specific wattage output. For practical guidance specific to that scenario, see the section on can you use a patio heater under an awning. For a focused answer on safety and clearance specifics, see can you put a patio heater under a canopy.
Screened porches
A screened porch is a semi-enclosed space, and the rules shift slightly. If you’re wondering can you use a patio heater on a screened porch, check that the unit is rated for outdoor use (IPX4 or higher) and follow the same wiring and clearance rules as other covered outdoor spaces. Electric heaters are generally safer here than gas heaters because there are no combustion byproducts, but ventilation still matters for comfort. The primary concern on a screened porch is that the heater is still technically outdoors and exposed to humidity and temperature swings, so your IP rating still applies. Mount the heater away from the screen panels, both to protect the screens from heat and to prevent direct water spray if rain is blowing in at an angle.
Garages
Electric patio heaters in garages are usable but come with specific concerns: garages may contain flammable vapors from vehicles, solvents, or lawn equipment fuel. An electric radiant heater does not produce an open flame, but a surface at 600 to 900 degrees Fahrenheit near a gasoline spill is still a serious ignition risk. If your garage stores any flammable liquids, keep the heater mounted high and away from storage areas, and never run it if you have recently spilled fuel. Ventilation is less of a concern with electric vs. gas, but airflow still helps the space warm evenly. For a focused discussion on garage-specific risks and safe practices, see are patio heaters safe in garage.
Electric patio heaters in rain and snow
Rain and snow are where a lot of people get into trouble with outdoor heaters. Here is the practical breakdown of what is safe and what is not.
Light rain and drizzle
If your heater is IPX4 or higher and is mounted under cover, light rain that splashes in from the sides is within its tested rating. Running a sheltered overhead heater during a light drizzle is generally fine. The issue is when rain becomes driving rain, because wind-driven rain can push water into enclosures and connection points that are only rated for gravity-splash protection. If rain is coming in sideways, turn off the heater and let things dry before the next use.
Heavy rain and direct exposure
Do not operate an IPX4-rated heater in direct, heavy rain. The test for IPX4 involves controlled splash from any direction, not a sustained downpour at full force. For a heater that is more exposed, you need IPX5 (water jet protection) at minimum, and even then, the sensible move is to turn it off during heavy rain and let the unit dry completely before restarting. Water inside the electrical enclosure of a heater is a shock hazard and will eventually destroy the heating element.
Snow and ice
Snow accumulation on a heater that is powered off is a real problem. Ice can form inside vent gaps and enclosures, and the freeze-thaw cycle works at seals and coatings over time. Operate a heater during snowfall only if it is under cover and only if snow is not accumulating on the heater body itself. When the unit is off during winter, keep it covered or stored. An operating heater will melt snow near it, but that meltwater has to go somewhere, and if it runs into the wiring connections, you will be doing a repair job in spring. If you’re wondering whether a heater will actually melt snow, read our guide on will a patio heater melt snow for details on melting distance, drainage, and safe operation.
Step-by-step prep to leave your heater outdoors
Whether you are leaving the heater out for a week or permanently mounting it, the prep steps are similar. Here is what I recommend working through before you consider the job done.
- Confirm the IP rating and outdoor listing on the heater label or installation manual. If you cannot find it, download the manual from the manufacturer's site before going further.
- Choose the mounting location and measure clearances against the manufacturer's minimum specs. Mark ceiling or wall mount points and verify you are hitting structural members (joists or studs), not just drywall or fascia.
- Install or verify a GFCI-protected outdoor outlet with an extra-duty while-in-use bubble cover at the supply point. For hardwired units, confirm the circuit is sized at 125% of the heater load with appropriate OCPD and THWN-2 conductors in listed conduit.
- Mount the heater using stainless-steel or hot-dip galvanized fasteners. Standard zinc screws will rust through within a season or two in humid environments.
- Seal any wall or ceiling penetrations where conduit or wiring passes through to the outside using listed weatherproof conduit fittings and outdoor-rated sealant (paintable silicone or polyurethane caulk). This keeps water from wicking in behind the conduit.
- If the heater has an external control box or thermostat, verify that the enclosure is NEMA 3R or better. Gasket the cover and confirm all knockouts are plugged.
- Apply a rust-inhibiting spray or manufacturer-recommended protectant to any bare metal brackets, mounting hardware, or exposed carbon-steel surfaces.
- For freestanding pole-mount heaters, anchor the base to a hard surface (concrete anchor bolts, not just weighted base resting on decking) so it cannot tip in wind.
- Elevate freestanding heaters at least a few inches off decking or ground surfaces by using a base pad or mounting bracket to prevent moisture wicking into the base.
- If the unit will not be used for more than a few days (or any time rain or snow is forecast), cover it with a fitted weatherproof cover rated for outdoor UV exposure.
Hardware and materials checklist
Before you start, have these materials on hand. Buying the right parts up front saves a second trip and prevents the common shortcut of using indoor-rated components outside.
- Stainless-steel (grade 304 or 316 near coast) or hot-dip galvanized mounting bolts, lag screws, and washers
- GFCI breaker or GFCI receptacle rated for outdoor use (15 A or 20 A to match circuit)
- Extra-duty while-in-use weatherproof bubble cover (NEMA 3R or better) for receptacle
- NEMA 3R or NEMA 4X junction box / disconnect enclosure for hardwired connections
- Listed liquidtight flexible metal conduit (LFMC) or rigid PVC/aluminum conduit for outdoor runs
- THWN-2 or dual-rated THHN/THWN-2 conductors in the appropriate AWG for your load and run length
- Listed weatherproof conduit connectors and sealing fittings for wall/ceiling penetrations
- Paintable silicone or polyurethane exterior caulk for sealing penetrations
- Rust-inhibiting primer/spray (Rust-Oleum or equivalent) for exposed brackets and hardware
- Fitted weatherproof heater cover in UV-resistant polyester or vinyl, sized for your model
- Concrete anchor bolts or deck-mount anchor kit for freestanding base (if applicable)
- Moisture-barrier mounting pad or standoff feet to keep base off deck surface
Seasonal storage vs permanent outdoor installation: how to decide
Not every heater is worth leaving outside year-round, and not every homeowner has a good indoor storage option. Use the checklist below to make the call for your specific situation.
| Factor | Leave Outdoors Permanently | Store Indoors Seasonally |
|---|---|---|
| IP rating | IPX4 minimum (sheltered); IPX5+ for exposed | Any rating; storage removes risk |
| Heater type | Hardwired overhead/wall mount | Portable plug-in, freestanding pole |
| Climate | Mild to moderate; low freeze-thaw cycles | Harsh winters, heavy snow, coastal salt air |
| Use frequency | Year-round or most-of-year use | Seasonal use only (3-5 months/year) |
| Cover availability | Mounted under roof, canopy, or overhang | No permanent overhead cover |
| Unit cost | Higher-value hardwired units (cost to store or reinstall is high) | Lower-cost portable units (easy to move) |
| Warranty terms | Manufacturer permits outdoor permanent install for that model | Manufacturer limits outdoor exposure; storage preserves warranty |
| Implementation timeline | Plan for licensed electrical work if hardwiring; allow 1-2 weeks for permits | Covers available immediately; storage is seasonal task |
If your heater is a portable 1500 W plug-in unit on a stand, honest advice is to store it indoors when not in use. These units typically are not built to the same weather-resistance standard as hardwired overhead models, and the cost of a damaged heating element or failed controller often approaches the cost of a replacement unit. If your heater is a permanently mounted overhead infrared panel with a hardwired 240 V connection, leaving it outdoors under cover with a fitted weatherproof cover during off-season is usually the right call. Repeatedly disconnecting and reconnecting hardwired units is more damaging to connections than leaving a properly protected unit in place.
Inspection and maintenance after weather exposure
Every spring, and after any significant storm or extended period of non-use, run through a quick inspection before you power the heater back on. This takes about 15 minutes and catches the issues that turn into expensive repairs or safety hazards.
- Visually inspect the heater body for cracked or brittle housing, rust spots on the frame or heating element guard, and any deformation that suggests impact damage.
- Check all mounting hardware (bolts, brackets, ceiling mounts) for rust or looseness. Tighten any loose fasteners and replace any that show significant corrosion.
- Inspect the power cord (for plug-in units) for cracking, brittleness, or rodent damage along its full length. Do not plug in a damaged cord.
- For hardwired units, open the junction box or connection enclosure and visually check for water intrusion (rust staining, mineral deposits, moisture on terminals). If you see any, dry the enclosure thoroughly with a clean cloth and let it air out for 24-48 hours before re-energizing.
- Check that the while-in-use outlet cover (for plug-in units) still seals properly and that the gasket is not cracked or missing.
- Power on the heater and verify it heats up evenly across the element face. Cold spots in an infrared element indicate internal damage.
- Listen for unusual buzzing, crackling, or intermittent cycling that was not there before. These often indicate moisture in the element or a failing connection.
- If the heater trips the GFCI immediately on power-up after exposure to weather, do not reset it repeatedly. This indicates current leakage to ground, almost always from moisture. Let the unit dry for 48 hours and retest. If it continues to trip, the heater needs inspection and likely repair before further use.
Persistent GFCI trips, cold spots in the element, or visible burn marks around wiring terminals are the three signs that a heater has crossed from 'needs maintenance' into 'needs repair or replacement.' At that point, pull the unit, dry it out completely, and diagnose the specific component. Heating elements, thermostats, and overheat protection switches are all serviceable parts on most name-brand units, and looking up the part number in your model's service manual is the right first step before assuming the whole heater is finished.
What your warranty likely says about outdoor use
Manufacturer warranties on electric patio heaters almost always include an installation-compliance clause. That means if the heater was not installed according to the installation manual, the warranty is void, regardless of what caused the failure. Bromic's Tungsten electric manual is explicit about this: even incorrect orientation (mounting vertically when the unit is rated horizontal) voids the warranty. If you leave an indoor-rated heater outside and the element fails, the manufacturer has no obligation to cover it.
Read the installation manual for your specific model before deciding on permanent outdoor placement. Look for phrases like 'suitable for outdoor use under cover,' 'not suitable for direct rain exposure,' or 'must be installed by a licensed electrician.' These are not boilerplate; they define the conditions under which your warranty applies. Download and save a PDF copy of your manual. If you have already discarded the paper copy, most manufacturers host manuals on their site, and model-specific manuals are often available through heater manual databases as well.
When to repair vs. replace after outdoor exposure
If the heater has suffered water damage to the electrical enclosure but the heating element tests fine and the housing is structurally intact, repair is almost always the right call on a quality unit. Replace the damaged wiring terminals, dry and re-seal the junction box, and test before putting it back in service. If the heating element itself has failed (shows a break in continuity or burns through), replacement elements are available for most major brands and are a straightforward DIY swap on units with accessible element chambers. Where repair becomes a questionable investment is on units that are already 5-plus years old, have sustained rust through the main housing, or where the cost of parts approaches 50-60% of a new unit price. At that point, the reliability of the repaired unit is uncertain enough that replacement makes more financial sense.
FAQ
Short answer — can you leave an electric patio heater outside temporarily or permanently?
Yes — but only if the heater and its installation are rated and installed for the expected outdoor exposure. Use heaters listed for outdoor or ‘outdoor protected/undercover’ use for sheltered locations; use higher ingress‑protection ratings (IPX5/IP55 or NEMA 4/4X) for exposure to driving rain; follow the heater’s manual, local electrical code (NEC), and manufacturer mounting/clearance specs.
What are the key technical criteria that determine if a heater can stay outdoors?
1) Ingress rating: minimum IPX4 (splash) for sheltered/outdoor‑undercover use; IPX5/IP55 or higher for direct exposure/driving rain. 2) Listing: UL/ETL or equivalent listing for outdoor use, or explicit outdoor/undercover listing in the manual. 3) Materials & corrosion resistance: stainless or powder‑coated housings and corrosion‑resistant hardware for coastal/salty environments (prefer 4X/316 stainless). 4) Electrical component ratings: outdoor‑rated junction boxes, conduit, and connectors (NEMA/IP matched to exposure). 5) Manufacturer instructions: follow model‑specific clearance, orientation and mounting rules exactly.
What specific ingress/NEMA thresholds should I use when deciding suitability?
- Sheltered (ceiling/awning, not exposed to jetting rain): minimum IPX4 (splash protection) or NEMA 3R. - Exposed to driving rain/wind: aim for IPX5/IPX6 or IP55/IP56; NEMA 4/4X recommended. - Immersion/high‑pressure washdown: IPX7/8/9K or NEMA 6/6P/4X. Match the enclosure rating to expected exposure; do not assume IP/NEMA equivalence without vendor guidance.
What are the electrical/wiring requirements for outdoor plug‑in heaters?
- Always use GFCI protection for outdoor receptacles (NEC 210.8 and local amendments). - Use a listed outdoor receptacle with an ‘in‑use’ weatherproof cover per NEC 406.9 when a cord is connected. - Keep portable heaters to circuits sized to the heater’s rating; 1500 W@120 V ≈ 12.5 A (OK on a 15 A circuit if not continuous). - For long runs consider voltage drop (NEC recommends ≤3% on branch circuits). - Do not run NM‑(B) (Romex) in outdoor/wet locations; use THHN/THWN‑2 or XHHW‑2 in conduit for outdoor hardwires.
What are the electrical/wiring requirements for hardwired/permanent heaters?
- Treat fixed heaters as continuous loads for sizing: size conductors and overcurrent devices at 125% of heater nameplate current (NEC continuous‑load rule). - Use conduit and conductors rated for wet locations (THWN/THWN‑2 or XHHW‑2). - Install a dedicated circuit sized to nameplate and 125% multiplier (example: 6000 W@240 V → 25 A → size breaker and conductors for ≥31.25 A → typically 40 A OCPD and appropriate conductors as per code). - Obtain required permits and have hardwired installations done or inspected by a licensed electrician per local code.
What GFCI and outlet hardware should I use for temporary outdoor setups?
- Use a GFCI‑protected outdoor circuit or an in‑line/listed GFCI device rated for the heater’s current. - Use outdoor 'while‑in‑use' weatherproof covers (NEC 406.9) for plugged cords. - Use outdoor‑rated extension cords sized for the heater (minimize length; use heavy‑duty 12/3 or 14/3 cord as required by current) and keep cords off the ground and away from water paths.